
Dragging and dropping an object using the mouse is a common mechanic that’s used in many different games in many different ways.
How you use it in your game will depend on what it is you’re trying to do.
For example, clicking and dragging a UI object, such as an inventory item, works in a different way to moving an object that exists in the game world.
And clicking to pick up an object that falls under gravity works in a different way to picking up static, non-moving objects.
But don’t worry, because in this article I’ll show you all of the different methods for moving an object around the screen with the mouse, so that you can use the one that’s right for your game.
Here’s what you’ll find on this page:
- How to drag and drop an object with the mouse (the basic method)
- How to move an object with the mouse (using Overlap Point)
- How to move a physics object with the mouse (using a Kinematic Rigidbody)
- How to move, and throw, an object with the mouse (using a Dynamic Rigidbody)
- How to move a 2D object without a collider (using Renderer bounds)
- How to move a UI Object with the Mouse (using Event Triggers)
Related Articles:
Let’s start with the basic method…
How to drag and drop an object with the mouse (the basic method)
The basic method of dragging and dropping an object with the mouse in Unity typically involves adding a Collider component to the object and then using a physics function, such as Overlap Point or Raycast to detect when it’s clicked. This returns a reference to the object, which can then be used to move it to the position of the mouse while it’s being held.
So how do you do it?
How to get the position of the mouse in the world
First, you’ll need to convert the position of the mouse on the screen to a position in the world.
The mouse’s position on the screen is available as a property of the Input Class:
Input.mousePosition;However, this returns a position in pixel coordinates, which doesn’t relate to the world position of objects in the game.
Luckily, however, converting the screen position of the mouse to a world position can be very straightforward. In this case, by using the Screen To World Point function of the Camera Class.
Like this:
Vector3 mousePosition = Camera.main.ScreenToWorldPoint(Input.mousePosition);
This returns the position of the mouse on the screen as a Vector 3 position in the game world, which can be used to check against objects in the scene.
Adding a Collider to the moveable object
Next, so that the object that you want to pick up has a physical presence, you’ll need to add a Collider to the object you want to move.
While many basic 3D shapes are created with Colliders already attached, you’ll often need to manually add a Collider to 2D objects, such as Sprites.
For example, if I want to move a box around the screen…

To move this sprite around the screen with the mouse, I’m going to need to add a Collider to it.
Then, because it’s a 2D sprite, I’m going to need to add a Box Collider 2D to the object:
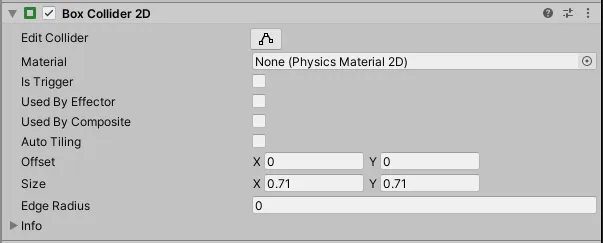
2D physics in Unity uses 2D-specific colliders, so make sure to pick the right type.
In Unity, the 2D and 3D physics engines are separate, meaning that, when working with 2D physics, you’ll need to use Unity’s 2D Colliders and 2D physics functions.
Many of the functions and components available to use with 3D physics are also available in 2D as well. However, be careful to use the correct version for your project, as it can be surprisingly easy to reference 3D physics components and functions by mistake.
Once you have the position of the mouse in the world and once you’re able to check against the object you want to pick up, by using its Collider, you’ll be able to use physics functions to detect if the mouse is over the object when it’s clicked.
How to move an object with the mouse (using Overlap Point)
There are several different physics functions that can be used to test if a position in the world intersects with a Collider.
For example, Raycasts can be used to draw lines in the world and find the Colliders that they hit.
While overlap functions, such as Overlap Box or Overlap Area, can be used to detect if a specific shape overlaps a Collider at a certain position.
In this example, however, I only want to test a single 2D position, a point, which is the position of the mouse when it’s clicked, against any Colliders in the world that are underneath it.
I can do that using the Overlap Point function.
Overlap Point is a 2D physics function in Unity that checks to see if a specific point in the world intersects with a Collider.
This is useful, as it means that all you need to do to get a reference to the Collider that’s under the mouse is pass the mouse position to the Overlap Point function.
Like this:
Vector3 mousePosition = Camera.main.ScreenToWorldPoint(Input.mousePosition);
Collider2D targetObject = Physics2D.OverlapPoint(mousePosition);
Then if an object is there, you can store a reference to it when the left mouse button is clicked.
Like this:
public GameObject selectedObject;

void Update()
{
    Vector3 mousePosition = Camera.main.ScreenToWorldPoint(Input.mousePosition);

    if (Input.GetMouseButtonDown(0))
    {
        Collider2D targetObject = Physics2D.OverlapPoint(mousePosition);

        if (targetObject)
        {
            selectedObject = targetObject.transform.gameObject;
        }
    }
}
This works by setting the Selected Object reference to the parent object of the Collider that’s under the mouse whenever the left mouse button is pressed down.
Then, to deselect the object, in this case, putting it down, simply clear the reference to the selected object when the mouse button is released.
Like this:
if (Input.GetMouseButtonUp(0) && selectedObject)
{
    selectedObject = null;
}
How to select an object in 3D (using a Raycast)
While the Overlap Point function can be useful for selecting an object in 2D, selecting an object with the mouse in 3D works in a slightly different way.
Whereas a 2D Collider generally ignores depth when calculating collisions, when selecting an object in 3D you’ll usually need to account for the distance between the camera and the object on the Z-Axis.
Typically this involves projecting into the scene to check for Colliders, using a Raycast for example.
While the object is now selectable, it still won’t move with the mouse.
To do that you’ll need to set the position of the now selected object to match the position of the mouse in the world.
Like this:
if (selectedObject)
{
    selectedObject.transform.position = mousePosition;
}
However…
The world position that’s generated by the Screen to World Point function will, by default, use the camera’s Z position for depth, meaning that if you snap an object to the world position of the mouse, it will disappear behind the near clip plane of the camera.
One way to fix this, and to also respect the object’s existing Z position, is to measure the offset between the mouse and the object when it’s selected.
Like this:
Vector3 offset = selectedObject.transform.position - mousePosition;The offset value can then be added to the mouse position when the selected object is moved:
if (selectedObject)
{
    selectedObject.transform.position = mousePosition + offset;
}
So, why do it this way?
This isn’t the only option for managing the depth of the mouse position in the world.
However, this particular method of using an offset between the object and the mouse doesn’t only affect the depth of the object’s position, but also its X and Y values too.
Which is useful, because it means that, instead of the object snapping to the mouse’s position at its centre, it can be picked up and moved relative to where it was clicked.
Which looks like this:

Offsetting the object’s position from the mouse anchors its movement to the click position.
Here’s how it looks all together:
public class ClickAndDrag : MonoBehaviour
{
    public GameObject selectedObject;
    Vector3 offset;

    void Update()
    {
        Vector3 mousePosition = Camera.main.ScreenToWorldPoint(Input.mousePosition);

        if (Input.GetMouseButtonDown(0))
        {
            Collider2D targetObject = Physics2D.OverlapPoint(mousePosition);

            if (targetObject)
            {
                selectedObject = targetObject.transform.gameObject;
                offset = selectedObject.transform.position - mousePosition;
            }
        }

        if (selectedObject)
        {
            selectedObject.transform.position = mousePosition + offset;
        }

        if (Input.GetMouseButtonUp(0) && selectedObject)
        {
            selectedObject = null;
        }
    }
}
This method of clicking to drag an object will select the object that’s closest to the camera first.
However…
When working in 2D, it’s entirely likely that all of the objects in the scene may be at the same position on the Z-Axis.
What’s more, the order of rendered objects on the screen, which is defined by the Renderer’s Sorting Order and Layers, may not actually match the positional order of objects in the world.
Which can cause problems when trying to select what looks like the ‘top object’.
One method of fixing this is to only use physical depth to sort the visual display of 2D objects in the world.
However, while this might work for you, it could easily become difficult to sort groups of objects using this method which, after all, is exactly what the Sorting Layer feature is designed to do in the first place.
So what’s the solution?
How to select the sprite with the highest Sorting Order
An object’s Sorting Order, which is its position in a Sorting Layer, is a Renderer property that decides which objects will be displayed above which other objects.
Generally, any 2D object with some kind of renderer component, such as a Sprite Renderer, will include a Sorting Order setting.
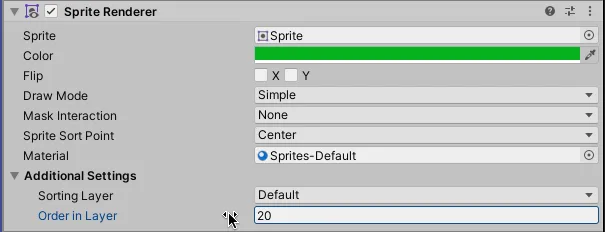
A 2D Renderer’s Sorting Order decides if it will appear in front of or behind other objects.
Objects with a higher Sorting Order value will be shown in front of other objects on that layer, regardless of the physical position of that object.
Which means that, even if an object is further away from the camera, it will be placed in front of closer objects if their Sorting Order value is lower.
Which can be very useful, as it allows you to manage the visual display of sprites in a 2D scene without changing their physical position.
However…
Physics functions, such as Overlap Point, will only recognise the physical position of the object, not its Sorting Order.
Which means that, if you use Sorting Order to manage the Z sorting of your sprites, clicking on an object when it’s overlapping another object won’t necessarily select the object on top.
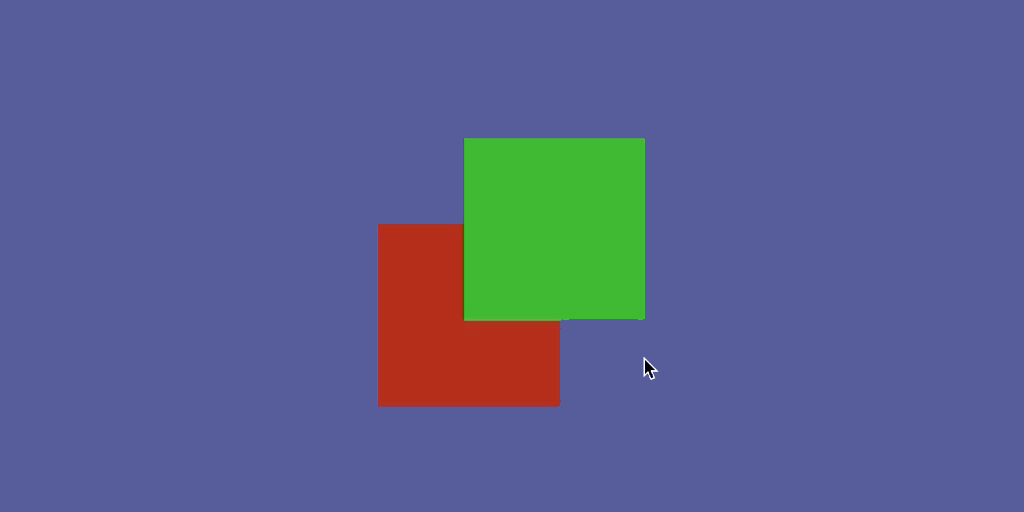
The green box is physically further away, but has a higher Sorting Order than the red box. This means that, although the green box is shown in front, the red box is closer to the camera.
So how can you select the first displayed object?
One method is to get a reference to all of the Colliders that are under the mouse when it’s clicked and then simply sort them by their Sorting Order.
Then, the Collider with the highest Sorting Order can be returned, selecting the object that appears to be on top.
This works by getting all of the Colliders under the mouse in an array using the Overlap Point All method.
Like this:
Collider2D[] results = Physics2D.OverlapPointAll(mousePosition);Then, the results can be sorted to return the object with the highest Sorting Order value.
Like this:
Collider2D GetHighestObject(Collider2D[] results)
{
    int highestValue = 0;
    Collider2D highestObject = results[0];

    foreach(Collider2D col in results)
    {
        Renderer ren = col.gameObject.GetComponent<Renderer>();
        if(ren && ren.sortingOrder > highestValue)
        {
            highestValue = ren.sortingOrder;
            highestObject = col;
        }
    }

    return highestObject;
}
This works by checking the Sorting Order value of each Renderer to see if it’s higher than the last, returning the one with the highest value or, if they’re all the same, the first one.
To use it, simply call the Get Highest Object function, passing in the Array of Colliders that the Overlap Point All function returns.
Like this:
if (Input.GetMouseButtonDown(0) && Physics2D.OverlapPoint(mousePosition))
{
    Collider2D[] results = Physics2D.OverlapPointAll(mousePosition);
    Collider2D highestCollider = GetHighestObject(results);
    selectedObject = highestCollider.transform.gameObject;

    offset = selectedObject.transform.position - mousePosition;
}
Using the Overlap Point function and a Collider is a convenient way to move objects using the mouse in 2D.
However, moving an object with its Transform, that has a Collider component attached to it, can be bad for performance.
Generally speaking, the most efficient way to move an object with a Collider on it, is with a Rigidbody component.
This is to do with how the physics engine optimises moving and non-moving physics objects. While it’s less of an issue when working in 3D, moving a static Collider object in 2D, without using a Rigidbody to do so, can be inefficient.
So how can you click and drag an object around using a Rigidbody instead?
How to move a physics object with the mouse (using a Kinematic Rigidbody)
Moving a Rigidbody object with the mouse works in nearly the same way as when moving it with its Transform, with a couple of key differences.
First of all, you’ll need to add a 2D Rigidbody to the object that you want to move:
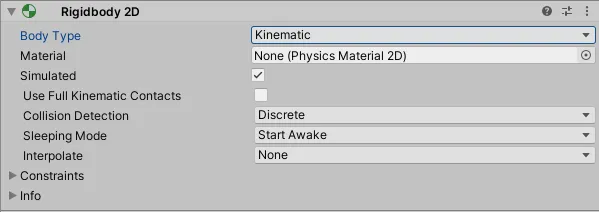
Technically, when moving an object with a Collider attached, you should use a Rigidbody to do it.
In this case, I’ve used a Kinematic Body Type, which will allow the object to move but not be moved by other objects, such as forces, or gravity.
Then, when selecting the object, instead of getting a reference to the game object that the Collider is attached to, you’ll need to get a reference to the 2D Rigidbody component on the object instead.
Like this:
Rigidbody2D selectedObject = targetObject.transform.gameObject.GetComponent<Rigidbody2D>();
This will allow you to use the Move Position function of the Rigidbody Class, which instantly sets a physics object to a new position, in this case, the mouse’s world position.
Like this:
void FixedUpdate()
{
    if (selectedObject)
    {
        selectedObject.MovePosition(mousePosition + offset);
    }
}
Because Move Position is a physics function, it’s generally a good idea to place it in Fixed Update instead of the regular Update, which will keep the position updates in sync with the time steps of the physics engine.
Here’s how it looks all together:
public class ClickAndDragWithRigidbody : MonoBehaviour
{
    public Rigidbody2D selectedObject;
    Vector3 offset;
    Vector3 mousePosition;

    void Update()
    {
        mousePosition = Camera.main.ScreenToWorldPoint(Input.mousePosition);

        if (Input.GetMouseButtonDown(0))
        {
            Collider2D targetObject = Physics2D.OverlapPoint(mousePosition);

            if (targetObject)
            {
                selectedObject = targetObject.transform.gameObject.GetComponent<Rigidbody2D>();
                offset = selectedObject.transform.position - mousePosition;
            }
        }

        if (Input.GetMouseButtonUp(0) && selectedObject)
        {
            selectedObject = null;
        }
    }

    void FixedUpdate()
    {
        if (selectedObject)
        {
            selectedObject.MovePosition(mousePosition + offset);
        }
    }
}
Moving a Collider object with a Rigidobdy component is, technically, the correct way to do it.
However, this method has its own drawbacks.
For example, physics objects, when moved under simulation, are updated in time with the fixed time step, which is usually much slower than the framerate of the game, at 50 frames per second by default.
And while this can, in part, be fixed by using the interpolation setting of the Rigidbody, which smoothes out the motion of a physics object, it may feel like overkill if all you want to do is move an object around and check against its Collider.
So is it worth doing it this way?
Generally speaking, there is a right way to do this, in that using a Rigidbody to move a Collider in 2D is technically more efficient and avoids the performance hit of moving a Static Collider with its Transform.
But…
Sometimes it can be more useful to go for the less efficient method if it turns out to be much more convenient.
Put simply, if it works for your project, and doesn’t ruin your game’s performance, then moving Colliders, even in 2D, may not cause you a significant problem.
How much of an issue it causes for you will depend entirely on how frequently you’re doing it and the performance of the device you’re targeting.
Put simply, your mileage may vary but it can help to be aware of the potential issues of not using a Rigidbody, in case you run into problems later on.
However, there may be times when using a Rigidbody to pick up objects with the mouse makes perfect sense.
For example, when using dynamic physics objects.
How to move, and throw, an object with the mouse (using a Dynamic Rigidbody)
In the same way that a Kinematic Rigidbody can be moved around using the Move Position function, a Dynamic Rigidbody, that is affected by gravity and other physics forces, can also be picked up and dragged using the mouse.

Changing the Body Type of a 2D Rigidbody to Dynamic (instead of Kinematic) will make it fall to the floor.
For the most part, the method of clicking and dragging a Dynamic Rigidbody is the same as when moving a Kinematic one.
However, there are a couple of differences.
For example, when holding an object, it will keep any built-up momentum, meaning that, after catching a fast-moving object, it will fall at the same increased speed when it’s released, unless the object’s velocity is reset.
Like this:
if (Input.GetMouseButtonUp(0) && selectedObject)
{
    selectedObject.velocity = Vector2.zero;

    selectedObject = null;
}
This resets the velocity of the object to zero, so that it falls naturally when released, as if it’s been dropped.
However, when moving the object around with the mouse, no new momentum is created, meaning that, if the player tries to throw it, it will simply fall down as if it was dropped still.
Chances are that, if the player is able to catch and release a falling object, they will likely want to be able to throw it using the mouse as well.
So here’s how to do that…
How to throw a 2D object with the mouse in Unity
Throwing an object with the mouse involves measuring the velocity of the cursor when the mouse button was released and passing that force to the Rigidbody before letting go of it.

Throwing a 2D box involves measuring the velocity of the mouse and passing it to the Rigidbody.
The velocity of the mouse can be calculated by comparing its current position to its last position and then dividing the result by Time.deltaTime.
Like this:
Vector2 mouseForce;
Vector3 lastPosition;

void Update()
{
    if (selectedObject)
    {
        mouseForce = (mousePosition - lastPosition) / Time.deltaTime;
        lastPosition = mousePosition;
    }
}
Then when the object is released, the force value can be applied to the Rigidbody as an Impulse.
Like this:
if (Input.GetMouseButtonUp(0) && selectedObject)
{
    selectedObject.velocity = Vector2.zero;
    selectedObject.AddForce(mouseForce, ForceMode2D.Impulse);
    selectedObject = null;
}
Because the mouse’s movement can be twitchy, you might also want to limit how fast an object can be thrown:
mouseForce = Vector2.ClampMagnitude(mouseForce, maxSpeed);Which will prevent the player from accidentally launching the object into space, thanks to an overly sensitive mouse.
Here’s how it looks all together:
public class ClickAndDragWithDynamics : MonoBehaviour
{
    public Rigidbody2D selectedObject;
    Vector3 offset;
    Vector3 mousePosition;

    public float maxSpeed=10;
    Vector2 mouseForce;
    Vector3 lastPosition;

    void Update()
    {
        mousePosition = Camera.main.ScreenToWorldPoint(Input.mousePosition);

        if (selectedObject)
        {
            mouseForce = (mousePosition - lastPosition) / Time.deltaTime;
            mouseForce = Vector2.ClampMagnitude(mouseForce, maxSpeed);
            lastPosition = mousePosition;
        }

        if (Input.GetMouseButtonDown(0))
        {
            Collider2D targetObject = Physics2D.OverlapPoint(mousePosition);

            if (targetObject)
            {
                selectedObject = targetObject.transform.gameObject.GetComponent<Rigidbody2D>();
                offset = selectedObject.transform.position - mousePosition;
            }
        }

        if (Input.GetMouseButtonUp(0) && selectedObject)
        {

            selectedObject.velocity = Vector2.zero;
            selectedObject.AddForce(mouseForce, ForceMode2D.Impulse);
            selectedObject = null;
        }
    }

    void FixedUpdate()
    {
        if (selectedObject)
        {
            selectedObject.MovePosition(mousePosition + offset);
        }
    }
}
Moving objects with Rigidbody components makes sense when you’re making use of the physics system in Unity.
After all, if you want to pick up and throw dynamic objects, or if you want to make full use of physics collisions and Colliders, then you’re going to need to use Unity’s physics system to do that.
But…
What if you’re not using the physics engine? Or what if you don’t want to add Colliders to every moveable object?
How can you pick and move an object with the mouse, without using a Rigidbody, a Collider or the physics system at all?
How to move a 2D object without a collider (using Renderer bounds)
It’s possible to pick up and move objects with the mouse in Unity without using Colliders and without using physics functions, such as Raycasts or Overlap Point.
For the most part, the method of moving an object without a Collider is the same, in this case moving the object using its Transform component.
However, the method of getting a reference to it when the mouse button is clicked is, of course, different.
Here’s how it works…
How to select an object without using a Raycast or a Collider
This method uses two scripts.
The first, the Click Manager, is used to detect the button input from the mouse and move the object when it’s selected.
For the most part, the script isn’t any different to other methods in this article.
What is different however is that the Selected Object reference and the Mouse Position value are now public Static variables, meaning that they belong to the Class, in this case, Click Manager, and not the specific instance of the class:
public static Vector3 mousePosition;
public static GameObject selectedObject;
This means that they work like global variables, allowing other scripts to read and set their value, even if they don’t have a reference to the instance of the class.
This will allow objects that are moveable to access the Mouse Position variable, without a reference, and check themselves if they’re under the mouse or not.
If they are, they can then set themselves as the Selected Object when the mouse is clicked.
But how will moveable objects know when the mouse button has been clicked?
While you could have every object check for the mouse button click in Update, just as the Click Manager script does, duplicating and splitting out input checks in this way is generally inefficient and could become difficult to manage.
Instead, it’s possible to check for mouse input from just one script, in this case the Click Manager, and then have that script broadcast to any moveable objects that a click has happened.
This works by declaring a Delegate in the Click Manager script, called Mouse Click, and declaring a public Static Event of the type Mouse Click, called On Mouse Click.
Which looks like this:
public delegate void MouseClick();
public static event MouseClick OnMouseClick;
Other scripts will be able to subscribe to the On Mouse Click Event and then, when it’s called, perform an action in response.
In this case, the Click Manager script will call the Event when a click takes place if any clickable objects have subscribed a function to it:
if (Input.GetMouseButtonDown(0))
{
    if(OnMouseClick != null)
    {
        OnMouseClick();

        if (selectedObject)
        {
            offset = selectedObject.transform.position - mousePosition;
        }
    }
}
Delegates & Events in Unity
Delegates work like variables except that, instead of holding data, they hold functions.
They can be used to trigger a single function or multiple functions when they’re called, which works by adding or subtracting the function to the instance of the Delegate.
Events are specialised Delegates that can be used to broadcast to other objects that something has happened. In this case, the On Mouse Click event is called whenever the mouse button is pressed and, when it is, it will execute any functions that have subscribed to it.
Here’s how it looks all together.
The Click Manager script:
public class ClickManager : MonoBehaviour
{
    public delegate void MouseClick();
    public static event MouseClick OnMouseClick;

    public static Vector3 mousePosition;
    public static GameObject selectedObject;

    Vector3 offset;

    void Update()
    {
        mousePosition = Camera.main.ScreenToWorldPoint(Input.mousePosition);

        if (Input.GetMouseButtonDown(0))
        {
            if(OnMouseClick != null)
            {
                OnMouseClick();

                if (selectedObject)
                {
                    offset = selectedObject.transform.position - mousePosition;
                }
            }
        }

        if (selectedObject)
        {
            selectedObject.transform.position = mousePosition + offset;
        }

        if (Input.GetMouseButtonUp(0) && selectedObject)
        {
            selectedObject = null;
        }
    }
}
The second script, the Moveable Object script, should be placed on any object that can be clicked and dragged using the mouse, and will be responsible for checking if it is under the mouse when a click happens.
This works by checking if the Mouse Position is inside the bounds of its Renderer, which in this case is the Sprite Renderer that’s displaying the box.
Like this:
public Renderer myRenderer;

void CheckForClick()
{
    Vector3 positionToCheck = ClickManager.mousePosition;
    positionToCheck.z = myRenderer.bounds.center.z;

    if (myRenderer.bounds.Contains(positionToCheck))
    {
        ClickManager.selectedObject = gameObject;
    }
}
Setting the Z value of the position that’s being checked to match the centre of the object’s Renderer Bounds essentially ignores the depth of the mouse position.
Which is important as, even though the Renderer does have a small amount of depth, there’s a chance that mouse clicks at that position might get missed on account of the object’s Z value being different:
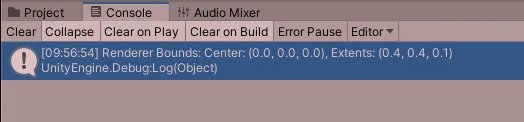
Despite being a flat Sprite, the Renderer Bounds still has a small amount of depth.
This script doesn’t use Update and, at the moment, nothing is calling the Check for Click method.
When the mouse button is clicked, the Check For Click function needs to be triggered, which can be done by subscribing it to the On Mouse Click Event, which is the delegate that will be called when a click happens.
This works by adding it to the Event instance when the moveable object is enabled and removing it if it’s disabled (to avoid calling a function on an object that no longer exists).
The Moveable Object script:
public class MoveableObject : MonoBehaviour
{
    public Renderer myRenderer;

    void CheckForClick()
    {
        Vector3 positionToCheck = ClickManager.mousePosition;
        positionToCheck.z = myRenderer.bounds.center.z;

        if (myRenderer.bounds.Contains(positionToCheck))
        {
            ClickManager.selectedObject = gameObject;
        }
    }

    void OnEnable()
    {
        ClickManager.OnMouseClick += CheckForClick;
    }

    void OnDisable()
    {
        ClickManager.OnMouseClick -= CheckForClick;
    }
}
If the mouse’s position is inside the object’s Renderer Bounds, it will set itself as the Selected Object on the Click Manager script, causing it to be picked up.
Allowing you to click and drag objects with the mouse without using any physics, Rigidbodies, or even a Collider.
However…
You only need to do this if the object actually exists in the game world.
If the object that you want to click and drag is a UI object, such as an inventory item, for example, then the method of moving it around the screen with the mouse can be much more simple.
How to move a UI Object with the Mouse (using Event Triggers)
Compared to the methods of moving an in-game object, moving a UI object by clicking and dragging it with the mouse can be very straightforward.
In fact, there are a number of built-in Event Triggers that can be used to detect if the mouse is over a UI object, if it’s been clicked and even if it’s being dragged around.
These triggers can be used to execute functions in a script.
For example, I could use the Pointer Down Event Trigger, which is fired when an object first receives a click from the mouse, to get the offset between the object and the mouse’s position, and the Drag Event Trigger to move the UI object when it receives a dragging movement.
Like this:
public class MoveUIObject : MonoBehaviour
{
    // Add this script to the moveable object
    public RectTransform rectTransform;
    Vector3 offset;

    public void GetOffset()
    {
        offset = rectTransform.position - Input.mousePosition;
    }

    public void MoveObject()
    {
        rectTransform.position = Input.mousePosition + offset;
    }
}
Then, all I’d need to do is connect the Event Triggers to the script functions.
Here’s how to do that…
First, add an Event Trigger component to the UI object you want to move:

Next, add the Drag and Pointer Down Event Types:
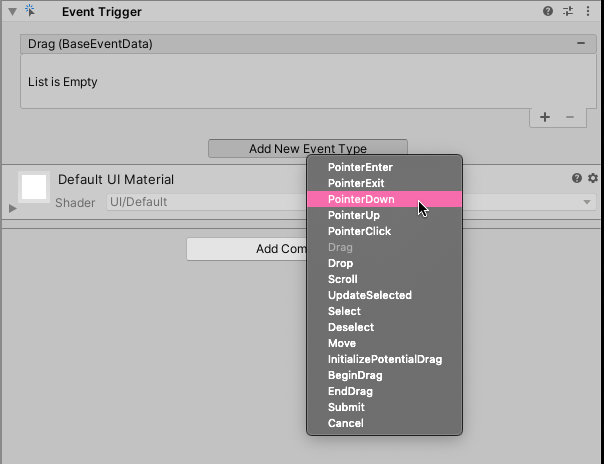
Using the plus symbol, add an entry for each of the event types, then drag the Move UI Object script to both fields.
Like this:

Finally, connect the Drag trigger to the Move Object function and the Pointer Down trigger to the Get Offset function:
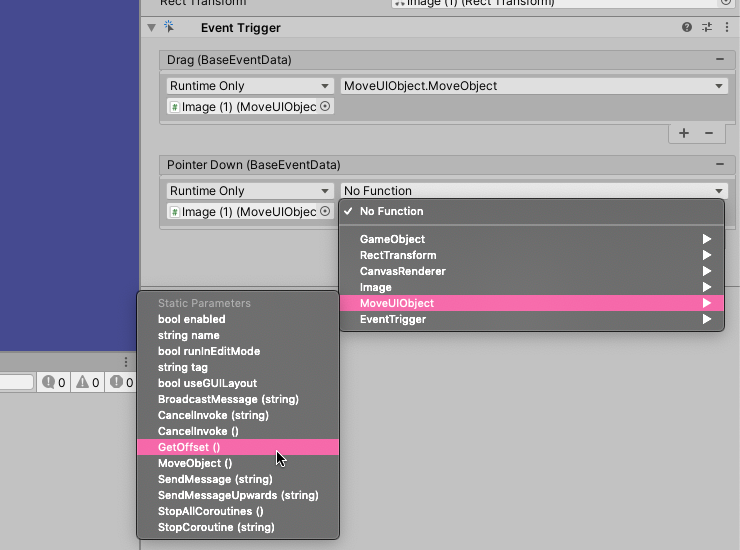
The result is an easy-to-use click and drag system that leverages the features of Unity’s User Interface and Events system.
Now it’s your turn
Now I want to hear from you.
How are you using click and drag mechanics in your game?
Are you using Raycasts? Overlap Points? Or some other method to detect clicks against an object?
And what have you learned about moving objects with the mouse that you know others will find useful?
Whatever it is, let me know by leaving a comment.
Image Attribution

John French writes all of the Unity tutorials for Game Dev Beginner, and specialises in deep-dive guides teaching game development basics.

Comments
Great tutorial, I’m trying to create a game where I can click and drag objects around a room in a 2D isometric environment. This tutorial really helped me out, but I’m having some issues with the selecting an object with the renderer bounds part. I have no compiling errors in Visual Studio, but when I test it in Unity, I get an error that ClickManager does not contain a definition for ‘OnMouseClick’
(using Unity 2019.4.21f1 on Mac)
Thanks Chris, if it’s in the same script, like in my example, I’d double-check for typos. Although it’s odd that you’re not getting the error until you test. If it helps, email me at [email protected] and I can take a look.
Thanks for the nice tutorial, I also spend almost a hour debug with the code, and then I realized what you add to the sprite is Box Collider 2D, but not Box Collider, make sense, since this is 2D. o(╯□╰)o
The article is very useful for the new comers of Unity.
I made that same mistake so many times when writing this article. Glad it helped in the end!
Super cool! I am making a game where I drag and drop flowers, but I would love it if the flowers rotated in ur hand? if you know what i mean. Is it possible to have the object influenced bye gravety/ force while in ur hand?
Thanks, Jeppe. I’ve also got your email about this so I’ll reply to that when I can with an answer.
This is great! Just in case you could help me with this, it looks like this code is made for one object, when adding another one they teleport to the cursor at runtime. How could I make it work for multiple different objects, being draggable one at a time?
Thanks! As far as I remember, all of the examples should work with multiple objects. So that I can double-check, which method are you using? Alternatively, feel free to email me at [email protected] with more details.
This tutorial was pretty easy to understand and the code worked great! Two things that are definitely *not* true about most Unity stuff, I find… Many thanks!
I used the “How to move a physics object with the mouse (using a Kinematic Rigidbody)” script and once I unchecked the “freeze positions” boxes on my rigidbody objects, worked like a charm.
Happy I could help!
im trying to make a basketball game where its 2d and you use your mouse but not a charecter in the game but i tried this code and there were so many compiler errors i fixed all of them exept for one its error code CS8803 Top-level statements must precede namespace and type declarations and im new so i dont know what that means could oyu help me please?
If you don’t mind sending me your script at [email protected] I’ll try to help you.
What is the difference between IDragHandler and Event Trigger, and is Event Trigger just an Unity editor solution? What are their best practices?
I haven’t used IDragHandler specifically, but as far as I can tell you’re right, it’s likely to be the interface that works behind the editor Drag Event Trigger.
I have noticed that the Object tends to move past the mouse instead of sticking to the mouse. Could you help me out?
That seems like an odd issue, could you share your code with me? Email me at [email protected] and I’ll try to help.