
Managing the order of 2D sprites and objects on the screen in Unity can be very straightforward.
After all, it’s easy enough to place background objects further away from the camera, so that they’re rendered behind other objects in the scene that are closer.
However, while this may be all you need to do, using distance alone to manage how your game’s 2D objects are sorted can sometimes become difficult to manage.
For example, what if you want to combine multiple sprites to create a character?
Or create a game with a top-down sorting perspective.
And, as your game grows, how can you manage the order of many different objects, easily?
Exactly how you manage the order of objects in your game will depend on what it is you’re trying to do but, for the most part, Unity’s built-in sorting tools and components can make it much, much easier to manage which objects are supposed to go on top, and which go on the bottom.
In this article, you’ll learn about the different methods for sorting objects in 2D and 3D, so that you can choose what will work for your game.
Here’s what you’ll find on this page:
So how do Unity’s sorting tools work?
How to sort 2D objects in Unity
Normally, objects in Unity are displayed on the screen in their order of distance from the camera.
Just as you might expect.
However, while this makes a lot of sense for 3D geometry, for 2D sprites, it can cause some problems.
When building a 2D game, it’s not uncommon to place all of your sprites at the same physical distance from the camera.
When making a 2D game, it’s common to place all of your sprites on a single, flat plane.
Which means that Unity can’t know which sprites should be displayed in the foreground and which should be placed in the background.
This problem can be simple to fix, just move the background back and the foreground forward.
Problem solved, right?
Using physical distance to manage the order of rendered objects can work just fine and, if it works for you, it may be all you need to do.
However, you may find it easier to group sections of your game into specific render layers, such as the sky, the background and different parts of the environment, so that objects are always rendered in their correct order, no matter how far away they are from the camera.
Which is where Sorting Layers come in…
How to use Sorting Layers in Unity
Sorting Layers in Unity allow you to control the render order of 2D objects, regardless of their physical distance from the camera.
This can be useful for placing objects in the background or foreground, without needing to move the object to a physical position.
So, how do they work?
Every visible object in Unity has some kind of renderer component that’s used to display it in the game.
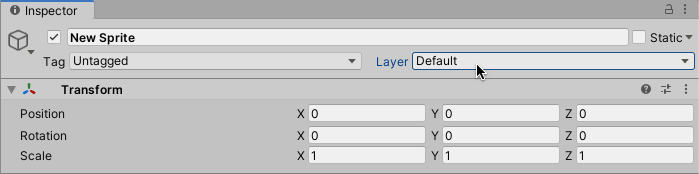
2D renderers, such as Sprite Renderers allow you to set a Sorting Layer for the sprite, as well an Order in Layer value.
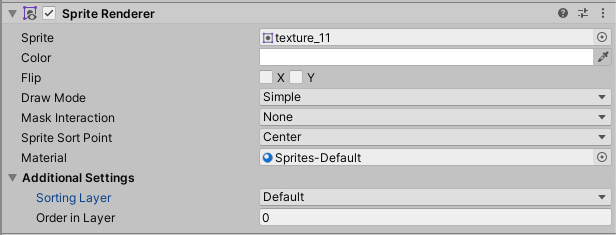
Some renderers, such as 2D Sprite Renderers, allow you to specify a Sorting Layer and order value.
Unity uses this information, as well as other data, such as the object’s position, to work out a sorting order.
First, Unity will use the renderer’s Sorting Layer and, after that, it will use the Order in Layer value, which is a numerical value that’s used to sort objects that are on the same Sorting Layer.
If two objects are on the same Sorting Layer and also have the same Order in Layer value, then the object’s distance from the camera will be used to decide its order, specifically the distance between the camera and the sprite’s Sort Point.
The Sort Point of a sprite can be either the centre, or its pivot point, which can be set in the sprite’s import settings.
This is why, by default, sprites are ordered by distance, as every new object uses the same default Sorting Layer with the same default Order in Layer value, which is 0.
Adding a Sorting Layer, or changing the Order in Layer value, overrides the object’s distance, allowing you to display objects in front of others, even if they’re closer to the camera.
So how can you add a new Sorting Layer?
How to add a new Sorting Layer in Unity
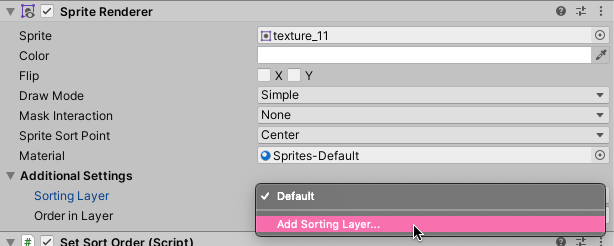
Sorting Layers can be added and reordered in the Tags and Layers settings, which you’ll find in the Project Settings window, under Tags and Layers, or from the Sorting Layer dropdown which will open the Tags and Layers tab in the Inspector.
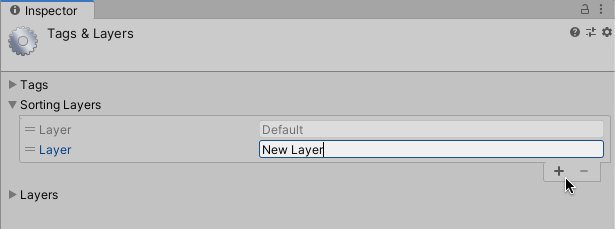
The quickest way to get to the Tags and Layers settings is to simply click on the Sorting Layer field and select Add Sorting Layer.
By default, there’s only one Sorting Layer, the Default layer, which can’t be removed.
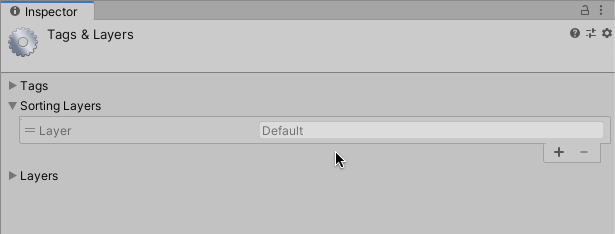
To add more, simply click the plus symbol and drag the layers into the order you want. Layers at the bottom of the list will be shown in front of layers at the top.
Sorting Layers are ordered from top to bottom, where layers on the bottom are shown in front of layers at the top.
While it’s possible to manage the sorting order of all of your objects on a single Sorting Layer, it can be easier to add extra layers for groups of objects that you know will always need to be in front of or behind other objects in the scene.
For example, I could add a Background and a Foreground Sorting Layer for everything that should be displayed in front of or behind the player and then simply leave everything else on the Default layer.
Like this:
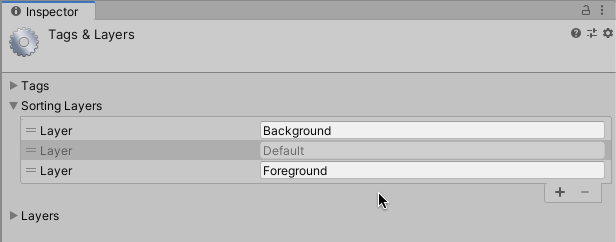
Grouping objects into layers that will always be behind or in front of other objects can make it easier to manage how they are displayed on the screen.
Sorting Layers vs Layers in Unity
There’s a difference between Sorting Layers, which are used by some renderer components to manage 2D sorting order, and Layers, which are an organisational tool that can be used on any game object.
Sorting Layers are specifically used to manage the rendering order of 2D objects, such as sprites, allowing you to display objects in front of other objects, regardless of their physical position in the scene.
Layers, on the other hand, are used to group specific types of game object together for organisational reasons. You’d typically use Layers to include or exclude certain types of object. Raycast functions, for example, allow you to selectively ignore certain layers, which can be useful for performing a ground check without hitting your player’s own collider.
Different to Sorting Layers, Object Layers are used as a way to include or exclude groups of game objects from certain functions and to filter camera views.
Sorting Layers and the Order in Layer value can be useful for easily managing the order of sprites in your scene.
Sometimes, however, particularly if you’re creating objects made up of many different sprites, managing them with individual values can be difficult to do.
What’s more, if the individual sprites of one object are on the same layer as other objects in the scene, you’ll need to create Order in Layer values that are relative to other objects, so that they don’t overlap in confusing ways.
Which is no easier than changing the distance of every object.
That is, unless, you use Sorting Groups.
How to use Sorting Groups in Unity
Sorting Groups allow you to change and manage the sorting order of multiple Sprite Renderers, from a single component.
Put simply, a Sorting Group allows you to treat a collection of Sprite Renderers as one object, making it easier to manage.

Sorting Groups allow you to treat multiple renderers as one.
For example, if you create a character that’s made up of many individual sprites, it can be difficult to manage how those sprites interact with other sprites on the same layer.
Which could cause only some parts of a character to be rendered above parts of a different character when they overlap, depending on their Order in Layer values.
Adding a Sorting Group component to the character’s root object solves this problem by treating the object’s many different renderers as one combined object.
While Unity will still use the Sort Layer and order settings of each individual renderer, they are no longer sorted relative to other objects in the scene.
Instead, they are sorted relative to their parent Sorting Group, regardless of their Sorting Layer or order value.
Which means that, when using a Sorting Group, an object’s individual renderers can be sorted relative to itself, using Order in Layer values and even different Sorting Layers, while the Sorting Group manages the order position relative to other objects.
This allows you to create complex objects, made up of many different sprites, but that will only ever be in front of, or behind, other objects as a whole.
How to manage Sorting Layers using a script
While you would normally set an object’s sorting values ahead of time, such as when creating an object from a Prefab, you may want to set or change an object’s Sorting Layer and order value using a script.
Luckily, it’s fairly straightforward to set an object’s Sorting Layer in scripting. All you’ll need is a reference to its Renderer component.
There are many different types of renderer, such as Mesh Renderers, which display objects in 3D and Sprite Renderers, for 2D graphics.
However, they all inherit from the Renderer class, which also contains the Sorting Layer and Order in Layer properties.
So, while not all renderers support Sorting Layers, which only work with 2D renderers such as Sprite Renderers and Tilemap Renderers, you won’t need a specific reference to a Sprite Renderer to use them in a script.
You can simply get a reference to the base Renderer class instead.
Like this:
Renderer myRenderer = GetComponent<Renderer>();You can then use that reference to set either the Sorting Layer, using the layer’s name, or the Order in Layer value.
Like this:
void Start()
    {
        Renderer myRenderer = GetComponent<Renderer>();
        myRenderer.sortingLayerName = "Top";
        myRenderer.sortingOrder = 10;
    }
How to use the Sorting Layer ID in Unity
You may have noticed that, in addition to the Sorting Layer name and order properties, Renderers in Unity also have a Sorting Layer ID property.
However, while you might assume that the Sorting Layer ID value relates to the numerical order of the Sorting Layers, it is, in fact, a unique identifier that can’t be directly used to manage an object’s layer. This is because, while the default Sorting Layer will always have an ID value of zero, new layers will have uniquely created IDs that are assigned internally.
However, it is still possible to assign a Sorting Layer based on its position in the layer list.
This works by retrieving all of the project’s Sorting Layers as an array and then simply returning the one that you want using its index position.
For example, I could use this method to get the bottom layer…
Like this:
void Start()
{
    // Sets the renderer to display on the first layer in the list
    Renderer myrenderer = GetComponent<Renderer>();
    myrenderer.sortingLayerID = SortingLayer.layers[0].id;
}
Or the top layer…
Like this:
void Start()
{
    // Sets the renderer to display on the last layer in the list
    Renderer myrenderer = GetComponent<Renderer>();
    myrenderer.sortingLayerID = SortingLayer.layers[SortingLayer.layers.Length-1].id;
}
This can be useful for sorting a Renderer by a specific layer position, such as the top or bottom, without needing to know the name of the layer first.
How to sort 2D sprites by distance in Unity (using a custom camera axis)
While Sorting Layers can be incredibly useful for managing 2D sprite order in Unity, an object’s distance from the camera can still be a vital tool for managing how objects are displayed.
For example, a side-on 2D game may not need to consider an object’s physical distance from the camera at all, and, instead, the order of objects can be managed using only Sorting Layers.
However, some types of 2D games may still incorporate a perception of depth, where the movement of an object past another means that it should be rendered behind it.
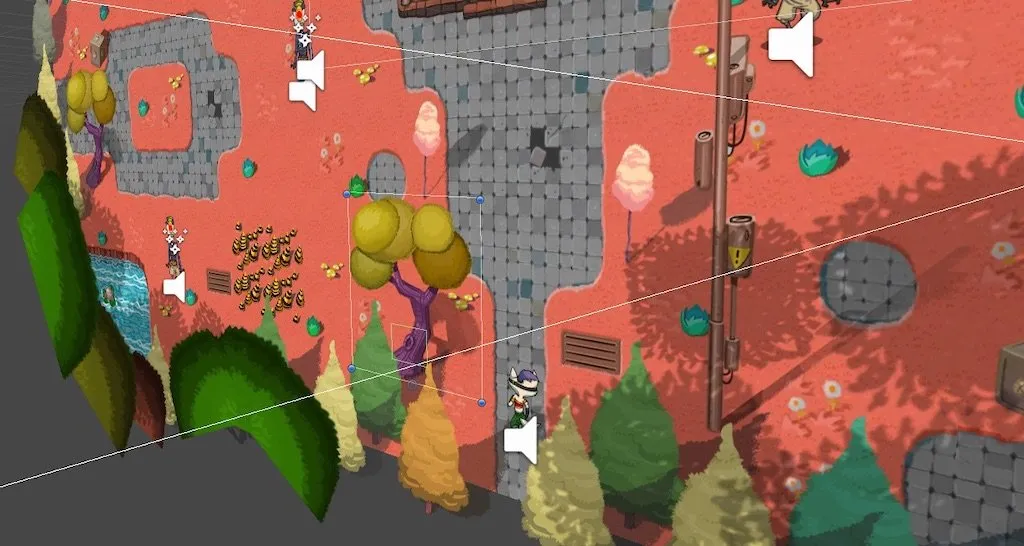
For example, in a 2D game with an overhead perspective, moving up moves the player into the background. Objects that are lower than the player are technically in front of them, while higher objects are behind them.
Some 2D games use perspective in a different way, where objects at the top of the screen are behind objects at the bottom.
While dynamically sorting objects in this way using layers could become difficult, it’s possible, instead, to simply use a camera’s normal method of sorting by distance, just from a different angle.
By default, Renderers in Unity are typically ordered according to two different queues: The Opaque Queue, which includes most solid 3D objects and the Transparency Queue, which includes transparent objects and most 2D sprites.
The axis of the Transparency Queue, which is the direction in which objects are sorted, defaults to the direction between the object being rendered and the camera’s position for perspective cameras or simply the direction of the camera for orthographic cameras.
Setting the axis to a custom value, however, allows you to change the direction of the Transparency queue, from the default back to front to top to bottom, for example.
This can be done in the Project Settings window, under the Graphics tab:
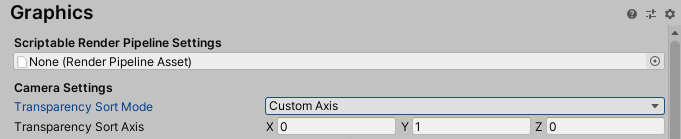
Changing the Camera’s Transparency Axis changes the sorting direction, in this case from top to bottom.
Or from a script,
Like this:
void Start()
{
    Camera.main.transparencySortMode = TransparencySortMode.CustomAxis;
    Camera.main.transparencySortAxis = Vector3.up;
}
When sorting sprites in this way, you’ll often need to make sure that the sprite’s pivot point is anchored at the position it can be passed at, as this is the point on the sprite that Unity will use to determine if it is in front of or behind another object.
The pivot position of a sprite can be changed in its Import Settings and selected on the Renderer itself, where you’ll have the option to choose the sprite’s pivot or the centre of the sprite as a Sort Point.
By default Unity uses the centre of a sprite to determine where it is, however you can change this to use the sprite’s pivot point instead.
Typically, when creating top-down distance, this will be at the bottom of the sprite.
You can change a sprite’s pivot point in the sprite’s Import Settings panel.
For example, both a player object and a tree are likely to be connected to the world at their base, meaning that if the bottom of the player is higher than the bottom of the tree, it should be rendered behind it.
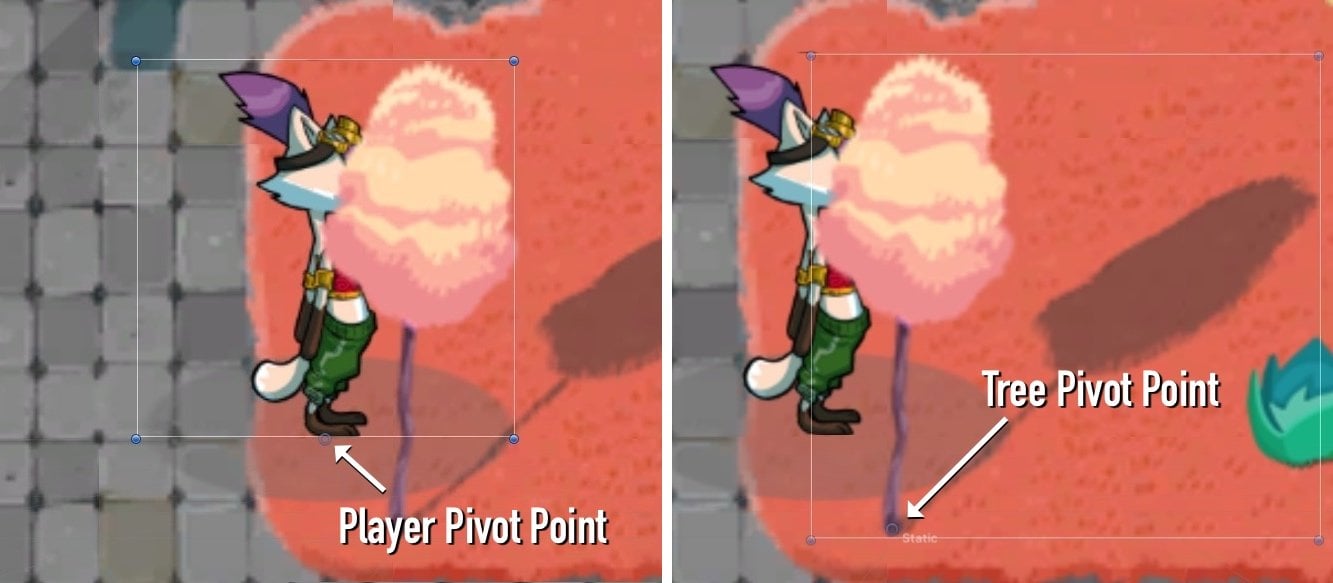
When using a top-down camera axis, pivot points that are higher are considered to be behind pivot points that are lower. In this case, the objects are grounded at their base, so the pivot points are measured from the bottom of the sprite.
However, elevated objects, or taller objects that are made up of multiple sprites (such as the top and bottom half of a tree), may need to be anchored at a custom distance, lower than the bottom of their sprite, so that they render correctly.
The pivot point of this sprite is set to a custom distance that extends below the bottom of the sprite, allowing an object to be behind it when it’s past the bottom of the tree.
Using a combination of camera distance, Sorting Layers and sprite pivot points can make it significantly easier to manage how 2D objects are displayed in your game.
But what if you want to use Sorting Layers with 3D objects?
Is it possible to use Unity’s 2D sorting tools with 3D Mesh Renderers?
Using Sorting Layers in 3D in Unity
The Sorting Layers and Order in Layer values that are used to sort 2D renderers in Unity don’t work with 3D Mesh Renderers.
A lot of the time, this may not be a problem, however, there may be times when you want to display a 3D object in front of another, regardless of its distance, in order to create a specific visual effect.
So, if you can’t use Sorting Layers, what can you do?
While Unity’s 2D sorting tools aren’t compatible with 3D renderers, it’s still possible to create visual effects that place one or more objects in front of others in the scene, even if they’re further from the camera.
Exactly how you do this depends on the complexity of the effect that you’re trying to achieve.
For example, if you want to display multiple objects above other parts of a scene, one method is to use a second camera.
How to sort 3D objects (using a second camera)
One option for displaying 3D objects in front of other objects in Unity is to use a second camera.
This works by adding a duplicate camera in the scene, that’s set to render on top of the original camera’s image, but that will only display certain objects, showing the rest of the scene below.
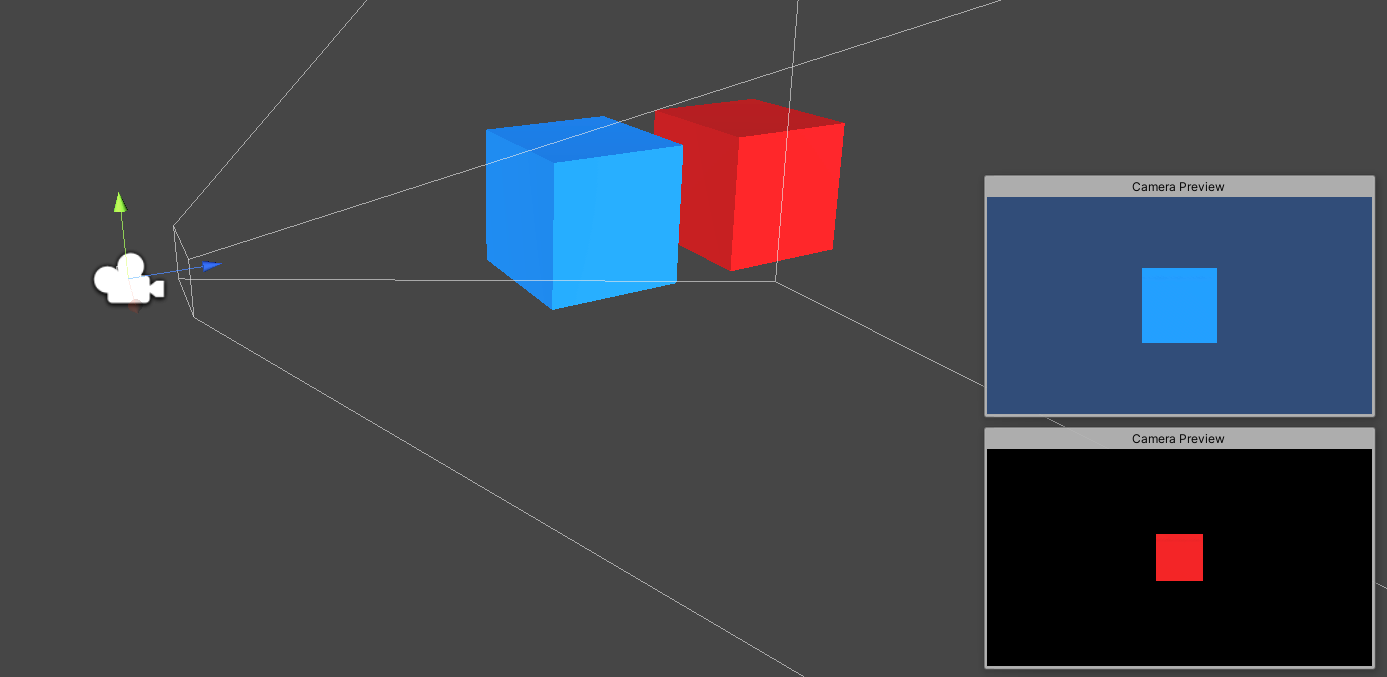
By using two cameras at the same position, it’s possible to separate what each camera sees and then reorder the layers.
Here’s how to do it…
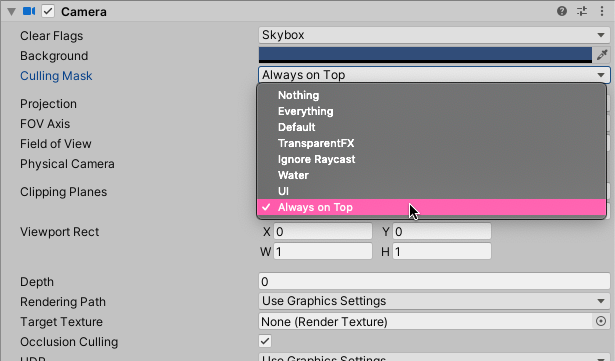
First, add a second camera to your scene (you may wish to make both of the cameras children of one game object, so that you can control them more easily together).

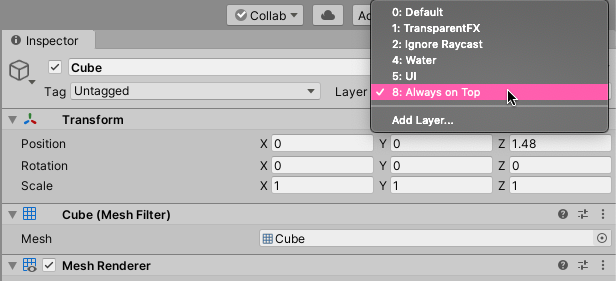
Next, create a new Object Layer that will hold any ‘Always on Top’ objects.
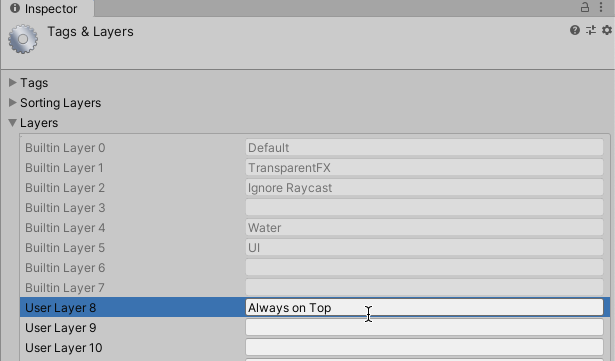
On the duplicate camera, click the Culling Mask dropdown and deselect all other Object Layers, so that the Always on Top layer is the only one that’s being rendered (you may wish to disable this layer on the original camera).
Then, to display the camera’s image above the original, set the Depth value to a higher number than the main camera.

Finally, click the Clear Flags dropdown and select Depth Only.
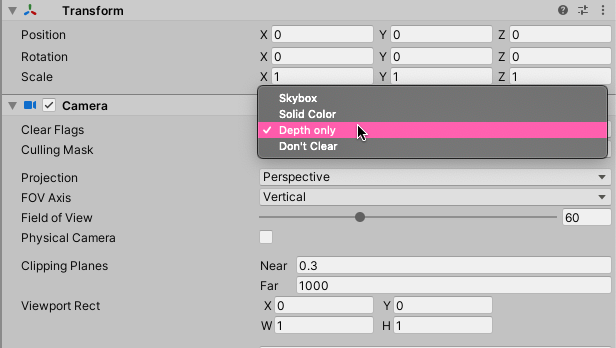
The Clear Flags setting essentially decides what the camera will show in an empty space.
Usually, this is used to show a Skybox, or even just a solid colour. Setting it to Depth Only allows the original camera to display beneath any objects rendered by the duplicate camera.
Now, any objects that you add to the Always on Top Layer will be shown above all other objects.
Using a second camera can be a useful way to superimpose objects onto an existing view.
However, it’s not the only method.
For example, it’s possible to change how an object is displayed by modifying the material’s shader, forcing Unity to ignore its depth.
How to sort 3D objects (using a shader)
It’s possible to render a 3D object in front of another object in Unity, without using multiple cameras, by disabling ZTest.
ZTest is a shader command that checks geometry distance to see if it should be rendered or not based on what’s in front of it, rejecting geometry that fails the test, because it’s behind another object.
Setting ZTest to Always or Off forces the geometry to always pass the test, even if it’s behind another object, displaying it in front.
It works by adding the ZTest command to a custom shader script.
Like this:
Shader "Custom/AlwaysOnTop"
{
    Properties
    {
        _Color ("Color", Color) = (1,1,1,1)
        _MainTex ("Albedo (RGB)", 2D) = "white" {}
        _Glossiness ("Smoothness", Range(0,1)) = 0.5
        _Metallic ("Metallic", Range(0,1)) = 0.0
    }
    SubShader
    {

        ZTest Always

        Tags { "RenderType"="Opaque" }
        LOD 200

        CGPROGRAM
        // Physically based Standard lighting model, and enable shadows on all light types
        #pragma surface surf Standard fullforwardshadows

        // Use shader model 3.0 target, to get nicer looking lighting
        #pragma target 3.0

        sampler2D _MainTex;

        struct Input
        {
            float2 uv_MainTex;
        };

        half _Glossiness;
        half _Metallic;
        fixed4 _Color;

        // Add instancing support for this shader. You need to check 'Enable Instancing' on materials that use the shader.
        // See https://docs.unity3d.com/Manual/GPUInstancing.html for more information about instancing.
        // #pragma instancing_options assumeuniformscaling
        UNITY_INSTANCING_BUFFER_START(Props)
            // put more per-instance properties here
        UNITY_INSTANCING_BUFFER_END(Props)

        void surf (Input IN, inout SurfaceOutputStandard o)
        {
            // Albedo comes from a texture tinted by color
            fixed4 c = tex2D (_MainTex, IN.uv_MainTex) * _Color;
            o.Albedo = c.rgb;
            // Metallic and smoothness come from slider variables
            o.Metallic = _Metallic;
            o.Smoothness = _Glossiness;
            o.Alpha = c.a;
        }
        ENDCG
    }
    FallBack "Diffuse"
}
In this example, I’ve created a new shader based on the Standard Surface Shader and simply added the ZTest command.
Any material that uses the shader will then be displayed in front of other objects, even if they’re closer to the camera.
Now it’s your turn
Now I want to hear from you.
How are you managing sorting order in your game?
Are you using Sorting Layers to combine objects into easy to manage groups?
Or do you prefer to use distance to handle which objects are displayed first?
And what have you learned about sorting objects in Unity that you know others will find useful?
Whatever it is, let me know by leaving a comment.

John French writes all of the Unity tutorials for Game Dev Beginner, and specialises in deep-dive guides teaching game development basics.

Comments
I hadn’t heard of the Sorting Group component before, it’s exactly what I was looking for!
Concerning displaying some objects always in front of others, you can now easily do that using a Custom Renderer as shown here https://youtu.be/szsWx9IQVDI.
Cheers 🙂
Thanks for the tip!
Thanks guy, that was very helpful. Well done 😀
You’re welcome!