
Making a player jump in Unity seems like a very simple thing to do.
However… it can be a surprisingly tricky thing to do right.
Why?
Because, to be able to make a player object jump in Unity, you’re going to need to decide how to move that object into the air.
For example, will you use physics to launch the player upwards, or will you use script-based movement to manually move the character up and down when they jump?
How can you control the speed of the jump, to avoid floaty jumping physics?
And how can you limit how high the player can jump or let them jump higher by pressing the jump button for longer?
There’s a lot to consider…
And exactly how you choose to make your player jump will depend on how your game works.
But don’t worry, because in this article I’ll show you everything you need to know about the basics of jumping in Unity, step by step, so that you can decide which method will work best for your game.
Here’s what you’ll find on this page:
Related Articles:
Jumping in Unity: Overview video
For a general overview of how to jump in Unity, try my video, or continue to the full article below.
Let’s get started with the basic method.
How to jump in Unity using physics
The basic method of jumping in Unity involves applying an amount of force to an object to move it into the air using physics.
This works by applying force to a Rigidbody component, using the Add Force method.
Like this, when working in 3D:
Rigidbody.AddForce(Vector3 force);Or, when working with 2D physics, like this:
Rigidbody2D.AddForce(Vector2 force);The Rigidbody component in Unity allows an object to move under physics simulation.
Meaning that it will be affected by gravity, it can be moved using physics forces and, when used with a Collider, it will collide into other objects that also have Collider components attached.
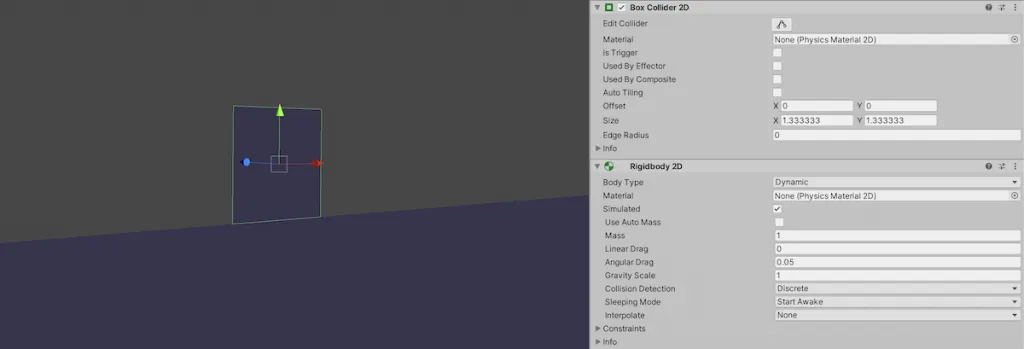
To move the character under physics, I need to add a 2D Rigidbody, which allows it to be moved under physics simulation, and a 2D Collider, to stop it from falling through the floor.
Using a Rigidbody, it’s possible to make a character jump by applying an amount of upward force, allowing gravity to pull the player back down again.
For example, if I have a character, in this case a simple 2D box, with a Rigidbody and a Collider component attached to it, I can make the box jump by applying force to the Rigidbody when a jump button is pressed.
Making the player jump when the Space Bar is pressed
To make the character jump, I need to get a reference to the Rigidbody.
Then, I can call the Add Force function when I want to trigger the jump. For example, when the Space Bar is pressed.
Like this:
public Rigidbody2D rb;
public float jumpAmount = 10;

void Update()
{
    if (Input.GetKeyDown(KeyCode.Space))
    {
        rb.AddForce(Vector2.up * jumpAmount, ForceMode2D.Impulse);
    }
}
This works by passing Vector2.up into the function, which is shorthand for (0,1), multiplied by the jump amount, in this case, ten.
Doing it like this makes it easy to pass the Jump Amount straight into the function, without declaring a new Vector 2.
You’ll notice that the Add Force function, in this example, also includes a parameter for Force Mode.
By default, Add Force applies physics forces in an additive way, building momentum up like thrust on a rocket.
This is great for pushing objects around but doesn’t work well for jumping, which usually involves an immediate hit of force to move the player up quickly.
The Impulse Force Mode, however, which is available on both the 2D and 3D versions of the Add Force function works differently.
It applies an immediate amount of force to the Rigidbody instantly, which works great for faster movements such as jumping.
Which looks like this:

A basic, physics-based jump.
While this works, there’s a problem…
In some cases, this type of jump movement might be exactly what you want.
Chances are, however, depending on the type of game you’re making, that this type of jump is a bit too floaty.
The character rises and falls slowly, and the whole jump process takes several seconds to complete.
So how can you change how fast the character jumps and falls?
How to increase jump speed in Unity (to prevent a floaty jump)
While the basic physics-based jump in Unity works well, the type of jump it produces can be too floaty for some types of games.
So how can you fix it?
One simple method of creating a faster jump is to increase the Gravity Scale of the Rigidbody component:
The Gravity Scale, which is set to one by default, multiples the effect of gravity on a Rigidbody.
For example, setting it to zero, turns off the gravity completely, while turning the Gravity Scale up past one will increase the effect of gravity on the object.

Increasing the Gravity Scale of a Rigidbody allows you to change how an object experiences gravity, without changing the global value.
This is useful, as it allows you to change how an object experiences gravity, without changing the global gravity value in the physics settings. So you could, for example, make an object float by turning off its gravity, without affecting any other objects.
For jumping, it works as a way to speed up the jump, as the increased gravity makes the object fall to the floor faster.
A higher Gravity Scale requires a higher jump force, to offset the increase in gravity, however, the end result is a faster jump movement.
Which looks like this:

Increasing the Gravity Scale and the Jump Amount produces a faster jump at the same height.
How to change the gravity of a single object, when using a 3D Rigidbody
Normally, the Gravity Scale setting is only available when using the 2D Rigidbody component. However, when working with 3D physics in Unity, it’s still possible to change the gravity of just one object.
This works by adding a continuous downward force to the Rigidbody, which can be controlled by a multiplier value, to simulate the Gravity Scale setting.
Like this:
public Rigidbody rb;
public float gravityScale = 5;

private void FixedUpdate()
{
    rb.AddForce(Physics.gravity * (gravityScale - 1) * rb.mass);
}
Increasing the Gravity Scale makes an object fall faster through the air.
However, moving an object faster can cause issues.
For example, if your player object is moving very fast, it’s possible for the player to move through an object that they’re supposed to land on.
To prevent this from happening, change the Collision Detection setting on the Rigidbody component from Discrete to Continuous:

Setting the Collision Detection to Continuous has a performance hit, but it prevents the player from getting stuck in the environment.
Continuous Collision Detection is available on both 2D and 3D Rigidbody components, with the 3D version also offering a Continuous Speculative mode, which can offer better performance.
While using a continuous collision detection mode is generally less efficient, the performance hit is often justifiable, as it will help to prevent the player from passing through the environment if they move too fast.
Alternatively, the physics time step, which is the duration between each Fixed Update call, can be reduced to increase simulation precision.
To change it, open the Project Settings and, under Time, you’ll find the Fixed Timestep setting. Decreasing the value, which reduces the amount of time between updates, increases physics accuracy but at the cost of a higher CPU load.
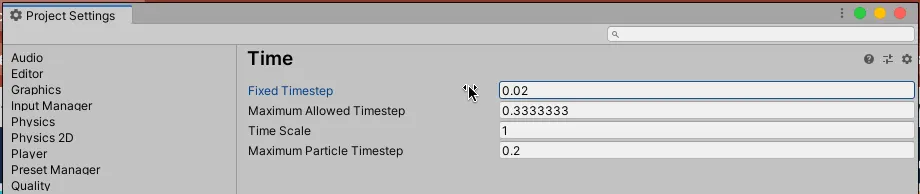
Reducing the Fixed Time increases physics precision at the cost of increased CPU load.
Most of the time, however, unless you have a specific need for increased physics accuracy, you’ll be better off leaving the Fixed Timestep value at its default of 0.02.
How to fall faster when jumping in Unity
While simply increasing the Gravity Scale may be all you need to do to create a jump movement that you’re happy with, it’s possible to further control the speed of a jump by further manipulating gravity.
In this case, by different amounts during the jump movement.
Why would you want to increase or decrease gravity for only part of the jump?
While many games use jump curves that take as long going up as they do coming down, many others actually use a faster fall, where the player will come down faster than they went up.
The original Super Mario, for example, uses a jump movement that falls faster than it ascends.

Many games use a “faster fall” style jump, where the player will fall faster than they rise.
So how can you create a Mario style jump in Unity?
The simplest way to do this is by adding more gravity when the player is falling.
Like this:
using UnityEngine;

public class PlayerJump : MonoBehaviour
{
    public Rigidbody2D rb;
    public float jumpAmount = 35;
    public float gravityScale = 10;
    public float fallingGravityScale = 40;

    void Update()
    {
        if (Input.GetKeyDown(KeyCode.Space))
        {
            rb.AddForce(Vector2.up * jumpAmount, ForceMode2D.Impulse);
        }

        if(rb.velocity.y >= 0)
        {
            rb.gravityScale = gravityScale;
        }
        else if (rb.velocity.y < 0)
        {
            rb.gravityScale = fallingGravityScale;
        }
    }
}
This works by checking the velocity of the Rigidbody in Update. If it’s a positive value, then the player is rising and the Gravity Scale is set to its normal value, in this case ten.
However, if the player is falling, and their velocity is negative, the Gravity Scale is increased and they fall faster.
The result is an automatic change in Gravity Scale, depending on whether the player is jumping up or falling down, that doesn’t affect other objects.
Using a specific amount of force to create a jump will often get you the results you want.
You can increase the jump height by applying a greater amount of force, or reduce it by using less.
However…
What if you want to control how high a player should be able to jump?
How could you do that?
How to jump to an exact height in Unity
When creating a jump function in Unity, it’s possible to calculate how much force will be required to jump to a specific height.
This works by calculating the square root of the target height multiplied by gravity, multiplied by minus two.

Once you know gravity, and the height you want to reach, you can find the required velocity.
Because gravity and the target height are known you can work out the amount of force required to jump to a certain height.
Like this:
float jumpForce = Mathf.Sqrt(jumpHeight * -2 * (Physics2D.gravity.y * rb.gravityScale));The Jump Force value can then be passed into the Add Force function to create the jump.
Like this:
rb.AddForce(new Vector2(0, jumpForce), ForceMode2D.Impulse);The result is a jump that will closely match the target height.
For example, 5 units:

When jumping in Unity, it’s possible to calculate the force required to jump to a specific height.
While this method of creating a jump force based on a target height is very consistent (i.e. the height that the player can jump will be the same every time) it’s not 100% accurate.
The actual height that can be achieved will often be slightly less than the target amount.
However, it can still be extremely useful to limit the jump height in this way.
Calculating the force required to hit a certain height creates a consistent jump that is unaffected by other physics changes.
While other jump methods can be significantly affected by physics changes, such as Gravity Scale, by calculating the required force to reach a certain height, it’s possible to create a consistent jump that closely matches the target height, no matter what else you change.
While limiting the maximum height of a jump can be useful for designing your game, you may also want to give the player some control over how high their character can jump.
For example, by allowing the player to jump higher or lower depending on how long the jump button is pressed.
How to create a variable height jump in Unity
Many games offer an amount of control over how high the character will jump depending on how long the player pressed the jump button.
A quick tap and the character might only hop.
While a long press will mean they’ll jump as high as they can into the air.

Variable height jumps, where a long press of the jump button produces a higher jump than a tap, are common in many games.
For games that require any kind of precise jumping, such as platform games, for example, being able to offer a degree of control over the character’s jump height is important.
Here’s how to do it in Unity.
How to measure a variable jump
First, I need to know how long the player pressed the jump button.
This can be done by creating a short window of time at the beginning of the jump, the Button Time, which is measured using a timer, the Jump Time, as soon as the jump starts.
Like this:
public float buttonTime = 0.3f;
float jumpTime;
bool jumping;

private void Update()
{
    if (Input.GetKeyDown(KeyCode.Space))
    {
        jumping = true;
        jumpTime = 0;
    }

    if(jumping)
    {
         jumpTime += Time.deltaTime;
    }
}
Then, if the player releases the button early, or if the time runs out, the jump ends.
Like this:
if(Input.GetKeyUp(KeyCode.Space) | jumpTime > buttonTime)
    {
        jumping = false;
    }
How to change the height of a jump
Now that I can measure how long the player pressed the jump button for, all I need to do to create a variable jump is to keep adding an amount of force while Jumping is equal to true, to keep the jump going.
In the previous example, I used the Add Force method to apply an amount of force once to create a jump.
However, while the Add Force method worked well for a single application of force, it won’t work as well when applying force over a number of frames.
This is because the Force Mode I used before, the Impulse mode, is designed to add a single amount of force all in one go.
Using the Impulse Force Mode over a number of frames would fire the player character up extremely high, like a rocket.
Whereas switching to the default Force Mode, Force, which is designed to push objects over a number of frames, would push the character up slowly, creating an acceleration effect. Which isn’t what I want for a jump either.
So what’s the answer?
It’s possible to create the effect of the Impulse Add Force method, over a number of frames, without multiplying the amount of force that’s applied to the object.
This can be done by setting the Velocity of the Rigidbody directly.
Like this:
float jumpForce = 15;
Rigidbody2D.velocity = new Vector2(rb.velocity.x, jumpForce);
Doing it like this allows me to add force instantly, but it doesn’t add up over time. It simply stays the same.
Using Add Force or Velocity to jump in Unity
The Add Force method adds an amount of force to a Rigidbody, while the Velocity property is the object’s current speed and direction in units per second, represented as a Vector 2 or a Vector 3 value, depending on if you’re working in 2D or 3D.
Normally, you wouldn’t set the Velocity of an object directly, because doing so can cause unrealistic behaviour.
For example, setting the Velocity to Zero would instantly stop an object that’s already moving.
While setting it to a new value will immediately start the object moving in that direction or suddenly change its course.
Also, keep in mind that changes to the Velocity setting override the existing momentum of that object. So if a Rigidbody is being moved by another force, such as a platform, or an elevator, the new Velocity you set will, effectively, cancel the object’s current movement.
While, for a simulation of physics, this kind of sudden movement can be unrealistic, it can also be beneficial as setting the Velocity basically has the same effect as the Add Force method in Impulse mode.
Except that, while the Add Force method adds force creating an acceleration over time, setting the Velocity property over a number of frames will, instead, overwrite and maintain the amount of velocity that is set.
Which can be useful for creating a variable height jump that’s precise and easy to control.
Here’s how it looks all together:
using UnityEngine;

public class PlayerVariableHeight : MonoBehaviour
{
    public Rigidbody2D rb;
    public float buttonTime = 0.3f;
    public float jumpAmount = 20;
    float jumpTime;
    bool jumping;

    private void Update()
    {
        if (Input.GetKeyDown(KeyCode.Space))
        {
            jumping = true;
            jumpTime = 0;
        }

        if(jumping)
        {
            rb.velocity = new Vector2(rb.velocity.x, jumpAmount);
            jumpTime += Time.deltaTime;
        }

        if(Input.GetKeyUp(KeyCode.Space) | jumpTime > buttonTime)
        {
            jumping = false;
        }
    }
}
What’s happening here is, once the player starts the jump with the Space Bar, Jumping is set to true.
While Jumping is true, the Velocity of the Rigidbody is set to a new Vector 2 value setting both the horizontal and vertical velocity.
The horizontal velocity is left unchanged, which is important, as it allows the character to still move left and right.
The vertical velocity, however, is set to the value of the Jump Amount variable, creating instant upward motion.
So long as Jumping remains true, i.e. the player keeps the jump button held dwon, the vertical velocity will continue to be set to match the Jump Amount value, meaning that the momentum of the object won’t be slowed by gravity.
One Jumping becomes false, either because the Button Time window has ended, or because the player released the jump button early, gravity will start to take effect and the player will be slowed down
The result is a natural-looking jump that is higher or lower depending on how long the jump button was held for.
Advanced jump features
If jumping is important to your game, then allowing the player to control the height of their jump is a simple but effective method of improving the jump mechanic.
There are also other, additional, features that can make jumping in your game easier or, at the very least, less frustrating.
For example, extending the amount of time the player can trigger a jump to include the moment just before they land and just after they’ve left a ledge.
This can make a significant difference to the feel of a jumping mechanism as it creates a more forgiving system and prevents dropped inputs, where the player felt like they should have been able to jump, but didn’t.
Likewise, tailoring the amount of in-air control can help make it easier for players to plan where they will land, by increasing the time spent at the apex of the jump, or by allowing them to go back more easily if they change their mind.
For more information on advanced platformer mechanics, try David Strachan’s article here.
How to limit the height of a variable jump
In the same way that it’s possible to specify how high the player will be able to jump, by calculating the force that’s required to reach a certain height, based on the game’s gravity, it’s also possible to create a variable height jump, that is limited to a specific maximum height.
It combines the method of jumping to an exact height, by calculating the force that’s required to reach it, with the method of detecting long and short button presses, by measuring how long the button was held during a window of time at the beginning of the jump.
However, whereas before I simply stopped setting the Rigidbody’s Velocity if the jump button was released, allowing gravity to slow the object down, in order to vary the height of a measured jump, I need to apply the maximum force required all in one go, straight away.
Then, if the jump turns out to be lower, because the player released the button early, I can reduce the object’s upward velocity, so that the player doesn’t jump as high.
Doing it this way means that, if the player does keep the button held down, they will reach the maximum jump height consistently and, if they don’t, they’ll be able to perform a lower jump.
Here’s how it works…
Like before, I’m going to measure a window of time at the beginning of the jump.
However, instead of maintaining the jump velocity during this time, I’m going to create the force required to start the full jump using the Add Force method.
Like this:
float jumpForce = Mathf.Sqrt(jumpHeight * -2 * (Physics2D.gravity.y * rb.gravityScale));
rb.AddForce(new Vector2(0, jumpForce), ForceMode2D.Impulse);
Then, during the jump, if the player releases the jump button inside the Button Time window, the jump is cancelled, which sets a Jump Cancelled boolean value to true.
Like this:
bool jumpCancelled;

if (jumping && Input.GetKeyUp(KeyCode.Space))
{
    jumpCancelled = true;
}
Meanwhile, in Fixed Update, I can check for the cancelled jump signal and then, if the jump is still in progress and if the vertical velocity of the Rigidbody is still positive, i.e. the player is moving upwards, I can apply a downwards force to cancel out the jump’s momentum.
Like this:
private void FixedUpdate()
    {
        if(jumpCancelled && jumping && rb.velocity.y > 0)
        {
            rb.AddForce(Vector2.down * 100);
        }
    }
In this example, when the character is still jumping, but the jump has been cancelled, a downward force of 100 units per second will slow the player until they’re no longer moving upwards.
This is the Cancel Rate, which is how fast the velocity will change, in units per second, if a jump is cancelled.
Here’s how it looks all together:
using System.Collections;
using System.Collections.Generic;
using UnityEngine;

public class VariableJump : MonoBehaviour
{
    public Rigidbody2D rb;
    public float buttonTime = 0.5f;
    public float jumpHeight = 5;
    public float cancelRate = 100;
    float jumpTime;
    bool jumping;
    bool jumpCancelled;

    private void Update()
    {
        if (Input.GetKeyDown(KeyCode.Space))
        {
            float jumpForce = Mathf.Sqrt(jumpHeight * -2 * (Physics2D.gravity.y * rb.gravityScale));
            rb.AddForce(new Vector2(0, jumpForce), ForceMode2D.Impulse);

            jumping = true;
            jumpCancelled = false;
            jumpTime = 0;
        }

        if (jumping)
        {
            jumpTime += Time.deltaTime;
            if (Input.GetKeyUp(KeyCode.Space))
            {
                jumpCancelled = true;
            }

            if (jumpTime > buttonTime)
            {
                jumping = false;
            }
        }
    }

    private void FixedUpdate()
    {
        if(jumpCancelled && jumping && rb.velocity.y > 0)
        {
            rb.AddForce(Vector2.down * cancelRate);
        }
    }
}
Separating Update and Fixed Update
You may have noticed that, in this example, I’ve placed some of the script’s code in Update, and some in Fixed Update, connecting the two with a boolean.
So why not put it all in one or the other?
While Update is called every frame, Fixed Update is called every physics step, which is usually slower than Update at 50 frames per second by default.
However, continuous physics forces, such as the Add Force function, should usually only be used inside Fixed Update, in order to keep any application of force in sync with the physics system that will respond to it.
However, there are times where using Fixed Update isn’t as important, such as when calling a physics function only once (such as when using the Impulse Add Force function) or when the timing difference won’t actually have an effect (such as when directly setting a consistent Velocity value).
Why the jump button doesn’t always work
While it’s often important to place physics-based functions inside of Fixed Update, accidentally placing Update based functions inside of Fixed Update can cause issues.
For example, when checking for player input you’d typically use the Get Key Down function to detect a key being pressed, which returns true on the frame that the key is first pressed down.
Checking for the Get Key Down condition in Fixed Update, however, can cause the down signal to be easily missed, which can cause inconsistent or undetectable input. This happens because the game’s framerate will usually run much faster than the Fixed Update time step so, in order for input to be accurately detected, it should always be placed in Update.
Tweaking the jump sensitivity
The Cancel Rate, which is the rate of downward force in units per second, decides how quickly the object will be slowed down after the button is released.
Typically, higher values, such as 100, will create a more sensitive jump button, while lower values may be more suitable for lower speed jumps.
Additionally, using a very short Button Time can reduce the amount of control that the player will have over the jump, as there will be less chance for them to release the button during the movement.
Increasing the Button Time value, to include more, or all, of the time taken for the character to reach their maximum jump height, will provide the player with the greatest amount of control over their jump. However, a different level of control may work best for your game and you’ll most likely want to experiment with the different values: Jump Height, Button Time, Cancel Rate, and also the Gravity Scale, to create a jumping movement that feels right for your game.
The result will be a physics-based jump, that reaches a specific height but that can also be controlled by the player.
Which looks like this:

By cancelling a jump if the player releases the jump button, it’s possible to create a variable height jump, with a maximum achievable height.
Smooth physics-based jumping in Unity (using Interpolation)
One of the drawbacks of using physics to move objects in Unity is that, by default, physics steps update at a fixed 50 frames per second.
Which means that any physics-based movement will also update at 50 fps, which can cause a jittery motion that won’t scale with the performance of the game.
Put simply, it doesn’t matter how fast the game runs, physics objects will only appear to move at 50 fps.
Which can result in jerky, jittery movement for any object that’s moved using physics.
This is particularly noticeable when comparing a physics object with an object that moves under Update, for example when following the player with a camera.
So what can you do about it?
The solution is to enable Interpolation on the player object:

Enabling Interpolation smooths out physics-based movement.
Interpolation smooths out the physics-based movements of the object so that they update more regularly than the physics system does.
When working in the editor, you might not notice a difference right away. However, when running the built game, the result is a significantly smoother physics movement that doesn’t jitter.
While it works well, it comes at a performance cost, so it’s sometimes best to only use Interpolation on the player object, where the benefit will be noticed the most.
How to jump in Unity without using physics
Most of the time, the simplest way to create character movement in Unity, including making a player jump, is to do it with physics, by adding a Rigidbody component to the object and applying forces to it.
However, what if you don’t want to use Unity’s physics system to move your player?
It might be that you want a specific type of movement that’s not easy to create with physics.
Maybe you want to improve performance by avoiding physics calculations altogether, or it might simply be that you don’t need many of the features that the physics system provides.
So how can you make an object jump, without using physics?
One option is to move the object using its Transform component.
How to jump in Unity without a Rigidbody (using Transform)
In Unity, every object can be moved using its Transform component, either by setting the Transform’s Position property directly or by using the Translate function.
Like this:
transform.Translate(Vector3 movementVector * Time.deltaTime);This can be used to make an object jump. This works by creating a local Velocity variable and adding an amount of force to it.
Like this:
public float jumpForce = 20;
float velocity;

void Update()
{
    if (Input.GetKeyDown(KeyCode.Space))
    {
        velocity = jumpForce;
    }

    transform.Translate(new Vector3(0, velocity, 0) * Time.deltaTime);
}
However…
While moving an object upwards using its Transform component can be very simple, it can be a little tricky to recreate some of the features that the physics system would normally manage for you.
Such as gravity for example.
How to make your own gravity in Unity
When you make your player jump, you’re probably going to want them to come down again, which means you’ll need to apply a gravitational force.
Typically this can be done by multiplying a gravity amount, such as –9.81, which is Unity’s default gravity value, by Time.deltaTime, twice.
Once, when calculating the gravity value, and again when applying it to the character’s motion.
Like this:
public float jumpForce=20;
public float gravity = -9.81f;
float velocity;

void Update()
{
    velocity += gravity * Time.deltaTime;
    if (Input.GetKeyDown(KeyCode.Space)){
        velocity = jumpForce;
    }

    transform.Translate(new Vector3(0, velocity, 0) * Time.deltaTime);
}
Why twice?
Because the gravity value is not a constant speed, it’s an acceleration, measured in metres per second squared.
Multiplying gravity by the Delta Time twice squares the time value, returning an acceleration of –9.81 m/s2, which can then be added to an object’s existing velocity to create an accelerating gravitational force.
And, if you want to change the scale of gravity, for example to increase the speed of the jump, you can, by introducing a local Gravity Scale variable.
Like this:
velocity += gravity * gravityScale *Time.deltaTime;Just remember that, when using a larger amount of gravity, you’ll need to apply a larger amount of jump force to reach the same height.
While creating gravity can actually be relatively straightforward, doing so creates another problem.
Before, when using physics, the player’s character didn’t fall through the floor because both the player and the floor had Collider components attached.
However…
Adding a Collider to the player object, in this scenario won’t actually help.
Colliders are part of the physics system and, on their own, they don’t prevent an object from moving through another object when it’s moved using its Transform.
Colliders define the bounds of a physics object, but collisions only occur when one of the objects also has a Rigidbody attached.
And while you could add a Rigidbody to make collisions between Colliders work, it doesn’t make any sense to do that, only to then move the object around using its Transform.
So how can you prevent an object from falling through the floor, without using a Rigidbody?
While you normally need a Rigidbody to detect when one Collider object hits another, it’s possible to detect the presence of other Colliders, such as on the floor and walls, without using a Rigidbody.
Typically, this involves using some kind of Raycast, or an Overlap Box, to perform a Ground Check.
Here’s how…
How to perform a ground check in Unity
A Ground Check in Unity is a method of testing whether or not a player object is currently grounded, meaning that they’re touching the floor.
Which is useful, as it allows you to restrict the player from performing actions in the air that should, normally, only happen when the player is standing on the ground.
Such as jumping.
Every method of jumping will usually need some sort of ground check as, without it, players would be able to infinitely jump without first needing to land.
However, ground checks are particularly important when moving an object manually to make it jump.
This is because, not only will the ground check prevent the player from jumping when they’re already in the air but, without any kind of physics-based obstruction, checking to see if they’re on the ground, and turning off their gravity if they are, will be the only thing stopping the player from falling through the floor.
So, how can you perform a ground check when jumping in Unity?
One method of detecting if the player is on the ground or not is to use a Raycast.
Generally speaking, this involves defining a point of origin, a direction vector and a maximum distance and then checking to see if a collider was hit.
So, for example, I could use the position of the object and check downwards to see if a Collider is there.
Like this:
using UnityEngine;

public class GroundCheck : MonoBehaviour
{
    public float distanceToCheck=0.5f;
    public bool isGrounded;

    private void Update()
    {
        if (Physics2D.Raycast(transform.position, Vector2.down, distanceToCheck))
        {
            isGrounded = true;
        }
        else
        {
            isGrounded = false;
        }
    }
}
Then, to stop the player from falling through the floor, the gravity can simply be turned off whenever they’re grounded.
In this case by setting the Velocity to zero when the player is on the ground and not moving upwards (i.e. they’re not trying to jump).
Like this:
public GroundCheck groundCheck;

if (groundCheck.isGrounded && velocity < 0)
{
    velocity = 0;
}
For this to work the changes in Velocity must be applied in a specific order.
- First, add the gravity.
- Next, check if the player is grounded. If they are, reset their Velocity, which cancels out the gravity, so that they don’t fall through the floor.
- Finally, if the player tries to jump, their new upward Velocity won’t be affected by being grounded.
Here’s what it looks like all together:
using System.Collections;
using System.Collections.Generic;
using UnityEngine;

public class TransformJump : MonoBehaviour
{
    public GroundCheck groundCheck;
    public float jumpForce=20;
    public float gravity = -9.81f;
    public float gravityScale = 5;
    float velocity;

    void Update()
    {
        velocity += gravity * gravityScale * Time.deltaTime;

        if (groundCheck.isGrounded && velocity < 0)
        {
            velocity = 0;
        }

        if (Input.GetKeyDown(KeyCode.Space))
        {
            velocity = jumpForce;
        }

        transform.Translate(new Vector3(0, velocity, 0) * Time.deltaTime);
    }
}
For this to work, the ground object will still need to have a Collider component attached to it, so that the Raycast can detect it.
While this method of using a Raycast to check when the player is on the ground works well, it has a drawback.
Because Raycast only fires a thin line downwards to check for the floor, it’s possible to miss the edge of ledges when doing ground checks in this way.
This can cause the player to fall off of the end of a ledge when they’re supposed to be standing on it or it can stop them from jumping when they should be able to.
Luckily, there are many different types of Raycast function, for both the 2D and 3D physics engines, that can help prevent this problem.
Such as Spherecast, for example, which can be thought of as a kind of thick Raycast.
However, while Raycasts can work well for performing ground checks, it may be easier to simply check the entire area below the character using an Overlap function.
This works by defining an area, such as a box, that is offset from the player, so that it covers the area beneath them, checking to see if there are any Colliders there.

Overlap functions can detect Colliders inside a shaped area, in this case, a box.
I can use the Overlap Box function to check if the player is grounded.
Like this:
public class GroundCheck : MonoBehaviour
{
    public bool isGrounded;
    public float offset = 0.2f;

    private void Update()
    {
        Vector2 point = transform.position + Vector3.down * offset;
        Vector2 size = new Vector2(transform.localScale.x, transform.localScale.y);

        isGrounded = Physics2D.OverlapBox(point, size, 0);
    }
}
Using this method casts a wider area beneath the player, which can be useful for controlling the size of the player’s footprint against obstacles and ledges.
However, there’s another problem.
Both the Raycast and Overlap Box methods do work for checking if the ground is beneath the player, but they can be prone to errors.
When performing a manual ground check such as this, the exact moment the player becomes grounded depends on when the Raycast or Overlap Box detected the Collider.
Which means that, even at very high frame rates, the distance between the player and the ground will always be slightly different.
Sometimes the difference will be barely noticeable.
Other times, however, the player will appear to be stuck in the ground:

Oh no.
So how can you fix it?
How to stop the player from getting stuck in the ground when jumping
One option is to snap the player object to the surface of the ground whenever they’re grounded.
Generally, this involves getting a point on the Collider’s edge and snapping the player’s position to it.
To do that, you’ll need a reference to the Collider that the player is standing on.
In this example, where I’m using an Overlap Box function to detect 2D Colliders, one way to snap the player to the ground is by using a different version of the Overlap Box method, that supports storing detected Colliders in a 2D Collider Array:
Collider2D[] results;To avoid Garbage Collection, this function uses an existing Array to store its results, instead of creating a new one every time it’s called.
But, for that to work I need to initialise the Array first.
Like this:
Collider2D[] results = new Collider2D[1];In this case, I’m only interested in getting information about one Collider at a time, so I’ve set the length of the Array at One.
This particular version of the Overlap Box function also requires a Contact Filter 2D parameter.
Contact Filter 2D is like a more in-depth version of the Layer Mask parameter in 3D Raycast functions. Put simply, it’s a custom data set that can be used to ignore certain types of Collider.
Although a reference to a Contact Filter 2D is required to complete the parameters of the function, it’s not needed to make it work, which means I can simply bypass it.
This works by declaring a Contact Filter 2D variable:
ContactFilter2D filter;Then, when I need to reference it in the method’s parameters, I can use the No Filter function to ignore it.
This version of the Overlap Box function returns an integer value, which is equal to the number of Colliders detected (but no more than the length of the Array that is used to store them).
Like this:
if (Physics2D.OverlapBox(point, size, 0, filter.NoFilter(), results) > 0)
{
    isGrounded = true;
}
else
{
    isGrounded = false;
}
If the number of Colliders returned is zero, the player is not grounded, meaning they’re in the air.
However, if they are grounded, and are touching at least one Collider, there will be a reference to that Collider in the first element of the Array:
Collider2D groundCollider = results[0];I can use that reference to run the Closest Point function, which will find the closest point, from the player’s position, on the perimeter of the Collider.
Like this:
Vector2 surfacePosition = Physics2D.ClosestPoint(transform.position, results[0]);This will return a Vector 2 value, which I can then store in a public reference for the Jump Script to access.
Here’s how it looks all together:
using System.Collections;
using System.Collections.Generic;
using UnityEngine;

public class GroundCheckWithSnapping : MonoBehaviour
{
    public bool isGrounded;
    public float offset = 0.1f;
    public Vector2 surfacePosition;
    ContactFilter2D filter;
    Collider2D[] results = new Collider2D[1];

    private void Update()
    {
        Vector2 point = transform.position + Vector3.down * offset;
        Vector2 size = new Vector2(transform.localScale.x, transform.localScale.y);

        if (Physics2D.OverlapBox(point, size, 0, filter.NoFilter(), results) > 0)
        {
            isGrounded = true;
            surfacePosition = Physics2D.ClosestPoint(transform.position, results[0]);
        }
        else {
            isGrounded = false;
        }
    }
}
Then, in the Jump Script, to snap the object to the floor whenever it’s grounded, I can set its height to the Surface Position’s Y value, plus an offset to account for the height of the player.
Like this:
if (groundCheck.isGrounded && velocity < 0)
{
    float floorHeight = 0.7f;
    velocity = 0;
    transform.position = new Vector3(transform.position.x, groundCheck.surfacePosition.y + floorHeight, transform.position.z);
}
The result is a smooth jumping action, created by moving the object’s Transform, but that doesn’t fall through the ground, or get stuck in it.
Which looks like this:

You’ll have to take my word for it, but this jump doesn’t use any physics!
How to snap the player to the floor in 3D using a Raycast
Snapping the player to the floor in 3D works in a similar way to 2D, as both the 2D and 3D physics engines support very similar Overlap and Raycast functions that can be used to get a reference to a Collider.
For example, in 3D, I could use the Raycast function to get a reference to the Collider beneath the player with a Raycast Hit variable.
Like this:
public class GroundCheck3D : MonoBehaviour
{
    public float distanceToCheck = 2f;
    public bool isGrounded;
    public RaycastHit hit;

    void Update()
    {
        Ray ray = new Ray(transform.position, Vector3.down);
        isGrounded = Physics.Raycast(ray, out hit, distanceToCheck);
    }
}
This gives me a reference to the Collider, which I can use to call the Closest Point function.
Then, just like when working in 2D, all I need to do is snap the player’s vertical position to the Collider’s edge, plus an offset to allow for the height of the player, whenever they’re grounded.
Like this:
if (groundCheck.isGrounded && velocity <= 0)
{
    float offset = 1;
    velocity = 0;
    Vector3 closestPoint = groundCheck.hit.collider.ClosestPoint(transform.position);
    Vector3 snappedPosition = new Vector3(transform.position.x, closestPoint.y + offset, transform.position.z);

    transform.position = snappedPosition;
}
Using an object’s Transform can be useful for creating a smooth jumping movement that doesn’t rely on physics.
However, without physics, you will usually need to manage the object’s collision detection yourself.
Or will you?
While you will need to manually check for the floor and other static objects when creating your own jumping movement in 2D, in 3D, Unity provides a built-in Component that makes collision detection a little easier.
The Character Controller.
However, it doesn’t jump on its own…
How to jump in Unity using the Character Controller
The Character Controller component in Unity is a simple way to create basic movement, that is restricted by collisions, but without using a Rigidbody.
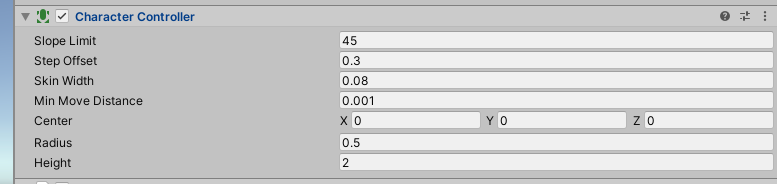
The Character Controller component adds simple collision detection, without using a Rigidbody.
It’s a useful way to quickly create character movement and works especially well with FPS controllers.
This is because, since all of the movement is Update based, the player’s view is always as smooth as the framerate of the game, without relying on interpolation.
So how can you use it to make a player jump?
While the Character Controller component can automatically detect collisions based on its movement, it doesn’t move, or jump, on its own.
To do that, you’ll need to use the Move function:
public CharacterController cc;

void MovePlayer()
{
    cc.Move(Vector3 movement);
}
The Move function essentially works like the Transform component’s Translate function.
This means that it’s possible to make a Character Controller jump in the same way as directly moving an object with its Transform.
In this case by adding Velocity when the Space Bar is pressed and applying gravity to work against it.
Like this:
public class CharacterControllerJump : MonoBehaviour
{
    public CharacterController cc;

    public float gravity = -9.81f;
    public float gravityScale = 1;
    public float jumpHeight = 4;

    float velocity;

    void Update()
    {
        if (Input.GetKeyDown(KeyCode.Space))
        {
            velocity = Mathf.Sqrt(jumpHeight * -2f * (gravity * gravityScale));
        }

        velocity += gravity * gravityScale * Time.deltaTime;
        MovePlayer();
    }

    void MovePlayer()
    {
        cc.Move(new Vector3(0, velocity, 0) * Time.deltaTime);
    }
}
However, the difference between moving an object with its Transform and moving a Character Controller using its Move function is that the Character Controller’s movement will be automatically obstructed by other Colliders.
This means that the Character Controller automatically knows when it’s on the ground, so performing a ground check is as easy as checking the Is Grounded property of the Controller.
Like this:
if (cc.isGrounded && Input.GetKeyDown(KeyCode.Space))
{
    // Jump !!
}
The Character Controller component provides a straightforward way to add movement, and jumping, to your game quickly and easily. It works particularly well for first person games and allows you to create collision-based movement without needing to use physics.
However, because the Character Controller works by checking the world around it, and adjusting its own movement accordingly, it doesn’t work as well with other moving objects.
While other objects can move the Character Controller, and even physics objects can be affected by its movement, the interactions are less precise than when using Rigidbodies.
Some interactions appear to work fine, while others don’t.
Generally speaking, if physics interactions are important in your game, the Character Controller may not do everything you want it to in the way that you want it to, and you may be better off using Unity’s physics system, by adding a Rigidbody component and making it move.
But, what if you want to use Unity’s physics system for collision detection but you don’t want to move your character with physics forces?
How can you jump and move, with the precision of explicit, Transform-based movement, but with a physics object?
How to jump using a Kinematic Rigidbody
A Kinematic Rigidbody is a physics object that is unaffected by physics forces. It has infinite mass and doesn’t fall under gravity.
To use a Kinematic Rigidbody, check the Is Kinematic checkbox on a Rigidbody component:
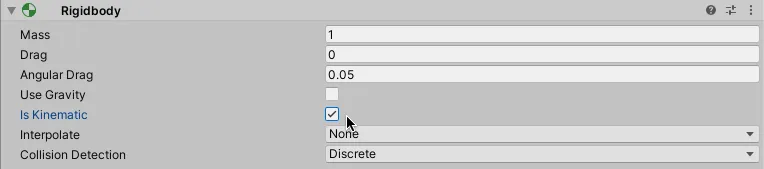
In 3D, use the Is Kinematic checkbox to set a Rigidbody to Kinematic.
Or, when working in 2D, select the Kinematic Body Type property:
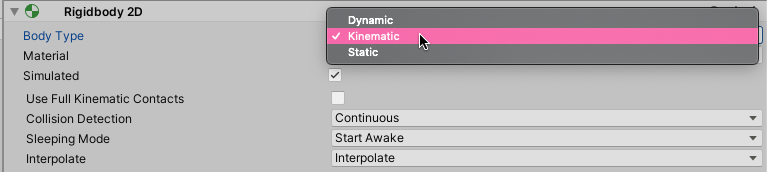
Select a 2D Rigidbody’s Body Type to set it to Kinematic.
So, if a Kinematic Rigidbody isn’t moved by physics, how do you move it?
A Kinematic Rigidbody can be moved using the Move Position function.
In 3D by passing in a Vector 3 for the object’s new position:
Rigidbody.MovePosition(Vector 3 newPosition);Or, in 2d, using a Vector 2:
Rigidbody2D.MovePosition(Vector2 newPosition);This moves the Rigidbody to a new, absolute, position which, in a similar way to moving the object with its Transform, can be used to make the object jump.
Like this:
public Rigidbody rb;

public float gravity = -9.81f;
public float gravityScale = 1;
public float jumpForce = 5;

float velocity;

void Update()
{
    if (Input.GetKeyDown(KeyCode.Space))
    {
        velocity = jumpForce;
    }
}

void FixedUpdate()
{
    float vPos = rb.position.y + velocity * Time.fixedDeltaTime;
    rb.MovePosition(new Vector3(rb.position.x, vPos, rb.position.z));
}
However, because a Kinematic Rigidbody has an infinite mass and isn’t affected by gravity, its movement will not be affected by other objects, even if they have Colliders attached.
Put simply, it’s an object that can move, but cannot be moved.
Which means that, if you use a Kinematic Rigidbody to control your character, you’ll need to generate your own gravity, just like with the Transform and Character Controller examples earlier:
velocity += (gravity * gravityScale) * Time.fixedDeltaTime;Also, despite being a physics object, Kinematic Rigidbodies aren’t obstructed by static Colliders.
Just like when moving an object with its Transform, you’ll need to manage the collisions of a Kinematic Rigidbody manually, otherwise, it will simply fall through the floor and pass through walls.
Like in the previous examples, this can be done with a Raycast, or an Overlap method, or by simply checking when the Rigidbody has collided with another object using the On Collision messages.
Like this:
void OnCollisionEnter(Collision collision)
{
    isGrounded = true;
}

void OnCollisionExit(Collision collision)
{
    isGrounded = false;
}
However, Kinematic Rigidbodies don’t recognise collisions with other objects by default.
For this to work, you’ll need to go into the Physics Menu, found in Project Settings and enable Kinematic Contact Pairs.
Like this:
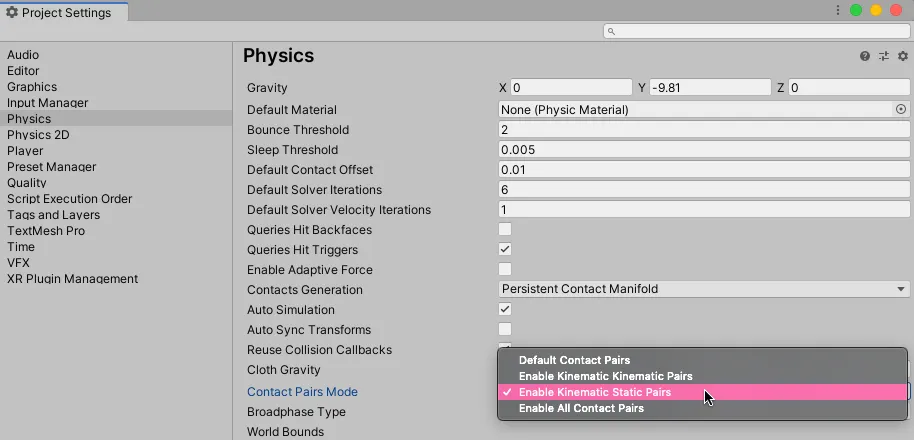
To allow Kinematic Colliders to recognise collisions with other objects, you’ll need to enable Kinematic Collision Pairs in the physics menu.
At this point, you might be wondering why you’d bother to use a Kinematic Rigidbody for your character controller at all.
After all, since moving a Kinematic Rigidbody involves managing the object’s movement and collisions manually anyway, why not just do it all with an object’s Transform?
Generally speaking, the purpose of a Rigidbody is to move a Collider.
So, if you want to attach a Collider to an object, and you also want to move that object around, you’ll probably need a Rigidbody to do it.
This is because moving a Collider without using a Rigidbody to do it can be bad for performance.
The right way to move a Static Collider in Unity
In recent years, there has been some confusion as to whether or not it’s ok to move a Static Collider, which is simply an object with a Collider attached to it, using its Transform.
Generally speaking, the advice was, if you’re going to move a Collider at all, you need to do so using a Rigidbody component. Either dynamically (using physical forces) or kinematically by using the Rigidbody’s Move Position function.
This is because moving a Static Collider used to trigger a rebuild of the physics simulation, which carried a heavy performance hit.
However, ever since Unity 5, when the 3D physics system was improved, the performance penalty for moving a Static Collider was, reportedly, fixed. So much so that, for some, it is now more efficient to move Static Collider objects using the wrong method, with their Transforms, rather than to move them explicitly using Kinematic Rigidbodies.
So what’s the right way to do it now?
Now, the general advice is to use what works best for your project.
While using Kinematic Rigidbodies to move a Collider can offer worse performance, if you need the complex features of the physics system, it will probably still be the best method.
However, for objects that don’t require complex physics behaviour, such as a simple door, or a moving platform, moving a Static Collider using its Transform is no longer a major issue.
However…
Because the 3D and 2D physics engines in Unity are different, while it’s ok to move a Static Collider in 3D, moving a Collider without a Rigidbody in 2D still carries the performance hit it always did.
Which means that, if you want to move a Static Collider in 2D, you’ll probably get better performance when using a Rigidbody component.
In any case, it’s generally a good idea to use a Rigidbody based option if your game relies on physics or complex collisions as this will allow you to make full use of the physics engine, natively.
And, while it can be a lot of work building a Kinematic Controller that works in the way you want it to, there are some very good ready-made options available on the Asset Store that can save you a lot of time, with excellent results. Such as the Kinematic Character Controller, which can make setting up a Kinematic character controller much, much easier.
Now it’s your turn
How are you making the character in your game jump?
Are you using physics?
Are you using the Transform component?
Or maybe you’re using a ready-made character controller system?
Whatever is, let me know by leaving a comment below.
Image attribution
Car vector created by upklyak – www.freepik.com

John French writes all of the Unity tutorials for Game Dev Beginner, and specialises in deep-dive guides teaching game development basics.

Comments
Great article! So many useful information in one place! Jumps in Unity always were confusing for me, and I didn’t understand what problem was. After your article I’ve made good-looking, juicy jumps for my game. Thank you very much for your work!
Thanks Alex! Glad it helped.
Great article! That sums up a lot about jumping.
Quick note: you forgot to add the rigidbody.mass when applying the gravity scale in 3D.
Thanks for the tip, I’ll add that in.
Sir, you are a lifesaver. I tried to make jump mechanism before with my vague knowledge of C# and Unity Scripting API, but I couldn’t understand it on my own. I nearly gave up, but your article popped up in search results and I am really grateful for your time and precise explanation of this subject.
Thanks Adam, really glad it helped.
Thank you so much for this article. You`re my saver
You’re welcome!
Hi John,
You have put together a very comprehensive and well-explained tutorial here. I just needed to say thanks for your effort.
Cheers
Andrew
Thanks Andrew, I appreciate it.
Hi John,
Thank you for posting this.
I was experimenting with your VariableJump code and I noticed that it’s possible to continue to jump even while the Rigidbody2D was in the air by repeatedly pressing the space key. A (possibly problematic) fix for this is to add a check to see if the velocity.y is equal to 0 when checking if the space key is down like so:
if (Input.GetKeyDown(KeyCode.Space) && rb.velocity.y == 0)
{
...
Other than this approach is there something else you might suggest to address this issue?
Thanks again,
Ryan
Thanks Ryan, to answer your question, if you add another condition to the if statement (that checks for the spacebar press) to also check if the player is grounded, that should solve this problem. That way a jump can only be started from the ground.
Hi John, thank you for posting this post it’s very helpful but I have a one problem.
When I tried jump player with physics, it gets force bounce when hit other collider. How can i solve it ?
You might need to show me what’s happening that you don’t want to happen so that I can understand the issue better. If you’re able to send me more information, email me at [email protected]
Awesome article! You helped me answer the question “how to do a fixed height jump in Unity?” I don’t know much about physics so the formula you gave was a golden nugget for me.
Thank you, glad it helped!
이것은 정확히 내가 찾고 있던 답이었습니다.
내장된 물리엔진을 써야 하는지, 따로 구현해서 내가 원하게 조절할 수 있을지에 대해 고민을 했는데, 이 글을 읽고 정리를 할 수 있음에 감사합니다.
감사합니다
I’m a Korean developer, so I’m not sure if this sentence translated by Google will be delivered well.
This was exactly the answer I was looking for.
I was thinking about whether I should use the built-in physics engine or if I could implement it separately and control it as I want, but I am grateful for reading this article and being able to organize it.
Thank you, I’m happy to hear that it helped you!
Hi John, with public GroundCheck groundCheck; visual studios informs me that GroundCheck could not be found (are you missing a using directive or an assembly reference)
I’m not entirely sure how this is used or made to work in the script?
Just to double-check, in this example, GroundCheck is a separate class that was shown earlier in the article that checks for colliders in Update and sets a bool to true or false. If you don’t also have that class in your project you’ll get this error when you try to reference it. If you already knew that and the issue is something else, my apologies. If you’re still having problems with it, email me at [email protected] and I’ll try to help.
Tutorial muy útil, de los mejores que he visto en años en internet sobre unity.
¡Gracias Pedro!
Your articles are gold. Now I understand a lot of more about Movement in Unity. Thanks for sharing!
Thanks so much!
Really incredible tutorial. Amazing. Jawdropping. One of the best & more complete and explained Unity tutorials I’ve ever seen. Congratulations and keep on this fantastic job.
Thanks so much!
Great article! For the physics-based jump script, I’m curious how you anticipate it coexisting with other physics-based abilities. For example, given a jump script that applies falling gravity scale on descent, and a dash script that suspends gravity on dash, when my test character performs a jump and air dash, then character’s rigid body rapidly alternates between the zero gravity of the dash script and the falling gravity scale of the jump script, resulting in a stilted descent. I assume the problem scales with the number of physics-based scripts that could impact the rigid body.
I’ve been looking for a general/scalable solution to this type issue that can resolve the conflict without (1) tightly coupling the scripts (e.g. passing an “isJumping” or “isDashing” boolean from one to the other); or (2) implementing a preposterously complicated finite state machine that relies on a globally necessary and globally mutable context object. I read your article on events and feel like the single rigid body ought to be manipulated by a stream of events, but I’m not sure if this is the right direction.
Hi Kevin, thanks for your feedback. To answer your question, I would guess that if you’re regularly manipulating physics in an out-of-the-ordinary way, you might want to ask yourself if you need to use the physics system at all for what you’re doing? (i.e. would you be better off writing your own transform-based physics that’s easier to modify?) and, if you need to manipulate the gravity of an object from multiple scripts, do you need to use separate the scripts? Or would it be possible for you to keep them together in one class? Alternatively, if you want to keep scripts separate, you could manage the physics of an object from one script and give every physics script on the object a reference to it. That might give you more control than dealing with the rigidbody directly.
Hope that helps, email me at [email protected] if you think I can help.
Very comprehensive and easy to follow. Very well done!
Thank you!
Wow! I normally help people but this actually helped me better understand all the different ways to go about doing this in a easy to learn fashion and even changed how I went about doing my jumps! Kudos good sir! Awesome article!
Happy to help!
This article helped me so much while designing my jump. The only thing I can say is that it’s a REAL and HUGE treasure !! It’s one thousands time better than most of You Tube tutorials on this subject.
I would recommend this documentation to every game dev who would like to implement any kind of jump for his game ! HUGE Time saver, very well explained & very straightforward !
Thanks so much!
Hi,
in 3d platform
void Update()
{
center = transform.localPosition + Vector3.down * overlapBoxOffset;
int numberOfDetectedCollider = Physics.OverlapBoxNonAlloc(center, transform.localScale * 0.5f, cols);
//Debug.LogWarning(“Collider name : ” + cols[0]);
//Debug.LogWarning(“The Number Of Colliders : ” + numberOfDetectedCollider);
if (numberOfDetectedCollider > 0)
{
isPlayerGrounded = true;
closestPoint = Physics.ClosestPoint(transform.position, cols[0], cols[0].transform.position, cols[0].transform.rotation);
Debug.LogWarning(“Player is Grounded”);
}
else
{
isPlayerGrounded = false;
Debug.LogWarning(“Player is not Grounded”);
}
}
this may bring a problem because this requires the collider to be a convex ^^
Could you explain the potential issue a little more? This isn’t a problem I’ve run into so I’m not familiar with it.
I found all the problems in my game that you talk about in the article. And falling through the ground, gravity not working and many other things. But with the help of your article everything works perfectly now. Very useful article, thank you very much! Added your site to my favorites 🙂
Happy to help!
i’m coming from youtube and confused. video is different than this. so is this updated version ? should i follow video or this article. thank you.
The video will be newer, and I would have changed it to make it flow better. What’s confusing you? Can I help?
i got it 🙂 thank you.