
Making a camera follow the player in Unity can be a relatively simple thing to do.
However, because there are so many different ways of doing it, choosing the method that’s right for your project can be a little tricky.
For example, do you want a rigid camera, that tightly follows the position of the player as they move through a 2D world?
Or do you want a smooth camera movement, that follows an object’s position in 3D, naturally and gradually over time?
And how will you build your camera system?
Will you use Cinemachine, Unity’s built-in suite of cinematic camera tools, or will you write it yourself using custom code?
There’s a lot to consider, but don’t worry.
In this article, you’ll learn the basic methods of creating a camera that follows the player in Unity, both with Cinemachine and without it, so that you can choose the option that’s right for your game.
Here’s what you’ll learn on this page:
- How to follow the player with a camera
- How to follow an object with the camera smoothly
- How to follow the player with a camera in 2D (using Cinemachine)
- How to make a third-person camera follow the player in 3D
- How to follow behind the player with a camera
Let’s get started…
How to follow the player with a camera
Generally speaking, there are two main ways to create a camera that follows the player in Unity.
You can build your own camera system manually which, while it can be tricky, gives you complete control over how your camera moves and how it follows the player.
Which can be great if you want to keep your camera system simple and lightweight.
Or, you can use Cinemachine, which is Unity’s built-in suite of camera tools, to quickly build different types of camera system without using any code at all.
Cinemachine is an extremely powerful tool, providing a wide range of ready-made cameras that are highly customisable and are, typically, very easy to use.
As a result, it’s generally a good idea to decide if Cinemachine can offer the type of camera you want before trying to build one yourself as, otherwise, you may find yourself trying to build a feature or mechanic that already exists inside of Cinemachine as a ready-made option.
So what is Cinemachine, and should you be using it?
What is Cinemachine and how does it work?
Cinemachine is a collection of camera tools in Unity that allows you to quickly and easily create different types of camera system, without having to code the logic of it yourself.
It works by connecting one or more virtual cameras to your existing main camera, allowing you to arrange multiple shots within a scene.
It’s sometimes associated with linear media, such as computer-animated video and in-game cutscenes, due to the wide range of compositional and framing options that allow you to create cinematic scenes inside of Unity.
However, Cinemachine also provides extensive support for in-game camera controllers, with ready-made options for third-person cameras, orbital cameras and side-scrolling 2D cameras.
Which makes a lot of sense.
After all, every game needs a camera and, while there are many different types of camera system that you could use in your game, most will fall into one of a few common camera types and many will require similar types of features.
Such as how to move, what to look at and camera-based effects, such as camera shake and sway.
As a result, if you’re building any type of complex camera controller, Cinemachine should absolutely be the first thing you try, as it provides ready-made solutions for common camera types and mechanics, potentially saving you a huge amount of time.
However, if you’re not sure if you want to use Cinemachine yet, or if you’re not sure what type of camera system it is you’re trying to build, it can help to understand how following an object with the camera works first.
Which, whether you’re using Cinemachine or not, generally starts with choosing an object to follow.
How to make the camera follow an object
Typically, making the camera follow another object, such as the player, involves specifying a target position for the camera to move to.
This could be a child object of a complex character, such as the player’s head, or a single object’s position, such as a 2D sprite.
However, in all cases, you’ll typically need to add an offset to the target’s position, to keep the player in view.
For example, to follow a 2D object, you might offset it by two units vertically, placing the object in the lower half of the frame, and ten units back, to prevent it from clipping the camera.
The camera object can then be moved to the offset position, typically inside of Late Update, following the player as they move.
Like this:
public Transform target;
public Vector3 offset = new Vector3(0, 2, -10);

private void LateUpdate()
{
    transform.position = target.position + offset;
}
Placing the position change in Late Update prevents the camera from trying to move before the player does.
This is because the order of Update, or Fixed Update, function calls, where the target object’s movement is most likely to happen, is not guaranteed by default.
Meaning that, unless you change the execution order of your scripts, the camera’s Update function could be called before the player’s, delaying its movement.
Placing the camera’s movement in Late Update schedules it after all Update functions have taken place and is typically how you’d stage logic that’s designed to happen after everything else during a frame.
Alternatively, it’s possible to achieve the same effect by making the camera object a child of the player.
This causes the camera to be moved with the object in exactly the same way except that, unlike when moving the object using a script, the camera is moved with its parent.

However, you may not want to move your camera by attaching it directly to the player.
Why not?
While setting the camera as a child of the player will make it follow the object exactly, this happens because the camera is, effectively, part of the player object.
Which, if you want the camera to move as if it’s stuck to the player, is fine.
But, if you want your camera to follow the player, instead of moving with them exactly then, chances are, you will want your camera to be able to ignore some of the player’s movements.
For example, when working in 2D, you may want to ignore the vertical movement of the camera, so that it follows the player along the x-axis only.
Like this:
public Transform target;
public float height = 2;
public float depth = -10;

private void LateUpdate()
{
    transform.position = new Vector3(
        target.position.x,
        height,
        depth
        );
}
In this example, the camera copies the horizontal position of the object it’s following but uses its own local offset values for height and depth.
The same approach could be used to create an Isometric Camera that follows the player’s movement on the X and Z axes, but not the Y.
Like this:
public Transform player;
public Vector3 offset = new Vector3(-20,20,-20);

private void Start()
{
    transform.rotation = Quaternion.Euler(35.264f, 45f, 0);
}

void LateUpdate()
{
    Vector3 target = new Vector3(player.position.x, 0, player.position.z) + offset;
    transform.position = target;
}
This can only work because the camera and its target are separate objects, meaning that the camera is able to move to a target position near to the player object, but without being directly influenced by its movements.
This also means that the camera is able to move at a different speed, which is useful if you want to create a camera that follows the player object smoothly.
How to follow an object with the camera smoothly
If you don’t want your camera to follow the player rigidly, as if it’s stuck to the player object, it’s possible to move a camera smoothly towards the player’s position instead.
This typically involves easing the movement of the camera towards its target, so that it moves with a delay, slowing as it gets closer.
But what’s the best way to do that?
While there are a number of different ways to ease the movement of an object, some methods are better suited for camera movement than others.
For example, it’s possible to create a smooth camera movement using Lerp, which gradually adjusts the position of the object towards its target by moving it a percentage of its distance each time it’s called, slowing the object’s movement as it gets closer.
And while this method does kind of work, and is an extremely common example of camera movement easing, it’s not really how Lerp is supposed to be used, as it will typically result in a camera movement that eases down constantly and that never quite reaches its target.
So what else could you do?
Another method to slow the movement of a camera is to use Move Towards, which can be useful for moving an object towards a position at a specific speed.
However, this kind of movement isn’t eased, it’s only delayed, and only then if the player is able to move faster than the camera. Which also means that the player will be able to outrun the camera, which isn’t ideal.
So what’s the right way to do it?
One of the best methods for moving a camera smoothly towards a target is to use Smooth Damp, which eases the value of a Vector 3 towards a target value over an approximate period of time.

This works well for camera movement because it means that, even though the camera object is smoothly eased towards its target, the player won’t be able to outrun it, since the speed of movement is based on time, allowing the camera to move faster or slower to achieve the approximate movement duration.
So how does Smooth Damp work?
How to use Smooth Damp to smooth an object’s movement
Smooth Damp is a mathematical function in Unity that eases a value, such as float, or in this case a Vector 3, towards a target smoothly, easing its movement at the beginning and end of its travel.
It works by setting the value that you want to smooth to the result of the Smooth Damp method, by passing in parameters for the current value, such as the object’s current position, the target it’s trying to reach, a local vector 3 value for the velocity of the movement, which is referenced using the ref keyword, and a smooth time value, which controls how quickly the value will change.
Like this:
public Transform target;
public Vector3 offset = new Vector3(0, 2, -10);
public float smoothTime = 0.25f;

Vector3 currentVelocity;

private void LateUpdate()
{
    transform.position = Vector3.SmoothDamp(
        transform.position,
        target.position + offset,
        ref currentVelocity,
        smoothTime
        );
}
The ref keyword allows the function to use a local variable when it’s called, in this case a Vector 3 to store the velocity of the movement between frames.
This allows the function to ease the movement over time, despite being called on a frame-by-frame basis.
While the Smooth Time parameter allows you to control how long the value change will take to complete, roughly, in seconds.
So, for example, passing in a value of 1 will mean that the camera will take roughly one second to move to a its new target position, assuming that the position it’s trying to reach doesn’t change before it gets there.
In practice, the amount of time that’s actually taken is typically longer than the value that’s passed in, but setting the smooth time value still allows you to control the overall speed of the smoothed movement, where a lower value, close to zero, will create a tighter camera, and a higher value, such as 1 or more seconds, will result in a much looser camera movement.
The benefit of this method is that it eases the camera towards the target smoothly, but because the function, by default, isn’t constrained by a maximum speed, the time that it takes to move to its target is appropriate for the speed of the object it’s following, meaning that you can’t outrun the camera, no matter how fast you go.
Which is why Smooth Damp is, generally, one of better methods for moving a camera towards a target object, smoothly.
If you want to write the code yourself that is.
While setting up a simple camera can be simple to do yourself in a script, it’s possible to create a smooth following 2D camera just like this one without any code, using Cinemachine.
Here’s how…
How to follow the player with a camera in 2D (using Cinemachine)
One of the biggest benefits of Cinemachine is that it can be used to create common camera types quickly and easily without writing any code.
So how does it work?
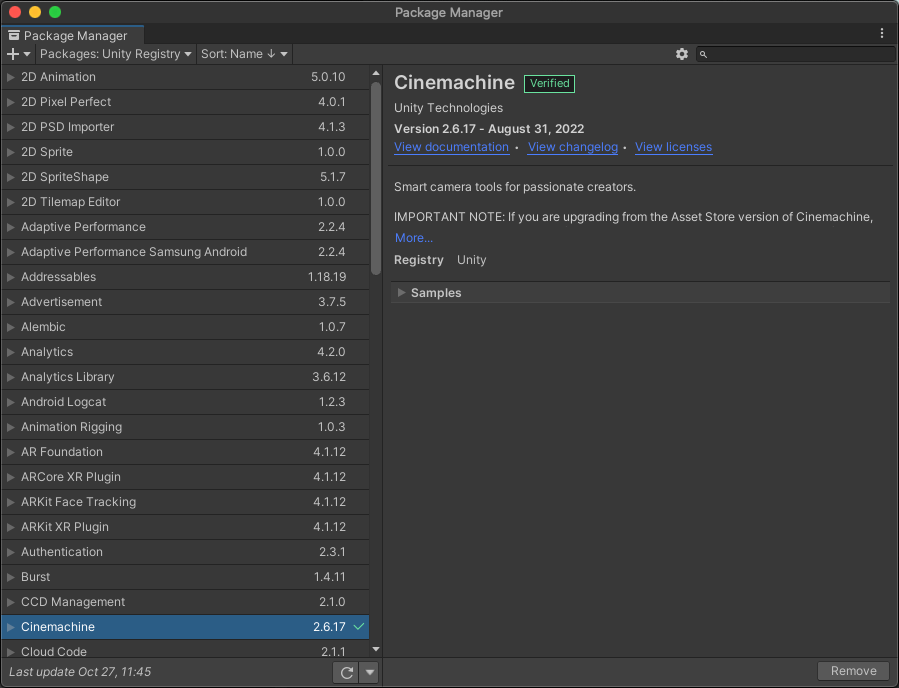
To use it, first, you’ll need to install Cinemachine using the Package Manager.
Simply select Window > Package Manager and search for Cinemachine in the Unity Registry.
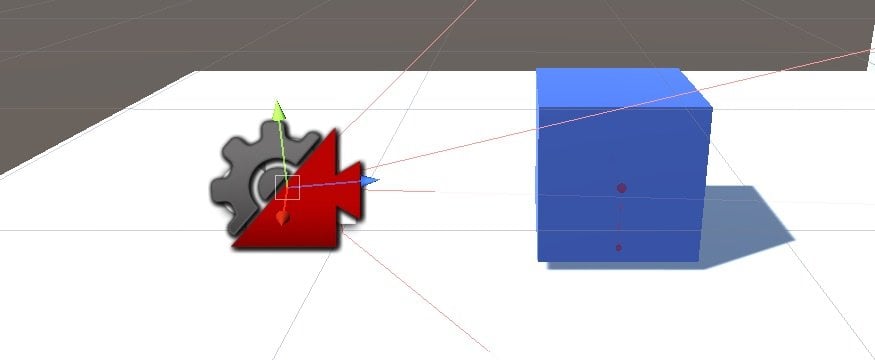
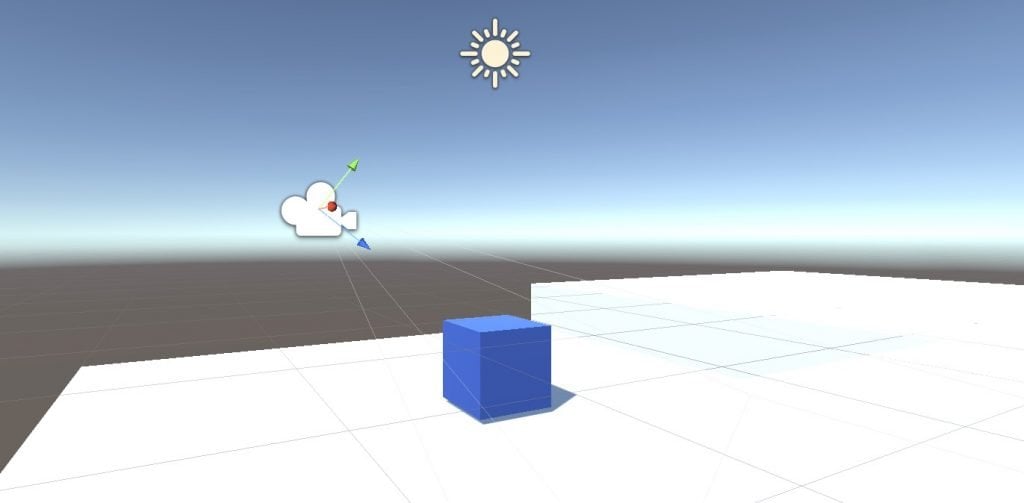
Once it’s installed, you’ll be able to use Cinemachine to create Virtual Cameras in your scene, which will work with your existing Main Camera, changing what it sees.
The idea is that each virtual camera acts as a different shot, allowing you to switch between different viewpoints easily and automatically.
Which can be great for linear media, such as videos and cutscenes, as it makes capturing a scene from multiple viewpoints easier to do.
However, a virtual camera can also be a type of dynamic camera, such as one that follows the player for example.
To create a new virtual camera, select the Cinemachine menu item and click Create Virtual Camera.
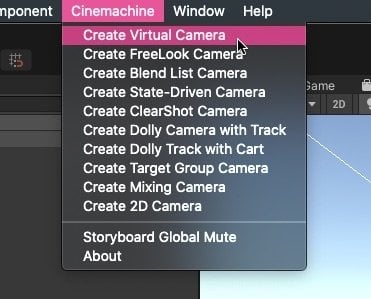
This will create a new virtual camera in your scene and add a Cinemachine Brain component to your main camera, if there isn’t one there already.
You’ll then be able to adjust the virtual camera’s settings, to change what the main camera can see.
Each camera accepts a Follow Target and a Look At Target which is the object in the scene that the camera will look at and move towards.
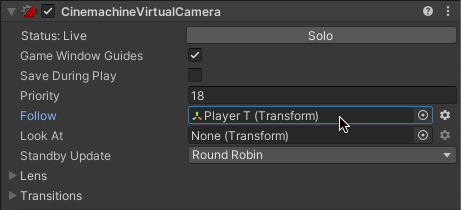
Exactly how it moves towards the follow target is defined by the camera’s Body Properties.
Cinemachine body properties
A virtual camera’s Body properties decide how it will move in the scene in response to the object it’s following.
Once you’ve set a Follow Target, you’ll be able to set different movement options inside of the Body Properties section depending on which Body Profile you select.
For example, the Do Nothing profile, simply means that the camera will not move, while the Transposer profile moves the camera towards a target with a basic offset.
The Body Profile enables different settings configurations, depending on the type of movement you want.
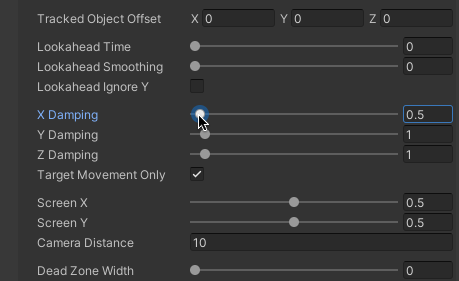
The Framing Transposer can be useful for creating a 2D side-scrolling camera that will follow the transform position of its target, typically from a fixed perspective.

Adjusting the Damping settings, which is a set of sliding scale values between 0 and 20 for the X, Y and Z axes, allows you to set the duration of the camera’s movement, in a similar way to using the Smooth Time setting when using Smooth Damp, allowing you to create a smooth following camera, that works just like the manual smooth camera, relatively quickly.
However, that’s not all that the Framing Transposer can do.
In some cases, just moving the camera towards the object may be all that you want, however there are a number of additional features that are common to 2D camera systems that can easily be recreated using Cinemachine and the Framing Transposer’s built-in settings.
Such as moving the camera as the player reaches the edge of the screen for example.
How to move a 2D camera at its edges
In some 2D games, it can be common for the camera to only move when the player gets closer to the edge of the screen meaning that, when they’re in the centre of the screen, they are able to move a limited distance, without the camera following them.
In code, this can be quite tricky to do as it typically involves defining bounds around the edges of the screen that push the camera in the player’s direction when entered.
However, using Cinemachine, the same functionality can be pretty easy to recreate.
When using the Framing Transposer body setting, two sets of bounds are automatically created, the Soft Zone, in which the camera will ease towards the player, and the Dead Zone, where the player is free to move without affecting the camera’s movement.
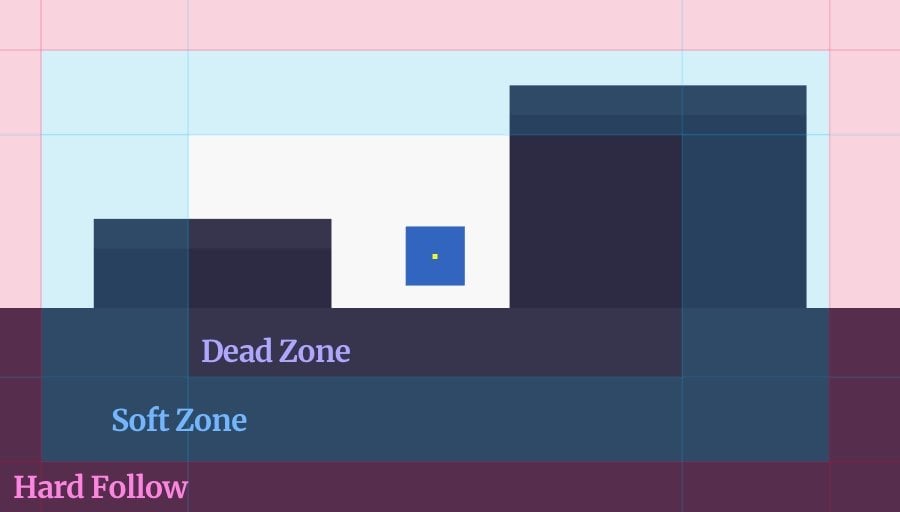
Inside the Dead Zone, the player won’t move the camera, while in the Soft Zone, the camera will follow the player smoothly. At the outer edges, in the Hard Follow Zone, the player will push the camera, forcing it to move.
Outside of the soft zone, the camera is forced to keep up with the player, essentially pushing the camera along to move with them.
Alternatively, you can use an unlimited soft zone, which will always smooth the movement of the camera.
You can even adjust the height and width of each zone, so that the camera responds differently to horizontal and vertical movement.
As a result, if you want to create a 2D camera that is moved when the player approaches the edge of the screen, Cinemachine is generally the best way to do it.
However, if you don’t want to use Cinemachine, it’s also possible to create the same camera edge-pushing effect, without it, using code.
How to create 2D camera bounds (without Cinemachine)
Creating a 2D camera that moves when the player approaches the edge of the screen, but without using Cinemachine, can be quite tricky.
To do it, you’ll need to detect if the player is moving into the bounds of the screen edges and, if they are, adjust the position of the camera to follow them.
A basic way to do this is to calculate the player’s position as it is on the screen, using the World to Screen Point function.
This converts a real-world position in units to a screen position in pixels.
The result can then be compared to margins that are created with the Viewport to Screen Point function, which allows you to convert a position on the viewport, expressed as a percentage, into a pixel position that can be compared to the player’s position, so that you can check if the player is close enough to a screen edge to move the camera.
Like this:
public class FollowCameraBounds2D : MonoBehaviour
{
    public Transform player;
    public Camera cam;
    public float horizontalMargin = 0.3f;
    public float verticalMargin = 0.4f;

    public float depth = -10;

    Vector3 target;
    Vector3 lastPosition;

    public float smoothTime = 0.25f;
    Vector3 currentVelocity;

    private void LateUpdate()
    {
        SetTarget();
        MoveCamera();
    }

    void SetTarget()
    {
        Vector3 movementDelta = player.position - lastPosition;
        Vector3 screenPos = cam.WorldToScreenPoint(player.position);
        Vector3 bottomLeft = cam.ViewportToScreenPoint(new Vector3(horizontalMargin,verticalMargin,0));
        Vector3 topRight = cam.ViewportToScreenPoint(new Vector3(1-horizontalMargin, 1-verticalMargin, 0));

        if (screenPos.x < bottomLeft.x || screenPos.x > topRight.x)
        {
            target.x += movementDelta.x;
        }

        if (screenPos.y < bottomLeft.y || screenPos.y > topRight.y)
        {
            target.y += movementDelta.y;
        }

        target.z = depth;
        lastPosition = player.position;
    }

    void MoveCamera()
    {
        transform.position = Vector3.SmoothDamp(transform.position, target, ref currentVelocity, smoothTime);
    }
}
What this does is, if the player moves into the vertical or horizontal margins of the camera, which are expressed as float values, up to a maximum of 0.5 (half of the screen), the distance they moved since the last frame is added to the position of the camera target.
Meaning that the player will push the target position up, down, left or right, depending on where there are on the screen.
The camera can then be smoothly moved towards the target position, using Smooth Damp, or it can be set to match its movement exactly by changing the camera’s position to match the player’s.
How to follow a Rigidbody object smoothly
When matching the position of a camera to a Rigidbody object, you may find that the movement of the game seems… more jerky, than it did before.
This is because the movement of a physics object is updated in Fixed Update, the physics system update call, which usually happens at a slower rate than Update, at 50 fps by default, meaning that the movement of the object is typically being processed at a slower framerate than the game.
While it’s not uncommon for physics systems to be processed at a slower framerate for performance reasons, and while it may not be noticeable for most physics objects, it can be obvious when the focus of your attention, such as the player object, is updating less frequently than the rest of the game.
What’s worse, by locking a camera to the position of the player, the entire view of your game will then be affected in the same way, appearing to run at a lower framerate when moving, no matter how fast the game is actually running.
To fix it, simply enable interpolation on the player’s Rigidbody. This will blend the less frequent Fixed Update movements together, so that they appear to run as fast as everything else, smoothing out the movement of your player and of the camera that’s following it.

Enabling Interpolation smooths out physics-based movement, which can be extremely obvious when a camera is following a physics object.
While moving an object to a fixed offset position can be useful for following an object in 2D, deciding exactly where a camera should put itself around an object in 3D, can be a little harder to do.
How to make a third-person camera follow the player in 3D
Following the player with a camera in 3D is similar to doing it in 2D, as it involves the same basic method of moving the camera towards a target position near the player.
However, what’s different is that, because the camera is able to approach the player from all directions, you’ll need to decide exactly where around the player the target should be.
One method is to move the camera to a target point that’s within a certain distance of the player.
This works by calculating the direction between the player and camera as a unit vector, which is a directional vector with a length of one.
Like this:
Vector3 direction = transform.position - player.position).normalized;This represents a direction value starting from the player’s position and moving towards the camera.
Which, when multiplied by a distance value, pinpoints a target position in the world that’s a set distance from the player, but in whichever direction the camera happens to be.

Multiplying a Unit Vector by a float value creates a vector with a specific length, which is useful for finding a point in a specific direction.
This position can be used as the camera’s target, meaning that all you need to do is move the camera object towards the target position, using the same Smooth Damp function as when working in 2D.
Like this:
public class FollowCamera3D : MonoBehaviour
{
    public Transform player;
    public float distance = 3;

    public float smoothTime = 0.25f;
    Vector3 currentVelocity;

    void LateUpdate()
    {
        Vector3 target = player.position + (transform.position - player.position).normalized * distance;
        transform.position = Vector3.SmoothDamp(transform.position, target, ref currentVelocity, smoothTime);
        transform.LookAt(player);
    }
}
This will smoothly move the camera to the nearest position that’s 3 units away from the player, while the Look At function will rotate the camera to face the player as it moves around it.
How to prevent the camera from moving below the player
A common issue that can occur when using this method is that the camera, if the player is able to jump in your game, will often end up below the player, in a position that isn’t necessarily incorrect but that is generally unhelpful.
One way to solve this is to simply adjust the target position if it ever falls below the player’s vertical position.
Like this:
if (target.y < player.position.y)
{
    target.y = player.position.y;
}
This will push the camera up to match the height of the player, instead of moving below it.
While it may sometimes be the case that you do want the camera to be able to move beneath the player, a lot of the time, if you’re trying to build a camera that simply follows the player around, keeping it at or above the player’s level can help to make the camera feel more natural.
This method of moving a camera to a position somewhere around the player is extremely common in 3D platform games, where the player is able to move independently from the camera while it follows them around.
However, using this method can get tricky when you also want to allow the player to rotate the camera around themselves manually, using the right thumbstick, or the mouse, for example.
Why can it be tricky?
Actually building the mechanism that rotates the camera around the player object isn’t necessarily difficult to do.
For example, it’s possible to use the Rotate Around function to move the camera around the object on a horizontal and vertical axis.
What can be tricky is switching between the two systems when the camera may have repositioned itself while moving.
For example, if you rotate the camera around the player object yourself, and then move to a new position that causes the camera to rotate around the object further, unless you keep track of the difference in rotation, the original manual rotation settings will still apply, causing any new change to pick up from a different point to the camera’s current location.
And while it’s not an impossible problem to solve, blending different mechanics together like this, particularly when they’re based on very common camera features, can be much easier to do using Cinemachine instead.
How to rotate the camera around an object (using Cinemachine)
Cinemachine provides a number of ready-made camera options that can create a natural following camera that can also be rotated.
So how does it work?
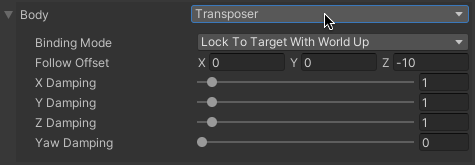
To create a camera that simply follows the player around, using Cinemachine, select the Transposer body option with the Simple Follow binding mode.
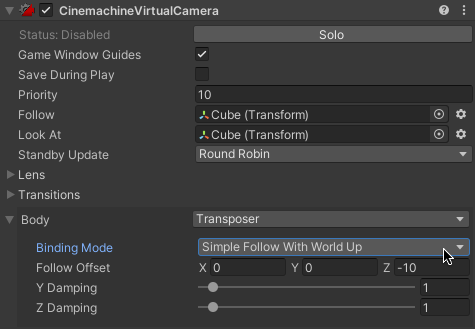
The Transposer body profile moves the camera towards the object, while the Simple Follow binding mode creates a basic 3D camera that follows the object around.
This will create a simple following camera that moves towards the player, or any other target, with an optional offset and damping.
The result is similar to manually creating a camera that moves to a position near to the object it’s targeting, but not rigidly, meaning that the camera’s position around the object may change, depending on where it goes.
However, this configuration doesn’t allow the player to rotate the camera around the object themselves.
The Orbital Transposer profile, combined with the same Simple Follow binding mode, creates a camera that can be rotated around the player horizontally, on the X-Axis.
It will still follow the player naturally, adjusting its position as they move around the world, but can also be rotated manually, picking up where the automatic camera left off.
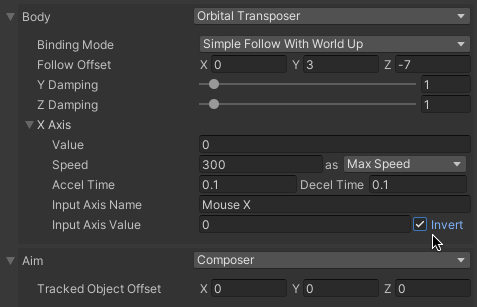
The Orbital Transposer body profile allows you to rotate a Cinemachine camera around an object on the X-Axis.
The X-Axis settings allow you to change how fast the camera can orbit around its target, which input axis will be used to move it and whether or not the movement should be inverted.
However, if you want to provide full orbital camera movement around an object, on both horizontal and vertical axes, you’ll need to use a different type of virtual camera to do it.
The Free Look Cinemachine camera can be used to provide XY control over a camera object.
Which, combined with the Simple Follow binding mode, creates a camera that automatically follows the player around, but that can also be moved manually, this time around the X and Y axes.
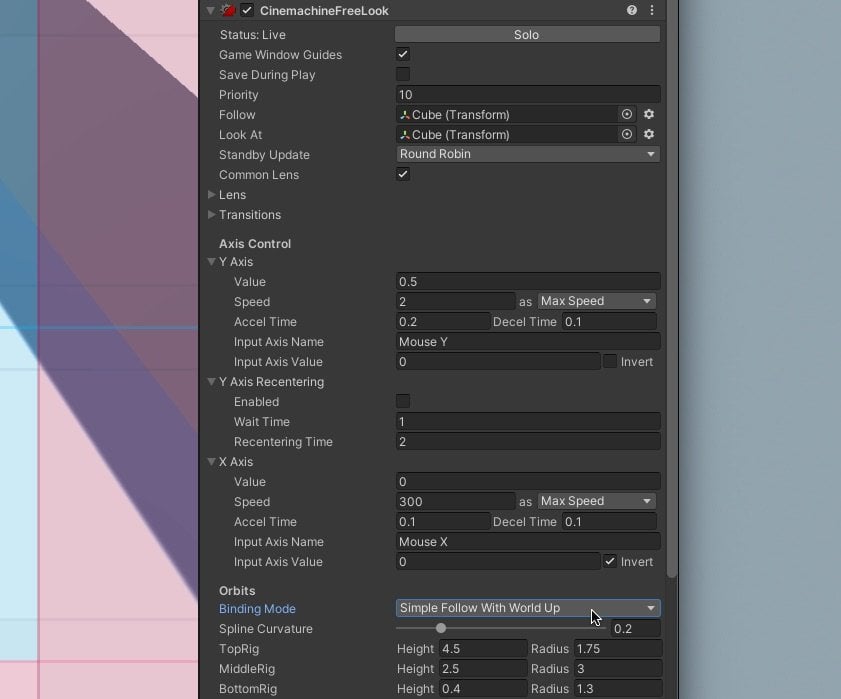
The Cinemachine Free Look camera, when combined with the Simple Follow binding mode, provides XY orbit control.
The Free Look camera settings provide controls to adjust the speed of both the X and Y axis inputs, as well as vertical recentering, allowing the camera to smoothly move back to a default position when the player isn’t manually controlling it.
While the Orbits section allows you specify exactly where the camera will position itself when orbiting around the target object.
It does this by blending between three orbits, the Top Rig, Middle Rig and Bottom Rig.
Essentially, each rig is an individual Orbital Transposer, with its own height and radius.
Adjusting the size and position of these three orbits allows you to create a custom shape that the camera can follow to move around the player.
Typically a sphere:
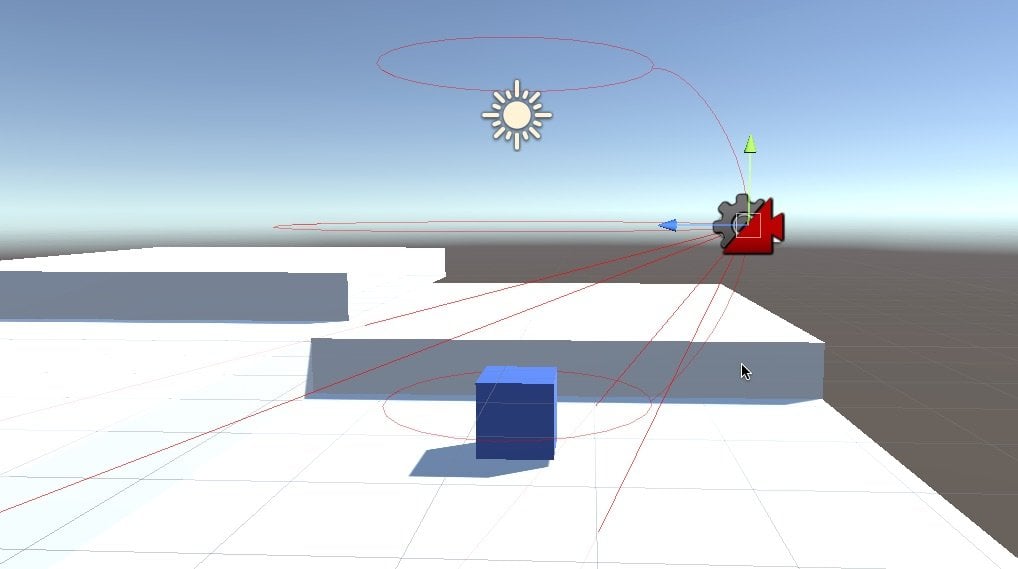
The orbit of the Free Look camera is defined by three rings, top, middle and bottom, that can be used to create a spherical shape around the object.
However, while you might normally create a sphere, the orbits also allow you to create less traditional shapes instead.
Such as a wide bottom ring, which can be used to move the camera out and away from the player when the camera gets too low,
Like this:
Customising the camera’s orbits allow you to change where the camera will position itself depending on its axis value.
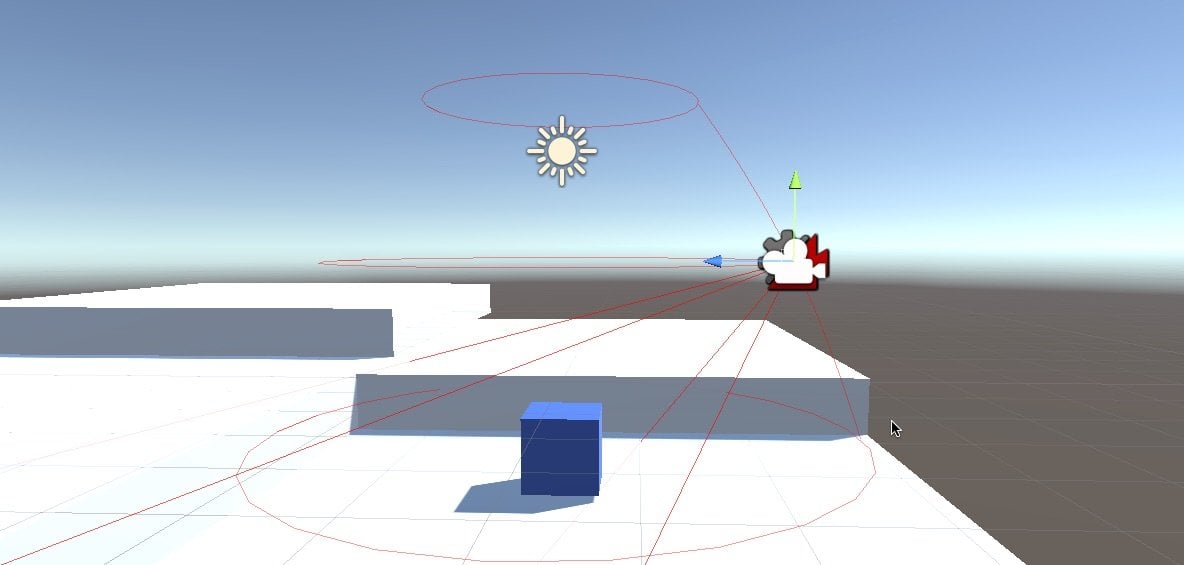
How to prevent the camera from moving through the world (using Cinemachine)
If you’re moving the camera around your player then, chances are, it’s going to move through part of the world as you approach the edges of your game’s environment.
It’s possible to avoid this by adding a Cinemachine Collider component to your virtual camera.
Like this:
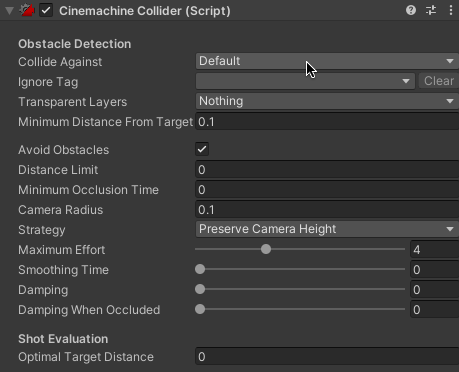
A Cinemachine Collider component stops the camera object from intersecting with the world as it moves around the player.
This will prevent the camera from moving into geometry, pushing it closer to the player object instead.
The Free Look camera allows the player to move the camera themselves when they want to, leaving it to loosely follow them around when they don’t.
But, what if you don’t want a loose camera?
What if you want a 3D camera that follows more tightly, behind the player, for example?
How to follow behind the player with a camera
Making a camera follow behind the player typically involves setting a target that’s offset from the object’s local forward direction.
Specifically, the opposite of their forward direction, negative forward, multiplied by a distance value and offset by the camera’s height.
Like this:
public Transform player;
public float distance = 3;
public float height = 2;
public float smoothTime = 0.25f;

Vector3 currentVelocity;

void LateUpdate()
{
    Vector3 target = player.position + (-player.transform.forward * distance);
    target += Vector3.up * height;
    transform.position = Vector3.SmoothDamp(transform.position, target, ref currentVelocity, smoothTime);
    transform.LookAt(player);
}
This will cause the camera to move to a position just behind the player, while still looking at them, which can be useful for creating a basic third-person camera that follows a player from a fixed rear position.
However, there’s a problem with this method.
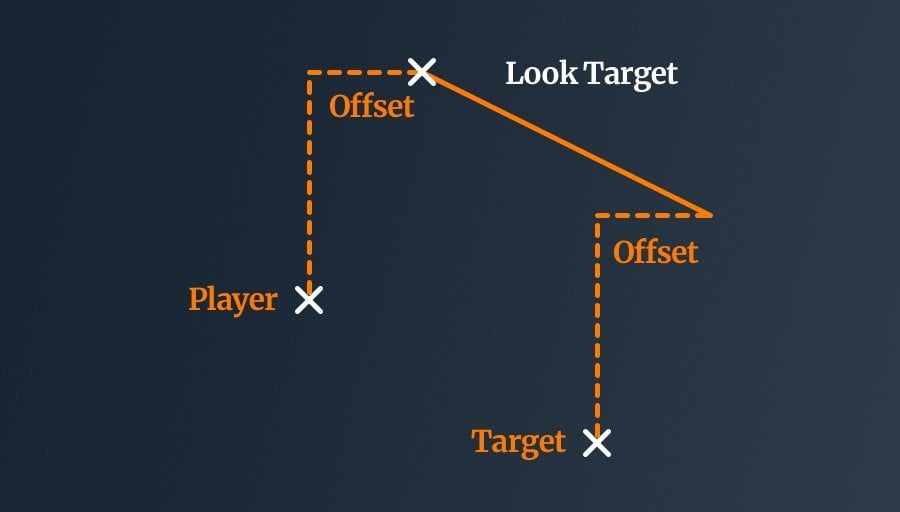
Cameras that are designed to follow behind a player, generally, act differently from a camera that simply follows the player’s position while looking at them.
For example, some third-person cameras, while following behind the player, look forward, aiming at a target point beyond their position, instead of directly at them, and sometimes at an offset to their horizontal position, such as over one of their shoulders.
While there are many different ways you could do this, one method of creating this behaviour in code involves adding the vertical height and horizontal shoulder offsets to the position target and the look target and easing them with the same smooth time value.
Like this:
public Transform player;
public float distance = 3;
public float height = 2;
public float shoulderOffset = 2;
public bool switchShoulder;
public float smoothTime = 0.25f;

Vector3 lookTarget;
Vector3 lookTargetVelocity;
Vector3 currentVelocity;

void LateUpdate()
{
    Vector3 target = player.position + (-player.transform.forward * distance);

    Vector3 verticalPosition = Vector3.up * height;
    Vector3 shoulderPosition = switchShoulder ? transform.right * -shoulderOffset : transform.right * shoulderOffset;

    transform.position = Vector3.SmoothDamp(transform.position, target + shoulderPosition + verticalPosition, ref currentVelocity, smoothTime);

    lookTarget = Vector3.SmoothDamp(lookTarget, player.position + verticalPosition + shoulderPosition, ref lookTargetVelocity, smoothTime);
    transform.LookAt(lookTarget);
}
Using the same offset for the camera’s movement and rotation target means that it looks straight ahead, past the player, from an offset position, instead of directly at the player, while still following just behind them.
How to create a third-person camera (using Cinemachine)
Creating a third-person, over-the-shoulder camera using Cinemachine can be pretty straightforward.
Simply add a new virtual camera and chose the 3rd Person Follow body profile.

The 3rd Person Follow body profile will follow just behind the player, while setting the Aim profile to Do Nothing, keeps the camera looking forward, instead of at the player.
In this example, no Look At target has been set and the Aim profile has been set to Do Nothing. This prevents the camera from looking at the player, instead of looking past it, over their shoulder.
The shoulder offset determines how far away from the player the camera will sit, while the Camera Side slider allows you to switch between left and right shoulders smoothly.
Now it’s your turn
Now I want to hear from you.
How are you making the camera follow the player in your game?
Are you using Cinemachine, or have you built your own camera system?
And what have you learned about working with cameras in Unity that you know someone else will find useful?
Whatever it is, let me know by leaving a comment.

John French writes all of the Unity tutorials for Game Dev Beginner, and specialises in deep-dive guides teaching game development basics.

Comments
Great article, very informative. It was useful on my 2.5D demo game. Thanks a lot.
Great to hear it helped!