
Very often in Unity, you may want to animate a button, move an object to a new position, smoothly fade audio or graphics or, perhaps, change the colour of something gradually over time.
And for those tasks, as well as many others, you’re probably going to need to use Lerp, one way or another.
What is Lerp in Unity?
Lerp, or Linear Interpolation, is a mathematical function in Unity that returns a value between two others at a point on a linear scale.
Most commonly it’s used for moving or changing values over a period of time.
It’s an incredibly common feature of Unity, and development in general,
However…
Surprisingly, it’s often misunderstood and can easily be used the wrong way, especially if you’re just getting started in Unity.
And, while this isn’t always a problem, it can lead to some unexpected results.
For example, it might mean that you can’t recreate the effect you want, or the Lerped animation may appear broken, or buggy or may not work at all.
Or, if you’re anything like me, you might occasionally forget how to use Lerp and need to look it up again every time you need to use it.
Which could be a lot.
But don’t worry, because that’s exactly what you’ll learn on this page.
In this post, I explain the basics of Lerp in Unity, when to use it and how to easily write a Lerp function (as well as how to add special effects, such as easing) with examples that you can use in your project.
What you’ll find on this page:
- How to use Lerp
- The right way to use Lerp
- Lerp slowing down at the end (how to stop it)
- Lerp with easing (the right way)
- How to Lerp by speed
- Why Lerp stutters (and how to fix it)
- Lerp Examples
- Using an Asset to Lerp (e.g. DOTween Pro)
Lerp in Unity: Overview video
For a general overview of how to use Lerp in Unity, try my video, or continue to the full article below.
Let’s start with the basic method…
How to use Lerp
The first thing that you need to know about Lerp, that will make it much, much easier to use, is that the basic Lerp calculation is actually very simple.
It’s how it’s used that often becomes complicated and confusing.
Here’s how Lerp works…
The Lerp calculation returns a value from a known range, which is specified using a minimum and maximum value (a & b). For example, a range of 0-100.
The value that’s returned is defined by a third value, the interpolation point (t) which returns a point on the scale between a and b.
The interpolation point that’s passed in is a float value between 0 and 1. Essentially, acting as a percentage between a and b.
For example…
An interpolation point of 0 (0%) would return the minimum value (in this case also 0) while an interpolation point of 0.5 (50%) would return a value halfway between the minimum and maximum value (in this case, 50).
Here’s what it looks like in scripting:
lerpValue = Mathf.Lerp(minValue, maxValue, interpolationPoint);And here are some examples:
float a = 0;
float b = 50;
float t = 0.5f;

lerpValue = Mathf.Lerp(a, b, t);

// Returns 25
float a = 10;
float b = 50;
float t = 1;
lerpValue = Mathf.Lerp(a, b, t);
// Returns 50You get the idea.
In this example, Lerp is being used to return a float, but it’s also possible to Lerp other values, such as colours and Vector3 values (more on that later).
It works in exactly the same way, retrieving a mid-point value from a range using a percentage interpolation point.
And that’s all there is to it.
That’s Lerp!
But how is that useful?
When would you use it?
And where does all the confusion come from?
The right way to use Lerp

Lerp can be used to create simple movement and animations.
A common use for Lerp is to produce an effect over a fixed period of time.
For example, to animate a button, fade the screen to black or move an object to a new position in a fixed amount of time.
This is done by increasing the interpolation point value from 0 to 1 over that duration.
Here’s how to do it:
- Create a timer, incrementing it every frame of the Lerp.
- Divide the time elapsed by the total duration of the Lerp.
- Pass in that value as the interpolation point (t).
For example, the script below will increment a value from 0 to 10 in 3 seconds time:
float timeElapsed;
float lerpDuration = 3;

float startValue=0;
float endValue=10;
float valueToLerp;

void Update()
{
  if (timeElapsed < lerpDuration)
  {
    valueToLerp = Mathf.Lerp(startValue, endValue, timeElapsed / lerpDuration);
    timeElapsed += Time.deltaTime;
  }
}
Simple right?
If you try this method, however, you’ll notice that the value doesn’t quite reach ten, often ending on a very close, but not exact, value. Such as 9.998 for example.
This is because the value that’s being used to measure if the Lerp is complete is time, not the actual value that’s being Lerped.
To fix this, ‘snap’ the value that’s being Lerped to the final target value after the Lerp is complete.
Like this:
void Lerp()
  {
    if (timeElapsed < lerpDuration)
    {
      valueToLerp = Mathf.Lerp(startValue, endValue, timeElapsed / lerpDuration);
      timeElapsed += Time.deltaTime;
    }
    else
    {
      valueToLerp = endValue;
    }
  }
Finally, because Lerp functions are often used to carry out an action over multiple frames, it can be helpful to place them in a Coroutine.
This makes them easier to write, easier to manage and, once they’re finished, they stop themselves.
Here’s the same example, written in a Coroutine:
float lerpDuration = 3;
float startValue = 0;
float endValue = 10;
float valueToLerp;

void Start()
    {
        StartCoroutine(Lerp());
    }

IEnumerator Lerp()
    {
        float timeElapsed = 0;

        while (timeElapsed < lerpDuration)
        {
            valueToLerp = Mathf.Lerp(startValue, endValue, timeElapsed / lerpDuration);
            timeElapsed += Time.deltaTime;

            yield return null;
        }

        valueToLerp = endValue;
    }
When used in this way, Lerp is a simple, helpful method for creating animations and movement
However,
Despite being simple, there are a surprising number of examples of Lerp being used the wrong way.
Or, at least, not in the way that Lerp is supposed to be used.
For example…
Lerp slowing down at the end (and how to stop it)

This slowing effect is actually a result of using Lerp the wrong way.
You may have seen this method of using Lerp before:
transform.position = Vector3.Lerp(transform.position, target.position, Time.deltaTime);Although it’s used often, it’s not how Lerp is supposed to work.
The clue is in the name, Linear Interpolation.
Linear!
And, while you can argue that the easing effect of the object slowing down is desirable, it has issues.
One of which is that the object will, most probably, never reach the target. It will just get closer and closer in ever-decreasing amounts.
However…
This kind of movement can be very useful.
Especially when you want to ease an object constantly, and smoothly, towards another object every frame (i.e. not over a fixed time scale). For example, when creating a camera follow script, such as this one by Brackeys (YouTube).
But,
There is a better way to do it.
While the Lerp method may work for you, Smooth Damp is specifically designed for just this kind of task.
It works in a similar way except that it will stop once it reaches the target (or at least, close enough) and it won’t overshoot.
Smooth Damp also works more smoothly, with some users having reported jerky movement when using the Lerp method which, although very slight, I also found to be true during my research for this article.
These methods create a constant, dampened movement towards another value.
But what if you want to Lerp over a fixed duration and you want to apply easing to the movement?
How to ease Lerp in and out (the right way)
When using Lerp over time, the change is even and linear.
This happens because the interpolation point value (t) that’s passed in is calculated by dividing time elapsed by the total duration and, every frame, increasing time elapsed by a linear amount (i.e. using Time.deltaTime).
But what if you don’t want linear movement?
What if you want to ease the start or end of the Lerp?
You can do this by modifying the interpolation point value after it’s calculated but before passing it into the Lerp function.
All you need is a formula, and which one you use depends on what kind of curve you want.
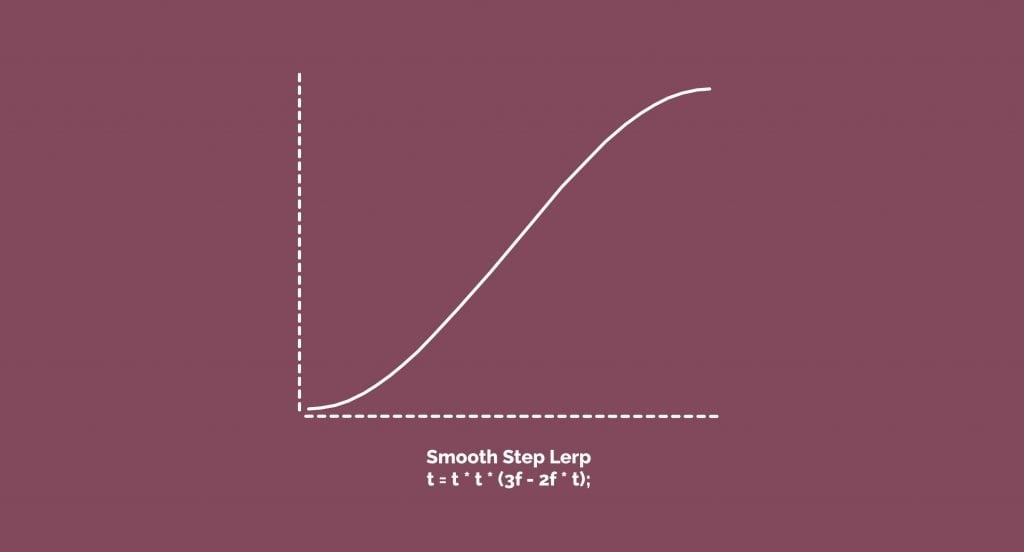
For example, the calculation below creates a Smooth Step Lerp movement:
float t = time / duration;
t = t * t * (3f - 2f * t);

transform.position = Vector3.Lerp(startPosition, endPosition, t);
This Lerp starts slow, is linear in the middle and then slows towards the end.
Here’s how it looks plotted over a chart:
And here’s what it looks like when applied to a Lerp movement script.
Notice the block speeding up as it starts and slowing down as it reaches the target:

Modifying the interpolation point value (t) eases the start and end of this movement.
Different easing effects can be achieved with different calculations.
For more curve formulas, try chicounity3d.wordpress.com or this article at febucci.com.
While calculating your own easing curve can be relatively straightforward, Unity also provides a built-in smoothing function.
Smooth Step works in the same way was Lerp, except that the rate of change is smoothed at the limits.
Like this:
float smoothedValue = Mathf.SmoothStep(start, end, t);Alternatively, tweening assets, such as DOTween Pro, feature built-in easing options (more on DOTween later).
Using Lerp by speed (instead of time)
Another commonly promoted use of Lerp is to change a value at a fixed rate.
Typically this involves incrementing a speed value that’s multiplied by Time.delta Time and then passing that in as the interpolation point.
Usually, it looks something like this:
void Update()
    {
        float valueToLerp = Mathf.Lerp(a, b, t);
        t += 0.5f * Time.deltaTime;
    }
Surprisingly, this is used in the official Unity documentation on Lerp, where the example shown uses an interpolation value of 0.5f + Time.deltaTime.
As with the slow down method, this is not how Lerp is supposed to work.
However, unlike before, there’s no obvious reason to use this method.
The calculation, in this case, does not perform movement over a set period of time working, instead, at a set speed.
And while you could argue that’s helpful, there are easier options for doing exactly that.
For example, to increase any value by one unit per second, simply increment it by one multiplied by delta time each frame.
There’s no need to use Lerp.
Like this:
if(value < targetValue)
{
    value += 1 * Time.deltaTime;
}
It’s also possible to move an object by a fixed speed using Move Towards, or rotate it with Rotate Towards.
So I’m not sure if this method of using Lerp to achieve a constant speed has a useful purpose.
And while I’m an advocate of using less conventional methods if they are easier to work with, or if they achieve a specific result when nothing else will do, using Lerp in this way seems to be more difficult.
But maybe I’m wrong…
Let me know in the comments if you’ve got a great reason for using Lerp like this.
When I use Lerp, the movement stutters and jerks. Why isn’t it smooth?
Sometimes when using Lerp, for example, to move an object, you may notice that the movement is not completely smooth, that it jerks around or appears bumpy.
For example the travel of the object stutters and jumps along its path, even though the movement is linear.
If this is happening to you, don’t worry.
While there are real issues that can cause this, the most likely reason is simply that you’re viewing it in the editor.
And, once you build the project, you’ll notice that the movement in the finished application is buttery smooth.
No need to worry.
Examples of using Lerp
Lerp can be used to smoothly change all kinds of different values, such as floats, Vector3 values, Quaternions and colours.
Some values require slightly different methods, however, most of the examples on this page follow a simple layout.
Blank Lerp template:
public float targetValue;

void Start()
{
  StartCoroutine(LerpFunction(targetValue, 5));
}

IEnumerator LerpFunction(float endValue, float duration)
{
  float time = 0;
  float startValue = valueToChange;

  while (time < duration)
  {
    valueToChange = Mathf.Lerp(startValue, endValue, time / duration);
    time += Time.deltaTime;
    yield return null;
  }
  valueToChange = endValue;
}
This blank example will Lerp a float. Simply replace valueToChange with the value you want to Lerp.
But what about values other than floats.
What does it look like to Lerp those?
How to Lerp a Vector 3

In this example, pass in a Vector3 location for the position to move to, ideal for moving an object to a new position over a fixed duration.
This also works with a GameObject, just use GameObject.transform.position whenever you want to access the Vector3 position value of an object.
Here’s what Lerping a Vector 3 looks like in scripting:
public class LerpToPosition : MonoBehaviour
{
    public Vector3 positionToMoveTo;

    void Start()
    {
        StartCoroutine(LerpPosition(positionToMoveTo, 5));
    }

    IEnumerator LerpPosition(Vector3 targetPosition, float duration)
    {
        float time = 0;
        Vector3 startPosition = transform.position;

        while (time < duration)
        {
            transform.position = Vector3.Lerp(startPosition, targetPosition, time / duration);
            time += Time.deltaTime;
            yield return null;
        }
        transform.position = targetPosition;
    }
}
Alternatively, try Move Towards to move to a set point at a fixed speed.
How to Lerp a Vector 2
The same method works for Lerping movement in 2D games as well, simply replace Vector3 with Vector2 and the same Lerp calculation will work.
Like this:
public class Lerp2D : MonoBehaviour
{
    public Vector2 positionToMoveTo;

    void Start()
    {
        StartCoroutine(LerpPosition(positionToMoveTo, 5));
    }

    IEnumerator LerpPosition(Vector2 targetPosition, float duration)
    {
        float time = 0;
        Vector2 startPosition = transform.position;

        while (time < duration)
        {
            transform.position = Vector2.Lerp(startPosition, targetPosition, time / duration);
            time += Time.deltaTime;
            yield return null;
        }
        transform.position = targetPosition;
    }
}
How to Lerp Rotation

Lerping Rotation is useful for rotating an object to an angle over a period of time.
In this example, the target rotation is passed in as a user-friendly Euler Angle (the Vector 3 angle you’re used to seeing in the Unity inspector).
However, it ‘s possible to deal with native Quaternions instead. Simply use a Transform reference as the target variable and pass in its direct rotation value.
In scripting, Lerping rotation with looks like this:
public Vector3 targetRotation;

    void Start()
    {
        StartCoroutine(LerpFunction(Quaternion.Euler(targetRotation), 5));
    }

    IEnumerator LerpFunction(Quaternion endValue, float duration)
    {
        float time = 0;
        Quaternion startValue = transform.rotation;

        while (time < duration)
        {
            transform.rotation = Quaternion.Lerp(startValue, endValue, time / duration);
            time += Time.deltaTime;
            yield return null;
        }
        transform.rotation = endValue;
    }
How to Lerp scale

This one works a little differently as it uses a modifier value to alter the scale.
This makes it easier to change the entire scale of an object by a single float value, without needing to use a Vector 3.
However, it also means that the current scale of the object is controlled by an arbitrary variable that is not natively accessible (e.g. like position or rotation are).
This means that to change the scale again, (for example, to scale up to twice the size only to then scale back down to the original size later) the scale modifier needs to be stored and accessible outside of the Lerp function.
This way, the relative scale is known and can be referenced if the function is used again.
Here’s what it looks like in scripting:
public float targetScale;
public float timeToLerp = 0.25f;
float scaleModifier = 1;

void Start()
{
    StartCoroutine(LerpFunction(targetScale, timeToLerp));
}

IEnumerator LerpFunction(float endValue, float duration)
{
    float time = 0;
    float startValue = scaleModifier;
    Vector3 startScale = transform.localScale;

    while (time < duration)
    {
        scaleModifier = Mathf.Lerp(startValue, endValue, time / duration);
        transform.localScale = startScale * scaleModifier;
        time += Time.deltaTime;
        yield return null;
    }

    transform.localScale = startScale * endValue;
    scaleModifier = endValue;
}
How to Lerp a Material’s Colour

Did you know you can Lerp colours too?
Well, you can! With Color.Lerp
You can set a target colour in the inspector or use RGBA values to control the colour and the alpha from scripting.
In this example, I’m setting a material’s colour to green:
public class LerpMaterialColour : MonoBehaviour
{
    public Color targetColor = new Color(0, 1, 0, 1);
    public Material materialToChange;

    void Start()
    {
        materialToChange = gameObject.GetComponent<Renderer>().material;
        StartCoroutine(LerpFunction(targetColor, 5));
    }

    IEnumerator LerpFunction(Color endValue, float duration)
    {
        float time = 0;
        Color startValue = materialToChange.color;

        while (time < duration)
        {
            materialToChange.color = Color.Lerp(startValue, endValue, time / duration);
            time += Time.deltaTime;
            yield return null;
        }
        materialToChange.color = endValue;
    }
}
Fade Camera to black using Lerp

It’s possible to fade any Canvas element with the Set Alpha method of the Canvas Renderer component.
When used with a full-screen black image that is drawn above all the other elements, this can be used to fade the Scene in or out:
using System.Collections;
using System.Collections.Generic;
using UnityEngine.UI;
using UnityEngine;

public class FadeToBlack : MonoBehaviour
{
    public float targetValue = 0;
    CanvasRenderer elementToFade;

    void Start()
    {
        elementToFade = gameObject.GetComponent<CanvasRenderer>();
        StartCoroutine(LerpFunction(targetValue, 3));
    }

    IEnumerator LerpFunction(float endValue, float duration)
    {
        float time = 0;
        float startValue = elementToFade.GetAlpha();

        while (time < duration)
        {
            elementToFade.SetAlpha(Mathf.Lerp(startValue, endValue, time / duration));

            time += Time.deltaTime;
            yield return null;
        }
        elementToFade.SetAlpha(endValue);
    }
}
How to fade out Text using Lerp
The Canvas Renderer method also works for other Canvas elements as well, such as Text.
Alternatively, the same effect can be achieved by Lerping the colour value of a Text object directly.
Like this:
using System.Collections;
using System.Collections.Generic;
using UnityEngine.UI;
using UnityEngine;

public class LerpColour : MonoBehaviour
{
    // Fades the text out
    public Color targetColor = new Color(0,0,0,0);
    Text textToFade;

    void Start()
    {
        textToFade = gameObject.GetComponent<Text>();
        StartCoroutine(LerpFunction(targetColor, 5));
    }

    IEnumerator LerpFunction(Color endValue, float duration)
    {
        float time = 0;
        Color startValue = textToFade.color;

        while (time < duration)
        {
            textToFade.color = Color.Lerp(startValue, endValue, time / duration);
            time += Time.deltaTime;
            yield return null;
        }
        textToFade.color = endValue;
    }
}
Note that these examples use UI elements, so they require the using UnityEngine.UI namespace.
Fade out a sprite using Lerp
The same technique can be applied to changing the colour, and transparency of Sprites.
Typically the colour of a sprite is white, meaning that the sprite isn’t tinted a different colour.
So, to fade out a sprite, you’ll usually only have to store the existing colour if you’ve changed it, while Lerping the alpha value to 0 (transparent) or 255 (opaque) as you need.
Like this:
// Fades the sprite out
public Color targetColor = new Color(1, 1, 1, 0);
SpriteRenderer spriteToFade;

    void Start()
    {
        spriteToFade = gameObject.GetComponent<SpriteRenderer>();
        StartCoroutine(LerpFunction(targetColor, 5));
    }

    IEnumerator LerpFunction(Color endValue, float duration)
    {
        float time = 0;
        Color startValue = spriteToFade.color;

        while (time < duration)
        {
            spriteToFade.color = Color.Lerp(startValue, endValue, time / duration);
            time += Time.deltaTime;
            yield return null;
        }
        spriteToFade.color = endValue;
    }
Fade out an Audio Source using Lerp
Fading an Audio Source over time, from its current value to a new value, uses a similar method as the other Lerp examples.
Setting the current value makes Lerp functions much easier to reuse, as you don’t have to worry about the start point, only the target value.
Here’s what it looks like to Lerp an Audio Source’s volume:
public float targetValue=0;
public AudioSource audioSource;

void Start()
  {
    audioSource = GetComponent<AudioSource>();
    StartCoroutine(LerpFunction(targetValue, 5));
  }

  IEnumerator LerpFunction(float endValue, float duration)
  {
    float time = 0;
    float startValue = audioSource.volume;

    while (time < duration)
    {
      audioSource.volume = Mathf.Lerp(startValue, endValue, time / duration);
      time += Time.deltaTime;
      yield return null;
    }
    audioSource.volume = endValue;
  }
Audio Sources are easy to fade as their 0-1 volume scale creates an even linear fade.
However, if you’ve followed any of my other posts or videos, you may already know that the same is not true when fading an Audio Mixer Group (including when making a volume control slider) which takes a bit of extra work to do properly.
- How to fade an Audio Mixer Group (the best method)
- The right way to may a volume slider in Unity (with logarithmic conversion)
Using an asset to Lerp (e.g. DOTween Pro)
Hopefully, I’ve shown that using Lerp to animate and move objects can be easy.
But, it can be even easier than that.
There are a number of Unity assets available that provide code-free alternatives to writing your own Lerp scripts.
![]()
DOTween Pro, for example, which is probably the most popular and fully-featured, provides a simple, inspector-based component to easily add animation and movement to objects.
Essentially, it does everything you’ve read about in this post (plus a whole lot more) from a component in the inspector.
But is it worth it? Or is it easier to write your own scripts?
I wanted to find out.
So, after writing this post, I bought DOTween Pro from the Unity Asset Store, costing $15 , to see if it was any faster, or easier, to use an asset instead of writing my own code.
Keep in mind that, while researching for this article, I’ve been writing Lerp scripts for days.
As someone who used to forget how to use Lerp and had to look it up every time, I’ll probably never be more familiar with it than I am right now, writing this.
However,
Despite my unfair advantage…
I still got much faster results when using DOTween Pro.
DOTween makes Lerp-style animations easier and much, much faster.
Getting the object moving, fading, or rotating was extremely fast, I could preview it from the editor, and it was easy to get the results I wanted without ever opening a script.
Beyond this, there are also a huge number of easing options, path animation and options to connect with other scripts, objects or UI events.
So would I use it?
For a simple, one-off animation, I’d probably just write a simple script.
Or, more likely, I’d copy one of the examples above and change the values.
However,
For anything larger than a small project, if I’m likely to be using Lerp over and over again, and especially if I want to create complex, chained animation and movements, I’d be much better off using DOTween Pro.
Even if I only used it to create animations that I could write manually, the amount of time I’m likely to save will easily outweigh the cost.
And that’s ignoring the other, more advanced features, which would be extremely difficult for me to recreate manually.
So, I’ll definitely be using it again and I definitely recommend it.
Now I want to hear from you
Are you using Lerp to create animation or movement in your project?
How are you using it? And have you been using any unconventional methods to get the effect you want?
Or maybe you’ve got a great tip for using Lerp that others would love to know?
Whatever it is, let me know by leaving a comment.

John French writes all of the Unity tutorials for Game Dev Beginner, and specialises in deep-dive guides teaching game development basics.

Comments
great efforts man and very helpful and clear examples, thank you and keep it up ..
You’re welcome!
2 days ago i made some UI element animations and i was like should i use DOTween and i was like naaaah… it’s prolly faster if i write it myself. But luckily you did the reserach for me for complex ones.
Anyway nice and clean programming you do despite the fact that your are an Audio engineer, keep up the goodwork!
Thanks! Great to hear it was helpful.
Great article. What I found to be an easy way of changing the curve of the lerp is to use an AnimationCurve. For the t-parameter I’d use: “AnimationCurve.Evaluate(time/duration)”
It’s way easier than writing curve functions ^^
Thanks for the great tip!
That’s a great tip!
I really wanted to give this a try so I wrote a simple behavior. I tidied it up for public consumption. You can adjust the animate curse to get some pretty cool effects.
https://gist.github.com/bslayerw/fb59afb9cc592271dc5f6fcdff6caf9c
Well done.
Thanks =)
You’re welcome Kristijan!
thanks you for tutorial, really helps a lot
You’re welcome!
You sir are a hero…
the coding world needs more of you!
I wish you a nice day and thanks a lot for your help / awesome tutorial 🙂
Thank you, glad it helped!
Very usefull article, thanks for your work sir 🙂
I will be visiting your site more othen !
You’re welcome!
Great article! Very Helpful.
Thank you, great website! This lerp page helped me
You’re welcome!
Great tutorial! Thank you so much
You’re welcome!
Hello,
In the smoothstep routine you have:
float t = time / duration;
It would be helpful is the ‘time & duration’ definitions were shown.
In looking through this page one has to figure out what is meant as starting values.
I am still having trouble figuring those out.
Thank you for this page.
Hi Paul, you’re welcome. Check back to the top of the article to see examples of those being set up and used. Or check out the article I linked after, as it’s a lot more in depth on that particular subject.
Thank You for this article. This is probably the best tutorial about lerp function that exists on the web (i know what I am saying, because I have read a lot about it). Impressive job.
Thanks so much!
Thanks for the aid in the quest man. Ill never forget you ;D
No problem.
Thanks!
You’re welcome!
This is great content. Thank you!
You’re welcome
You make exceptionally clear articles that are really helpful. Thanks, dude!
Thanks so much!
This really helped me understand how Lerping works!
I am currently making this gymnastics game, where I would like to make a player twist 180 degrees when pressing a button. I just can’t figure out how to make the target rotation become ´+180 whenever the old rotation is complete.
is it even the best method to use lerping, or should i use Rotate towards instead?
Thank you for this cool site!
I read your articles it is really helpful for me. so I request you please write article on playerprefs in unity.
Humble request
I’ve added it to my list! Thanks.
very nice article
Thank you!
Nice article John. Yeah I kept wondering why I saw rather strange t values in Lerp examples from Unity and in others code. On the Vector Lerp, note that this will not give a unit vector. You should use Vector3.Slerp (spherical interpolation) instead. Lerp’ing from (1,0,0) to (-1,0,0) will go through the vector (0,0,0) and hopefully you do not divide by the length :-). See: https://docs.unity3d.com/ScriptReference/Vector3.Slerp.html
Thanks for the tip! I’ll update the article.
Edit: Just coming back to this to update the article with your advice but on second look it doesn’t seem correct to me. Unit vectors work for direction without length, which isn’t being used here and Slerp performs a different function than Lerp does, often for rotational movements. Please do tell me if I’ve missed your point, on here or you can email me. Thanks!
Very nice article, help was much appreciated.
Great tutorial. As always, more informative than the official documentation.
I was hoping you might be able to provide some insight into using the scaling coroutine in a conditional check.
My logic is to check if the target value equals the current pvalue, if it does, fire a new random target and run the coroutine. I’ve tried inverting the logic as well, and moving statements around into elses, but this is the closest behaviour to what I want.
This worked with the rotation coroutine, but with the scaling coroutine I’m not getting the smooth transition on subsequent iterations, it just jumps to the new scale.
Thanks in advance.
If you’re willing to post your code, or email it to me, I could take a quick look and see if I can spot any errors.
ALl the best,
John
Unity comes with a built-in SmoothStep function, no manual formulae required! (https://docs.unity3d.com/ScriptReference/Mathf.SmoothStep.html)
Would be cool if you mentioned that in your subsection about “Lerp with easing (the right way)”
Thanks Thomas, I’ll add this in.
Lerp is one of the easiest math functions if you teach it well. I think many tutorials on internet makes it complicated than it has to be as well as this one.
Sorry but this is my opinion. Appreciate the work effort though.
No problem, I appreciate the feedback.
Hi. Thanks for the tutorial. I am trying to use your lerp scale code but its not working. I have a character with a scale of 1 and when he gets a booster he shrinks to o.75 for 5 secs. What is the difference between target scale and end value?
Hi, so in this example, the end value variable is used to Lerp the modifier value and then the actual scale of the object is changed using that modifier, so that you can have an object that you’ve made larger using its transform but then still make it twice as big if you want. The target scale is the new scale you want it to be, e.g. 0.75, and is only used to pass information in, so it doesn’t need to be in the Coroutine, which was a mistake on my part. I’ve updated the example, which hopefully makes it less confusing. Let me know how you get on, email me at [email protected] if you get stuck.
What about LERPing between start/end with an unknown time limit, like say for a loading screen?
Like a loading bar? For that there’s a progress value that you can use to measure the progress of the load. Typically in most situations, even if the duration of the action is variable, the limits will probably still be known. If they’re not known, however, then you can always use Move Towards to move a value towards another value that may change or be unknown.
Thanks for the smooth step formula. I’m actually looking for one with variable smoothness, but this will do for now.
And changing material color by Material.Color is a no-no. It creates a copy of material every time. Use MaterialPropertyBlock in runtime. This will stop you from editing material values in inspector but it will be efficient.
Thanks for the tip
Isn’t this:
float t = time / duration;
t = t * t * (3f – 2f * t);
transform.position = Vector3(startPosition, endPosition, t);
Supposed to read:
float t = time / duration;
t = t * t * (3f – 2f * t);
transform.position = Vector3.Lerp(startPosition, endPosition, t);
(did you miss the Lerp?)
Yes it is, and yes I did. Well spotted, thank you!
Regarding Lerp to move an object smoothly (particularly, an interpolated kinematic Rigidbody), do you have any insight on whether it’s better to use Vector3.Lerp or Vector3.MoveTowards?
In my testing, visually it’s difficult to tell if one is actually “smoother” than the other, but if I look at the speed reported by the rb’s info the object with with Lerp continually jumps back and forth (by very small values) whereas the object with MoveTowards reports a constant speed…
This makes me think that Lerp is more prone to floating point imprecision, which might cause tiny jitters in movement, but wondering if you have any opinions/knowledge on the matter
Thanks!
Personally, I’m not aware of a difference in quality between the two, but how you’re using them with the Rigidbody might affect it. For example, are you using the Rigidbody Move Position function? as that might be the best method to manually move the rigidbody, as it’ll correctly update the physics system as it does. Otherwise, there generally should be a difference between move towards and lerp, as they both operate on a linear frame-by-frame basis.
Thanks, it takes talent to explain a mathematical function so clearly.
Thanks so much!
For me best choise in Lerp use “time=Time.time-startTime” instead “time+=Time.deltaTime” bacause when use “time+=Time.deltaTime” Lerp didn’t reach end value and slowed at the end. Official Unity tutorial using this in SmoothStep, which is same as Lerp but smooth https://docs.unity3d.com/ScriptReference/Mathf.SmoothStep.html
In the “How to Lerp a Vector 3” section, I would do the following:
public Vector3 positionToMoveTo;
float startTime;
void Start()
{
startTime = Time.time;
StartCoroutine(LerpPosition(positionToMoveTo, 5));
}
IEnumerator LerpPosition(Vector3 targetPosition, float duration)
{
float time = 0;
Vector3 startPosition = transform.position;
while (time < 1f)
{
time = (Time.time – startTime) / duration;
transform.position = Vector3.Lerp(startPosition, targetPosition, time);
yield return null;
}
}