
Even if you’re new to scripting in Unity, you’re probably already familiar with the Update function.
Update is an event function in Unity that’s called every frame. It’s one of the first functions you’re likely to use and, typically, it’s where most of your game’s logic will go.
However…
As you start to work with other parts of Unity you may also notice another type of update function, called Fixed Update.
Compared to Update, which is called every frame, Fixed Update is called independently of framerate, at measured intervals, in sync with the game’s physics system.
As a result, Fixed Update is usually used for physics-based functions, such as applying force to a Rigidbody.
While choosing when to use Update or Fixed Update can be simple, it can sometimes be difficult to understand exactly what’s going on behind the scenes.
Which can make it tricky to know for sure if you’re using Fixed Update in the right way.
But don’t worry,
In this article, you’ll learn exactly how Fixed Update works, the right time to use it instead of Update, and when to avoid it entirely.
Here’s what you’ll find on this page:
- The difference between Update and Fixed Update in Unity
- How Fixed Update works
- When to use Fixed Update in Unity
Let’s get started.
What’s the difference between Update and Fixed Update in Unity?
Update is a special function in Unity that’s called on every script, during every frame.
Meaning that Update is called at a variable rate, depending on how fast the game is running.
Fixed Update on the other hand, is called at measured intervals, meaning that fixed update is always called at a consistent rate, which, by default, is 50 frames per second.
Typically, most of the logic in your game will happen in Update, either directly inside the Update loop or triggered by an event that is, itself, powered by Update.
While Fixed Update, which is called in sync with Unity’s physics system, is usually reserved for physics-based functions only.
So, as a general rule, it’s best to place logical code in Update and physics-based functions in Fixed Update.
However… unfortunately, it’s not always that simple.
For example, to move an object in Fixed Update, you’ll probably need to make input checks that, in order to work correctly, will need to be in Update.
Likewise, there will often be times when you’ll want to access the physics system, which includes Raycasts and Colliders, from an Update based function.
Which is why just putting physics in Fixed Update and everything else in Update, isn’t always as simple as it sounds.
For that reason, it can help to understand what’s actually happening behind the scenes when Fixed Update is called.
So, how does Fixed Update work?
How Fixed Update Works
Fixed Update runs on a fixed timestep that will almost always be different to Update’s variable rate.
Which means that Fixed Update might be called once during a frame, twice, or not at all, depending on the speed of the game.
For example, by default, Fixed Update is called once every 0.02 seconds, which is a rate of 50 frames per second.
Which means that, when the game is running at 60 frames per second, Fixed Update is called once per frame for most frames but not all.
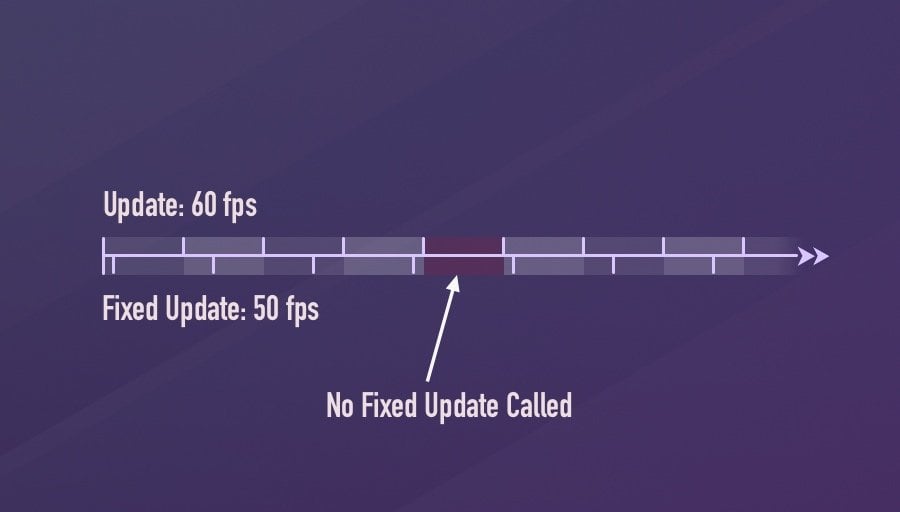
Because the frequency of Update and Fixed Update are almost always different, it’s highly likely that Fixed Update won’t be called at all during some frames.
When the framerate of the game is higher than the physics rate, there will be some frames where Update is called, but Fixed Update isn’t.
However, if the framerate of the game is lower than the physics rate, Fixed Update could be called more than once in a single frame.

If the game’s framerate drops, Fixed Update can be called multiple times during a frame.
Simple, right?
There’s just one problem…
While this chart is representative of how Unity is calculating the rate of Fixed Update calls compared to Update, it can be misleading.
Based on this chart, you might think that Fixed Update could be called early in a frame, or late, depending on the relative frequencies of the two event functions.
However, that’s not how Fixed Update works.
So when, exactly, is Fixed Update called during a frame?
When is Fixed Update called?
Unity’s event functions are triggered in a specific order.
For example, Awake is called before On Enable, On Enable is called before Start and, in the Update Loop, Fixed Update is always called before Update.
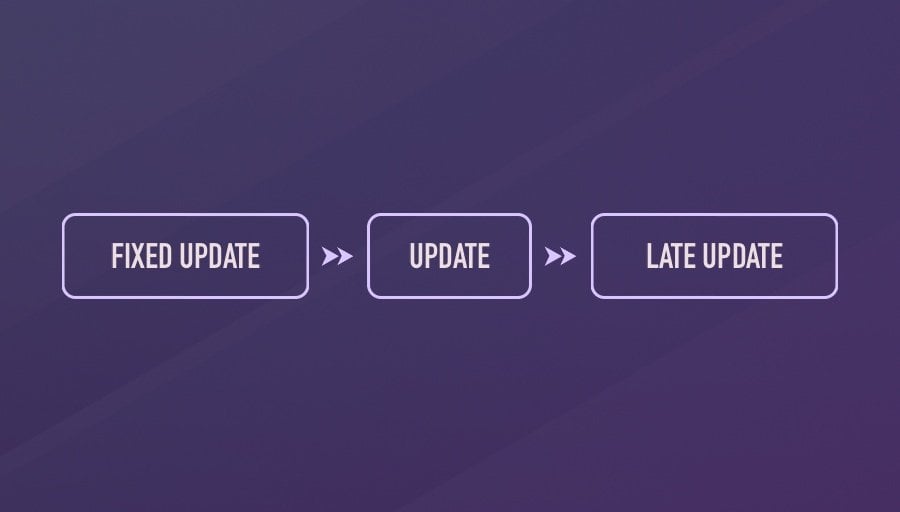
Fixed Update is always called before Update in the same frame.
This is because, while the frequency of Update and Fixed Update are different, they’re not asynchronous, Fixed Update is always called first, before Update.
So how does Unity know when to call Fixed Update and when to not?
Here’s how it works…
- At the beginning of the frame, Unity calculates Delta Time, which is the amount of time between the current frame and the one before it, and adds that amount to the total Time value, bringing it up to date.
- Next, Unity will check to see if the total Fixed Time is behind Time by at least the length of a physics step (0.02 seconds by default).
- If it is behind, a physics step is processed, Fixed Update is called and the Fixed Delta Time, the length of a physics step, is added to the Fixed Time total.
- At that point, if Fixed Time is still behind Time, another physics step will be processed, and so on, looping around until Time and Fixed Time are within a physics step of each other.
- After which, the Fixed Update phase ends and Unity moves on to Update, Late Update and, finally, rendering to finish the frame.
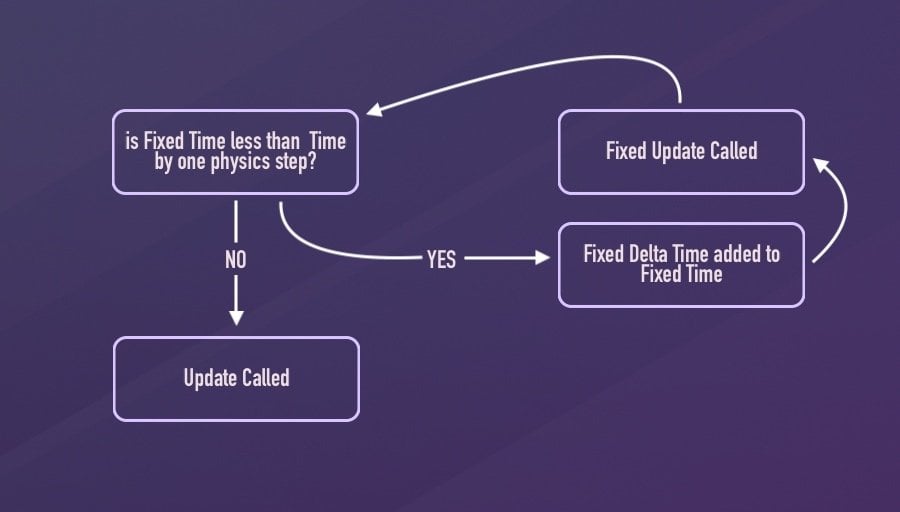
Unity compares Physics Time to Total Time to decide if a Fixed Update call is required. For more information on how Unity works this out, see the official documentation here.
What this means is that, if multiple Fixed Updates are required to take place during a frame, they will all be processed, one by one before Update.
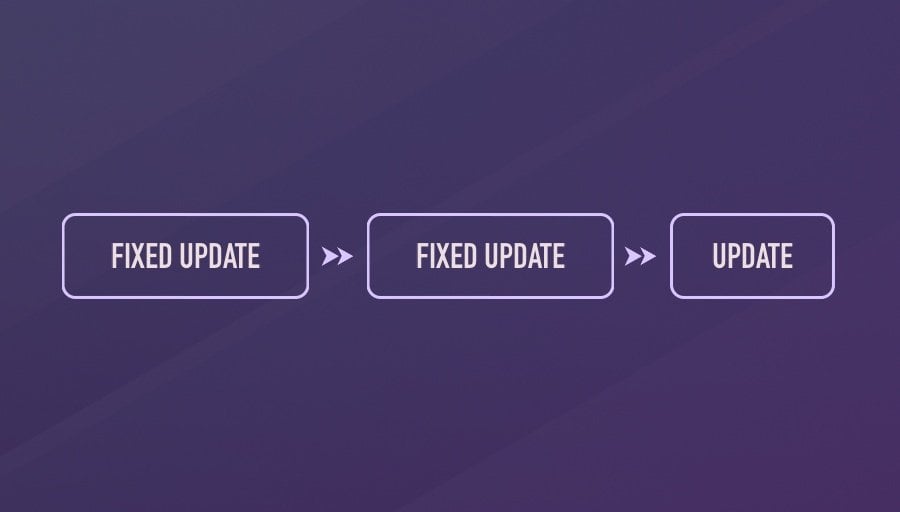
Fixed Update is always called first, even if it’s called multiple times.
Exactly how many times Fixed Update is called in a frame depends on the amount of time since the last frame and the Fixed Update Rate.
How does the Fixed Update Rate in Unity work?
The rate at which Fixed Update is called is based on the duration of the Fixed Timestep, which is the amount of time between each Fixed Update call.
By default, the Fixed Timestep value is 0.02 seconds, which is equivalent to a rate of 50 frames per second.
However, it’s possible to change the Fixed Timestep value in the Time panel of the Project Settings menu.
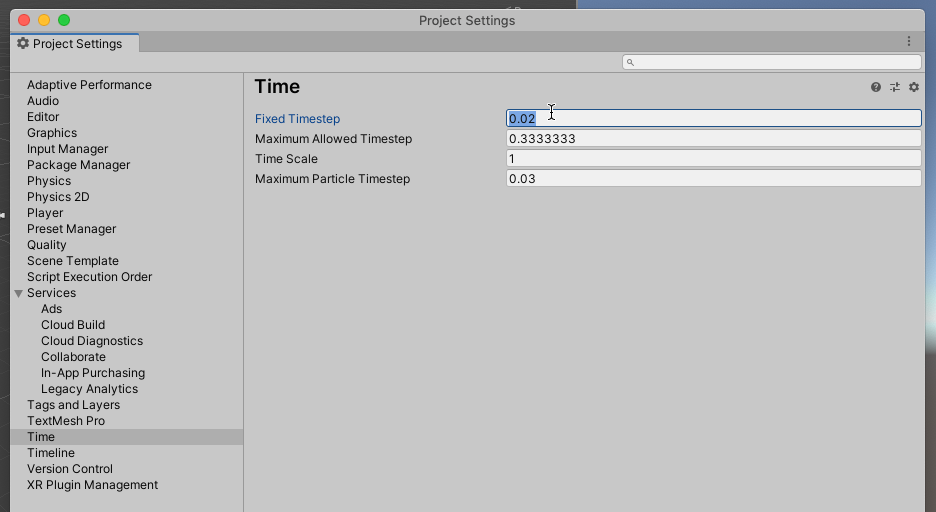
Or in code, by setting the Fixed Delta Time value of the Time class.
Like this:
// Sets the fixed delta time to 50fps.
Time.fixedDeltaTime = 1 / 50;
The Fixed Timestep value determines how frequently the physics engine and, with it, Fixed Update calls, are processed.
This means that objects under physics simulation will often move at a different rate to the framerate of the game.
For example, an object that’s being moved under physics will appear to move at the same rate as Fixed Update.
Which, at the default 50fps, may look choppy or jittery compared to the same movement in Update, particularly if the game is actually running much faster.

The blue cube is being moved in Update, while the Red cube is moved in Fixed Update at an exaggerated rate of 10fps.
This happens because the movement calculations that place a physics object in each new position will only take place in each physics step so, even if the actual framerate of the game is significantly faster, the position of the physics object won’t change until the next Fixed Update call.
No matter how fast the game runs.
Which can be especially frustrating for physics-powered first-person character controllers, or when physics controlled players are followed by Update controlled cameras, where the effect of a lower framerate will be obviously noticeable.
So what’s the answer?
How can you move physics objects smoothly?
How to fix choppy movement in Fixed Update
Jittery, choppy movement is caused by the Fixed Timestep value of the physics engine, and occurs when the framerate of the game is higher than the physics rate.
Generally, there are two options for creating smooth physics-based movement in Unity.
The first option is to enable Interpolation on the object’s Rigidbody.
Interpolation is a feature of the Rigidbody component that will blend the visual display of physics steps together.
While the accuracy of the physics system will be the same, it will appear to move much more smoothly, at the same framerate as the rest of the game.
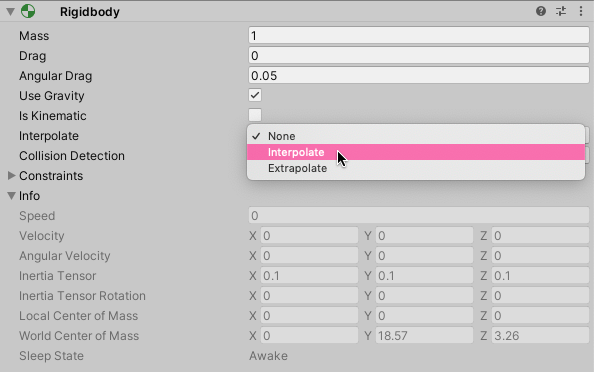
Enabling Interpolation blends the position of each physics step between frames.
It’s generally recommended to enable Interpolation on objects where the, usually, slower rate of the physics engine is felt the most, such as the player object or a camera controller.
However, interpolation doesn’t change how often the physics system is updated.
It only smooths the appearance of selected objects and their movement between frames.
Meaning that, if you want every physics object in the game to move more smoothly, without interpolating their Rigidbody components, you’ll need to increase the Fixed Timestep value instead.
Which will cause the physics engine to update more often, providing a smoother, more accurate, physics simulation.
But, how does changing the speed of the physics engine affect the performance of the game?
What happens when you change the Fixed Update Rate?
When you change the Fixed Timestep value, you change how often physics in Unity are calculated.
Increasing the timestep value reduces the frequency of Fixed Update calls, improving performance by, effectively, lowering the physics framerate.
While reducing the amount of time between Fixed Update calls will improve the accuracy and the framerate of the physics simulation, at the expense of an increased CPU load.
In many cases, unless you have a reason for changing the physics rate, it’s probably best to stick with the default value.
However, if you do change the Fixed Timestep value, what will that actually mean for your project?
Here’s what’s likely to happen in each scenario…
Slowing down physics (increased Fixed Timestep)
Increasing the Fixed Timestep will cause Fixed Update to be called less often, meaning that, more often than not, Fixed Update won’t be called in a frame.
Generally, this should improve the performance of the physics engine, but at the expense of accuracy.
Meaning that physics objects will move at lower frame rates and with less precision.
This is because Fixed Update is being called less often and the physics engine has fewer points of data to calculate where an object should be.
So much so that, at extreme values, such as 0.2 seconds, for example (equivalent to just 5 frames per second) physics objects are likely to miss collisions entirely, causing objects to pass through one another.
Speeding up physics (decreased Fixed Timestep)
Alternatively, it’s possible to increase the precision and frequency of physics in Unity by simply reducing the Fixed Timestep value, making it more likely that Fixed Update will be called in every frame, multiple times.
As a result, the physics system will be more precise and will update more often, reducing the chance that the game’s framerate will be noticeably higher than physics movements.
However…
Increasing the frequency of the physics system to make the game appear to run smoother can have the opposite effect if it places the physics engine under heavy load.
So, what actually happens when you put too much in Fixed Update?
What happens if you put too much in Fixed Update?
If the physics system is under heavy load, and the game can’t process each physics step in the Fixed Timestep window, the frame will take longer to process, impacting performance.
While the physics simulation will still be accurate, the game’s framerate will be lower as a result.
But that’s not all…
In extreme circumstances, consistently overloading the physics engine can cause performance degradation, where each frame takes longer to display than the last.
This is because the number of physics steps that are required in a frame are based on the duration of the last frame.
So, if the last frame took longer, because of a heavy physics load, Unity’s response will be to schedule even more physics steps in the next frame in order to meet the specified frequency of steps over the, now, increased Delta Time.
Meaning that, if the physics engine is still under the same load, each frame will take longer and longer than the last, until the game freezes entirely:
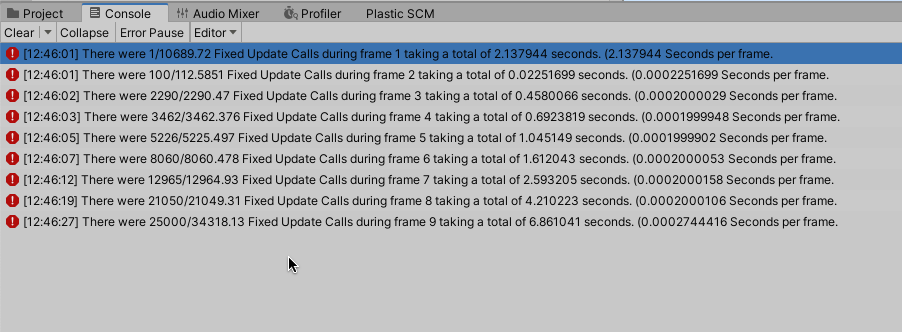
Placing the physics engine under an artificially heavy load can create performance degradation, eventually freezing the game.
But don’t worry…
While it’s technically possible to drain performance in this way, in the vast majority of cases, this won’t happen.
Firstly, for this test, in order to create a sustained heavy load that Unity couldn’t keep up with, I had to increase the Fixed Timestep frequency to an abnormally high level, in this case, equivalent to 5000 frames per second.
Secondly, to allow Unity to even attempt to process all of the physics steps that were scheduled for each frame, I had to effectively disable the built-in failsafe, the Maximum Allowed Timestep value.
Maximum Allowed Timestep
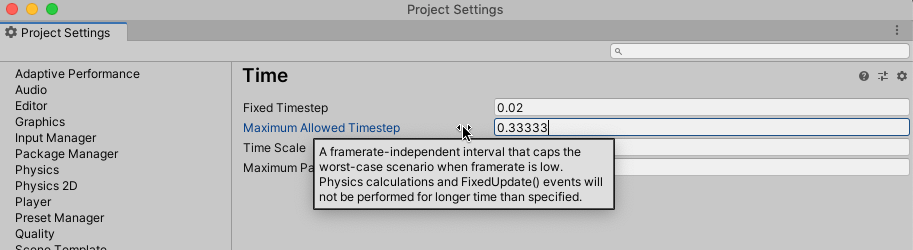
The Maximum Allowed Timestep is a failsafe that prevents Unity from taking too long to process physics calculations.
Put simply, it places a limit on how long a frame should take in worst-case scenarios.
Meaning that if performance drops severely, Unity will cut that frame short.
Which can be extremely useful for preventing a complete lock-up if Unity is unable to keep up with the demands of the physics engine.
However…
When the Maximum Allowed Timestep failsafe takes effect, it alters the processing of time in the game.
This is because the reported Delta Time for a frame that’s been interrupted will often differ from the actual amount of time it took.
Which can cause objects that are moved using scaled time to move a shorter distance than they would’ve done over the same duration, for example.
Because of this, the Maximum Allowed Timestep value should really only be used as a failsafe in extreme scenarios. It’s not suitable for controlling frame time, for example.
For that reason, the default value, which is equivalent to around 3 frames per second, is probably fine for most use cases.
For more information on frame time management in Unity, see the official documentation here.
When to use Fixed Update in Unity
While, generally speaking, you should only use Fixed Update for physics-based functions, it’s usually not that simple.
There will, no doubt, be times when you will want to do something physics related in Update, and there will probably be times when you’d like to do something in Fixed Update that would normally belong in Update, such as input checks, for example.
So what is ok and what isn’t?
Is it ok to call physics functions from Update?
In Unity, even if you’re not using any Rigidbody objects, you will probably still find yourself working with the physics engine surprisingly often, such as checking a Raycast or a Collider for example.
But, because they’re physics functions, do those checks need to be carried out in Fixed Update? Or is it ok to run them in Update?
Generally speaking, it’s perfectly safe to carry out most physics-based checks in Update.
This is because all you’re really doing is checking if a Collider is in a certain position or if a Raycast returned a hit at the time the check was made.
Which, in Update, will always be after the most recent Fixed Update.
What’s more, if the check you want to make is linked to a system that also operates in Update, such as input, or other game logic, it’s a good idea to keep the check, and any resulting action, in sync with each other.
Alternatively, if the result of the physics-based check is to perform a physics action, such as using a Raycast to move a Rigidbody when it gets close to another object, then it’s better to use Fixed Update for both tasks.
Should you use Update or Fixed Update for movement?
If you’re moving an object using its Transform component then you should generally use Update to do that.
However, technically, the correct way to move a physics object is by using a Rigidbody component and moving it in Fixed Update.
This keeps the application of force on the Rigidbody in sync with the physics system that’s moving it, keeping the movement consistent and correct relative to other objects.
However, there are exceptions to this rule.
For one-shot physics instructions, or immediate velocity changes, such as the Impulse mode of the Add Force function, you won’t need to use Fixed Update.
Because the function, in that mode, isn’t dependent on the Fixed Timestep duration, it’s safe to call it from Update, since it will only be triggered once anyway and doesn’t rely on Fixed Delta Time to be accurate.
What’s the right way to use Delta Time in Fixed Update?
When moving an object in Unity, you’d typically scale the movement amount by the Delta Time of the frame, which converts movement speed to a per/second value, keeping it even and consistent when the framerate varies.
In Fixed Update, however, you typically don’t need to do this.
This is because, most of the time, when moving an object using physics, you’ll be using a Rigidbody function to apply an amount of force to it.
Such as with the Add Force function, which in its Force and Acceleration modes, interprets the movement value you pass in as Newtons, or meters per second squared respectively, scaled in relation to the physics timestep.
Which means that you won’t need to manually scale the amount of force you pass in yourself, like you would when moving an object in Update.
If, however, you find yourself working in Fixed Update, without using a built-in Rigidbody function, it is still possible to use Fixed Delta Time or even the standard Delta Time value in the same way as you would in Update.
This is because Delta Time, when called in Fixed Update, returns the same value as Fixed Delta Time.
For more information about how the Add Force function scales force by time, see the Unity documentation here.
Should you use Update or Fixed Update for input?
When checking for input in Unity, you will usually always need to use Update to do it.
This is because Unity’s input checks, such as Get Key Down and Get Mouse Button Down return true on a per-frame basis.
Which means that, unless Fixed Update is called reliably, and only once for every frame of the game, which it rarely is, some input checks are likely to be missed or duplicated, depending on how many Fixed Update calls are being processed.
As a result, it’s rarely a good idea to try to place input checks in Fixed Update, as it almost always leads to unreliable behaviour and missed input.
However…
If you’re moving an object using physics, chances are that you’re using input to do it.
So how can you use input in Update to control a movement function that needs to take place in Fixed Update?
How to use Update and Fixed Update together
If you’re moving an object using its Rigidbody, then it’s best to do so in Fixed Update.
However, if you want to control that object’s movement, you’ll need to check for input, which can only be reliably detected in Update.
So what can you do?
One simple solution is to keep both functions separate and connect them with a variable.
For example, it’s possible to set up a movement vector using input checks that take place in Update.
Then, in Fixed Update, the movement vector can be passed into a function in Fixed Update to create physics-based movement.
Like this:
public class Movement : MonoBehaviour
{
    public Rigidbody rb;
    Vector3 movement;

    void Update()
    {
        movement = new Vector3(0, Input.GetAxis("Vertical"), 0);
    }

    void FixedUpdate()
    {
        rb.AddForce(movement);
    }
}
This allows you to keep critical input checks where they belong, in Update, while applying physics forces correctly in Fixed Update.
Now it’s your turn
Now I want to hear from you.
How are you using Fixed Update in your project?
Are you using it to move physics objects?
Or maybe you’re using it for something else?
And what have you learned about using Update and Fixed Update that you know others will find useful?
Whatever it is, let me know by leaving a comment below.

John French writes all of the Unity tutorials for Game Dev Beginner, and specialises in deep-dive guides teaching game development basics.

Comments
Amazing, Thank you!
You’re welcome!
These articles value are insane, keep it up!
Thank you!
I thought I would mention that FixedUpdate can help immensely in networking situations even if it isn’t (Unity) physics based logic, as the fixed time works very well with the common lockstep network model where without FixedUpdate you end up having to code your own FixedUpdate style logic somewhere to ensure consistency across clients that can have different frame rates.
Thanks for the tip Brian, that’s good to know!
Hey,I love your article and I would love to know what software is used to make the pictures in your article, they look great
Thanks! I use Pixelmator Pro for most of my images.
Thanks John I think you covered this really well. The only addition / exploration I’d welcome is the relationship between FixedUpdate() and Update() relative frequency. By this I mean if render frequency is 60fps, so a 0.0166667 interval, then I’d prefer my Fixed TimeStep to either equal (1:1 ratio) half (one frame on, one frame off etc) or double my render frequency. This feels deterministic, because the same ratio will occur every frame. A bit like the way animations may run at 60, 30, 20 or 15, within an 60fps game.
Thanks for the tip Daniel, I’ll see if I can work this into the article.
I was shown some historical information about the Unity 50hz value, and why it is accidental and no longer appropriate at say 60fps or higher frame rates, it may interest you also?
How did it end up that Unity would still use 50hz physics by default?
https://johnaustin.io/articles/2019/fix-your-unity-timestep “By default on desktop, Unity runs the FixedUpdate() at 50 FPS and the Update() at 60 FPS (the VSync rate). As for the reasoning behind this choice, it seems that even the folks at Unity have long forgotten.”
https://twitter.com/aras_p/status/1072227369405046792
Aras P @Unity: “I don’t think the “picked 50Hz on purpose” is true. And I’ve been at Unity for like 13 years. Why is it 50Hz? I’d say an accident.”
https://twitter.com/LooperVFX/status/1500154299497725955: “I assert: 1. This is *primarily* because of PAL 50hz analog TV standard. Unity was founded in Denmark which used PAL as did most of the world, minus North America & nearby used NTSC 60hz. 2. FixedUpdate *remaining* at 50hz this long post analog TV is the only accident / oversight”
So there we have it – 50hz was a setting from a bygone, post 60fps era!
What we see here is that they actually intended the physics update to match the render update, and just forgot to update the default for 60fps screens! Or 72/80/90/120 like Quest 2
How interesting, thanks for this.
Insane help for my school project. Amazing article. I especially like the parts where you tell input-physics or raycast-physics problem.
Thanks so much!
Great article and great blog, thanks John
You’re welcome David!