Even if you’re only just getting started with Unity, you probably already know what a Skybox looks like.
After all, it’s usually one of the first things you’ll see when creating a new project and might end up as the background to everything you make when working in Unity.
As a result, Unity’s default sky probably feels very familiar to you, but have you ever actually tried to change it?
While changing the skybox asset isn’t a difficult thing to do, unless you’ve worked with skyboxes in Unity before, you might be surprised by just how customisable they are, especially when using the High Definition Render Pipeline.
And even if you’re using the Universal Render Pipeline, or Unity’s built-in renderer, there are a lot of different ways to change exactly how your sky looks.
In this article, you’ll learn how skyboxes in Unity work, how to create your own custom sky assets and how to set up and change the skybox so that it looks exactly how you want.
Here’s what you’ll find on this page:
- What is a skybox in Unity?
- How to change the skybox
- How to make your own skybox in Unity
- Where to get skybox assets
- How to change how your skybox looks
- How to change the skybox in Unity when using HDRP
So what exactly is a Skybox?
And how does it work in Unity?
What is a skybox in Unity?
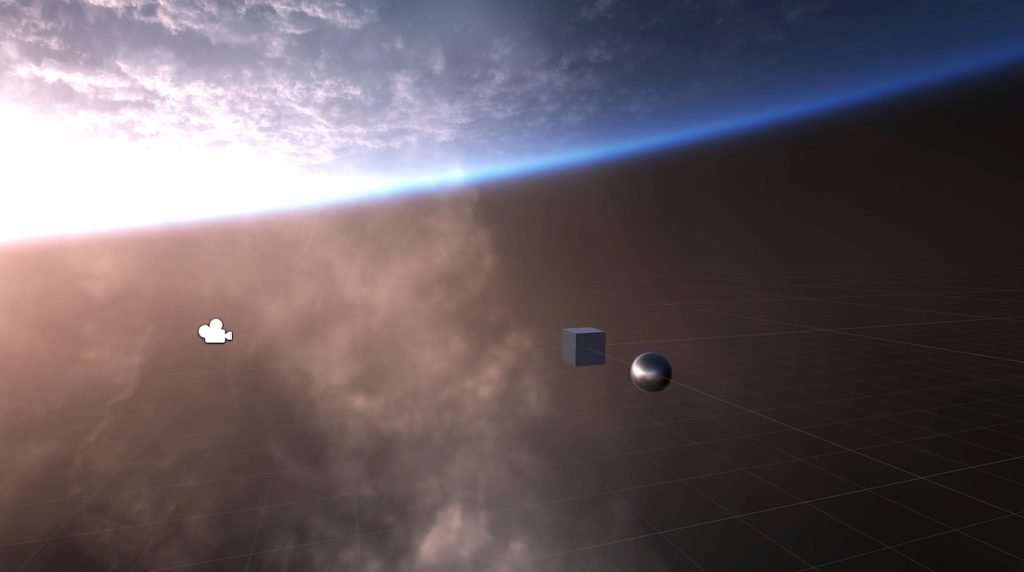
A Skybox is a kind of directional 3D background.
It’s what appears behind the geometry in a 3D scene and can be used to create a static, non-moving background in all directions.
Typically it’s used to display objects and views that are far away enough that they wouldn’t appear to move when the player does, such as the sky, stars and clouds, for example, or distant geometry, such as mountain ranges or horizons.
Skyboxes allow you to create an infinite background in all directions that pans, rotates and zooms just like a real 3D background would, but with no change in perspective.
So how do they work?
Typically, a skybox is just a texture, usually a six-sided texture, a cubemap, where the six sides correspond to the inside faces of a cube.
The view that the skybox creates is similar to the effect of putting a camera inside that cube, positioned so that the perspective of the cube’s faces, and the points at which they meet, can’t be seen, giving the appearance of an infinite world in all directions.
Typically, a skybox works in a similar way to placing a camera inside of a box, creating the illusion of sky in all directions.
In older game engines, this is actually how skyboxes used to work.
For example, in early versions of Unreal Engine, skyboxes were literal boxes that existed in the same scene as the game, with special skybox cameras placed inside them.
However, while the end result is similar, the skybox in Unity isn’t a box at all, at least not in the same way.
Instead, it’s a material, with a special skybox shader.
It’s a selectable asset that can be modified and changed.
So how do you change the skybox in Unity?
How to change the skybox
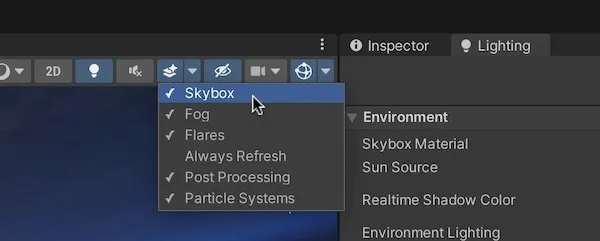
While it’s not difficult to do, changing the skybox in Unity can be a little confusing because there are two different places you can do it.
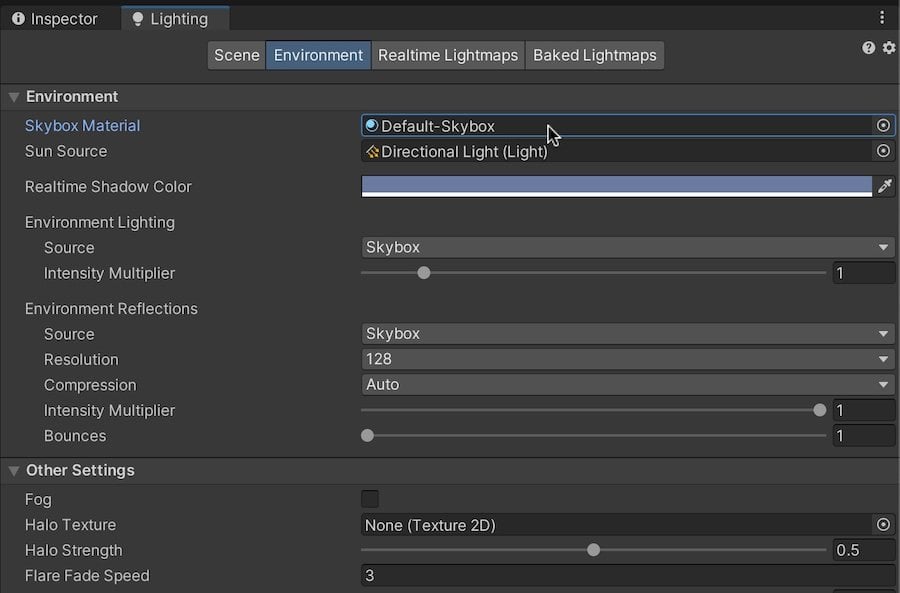
When using URP or the Built-In Renderer, you can change the skybox material in either the Environment panel of the Lighting window.
Like this:
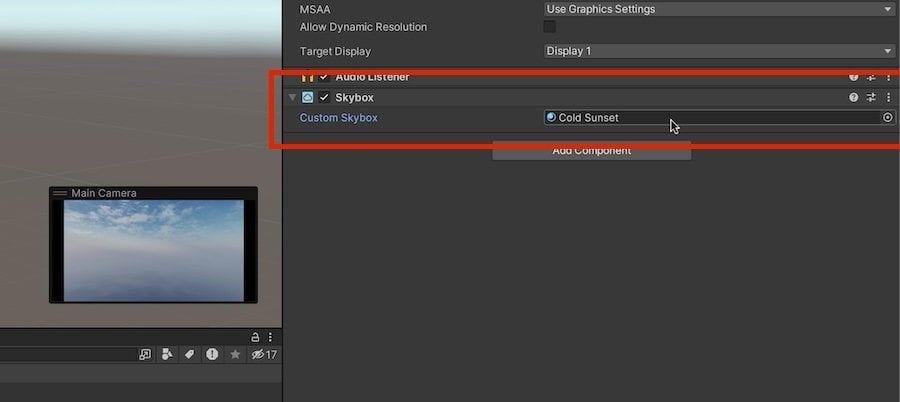
Or you can override the skybox for a particular camera, by adding a Skybox Component to the same object and, then, changing the skybox material there.
But why is it set up like this?
Why not just change the skybox in one place, and not the other?
Generally speaking, it’s because the skybox isn’t just a background, it affects the lighting of the scene as well.
By default, material reflections and the scene’s ambient light are generated using the environment’s skybox material.
Which is good, as it allows you to match the appearance of surfaces in your scene to the sky around it.
Skyboxes can also be used as a source of ambient light and reflections.
But, that doesn’t mean that you have to use the skybox in that way.
For example, it’s possible to use a skybox material for just your lighting, or to only use it for your reflections but then show a completely different background in your game, either by setting the camera’s Clear Flags to something other than a skybox, such as a solid colour for example, or by overriding a camera’s skybox using the Skybox Component.
Why can’t I see the skybox in Unity?
Generally speaking, if you can’t see the skybox in your Game View then, chances are, it’s because your camera’s Clear Flags are not set to the skybox option.
The clear flags setting defines what is seen behind the geometry of your game when viewed through that particular camera which, by default, is the skybox.
Changing it to a solid colour, or by using the depth only setting, which you would typically use for displaying the output of one camera on top of another, will mean that the skybox won’t be visible.
When working in the Scene View, the environment skybox is normally shown in the background at all times, even when overriding it.
Meaning that, if you can’t see a custom skybox in your Scene View, then it’s usually because you’re using the Skybox Component.
Alternatively, if the scene view background is completely grey, then it usually means that the environment skybox material has been manually removed, meaning that no skybox is set, or the skybox display has simply been turned off using the scene view Skybox Toggle.
It’s possible to turn the scene view display of the skybox on or off.
While the skybox material is easy to change, in order to actually change it to something else, you’re going to need… something else.
So how can you make your own, custom, skybox material?
How to make your own skybox in Unity
Generally speaking, there are 2 different ways to make your own skybox in Unity.
- With a Texture, which typically involves creating cubemaps and panoramic skybox materials using images.
- Or, with a Procedural Skybox, which generates a coloured sky, floor and sun using settings that are built into the skybox material itself
This is assuming that you’re using the Universal Render Pipeline or the Built-In Renderer. Things get a little different when using the High Definition Render Pipeline, which can be used to create very realistic, physically based skyboxes (more on that later).
To create your own skybox, create a New Material and select one of the 4 skybox shader types:
- 6-sided
- Cubemap
- Panoramic
- Procedural
To choose one, change the shader using the Shader Dropdown when selecting the material in the Inspector.
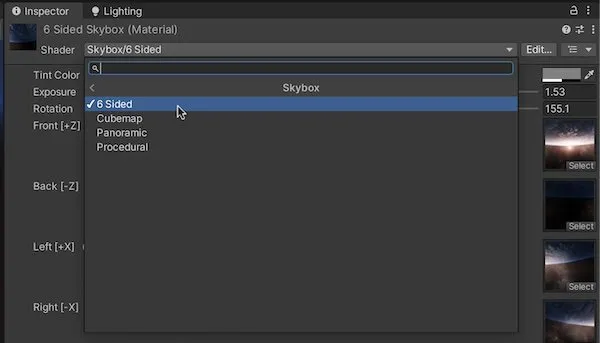
Use the dropdown menu in the Inspector to select which shader a material should use.
But which should you pick, and how are they different?
The 6-sided skybox shader
The 6-sided skybox shader allows you to create a skybox cubemap using 6 separate 2D textures.
It’s generally one of the easiest ways to make a skybox as all you need to do is select an image for each face of the cube.
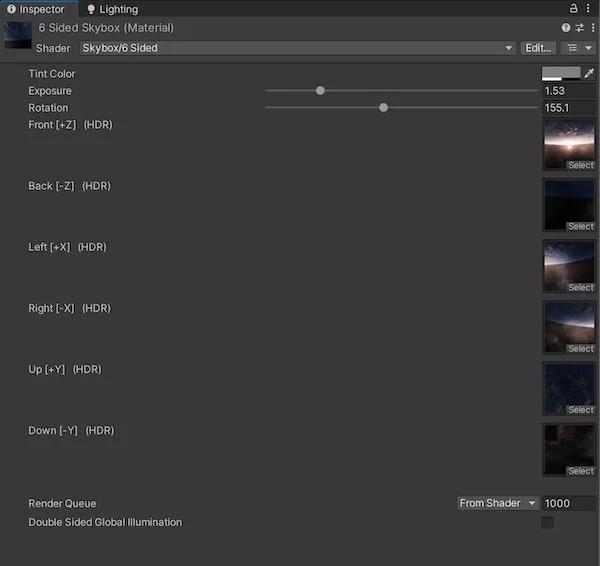
6-sided skyboxes allow you to select each face individually.
This is useful if your skybox assets are not set up as a cubemap, and all you have is individual textures.
Alternatively, being able to decide exactly which face goes where can also be useful if you want to get creative with the orientation of the skybox, such as placing it sideways or turning the skybox upside down for example, as the rotation setting on the shader typically only applies to the horizontal panning of the skybox around the Y-Axis.
The Cubemap skybox shader
Cubemap skybox shaders work in, basically, the same way as the 6-sided shader does, except that they take a single cubemap instead of 6 images.
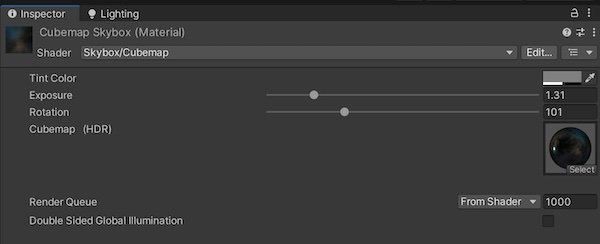
The cubemap skybox shader works in same way as the 6-sided shader, except that it uses cubemaps instead of individual textures.
To create a cubemap, which is built from an image that includes each of the six faces in an unwrapped, sideways t layout, you’ll need to set the Texture Shape of an image asset to the Cube option in the texture’s import settings.
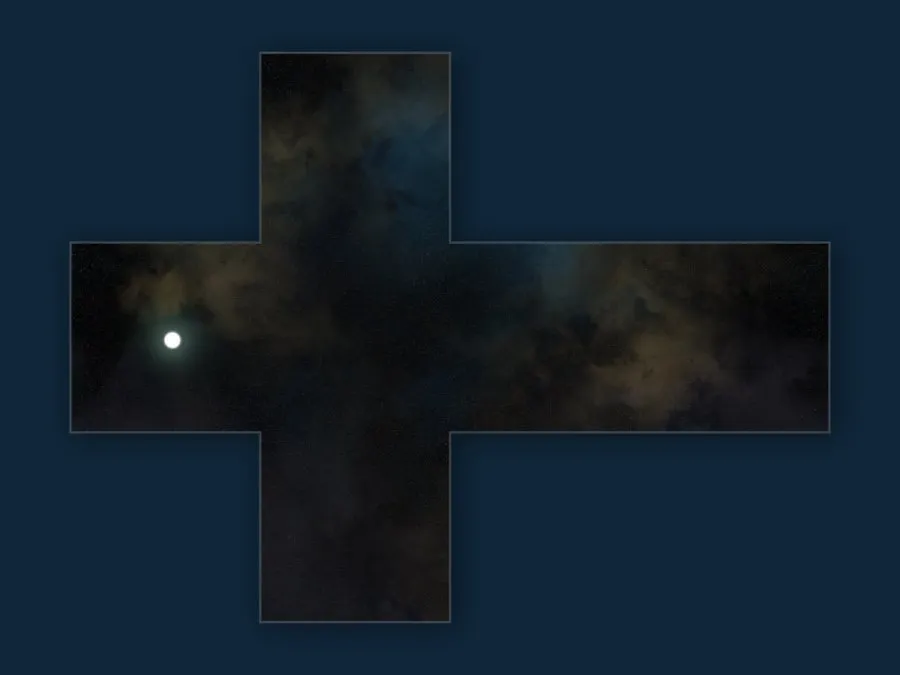
A Cubemap is, essentially, an unwrapped cube.
It’s also possible to create a cubemap from 6 separate images by creating a Legacy Cubemap asset, which you’ll find in the Create Menu under Legacy.
The Panoramic skybox shader
Panoramic shaders typically use equirectangular projection, which is a method of mapping a single flat image onto a sphere, using a latitude/longitude layout.
While this type of image mapping might be new to you, you’ve probably already seen it before.
Just open any flat map of the Earth and you’ll see a 2D image that can be projected onto a sphere to create the globe.
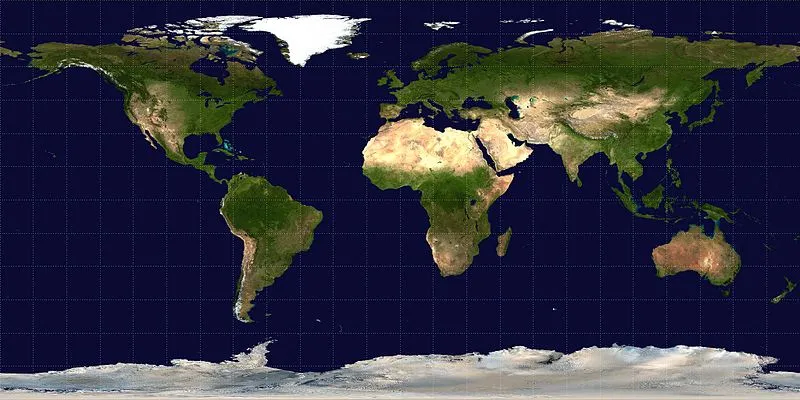
Even if it’s new to you, you’ve probably seen equirectangular projection before (source).
This type of projection can also be used for 360 video where, even though the projection of the video is flat and rectangular, the way that it’s distorted means that it can be mapped spherically, creating a video that appears to surround the camera seamlessly.
How to create a video skybox
It’s possible to create a Video Skybox using the panoramic skybox shader and a 360 video file.
To do it, simply drag the video into your scene to create a Video Player.
Next, create a Render Texture asset, change its dimensions to match the video you want to use and set the Depth Stencil Format to None.
Finally, output the video playback to the render texture.
You’ll then be able to use that texture with a panoramic skybox.
The Procedural skybox shader in Unity
The Procedural Skybox shader is a generative material that creates a coloured sky, ground, sun and atmosphere that can all be modified using the shader’s built-in settings.
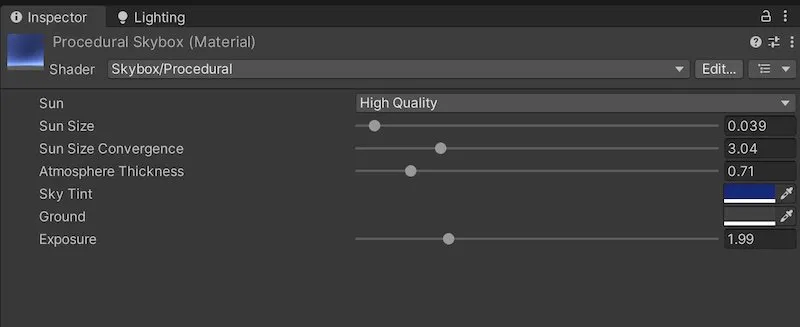
Procedural Skyboxes are created without textures, using settings and colours to generate a dynamic sky instead.
The skybox material doesn’t require any images to work, and instead uses colours and settings to determine how it should look.
For example, changing the thickness of the atmosphere changes how light is scattered through it, if it is at all.
Which can be used to create planetary effects.
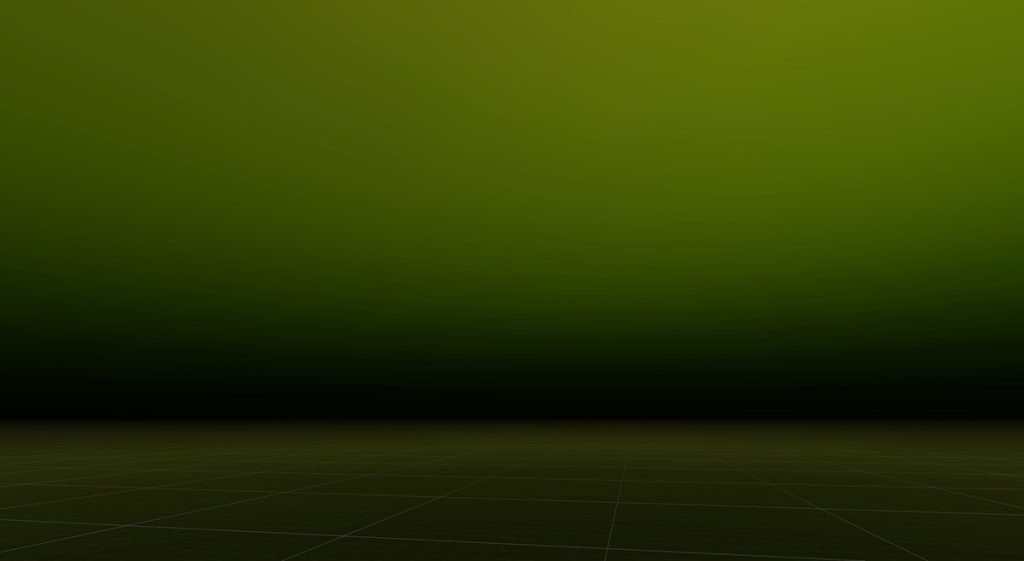
Like these:
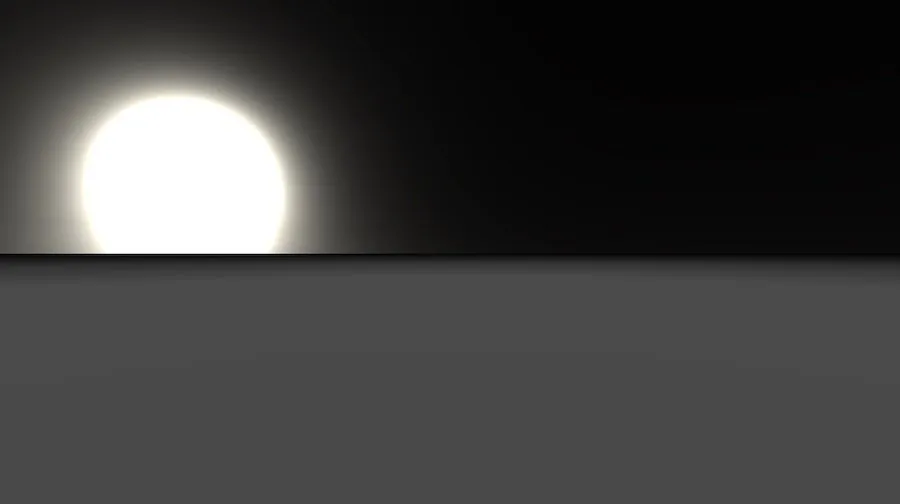
A thin atmosphere creates a moon-like appearance,
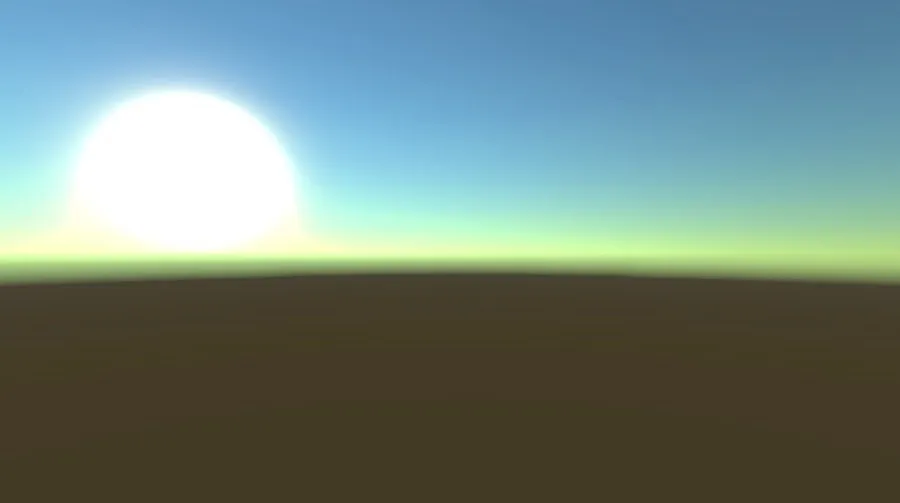
While the normal atmosphere setting looks similar to Earth.
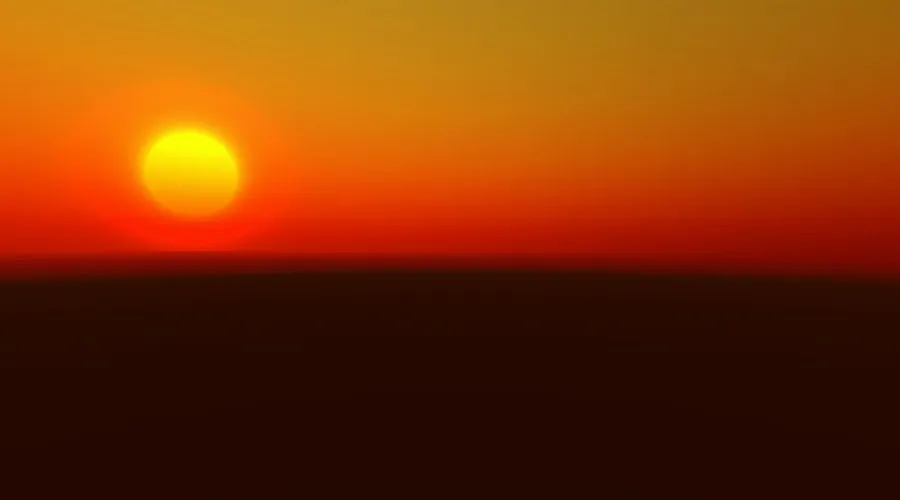
Thicker atmospheres create a dramatic, foggy effect and colour scattering.
When using the Procedural Skybox the angle of the sun is determined by the scene’s sun source which, by default, is the Directional Light that’s added to the scene when you create it.
What this means is that rotating the light places the sun at a different position in the skybox, allowing you to create dramatic sunsets, bright daytime or night.
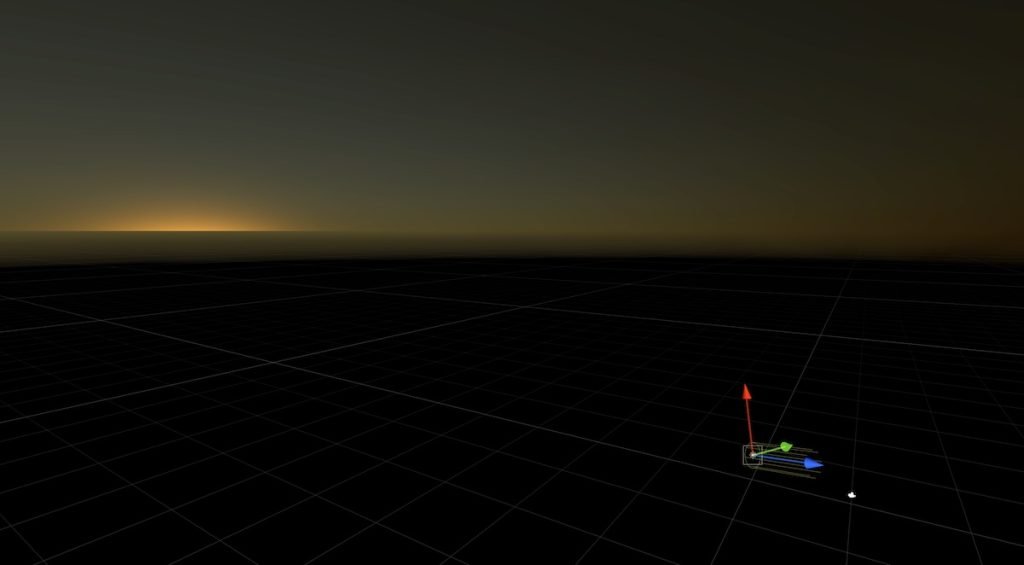
It’s possible to change the position of the sun in a procedural skybox by rotating the environment’s ‘sun source’ which, by default, is the directional light that’s added to the scene when you create it.
This can be useful, as it allows you to modify the appearance of the sky simply by rotating the directional light in the scene, making it easier to set up transitions between day and night, with a realistic sunset in between.
How to make a day/night cycle in Unity
When using a Procedural Skybox, it’s possible to change the position of the sun and, as a result, the tone and brightness of the scene, by rotating the main directional light.
As the sun approaches the horizon, it will scatter light across the sky in a different way, causing a coloured sunset, just like it would in real life.
Which is great, as it means it’s possible to create a realistic day/night effect, just by rotating the directional light over time.
Like this:
[Range(0,24)]
[SerializeField] float hour;
[SerializeField] float hourDuration = 5;

void Update()
{
    hour += (1 / hourDuration) * Time.deltaTime;
    if (hour > 24)
    {
        hour -= 24;
    }
    float angle = 360 * (hour / 24);
    if (angle > 360)
    {
        angle -= 360;
    }

    transform.rotation = Quaternion.Euler(-90 + angle, 0, 0);
}
In this example, offsetting the rotation of the light to -90 degrees means that zero hours will coincide with the directional light facing up, meaning that the sun is directly beneath the camera, roughly approximating the middle of the night.
The different types of skybox shader in Unity are, basically, just different methods of wrapping visual assets around the camera.
Making your own is as simple as choosing a skybox shader type and passing your own assets in.
But where can you get skybox assets from?
And how can you make your own?
Where to get skybox assets
Depending on the type of scene you’re trying to create, it can often make a lot of sense to simply buy the skybox assets that you need.
This is because, especially if you’re creating a traditional sky, like the kind of normal blue skies, sunsets and clouds that everyone is used to seeing in real life, it’s pretty unlikely that the sky texture you pick will be easily recognisable as an asset.
As a result, unless it’s drawn in a unique style, or includes easily identifiable elements, there’s nothing wrong with choosing a skybox from AllSky, for example, and simply getting on with the rest of your game.
But, what if you don’t want to use purchased textures?
What if you want to generate unique skyboxes yourself?
Well, there are tools for that too…
Skybox generators for Unity
One of the most flexible options for creating dynamic skyboxes is to use a purpose-built tool.
Altos Sky and Clouds, for example, is a lightweight option that allows you to create dynamic sky and clouds in Unity projects that use the Universal Render Pipeline.
While, if you want to generate a space skybox, the Space 3D generator (available at tyro.net) allows you to procedurally generate a random star scape, complete with sun, stars and optional nebulae, and then download it as a cubemap asset.
Or, if you want complete control over your skybox and what’s in it, it’s possible to completely build your own using Shader Graph.
And while there is, of course, a learning curve that comes with making your own shader, the upside is that you your skybox will completely customisable and unique to your project.
For more information on how to go about doing that, try Jannik Boysen’s case study:
Once you have a skybox material, and assets to use with it, you may want to tweak the shader’s settings to change how your skybox looks in the scene.
So how does that work, and what can you change?
How to change how your skybox looks
All four of the included skybox shaders allow you to change some part of how it looks by modifying the shader’s properties.
For example, it’s possible to apply a tint to texture-based skyboxes, changing their colour.
While the procedural skybox allows you to set both the colour of the sky and ground, allowing you to create other-worldly effects easily
Changing the tint of the sky and ground, and increasing the thickness of the atmosphere creates other-worldly effects.
The Exposure setting allows you to change how bright the skybox appears to be.
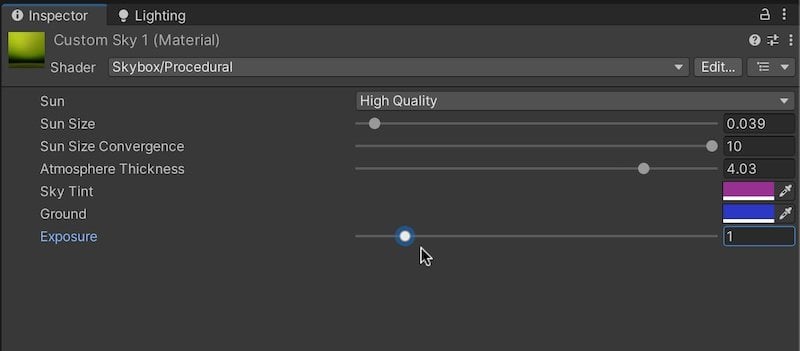
Which is important as, since the material is basically unlit, you might find that skybox is too bright, too dark or otherwise just doesn’t quite match the brightness of the scene.
How to fade a skybox (using exposure)
Changing the exposure allows you to modify how bright a skybox looks.
However, it can also be used to fade a skybox to black by modifying the exposure setting over time using a script.
This means that you could, for example, fade one skybox out, change to a different skybox and then fade it back in again.
Like this:
public class FadeSkybox : MonoBehaviour
{
    public Skybox skyboxComponent;
    public Material skyboxDay;
    public Material skyboxNight;
    public float fadeDuration;
    int exposureID;

    void Start()
    {
        exposureID = Shader.PropertyToID("_Exposure");
        StartCoroutine(TransitionToNewSkyBox(skyboxNight));
    }

    IEnumerator TransitionToNewSkyBox(Material newSkybox)
    {
        yield return new WaitForSeconds(2);
        yield return StartCoroutine(FadeExposure(0));

        skyboxComponent.material.SetFloat(exposureID, 1); // Resets the old skybox
        skyboxComponent.material = newSkybox;
        skyboxComponent.material.SetFloat(exposureID, 0);

        yield return StartCoroutine(FadeExposure(1));
    }

    IEnumerator FadeExposure(float targetValue)
    {
        float timer = 0;
        float startValue = skyboxComponent.material.GetFloat(exposureID);

        while (timer < fadeDuration)
        {
            float newValue = Mathf.Lerp(startValue, targetValue, timer / fadeDuration);
            skyboxComponent.material.SetFloat(exposureID, newValue);

            timer += Time.deltaTime;
            yield return null;
        }

        skyboxComponent.material.SetFloat(exposureID, targetValue);
    }
}
However, while this works, the skybox has to fade to black first, before the new sky can be revealed.
Which, while you might like the effect, isn’t very realistic.
Instead, if you’re trying to change a skybox by fading it, then you might want to be able to blend one sky into another instead, such as fading day into night, for example.
So how can you do that?
How to blend two skyboxes together (using Shader Graph)
To blend two skyboxes together, you’ll need to create your own skybox shader using Shader Graph.
This works by creating a new unlit shader graph, that takes two cubemaps, either as properties or set directly in the shader.
Like this:
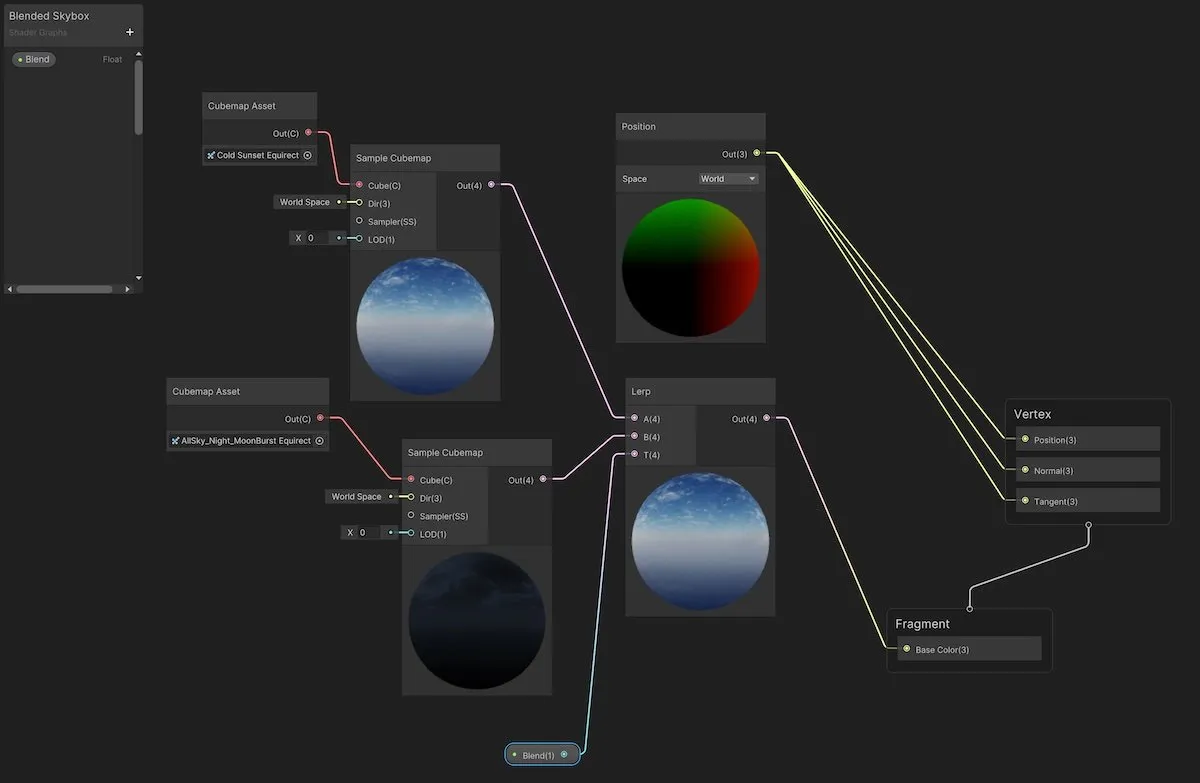
It’s possible to lerp two materials together using Shader Graph.
The shader then basically lerps the two cubemaps together using an exposed parameter, the Blend.
Just like when setting skybox’s exposure, the value can be changed by accessing the material’s blend property and adjusting it over time.
Allowing you to fade from one skybox to another, creating a smooth, gradual transition.
Like this:
public class BlendSkybox : MonoBehaviour
{
    public Skybox skyboxComponent;
    public float fadeDuration = 5;
    int blendID;

    void Start()
    {
        blendID = Shader.PropertyToID("_Blend");
        StartCoroutine(BlendSkyboxes(1));
    }

    IEnumerator BlendSkyboxes(float targetValue)
    {
        float timer = 0;
        float startValue = skyboxComponent.material.GetFloat(blendID);

        while (timer < fadeDuration)
        {
            float newValue = Mathf.Lerp(startValue, targetValue, timer / fadeDuration);
            skyboxComponent.material.SetFloat(blendID, newValue);

            timer += Time.deltaTime;
            yield return null;
        }

        skyboxComponent.material.SetFloat(blendID, targetValue);
    }
}
This script works by getting the Property ID of the parameter that you want to change by using its name, in this case ‘_Blend’, or, in the previous example ‘_Exposure’.
The point of this is to avoid passing the string in every time.
This is important, as constantly accessing the shader property using a string value is likely to cause garbage.
Instead, looking up the integer ID of the parameter using the Property To ID function allows you to get and set a particular property much more efficiently.
Which is ideal when you’re accessing a skybox property every frame, such as to fade it in or out, change the brightness, or to move the skybox using rotation.
How to rotate a skybox in Unity
All of the texture-based skybox shaders allow you to rotate the projection of the skybox horizontally around the Y-Axis by using the Rotation property.
As a result, it’s possible to create a kind of dynamic skybox by rotating it gradually over time.
This works by incrementing the rotation of the skybox every frame, depending on how fast you want it to move, and then resetting it if the value exceeds the full range of the skybox’s rotation.
Like this:
public class RotateSkybox : MonoBehaviour
{
    public Skybox skybox;
    public float rotationSpeed = 3;

    int rotationID;

    private void Start()
    {
        rotationID = Shader.PropertyToID("_Rotation");
    }

    void Update()
    {
        float newRot = skybox.material.GetFloat(rotationID);
        newRot += rotationSpeed * Time.deltaTime;
        if (newRot > 360)
        {
            newRot -= 360;
        }
        skybox.material.SetFloat(rotationID, newRot);
    }
}
Modifying a skybox directly is usually easiest when using the Skybox Component, as it allows you to get a reference to the skybox material that’s being displayed by dragging it to your script.
And, while it’s basic, this technique can be useful for creating moving 3D backgrounds, such as clouds that appear to pan across the sky.
But, if you’re trying to create a realistic skybox background with moving clouds, you might want to consider using Unity’s High Definition Render Pipeline instead.
So how do skyboxes work in HDRP projects, and what are the benefits?
How to change the skybox in Unity when using HDRP
Unity’s High Definition Render Pipeline, or HDRP, allows you to use more advanced rendering technologies in your game.
Unlike the Universal Render Pipeline, which is built for compatibility, HDRP targets higher-performance platforms, such as consoles and PC, allowing you to make the most of the graphical features that they can support.
Such as making some really nice-looking skies, for example.
But, skyboxes in HDRP projects work differently than when using URP or the built-in renderer.
In HDRP, the skybox is a component of the Volume Profile.
To change the skybox from the default setting, add a Sky and Fog Volume to the scene and then select which skybox option you’d like to use:
- HDRI Sky is image-based, and works in a similar way to the texture options found in URP and built-in renderer projects.
- Gradient is useful for creating a simple coloured background using specific colours that are blended together,
- While Physically Based Sky is the HDRP equivalent of the procedural skybox shader.
You can then select which Overrides will apply by adding and enabling them like components.
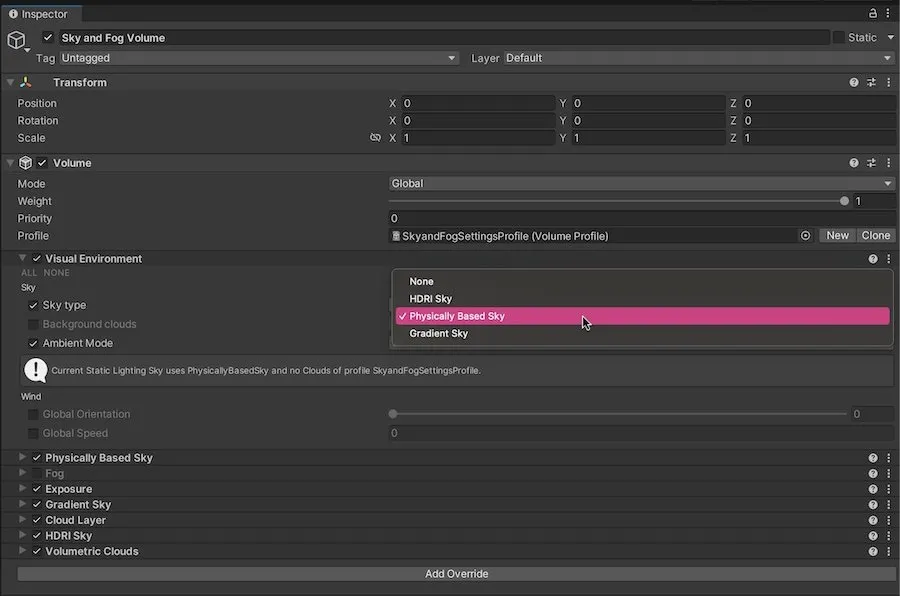
In HDRP projects, sky features can be enabled as overrides, in a similar way to adding components.
When using HDRP, it’s possible to combine multiple sky elements to produce a custom skybox without needing to make your own material.
Simply turn on the elements that you want to appear in your sky volume, such as the Cloud Layer which, because it’s separate to the skybox, allows you to combine realistic clouds with a HDRI sky or, for a really stunning effect, the physically based sky.
Which looks like this:
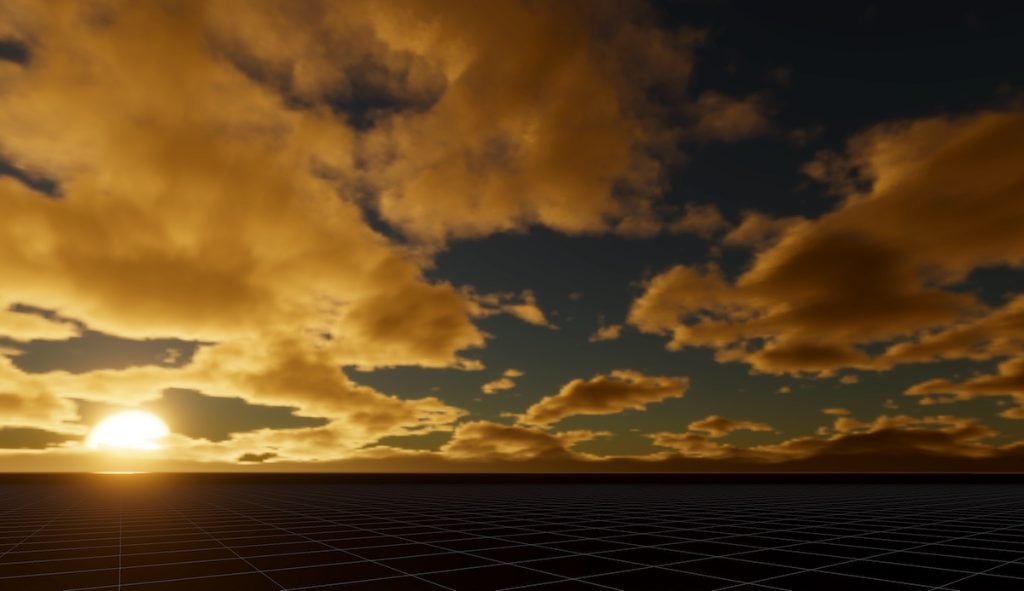
HDRP allows you to create beautiful skies very easily.
But, that’s not all.
While the Cloud Layer projects a realistic cloud texture onto the sky volume, there’s an additional option for creating clouds in Unity.
Adding the Volumetric Clouds override to the sky and fog volume allows you to generate extremely accurate volumetric clouds in your scene’s sky.
To use it, you’ll need to enable volumetric clouds in the HDRP tab of the Project Settings menu.
But, when you do, the results can be stunning:
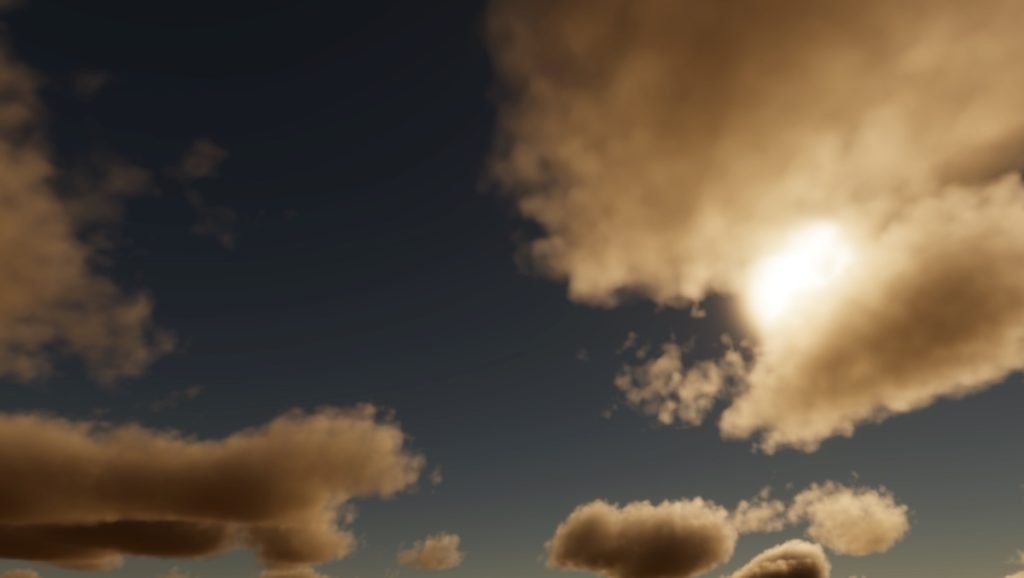
Volumetric Clouds are more customisable and are, generally, higher quality than the standard HDRP cloud layer.
Now it’s your turn
Now I want to hear from you.
How are you using skyboxes in your game?
Are you using the procedural skybox shader, texture assets, or are you making your own sky shaders in Shader Graph?
And what have you learned about creating skyboxes in Unity that you know someone else would find useful?
Whatever it is, let me know by leaving a comment.

John French writes all of the Unity tutorials for Game Dev Beginner, and specialises in deep-dive guides teaching game development basics.
