
There are lots of different ways to deliver information in your game.
You could use cutscenes, collectable notes and audio logs, or you could use dialogue, conversations between the player and non-player characters that explain the story and help the person playing the game work out what they should be doing.
But…
Even though dialogue is an extremely common feature in many different games, it can be surprisingly difficult to build a dialogue system yourself.
This is because even a simple conversation will typically require communication between multiple different systems, such as the UI, player input and the game’s state, even to deliver just a few lines of dialogue in a simple way.
In this article, you’ll learn how a basic dialogue system in Unity works, how to store, write and display your characters’ lines, and how to create multiple-choice answers and branching conversations, so that you can decide how dialogue in your game is going to work.
Here’s what you’ll find on this page:
- How dialogue systems in Unity work
- How to write and store dialogue text in Unity
- How to display dialogue in your game
- How to make a dialogue system in Unity
- What is the best dialogue system asset?
Other articles in this series:
How dialogue systems in Unity work
A dialogue system in Unity typically involves three main elements.
Authoring, which is how you will write and store the lines of dialogue that your game will use,
The Dialogue UI, which is how you will display the text of each conversation on the screen.
And, finally, the Dialogue System itself, which is how you will use scripts and code to pass dialogue data between the UI, the player, and the characters that they will interact with.
However, while building the structure and the UI of your dialogue system be tricky, actually writing all of the written content that your characters will say can be the most time-consuming task out of all three of them.
So what’s the best way to do it?
How to write and store dialogue text in Unity
If you have dialogue in your game, especially if you have a lot of it, exactly how you will write each line, and how you’ll import it into your project, can be extremely important.
This is because, after you’ve built the systems that will do things in your game, creating all of your project’s content and assets, including its written dialogue, can take a long time.
As a result, you will want to make sure that it’s as simple, and as streamlined, as possible.
For example, it’s possible to write a line of dialogue using a simple string variable that’s stored on the instance of the object that will use it.
Like this:
[TextArea]
public string dialogue;
Or, if your dialogue is separated into multiple sentences, an array of strings.
Like this:
[TextArea]
public string[] lines;
In this example, the Text Area attribute changes the shape of the input field in the inspector, from a simple line to a large box, which can make writing a longer line of text easier to do.

The Text Area Attribute will show a larger text area for the string’s public field.
But, while this will work fine for a basic dialogue system, storing text on the object in this way can be tricky to manage as your game gets bigger.
This is because if you want to change a particular line of dialogue, you’ll need to find the object that holds it first.
What’s more, if you want to reuse a line of dialogue somewhere else in your project, you’ll need to write it out a second time, as each script that’s attached to an object is a unique instance that holds its own, one-of-a-kind, data.
So what other options are there?
Well, written dialogue is basically an asset.
Which means that, just like other assets, such as models, textures, and audio files, lines of dialogue should really be created separately from the objects that will use them.
One way to do this is with Scriptable Objects.
Scriptable Objects allow you to create instances of a script inside your project, not your scene.
Put simply, they allow you to create data assets, using a script as a template.
As a result, they’re ideal for creating dialogue assets that can be managed from one place (with your other assets in the project window) and can be reused around your project.
To create a dialogue asset, create a new C# script in your project that inherits from Scriptable Object.
You’ll also need to add the Create Asset Menu attribute, which is what allows you to create instances of this type of data in your project using the Create Menu.
Like this:
[CreateAssetMenu]
public class DialogueAsset : ScriptableObject
{
    [TextArea]
    public string[] dialogue;
}
Then, in your project window, either right-click to create a new Dialogue Asset, or select Assets > Create > Dialogue Asset from the top menu.
Like this:
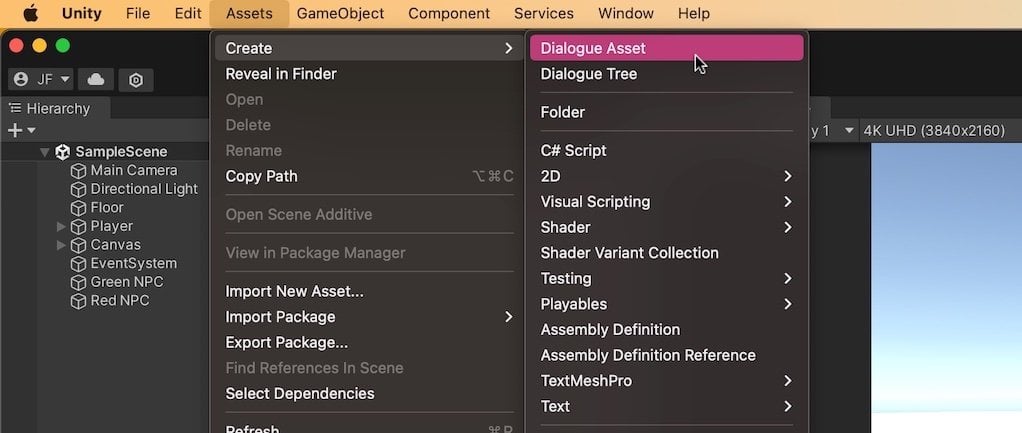
The dialogue asset that’s created can then be edited in the same way as a script on an object would be, by selecting it and editing its public values in the Inspector.
Like this:
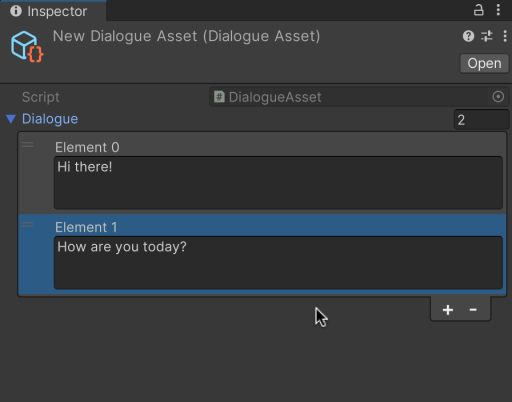
Selecting the asset will allow you to edit its public fields, in this case, the dialogue text.
What’s useful, however, is that this dialogue asset, and any others that you create, can all be accessed from one place, your assets folder.
Meaning that creating and editing dialogue can be much easier than if you need to track down the individual in-game objects that are holding each line of text.
To use the asset in your game, declare a variable of the Dialogue Asset type in a regular script that’s attached to a game object, and select the asset that you’d like to use in the Inspector, in the same way as you would set any other asset, such as an audio source, or a sprite.
Like this:
public DialogueAsset dialogue;How to import dialogue from outside of Unity
Using Scriptable Objects is typically one of the easiest ways to create written content for your game that is easy to manage, as they allow you to create custom data assets that can be found, changed, and reused easily.
However, if you’re working with writers, translating text to different languages, or you simply want to be able to manage your game’s dialogue content from outside of Unity, you might want to create it in a different format and then import it in to your project.
One way to do that is to use a file format like JSON to create dialogue files outside of Unity and then import them by reading and serialising the data (see this video for more information on how to do that).
However, unless you have a specific reason for using JSON, chances are it will make authoring the text in your game harder to do, instead of easier.
Instead, if you’re going to be writing a lot of dialogue content, it makes sense to use a system that has a better workflow than trying to write it all in the editor.
Tools such as Articy, or Ink, for example.
The benefit of using tools like these is that their interface and feature sets are designed solely around writing dialogue, which can make creating the written content in your game much easier, especially if there’s a lot of it or if you’re creating complex branching conversations.
And, when it’s time to use the dialogue in your project, both systems provide options to import your content into Unity using integration plugins that are freely available on the asset store.
Once you’ve worked out how you will create and store your text, you’re going to need a way to actually show it in your game.
So how can you create a UI panel that can be used to display dialogue text?
How to display dialogue in your game
Creating a dialogue box in Unity typically involves creating a reusable UI object with a text field that can be updated using a publicly available function.
Exactly how you do this is going to depend on the UI system you’re using and how you want it to look, but, a basic dialogue box could be as simple as a UI Panel that’s set to stretch across the screen horizontally and two Text Mesh Pro objects, one for the name of the character you’re speaking with, and one for their dialogue.
Like this:
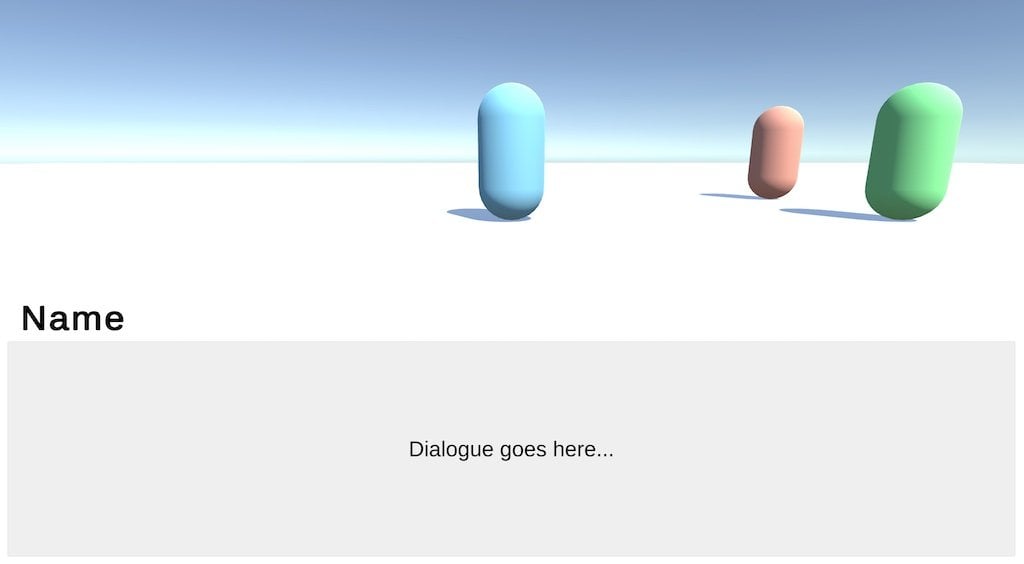
A dialogue box could be as simple as a UI panel with text fields for the content and the person you’re speaking with.
You can then control the dialogue box with public functions that turn it on, turn it off, and update its content.
Like this:
[SerializeField] TextMeshProUGUI dialogueText;
[SerializeField] TextMeshProUGUI nameText;
[SerializeField] GameObject dialoguePanel;

public void ShowDialogue(string dialogue, string name)
{
    nameText.text = name + "...";
    dialogueText.text = dialogue;
    dialoguePanel.SetActive(true);
}

public void EndDialogue()
{
    nameText.text = null;
    dialogueText.text = null;;
    dialoguePanel.SetActive(false);
}
All this script does is turn on the dialogue panel and set the text values of the display to match the dialogue data that’s been provided.
This happens instantly, however, it’s likely that, in your game, you may want to fade the box in, by Lerping a Canvas Renderer’s alpha value, for example, or animate the display of the text by revealing each character one by one, creating a kind of typewriter effect.
While a basic dialogue box can be fairly straightforward to make, when it comes to actually implementing one in your project, depending on what you want it to do, it may not be so simple.
For example, how can you manage multiple, skippable, lines of dialogue?
How can you prevent the player from doing anything else when a conversation is happening?
And how can you connect your player, NPCs and the UI system together, in a way that makes sense?
This is the System part of the dialogue system, and it’s how you’ll make everything actually work.
How to make a dialogue system in Unity
Generally speaking, a dialogue system is the connection between your authored dialogue assets and the UI that will be used to display them.
Basically, it’s the scripts and the structure that you will put in place to make everything work together.
But how should you do that?
There are a lot of different ways that you could make a dialogue system.
However, a simple approach is to keep each script with the object that will use it.
For example, the player will be able to trigger conversations and skip through dialogue, NPCs will store their own conversation data and, when they’re spoken to, that information can be passed to the UI to display it on the screen.
Getting this to work in a manageable way can sometimes be tricky, particularly early on in your project.
This is because dialogue systems will often touch multiple other systems that may not be ready yet, such as the UI, player input and game state.
As a result, it can be a good idea to keep each system as separate, and uncoupled, as possible, making them easier to change later on.
So what might that actually look like?
Dialogue system example
In this example, I’ve created a basic system that allows a player to talk with a non-player character and, when they do, their conversation data is passed to a UI dialogue box.
Each NPC holds a reference to a Dialogue Asset, a string variable for their Name and a Repeat Start Position number that will be used to decide where the conversation should start if they’ve been spoken to before.
Like this:
public class NPC : MonoBehaviour
{
    [SerializeField] bool firstInteraction = true;
    [SerializeField] int repeatStartPosition;

    public string npcName;
    public DialogueAsset dialogueAsset;

    [HideInInspector]
    public int StartPosition {
        get
        {
            if (firstInteraction)
            {
                firstInteraction = false;
                return 0;
            }
            else
            {
                return repeatStartPosition;
            }
        }
    }
}
This works by using a custom Get Property, which allows you to change what value is returned when a variable is accessed based on other data.
Such as if this particular NPC has been spoken with before, in which case the repeat start position value can be used to read the lines of dialogue from a different point, such as just the last one or two lines, for example.
The player can read this data when they interact with the object by checking to see if they have an NPC component or not.
For example, if the player is standing in front of the object they want to interact with, a Raycast can be used to get a reference to the object and the Try Get Component function can be used to check if that object is interactable or not.
Then, if it is, a conversation can be started by reading the NPC’s dialogue data.
Like this:
public class Player : MonoBehaviour
{
    [SerializeField] float talkDistance = 2;
    bool inConversation;

    void Update()
    {
        if (Input.GetKeyDown(KeyCode.E))
        {
            Interact();
        }
    }

    void Interact()
    {
        if (inConversation)
        {
            DialogueBoxController.instance.SkipLine();
        }
        else
        {
            if (Physics.Raycast(new Ray(transform.position, transform.forward), out RaycastHit hitInfo, talkDistance))
            {
                if (hitInfo.collider.gameObject.TryGetComponent(out NPC npc))
                {
                    DialogueBoxController.instance.StartDialogue(npc.dialogueAsset.dialogue, npc.StartPosition, npc.npcName);
                }
            }
        }
    }
}
This basic script works by trying to talk to an NPC if there is one or, if the player is already in a conversation, it prompts the dialogue system to skip the current line of dialogue.
The player is able to connect directly to the dialogue controller script because it is a Singleton, meaning that it’s possible for the player script to send dialogue data to the UI without getting a reference to it.
However, it’s up to the dialogue controller, not the player, to decide when a conversation is happening, since it might be possible for a character to start a conversation with the player, instead of the other way around.
As a result, it can be better to decide that the player is in a conversation whenever the dialogue box is shown, at which point an On Dialogue Started event is called, followed by an On Dialogue Ended event when the conversation ends.
The player, as well as any other systems that may need to respond to a conversation taking place, such as the script that allows the player to move, for example, can then connect their methods to these events by subscribing to them.
Like this:
public class Player : MonoBehaviour
{
    [SerializeField] float talkDistance = 2;
    bool inConversation;

    void Update()
    {
        if (Input.GetKeyDown(KeyCode.E))
        {
            Interact();
        }
    }

    void Interact()
    {
        if (inConversation)
        {
            DialogueBoxController.instance.SkipLine();
        }
        else
        {
            if (Physics.Raycast(new Ray(transform.position, transform.forward), out RaycastHit hitInfo, talkDistance))
            {
                if (hitInfo.collider.gameObject.TryGetComponent(out NPC npc))
                {
                    DialogueBoxController.instance.StartDialogue(npc.dialogueAsset.dialogue, npc.StartPosition, npc.npcName);
                }
            }
        }
    }

    void JoinConversation()
    {
        inConversation = true;
    }

    void LeaveConversation()
    {
        inConversation = false;
    }

    private void OnEnable()
    {
        DialogueBoxController.OnDialogueStarted += JoinConversation;
        DialogueBoxController.OnDialogueEnded += LeaveConversation;
    }

    private void OnDisable()
    {
        DialogueBoxController.OnDialogueStarted -= JoinConversation;
        DialogueBoxController.OnDialogueEnded -= LeaveConversation;
    }
}
Events like this can be useful when multiple systems may need to respond to the same in-game event.
In this case, when a conversation is happening, you might want to move the camera, disable input, or pause the game.
Which, if there’s a publicly available event to subscribe to, makes it much easier to manage.
The dialogue box controller holds a public static reference to a variable of its own type, which it sets in Awake, so long as it’s the only one that exists.
This is what makes the dialogue box script a Singleton, meaning that other scripts can access its public functions and variables via the class reference, without having a direct connection to the script.
While singletons can, sometimes, cause problems in a project, there will more than likely only ever be one dialogue box, meaning that a singleton, in this case, is appropriate and is unlikely to cause any major issues.
Because each set of dialogue may include multiple lines and may need to wait for the player to skip each section, it’s delivered in a coroutine, where the next line of dialogue is only triggered once the Skip Line function is called.
Then, when the dialogue ends, the UI box is closed and an On Dialogue Ended event is called, allowing the player, and any other subscribed scripts, to act in response.
Which, all together, looks like this:
using UnityEngine.UI;
using System;
using TMPro;

public class DialogueBoxController : MonoBehaviour
{
    public static DialogueBoxController instance;

    [SerializeField] TextMeshProUGUI dialogueText;
    [SerializeField] TextMeshProUGUI nameText;
    [SerializeField] CanvasGroup dialogueBox;

    public static event Action OnDialogueStarted;
    public static event Action OnDialogueEnded;
    bool skipLineTriggered;

    private void Awake()
    {
        if (instance == null) {
            instance = this;
        }
        else {
            Destroy(this);
        }
    }

    public void StartDialogue(string[] dialogue, int startPosition, string name)
    {
        nameText.text = name + "...";
        dialogueBox.gameObject.SetActive(true);
        StopAllCoroutines();
        StartCoroutine(RunDialogue(dialogue, startPosition));
    }

    IEnumerator RunDialogue(string[] dialogue, int startPosition)
    {
        skipLineTriggered = false;
        OnDialogueStarted?.Invoke();

        for(int i = startPosition; i < dialogue.Length; i++)
        {
            dialogueText.text = dialogue[i];
            while (skipLineTriggered == false)
            {
                // Wait for the current line to be skipped
                yield return null;
            }
            skipLineTriggered = false;
        }

        OnDialogueEnded?.Invoke();
        dialogueBox.gameObject.SetActive(false);
    }

    public void SkipLine()
    {
        skipLineTriggered = true;
    }
}
This basic system works with a set of strings to deliver a linear, one-way conversation.
But, typically, the conversations in your game might be a little more involved than that.
They might allow you to respond to NPC’s questions or direct the flow of conversation by choosing what to talk about next.
But how can you build that in Unity?
How to create a dialogue system with multiple options (using a dialogue tree)
A dialogue tree, or a conversation tree, is simply a set of dialogue paths that can be triggered by decisions, answers or other input from the player during a conversation.
For example, in a basic form, a non-player character might always start with a default set of dialogue lines but may then move to one of two different conversation branches, depending on the player’s answer to a question.
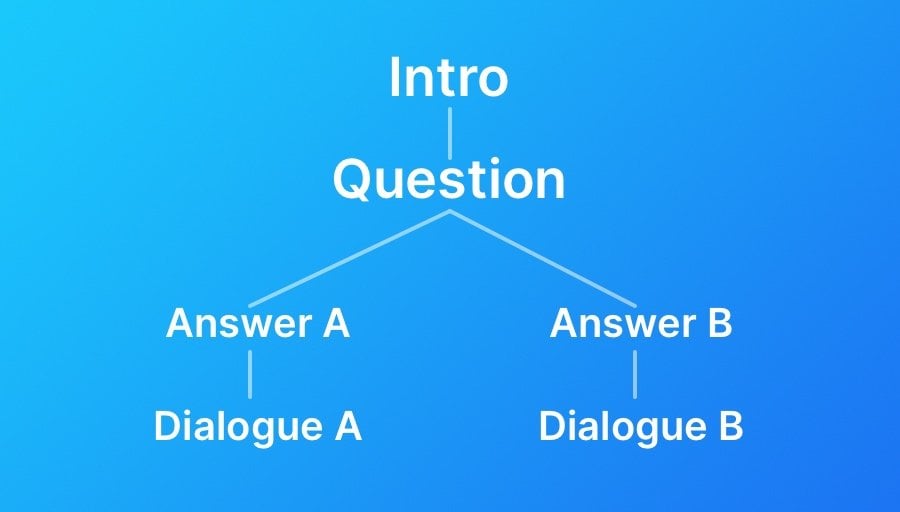
A dialogue tree is, essentially, just different branches of conversation.
In Unity, it’s possible to create a basic version of a dialogue tree using a combination of Scriptable Objects and Structs, custom data types that you make, and that can be serialised in the Inspector.
So how does that work?
Just like before, the Dialogue Tree asset is a Scriptable Object, which allows you to manage different conversation assets from the project, not the scene, making it a little easier to create and change conversations as you build your game.
The dialogue tree contains just one variable, an array of Dialogue Sections,
Like this:
[CreateAssetMenu]
public class DialogueTree : ScriptableObject
{
    public DialogueSection[] sections;
}
Dialogue Sections are Structs, custom data types that, in this example, contain an array of strings, just like the basic dialogue asset examples used earlier in this article.
However, they’re different in that each section also contains a boolean, that decides if this particular dialogue path ends the conversation or, if it doesn’t, leads to a Branch Point.
Structs can be defined in the same file as the class that uses them, or you might choose to place it in their own script.
In either case, you’ll need to make sure that the struct is serialisable, meaning it can be displayed in the Inspector, by using the System Serializable attribute.
Like this:
[System.Serializable]
public struct DialogueSection
{
    [TextArea]
    public string[] dialogue;
    public bool endAfterDialogue;
    public BranchPoint branchPoint;
}
The Branch Point is another struct, that holds one question, that will follow the dialogue section’s lines and an array of possible Answers.
Which looks like this:
[System.Serializable]
public struct BranchPoint
{
    [TextArea]
    public string question;
    public Answer[] answers;
}
The Answer type is also a struct, because it holds two pieces of information.
It’s made up of a string, the answer’s label, and an integer, which is the element in the array of dialogue sections that this particular answer will lead to next.
Like this:
[System.Serializable]
public struct Answer
{
    public string answerLabel;
    public int nextElement;
}
When these custom data types are combined, it’s possible to create a basic kind of dialogue tree using just simple arrays, where every section of dialogue either ends the conversation or moves it to a new branch.
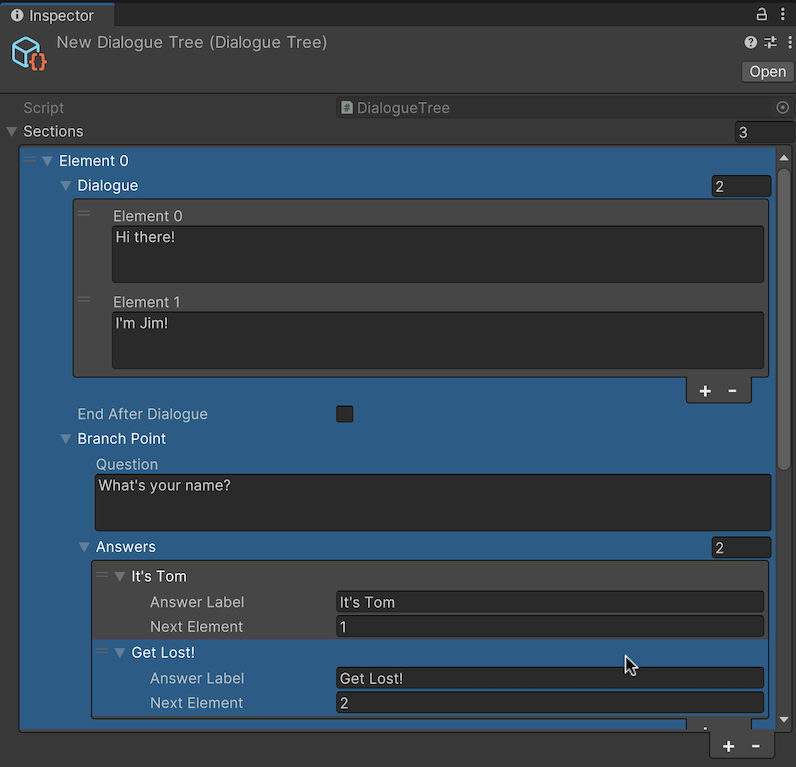
While it is basic, it’s possible to create a kind of dialogue tree using just arrays and custom data types, in this case, structs.
Then, all the dialogue controller needs to do is wait for an answer to be submitted after the dialogue section is finished or end the conversation there.
Like this:
using TMPro;
using UnityEngine;
using UnityEngine.UI;
using System;

public class DialogueBoxControllerMulti : MonoBehaviour
{
    public static DialogueBoxControllerMulti instance;

    [SerializeField] TextMeshProUGUI dialogueText;
    [SerializeField] TextMeshProUGUI nameText;
    [SerializeField] GameObject dialogueBox;
    [SerializeField] GameObject answerBox;
    [SerializeField] Button[] answerObjects;

    public static event Action OnDialogueStarted;
    public static event Action OnDialogueEnded;

    bool skipLineTriggered;
    bool answerTriggered;
    int answerIndex;

    private void Awake()
    {
        if (instance == null)
        {
            instance = this;
        }
        else
        {
            Destroy(this);
        }
    }

    public void StartDialogue(DialogueTree dialogueTree, int startSection, string name)
    {
        ResetBox();
        nameText.text = name + "...";
        dialogueBox.SetActive(true);
        OnDialogueStarted?.Invoke();
        StartCoroutine(RunDialogue(dialogueTree, startSection));
    }

    IEnumerator RunDialogue(DialogueTree dialogueTree, int section)
    {
        for (int i = 0; i < dialogueTree.sections[section].dialogue.Length; i++)
        {
            dialogueText.text = dialogueTree.sections[section].dialogue[i];
            while (skipLineTriggered == false)
            {
                yield return null;
            }
            skipLineTriggered = false;
        }

        if (dialogueTree.sections[section].endAfterDialogue)
        {
            OnDialogueEnded?.Invoke();
            dialogueBox.SetActive(false);
            yield break;
        }

        dialogueText.text = dialogueTree.sections[section].branchPoint.question;
        ShowAnswers(dialogueTree.sections[section].branchPoint);

        while (answerTriggered == false)
        {
            yield return null;
        }
        answerBox.SetActive(false);
        answerTriggered = false;

        StartCoroutine(RunDialogue(dialogueTree, dialogueTree.sections[section].branchPoint.answers[answerIndex].nextElement));
    }

    void ResetBox()
    {
        StopAllCoroutines();
        dialogueBox.SetActive(false);
        answerBox.SetActive(false);
        skipLineTriggered = false;
        answerTriggered = false;
    }

    void ShowAnswers(BranchPoint branchPoint)
    {
        // Reveals the aselectable answers and sets their text values
        answerBox.SetActive(true);
        for (int i = 0; i < 3; i++)
        {
            if (i < branchPoint.answers.Length)
            {
                answerObjects[i].GetComponentInChildren<TextMeshProUGUI>().text = branchPoint.answers[i].answerLabel;
                answerObjects[i].gameObject.SetActive(true);
            }
            else {
                answerObjects[i].gameObject.SetActive(false);
            }
        }
    }

    public void SkipLine()
    {
        skipLineTriggered = true;
    }

    public void AnswerQuestion(int answer)
    {
        answerIndex = answer;
        answerTriggered = true;
    }
}
However, while this does work and can be simple enough to use, it can also be inconvenient.
Arrays are not the ideal format for writing large amounts of text, and can often be tricky to use.
This is because, since each dialogue section includes a large amount of information, it only takes a couple of elements to fill up the available area in the Inspector, meaning that you’ll have to scroll through the array to see the full conversation.
As a result, if you plan to include any kind of complex dialogue in your game, you will more than likely be better off using a Dialogue System Asset instead.
What’s the best dialogue system asset?
Generally speaking, dialogue systems can be one of those obstacles in Unity where it simply doesn’t make sense to try to build your own solution.
This is because it’s usually pretty unlikely that the amount of time it will take to build a system that you’re happy with is worth less than the cost of simply buying an asset that already works very, very well.
As a result, unless you have extremely specific requirements, or buying an asset simply isn’t an option for you, purchasing a ready-made dialogue system is almost always going to be the easiest way to get professional results quickly.
But what’s the best dialogue system asset?
Dialogue System for Unity, by Pixel Crushers, is generally considered to be one of the best options available for managing dialogue in Unity.
It includes a node-based visual editor, which makes dialogue trees much, much easier to work with, and provides a huge number of additional features beyond basic dialogue, such as callouts, quests and audio.
And while it can be tricky to learn at first, it’s hugely customisable and can be integrated with Unity’s existing systems as well as other popular assets.
Now it’s your turn
Now I want to hear from you.
How are you managing dialogue in your game?
Have you created your own dialogue system, are you using an asset, or are you importing data from other content writing tools?
And what have you learned about writing dialogue in Unity that you know someone else would find useful?
Whatever it is, let me know by leaving a comment.

John French writes all of the Unity tutorials for Game Dev Beginner, and specialises in deep-dive guides teaching game development basics.

Comments
Thanks pro, your articles are really helpful. Hope you will post about opp in unity, the topic is really good and necessary
Thank you!
Thank you, very informative article, Dialogue systems are really dependent on Node Graph’s to be used conveniently. So without a graph, a game with middle-size dialogue system will be a lot of mess with all the scriptable objects and search.
So its better to use an asset a system with node graph or create your own node graph.
Absolutely!
This is more a general comment. I’ve discovered your blog about two weeks ago and Since then I’ve been binge reading your articles whenever I found time to do so. I think your paragraphing and interweaving of code works in favour of clarity and it is always pleasant to read your articles.
Also because of you my wallet is grumbling because I’ve been generously shopping the assets you’ve recommended since we just so happened to have a nice summer sale in the asset store.
I will regularly check back and am grateful for your insights and explanations and hope they will keep coming
Thanks so much! I apologise for your wallet, but at least the blog is free!
Thanks for the guides! I’ve been trying to get into coding for Unity for years on and off. Found your site and now I’m starting to feel like I actually get some of the things that felt overwhelming before 🙂
So glad I could help!
Is there a way to only include the branch point struct as needed? Wouldn’t the unused branch points take up memory?
There will be a way to do that, yes. In this example, for simplicity, the dialogue section always includes a branch point so that you can easily create dialogue sets of variable length, and, unless you’re creating massive conversations, the difference in memory is likely to be negligible. But, realistically, if you’re going to need anything more advanced than a basic system, the bottleneck probably won’t be memory, it will be usability, so you’d be better off with buying a dedicated asset.
uhh there are some errors that dialogue tree and branch point cannot be found
Just to double check, are you including those classes from the post in your scripts, because they’re not built-in.
thanks figured it out!
so where should i put the scripts at?
Hi!
Very usefull tuto, but i struggle a lot with adding the coroutine TypewritterEffect. I don’t know where i should start the coroutine (for me it’s in the StartDialogue coroutine) and what string line i should reference??
Thanks dude if you take time to answer me 🙂
You can start the coroutine in a normal function, but it’s tricky to know the problem you’re dealing with without seeing your code. If you’re happy to share it, email me at [email protected] and I’ll try to help you.
This may sound like a really newbie thing to suggest but after reading that last comment I was wondering wouldn’t it be easier to just put the dialogue in a coroutine, like this:
pseudocode
IEnumerator cafe_scene()
{
dialogueobject.text =”blah blah blah”;
yield return (pause)
somemethod() or whatever you want to do here, maybe show an image;
dialogueobject.text =”blah blah blah”;
yield return (pause)
somemethod();
dialogueobject.text =”blah blah blah”;
yield return (pause)
}
See what I mean? The coroutine would grow pretty big pretty quickly but still it would work wouldn’t it? You could even include menus in there if you needed.
Coroutines would work for this yeah, because they’re ideal for staging logic that needs to happen over a number of frames instead of one. The issue would be needing to write a new one for each conversation, ideally you’d pass a conversation asset into the coroutine so that you could reuse it when you needed it. I’ve used a method similar to that, using a coroutine, in the last example in the article.
Thanks for taking the time to reply.
Yes, I saw the last part of your article using coroutines, and this is what also got me thinking about making a coroutine for each conversation, and just having them as subroutines like we used to have back in the day.
I know a lot people who use unity, frown of using coroutines like this but if it works why not? Unless there is something about coroutines that means you can’t use them this way. I mean perhaps using them this way, just like subroutines, could lead to problems down the line but I’ve never seen any mention of anything about that online. Although having said that I’m quite new to unity and still finding my way through.
I think, like with all things, it depends exactly how you use them but just like Get Component and other potentially ‘bad’ functions, they solve a certain type of problem really well. In which case you’d just be making things more difficult for no real reason. Personally, I love coroutines!
I’m sorry to bother you with this, but after numerous tries I still don’t know what to do.
For some reason, in the DialogueBox Multi, Unity always tells me that BranchPoint does not exist in this context (everything else seems to work just fine, like the Dialogue Tree itself).
The problem shows up in the ShowAnswers(BranchPoint branchPoint) function.
I rechecked my Dialogue Tree scriptable Object script, and I couldn’t find any issues. In the DialogueSection struct I have a line “public BranchPoint branchPoint” and then I have the BranchPoint public struct itself.
I saw your answer to another comment with a similar issue, but I am still not sure what I’m doing wrong. Every other line of code in my Dialogue controller seems to work just great!
I would really appreciate your help.
P.S. I’m a newbie gamedev and your blog is my favorite go-to for any learning!!! your instructions are impeccable and very clear
No problem, would you be willing to send me your script at [email protected] so that I can take a look?
Thank you for reaching out!
Actually, I couldn’t let this problem go, so after some time shooting in the dark, I decided to change a function like this:
void ShowAnswers(DialogueTree.BranchPoint branchPoint)
And it worked!! I’ll be honest I don’t know exactly why, but I’m just happy it did.
Thanks to you and your tutorial I have a dialogue with choices up and running!
I’m using xNode, I started similar to how you explained here, then realized i would hate my life.
Creating custom nodes for text and branching conditions are fantastic and dialouge graphs look fantastic and visually appealing that anyone could create a dialouge tree.
I’m even planning to use the system from my quests, already partially set-up and lookimg sexy
I might even make an NPC decision tree, even though they’re mostly supposed to be stupid and static.