
Adding basic logic to an object in Unity can be very straightforward.
For example, if you want to make an object jump, simply add a script that allows it to do that whenever the jump button is pressed.
Easy, right?
However, chances are, jumping isn’t the only thing that a player will be able to do in your game.
While adding one behaviour to an object can be very simple, as you add more and more actions, such as running, ducking and sliding, for example, managing how and when they’re triggered can be difficult to do.
For example, how can you stop the player from jumping when they’re already airborne, or from sliding along the ground when they’re not running first?
One option is to use if statements to check what the player is or isn’t doing before you allow them to do something else.
Like this:
if (grounded)
{
    // Can Jump
}
Which can work just fine.
However, depending on how many different conditions could affect the state of your object, it can also become very difficult to keep checking them all before deciding what an object should or should not be able to do.
Meaning that, if you find yourself writing multiple if conditions, just to keep the code in your script separate, you might be better off using a State Machine instead.
A State Machine is a programming design pattern that allows an object or a system to behave differently, depending on its current circumstances.
They can be extremely useful for managing the flow of logic in your game, allowing you to control how objects behave in different contexts, to build basic enemy AI and manage global game state more easily.
In this article, you’ll learn how State Machines in Unity work, what they’re good for, and when not to use one, so that you can decide for yourself if a state machine will make your project easier to work with.
Here’s what you’ll find on this page:
- What are State Machines in Unity?
- How to make a State Machine in Unity
- Hierarchical State Machines
- State Machine Assets
Let’s get started…
What are State Machines in Unity?
A Finite State Machine is a design pattern that allows you to process logic depending on the current state of an object or system.
The benefit of this is that it allows you to focus on only the logic that’s relevant to the current situation at any given time and only the conditions that could cause that to change, ignoring everything else.
Which, depending on your object’s behaviour, can make it much easier to work with.
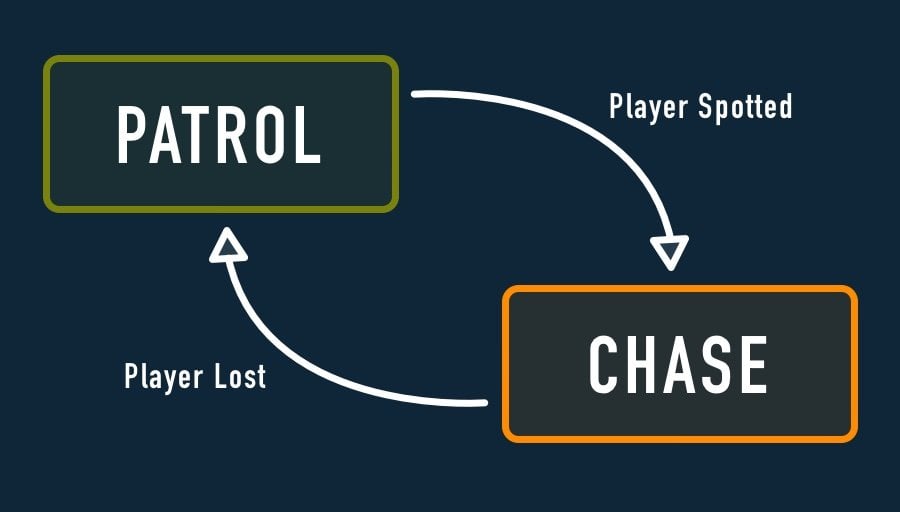
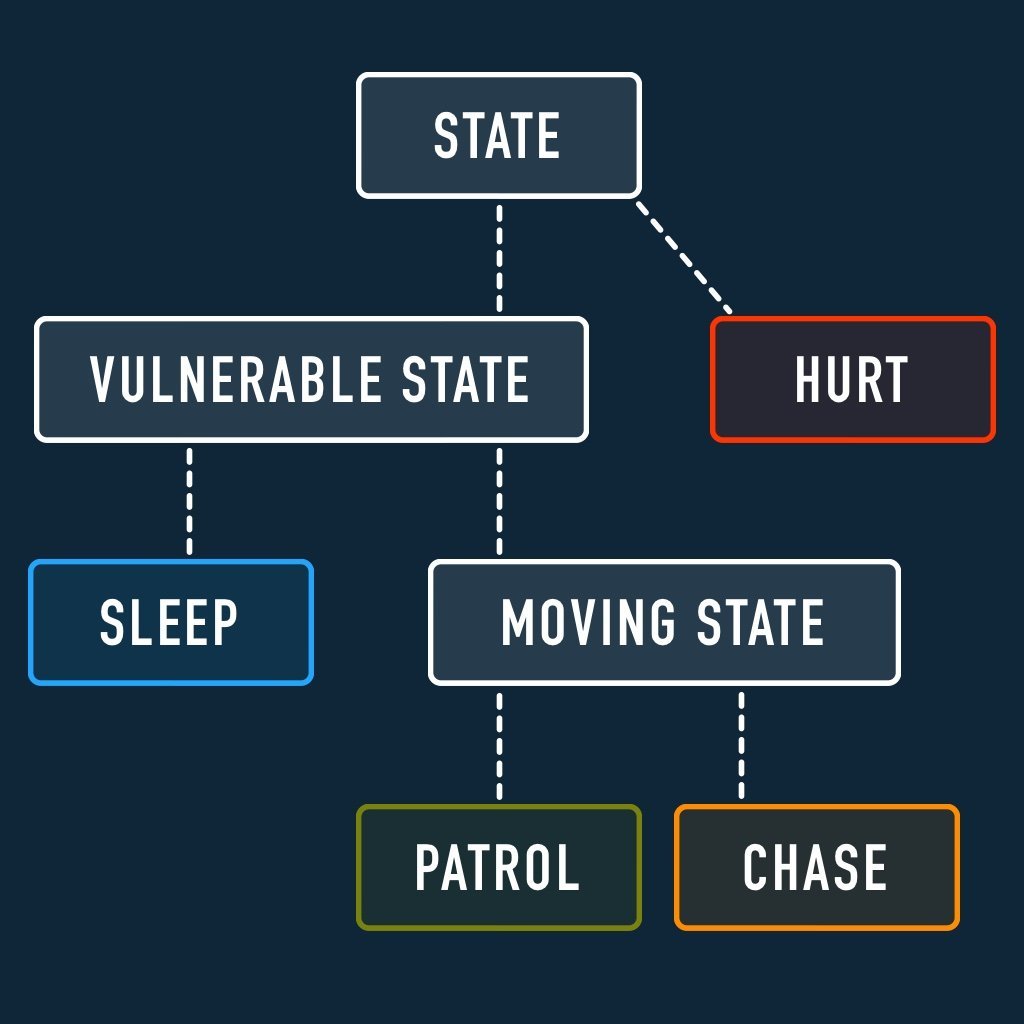
For example, an enemy object might have two states, a Patrol State and a Chase State.
When the enemy is patrolling, it’s wandering around, but when it sees the player, it chases them.
To do this using a script would typically involve checking to see if the player was in view of the enemy and then changing its behaviour in response.
Which, if all the enemy does is change what it’s moving towards, wouldn’t be too difficult to do in a single script.
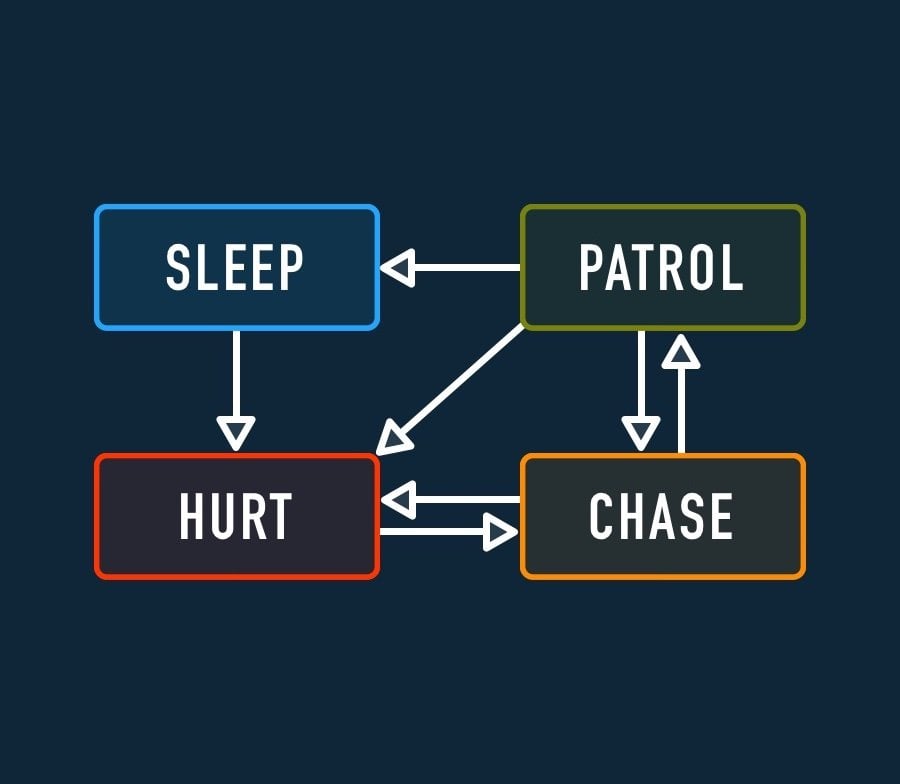
But, as soon as you start to add extra features to your enemy script, such as a little animation that makes them jump up when they’re alerted to the player, or additional states, such as a Sleep State, or a Hurt State, for example, managing what the enemy should be doing at any given moment can start to become difficult.
This is because you’ll typically have to check what the enemy is doing right now, before you can let them do something else.
public void HurtEnemy()
{
    if(sleeping)
    {
        // Wake up
    }

    if(patrolling)
    {
        // Chase!
    }
}
In a simple system, this might not be a problem.
But, it can quickly become complicated if there are many different conditions that could interfere with a particular action as you’ll need to check all of them before trying to do something.
A State Machine changes how you evaluate the state of a system.
Instead of checking what is currently happening, each state only needs to deal with its own behaviour and the conditions that could cause it to change.
For example, in a Sleep State, the system doesn’t need to move, or try to find the player, and the only event that might cause the enemy to enter a different state is being Hurt.
While, in the Patrol State, taking damage or seeing the player will cause the enemy to chase them.
Finally, when in the Chase State, if the enemy loses the player, it can transition back to the Patrol State.
After which, if enough time passes, it may go back to Sleep.
State machines allow you to focus on the conditions that could cause an object to change its behaviour.
Put simply, state machines allow you to focus on just the behaviour that should be allowed to take place inside of a specific state and ignore everything else.
But how do they actually work?
How State Machines in Unity work
There are many different ways you could make a state machine in Unity but, while not all state machines are built the same, they typically include some of the same elements and usually work in a similar way.
For example, most state machines involve a controlling element, the State Machine itself, that manages which state is currently active and calls the logic inside of each state when it is.
This could be as simple as a Delegate Function, which decides which block of logic gets called at a time.
Or it could be an Enum, that allows each state to check themselves if they need to run or not.
But, regardless of how they’re implemented, the general point is that each individual State only contains the behaviour that is unique to that state and that only one state is active at any one time.
Which is what makes state machines useful.
Because a state machine can only be in one state at a time, it’s possible to assume what the object is doing right now, based on which state it’s in.
Meaning that, inside the state, you typically won’t need to check if an action can be performed before doing it, you can just trigger it knowing that code in other states can’t interfere with it.
The state machine provides Input to the state, such as parameters, user input and functions that are shared between all of the possible states.
It’s then up to each state to interpret the information that’s passed to it and decide if the current state needs to change as a result.
The process of changing a state is typically known as a Transition, which is a possible exit route from one state to another
When a transition is triggered, the state machine will usually call an Exit function on the old state, allowing it to decommission itself if it needs to, and an Enter function on the new one, so that it can set itself up or perform any initial actions.
But when would you actually use any of this?
When would you use a State Machine?
While state machines can be extremely useful they can also make a simple problem more complicated than it needs to be, or introduce limitations to a complex problem that, ideally, needs a different solution.
As a result, there are no strict rules about when you should use a state machine, but, it’s generally a good idea to avoid starting with one unless you know it’s the right option for what you’re trying to do.
But how can you know that?
Generally, a state machine provides two main benefits:
- It can help you to selectively ignore code that shouldn’t be running while other code is (i.e. you have distinguishable states of functionality), and…
- It allows you to limit the conditions of change to just the state you’re currently in, meaning that only the current state can decide what could cause it to change (the state’s exit routes).
Meaning that, if you find yourself making multiple conditional checks to separate the logic in your script, or you’re worried that something else could cause a script to execute the wrong logic at the wrong time, then a state machine might be a good idea.
However, if you find that each state is difficult to distinguish, meaning that it’s difficult to decide what should be in one state over another, or if you find that you’re repeating the same code in each of your states, then that may be a sign that a different solution might work better for you.
State Machines vs Behaviour Trees
At a basic level, state machines can be quite limiting, as they can typically only process a single state at any one time and can only leave each state via a number of ready-made exits.
Which is kind of the point of state machines.
But, if your logic doesn’t easily fit into a number of clearly distinguishable states, trying to use one may be more complicated than it’s worth.
For example, while state machines can work well for basic state-driven AI, if you’re trying to build something more complex you may need to use a more dynamic system such as a Behaviour Tree.
But how are they different to state machines?
While state machines are controlled by the conditions of whichever state the system is currently in, behaviour trees work in a more dynamic, modular way.
Generally speaking, they allow you to create behaviour based on prioritised decision-making, where an AI object will change what it’s doing based on the evaluation of a number of different factors, not just what’s in its current state.
You’d typically use a behaviour tree instead of a state machine when your AI’s logic can’t be easily separated into finite states, or if you find yourself repeating a lot of the same checks between states.
State machines, when they’re used well, can be extremely useful for limiting the possible behaviours of an object based on what it’s currently doing.
But how do you actually make one?
How to make a State Machine in Unity
There’s no one way to make a state machine, as the different parts can typically be recreated using a number of different techniques.
However, while there are many different ways you could make one, the general approach is the same, where one of a number of different states is processed by a controlling script.
Which is only really possible if the states, which are normally, each, different scripts, can be treated as if they are all the same type of class.
And for that, you might typically use an Interface.
How to make a State Machine (using Interfaces)
Interfaces allow two different scripts to be treated as if they are the same.
This works by forcing a class that implements a particular interface to include a set of required functions.
What this means is, that, two different scripts, with different code and different logic, can be used interchangeably in one variable, as if they were instances of the same class type.
Meaning that, a state machine can swap one class, a state, for another, even though they’re different, so long as they share a common interface.
So how does it all work?
Typically, to build a state machine using interfaces, you’ll need a State Controller script, that holds a reference to the Current State, which can be any state that implements the IState Interface, which is what will be used to define the common functions that each state will need to include.
Like this:
public class StateController : MonoBehaviour
{
    IState currentState;

    void Update()
    {
        currentState.UpdateState();
    }

    public void ChangeState(IState newState)
    {
        currentState.OnExit();
        currentState = newState;
        currentState.OnEnter();
    }
}

public interface IState
{
    public void OnEnter();

    public void UpdateState();

    public void OnHurt();

    public void OnExit();
}
The Interface in this example includes an Update State function that’s called every frame, an On Enter function that’s triggered when a new state becomes active and an On Exit function, which allows states to decommission themselves when they’re disabled.
Also, because most states may need to respond to the object being attacked, an On Hurt function that’s called by the controller makes it easy for a state to transition to the Hurt State if it needs to.
To actually make each state, simply create a plain class, not a Monobehaviour, that implements the IState interface, and add the required On Enter, Update State, On Exit and On Hurt functions.
Like this:
public class PatrolState : IState
{
    public void OnEnter()
    {
        // "What was that!?"
    }

    public void UpdateState()
    {
        // Search for player
    }

    public void OnHurt()
    {
        // Transition to Hurt State
    }
    public void OnExit()
    {
        // "Must've been the wind"
    }
}
Then, simply repeat the process for each state.
Repeat the process to create the other states, making sure that each one implements the IState interface.
Because the state class implements the IState interface, it must include the On Enter, Update State, On Hurt and On Exit functions.
This allows it to be treated as a type of IState class, instead of its specific class type, allowing each state to be passed into the current state variable interchangeably.
But where will the state controller get each state from?
There are two ways you could manage the different states in your state machine.
You could either create a new instance of the state whenever the state is changed.
Like this:
ChangeState(new PatrolState());Or, you could create a set of possible states that are stored on the state controller itself.
Like this:
public SleepState sleepState = new SleepState();
public ChaseState chaseState = new ChaseState();
public PatrolState patrolState = new PatrolState();
public HurtState hurtState = new HurtState();
If you’re changing the state frequently, this method can be more efficient, as it avoids the garbage that’s created when instantiating a new class.
It also makes it a little easier to keep track of the possible states that the system is working with.
Then, when you want to change state, simply pass the reference of the new state you want to switch to, into the Change State function.
Like this:
ChangeState(chaseState);However, there’s a problem with this method.
While the State Controller has the ability to change from one state to another, the exit routes from a given state, and the conditions that can cause one to be triggered, exist inside the State itself.
For example, it’s up to the Patrol State to decide if the player has been found, leading to the Chase State or, if enough time has passed, that the enemy should go back to the Sleep State.
But, right now, the state class doesn’t know what’s happening to the object it exists on.
This is because plain class instances can’t access the game object they’re attached to like Monobehaviour scripts can, meaning that the state typically can’t interact with the world around it, making it difficult to know when the state needs to be changed.
And, even if it could, it wouldn’t be able to change the state itself, as the change state function can only be changed by the state controller.
So how can you pass information to the state, so that it knows what’s happening to the object, and how can you pass a message back up to the controller, so that it knows when to trigger a state transition?
One way to fix this is to simply include a reference to a State Controller in one, or more, of the State Interface’s required functions.
Like this:
public class StateController : MonoBehaviour
{
    IState currentState;

    public SleepState sleepState = new SleepState();
    public ChaseState chaseState = new ChaseState();
    public PatrolState patrolState = new PatrolState();
    public HurtState hurtState = new HurtState();

    private void Start()
    {
        ChangeState(patrolState);
    }

    void Update()
    {
        if (currentState != null)
        {
            currentState.UpdateState(this);
        }
    }

    public void ChangeState(IState newState)
    {
        if (currentState != null)
        {
            currentState.OnExit(this);
        }
        currentState = newState;
        currentState.OnEnter(this);
    }
}

public interface IState
{
    public void OnEnter(StateController controller);

    public void UpdateState(StateController controller);

    public void OnHurt(StateController controller);

    public void OnExit(StateController controller);
}
This allows the state to use the state controller as a reference to the game object it’s attached to, meaning that it can find and communicate with other scripts if it needs to and, when it’s time to change the state, it can, by calling the Change State function on the state controller.
Like this:
public class PatrolState : IState
{
    float timeBeforeSleep;

    public void OnEnter(StateController sc)
    {
        timeBeforeSleep = 20;
    }

    public void UpdateState(StateController sc)
    {
        if (Physics.Raycast(sc.transform.position, sc.transform.forward))
        {
            sc.ChangeState(sc.chaseState);
        }

        if (timeBeforeSleep < 0)
        {
            sc.ChangeState(sc.sleepState);
        }

        timeBeforeSleep -= Time.deltaTime;
    }

    public void OnHurt(StateController sc)
    {
        sc.ChangeState(sc.hurtState);
    }

    public void OnExit(StateController sc)
    {

    }
}
This method of creating a state machine works and is relatively easy to implement.
But, it does have drawbacks.
For example, the On Hurt function is useful, as it allows you to easily transition to the hurt state from any other state, without having to make the same conditional checks in each of them.
However, because interfaces force classes to include certain functions, you’ll need to add the same set of methods to every state you add.
Which, if you’ve got a lot of states, with a lot of different triggers, could be difficult to manage.
So what’s the alternative?
How can you make a state machine that allows you to share common triggers between its states, but without always having to write them out in each one?
One option is to build your state machine using Inheritance.
How to make a State Machine (using Inheritance)
While interfaces allow you to enforce common behaviour in a script based on what the script is supposed to be able to do, Inheritance defines a class’s behaviour by what it is instead.
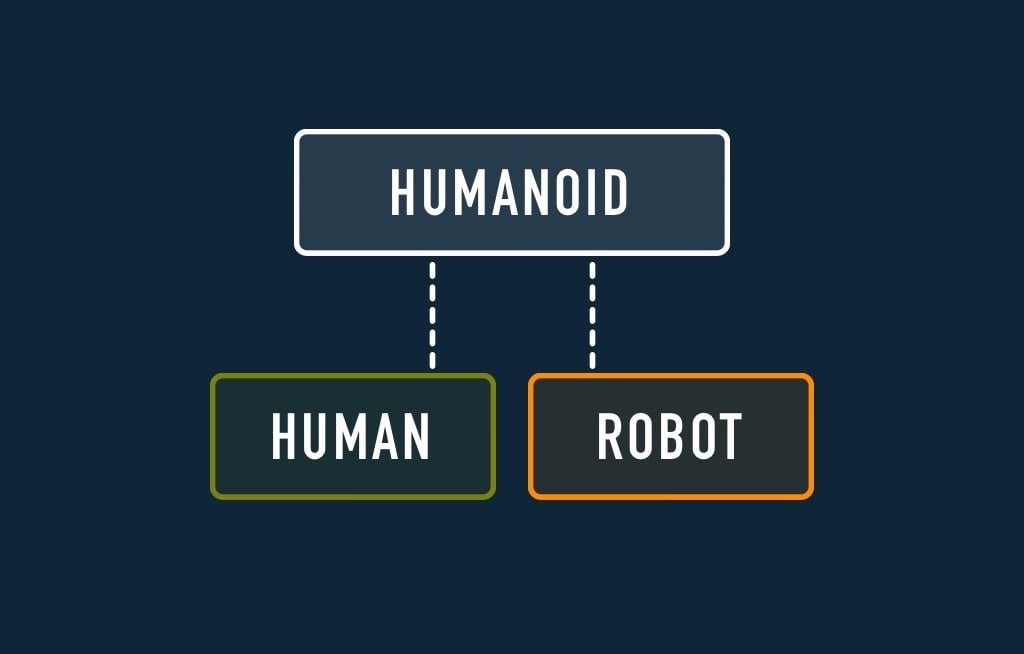
For example, you might normally use inheritance to give a humanoid object the ability to walk around on two legs.
The individual classes that inherit from the humanoid base class may do different things but, will all be able to walk around in the same way.
Inheritance allows different classes to share common functionality.
This is useful, as it allows you to place logic that is shared between different classes in a parent class that’s common to both of them, preventing you from having to rewrite the same code over and over.
In a state machine, inheritance allows you to place core state functions, such as the On Enter, On Update, On Hurt and On Exit methods, in a base State class.
Like this:
public abstract class State
{
    public virtual void OnEnter()
    {

    }

    public virtual void OnUpdate()
    {

    }

    public virtual void OnHurt()
    {

    }

    public virtual void OnExit()
    {

    }
}
The class is Abstract, meaning that it can’t be instantiated, so, in order to use it, a non-abstract class must derive from it.
Such as the individual states of the state machine, for example.
This works by replacing Monobehaviour, which is what new C# scripts in Unity inherit from by default, with the name of the class you want to derive the script from instead, in this case, State.
Like this:
public class PatrolState : StateThis allows any class that inherits from State to also inherit its base functionality.
Because the core functions are marked as Virtual, each individual state then has the option of Overriding them, replacing their contents and allowing you to execute different logic in different states, using the same shared triggers.
Like this:
public class PatrolState : State
{
    public override void OnEnter()
    {
        // Start animation
    }

    public override void OnUpdate()
    {
        // Patrol for player
    }
}
You can override one of the functions, all of them, or none of them, depending on what the individual state needs to do.
If a function in the child class does not override its base version, then the method in the parent is called instead which, in this example, is empty, meaning that nothing happens.
Just like when using interfaces, an inheritance-based state machine can be managed using a State Controller, that holds a reference to the current state and a set of possible states that the system could change to.
Like this:
public class StateController : MonoBehaviour
{
    State currentState;

    public SleepState sleepState = new SleepState();
    public ChaseState chaseState = new ChaseState();
    public PatrolState patrolState = new PatrolState();
    public HurtState hurtState = new HurtState();

    private void Start()
    {
        ChangeState(patrolState);
    }

    void Update()
    {
        if (currentState != null)
        {
            currentState.OnUpdate();
        }
    }

    public void ChangeState(State newState)
    {
        if (currentState != null)
        {
            currentState.OnExit();
        }
        currentState = newState;
        currentState.OnEnter();
    }
}
However, one of the main differences between a class that inherits from a parent class and an interface that enforces functionality is that a parent class can store a reference variable, and share it with its derived classes automatically, while an interface can’t.
This can be useful for keeping a reference to the State Controller that’s running each state by getting a reference to it when the On Enter function is called.
Like this:
public class State
{
    public StateController sc;

    public virtual void OnEnter(StateController stateController)
    {
        sc = stateController;
    }

    public virtual void OnUpdate()
    {

    }

    public virtual void OnHurt()
    {

    }

    public virtual void OnExit()
    {
    }
}
Just like when passing a reference to states using interfaces, the state controller can provide a reference to itself using the This keyword.
Like this:
currentState.OnEnter(this);Derived classes would then be able to use a cached reference to the state controller, such as to get object information, or change the state, without having to pass it to the state as a parameter in every function.
But…
Because this happens in the base version of the On Enter function, if a state overrides it, as it may need to do, then the base method won’t be called at all.
Meaning that the state controller reference won’t be cached.
This happens because overriding a function in a child class means that it will be called instead of its parent function, not in addition to it.
And while the On Enter method still carries a reference to the state controller as a parameter, the whole point of setting a reference in the first place was to avoid having to pass it in with every function.
So what’s the answer?
How to always call the base method in an inherited class
Typically, overriding a virtual method means that the original will not be called. However, it is possible to call the override version of a method and the base version it’s derived from by using the Base keyword in the inheriting script.
Like this:
public class ChaseState : VulnerableState
{
    public override void OnEnter()
    {
        base.OnEnter();
        // Calls this function AND the function it overrides
    }
}
This will call both versions of the method, the inherited version and the original that it is derived from.
However, while this works, and while it’s typically the method you would use to include base functionality in a child’s override, it may not be convenient to manually call base functions if you just want them to run automatically every time anyway.
So how can you trigger a base function, without having to call it yourself?
One method is to separate the base function that the state controller triggers from the function that child states inherit from.
Like this:
public abstract class State
{
    protected StateController sc;

    public void OnStateEnter(StateController stateController)
    {
        // Code placed here will always run
        sc = stateController;
        OnEnter();
    }

    protected virtual void OnEnter()
    {
        // Code placed here can be overridden
    }

    public void OnStateUpdate()
    {
        // Code placed here will always run
        OnUpdate();
    }

    protected virtual void OnUpdate()
    {
        // Code placed here can be overridden
    }

    public void OnStateHurt()
    {
        // Code placed here will always run
        OnHurt();
    }

    protected virtual void OnHurt()
    {
        // Code placed here can be overridden
    }

    public void OnStateExit()
    {
        // Code placed here will always run
        OnExit();
    }

    protected virtual void OnExit()
    {
        // Code placed here can be overridden
    }
}
This works by creating one version of each core function for the state machine to use and one version for the states to inherit from.
On State Enter, for example, will always be called by the state controller when the state changes, which in turn, will trigger the On Enter function.
The On Enter function is now Protected, meaning that only the same class, or classes that are derived from it, can access it.
Meaning that the state machine can’t call it by accident.
By default, it’s kept blank so that, if an inheriting class chooses not to override it, nothing happens.
And, if a child state does override one of the core methods then, because the core state functionality is placed in a separate function, you won’t have to manually call it yourself using the Base keyword.
This approach can be useful as an alternative to interfaces, particularly when you want to include base logic automatically in all of your states since, generally, allowing one class to adopt the functionality of its parent is exactly what inheritance is designed to do.
But, what if you want to include parent functionality in some states but not others?
How can you share conditional checks between groups of states, without copying the same logic between all of them?
Hierarchical State Machines
Hierarchical State Machines are, basically, inheritance-based state machines, but with extra layers.
They allow you to create a Super-State, that inherits from the base state, but that may also be, itself, a parent to multiple other Sub-States.
Which is useful, as it means that you can place functionality that’s common to a number of states in one place, and then have those individual states simply inherit from that.
For example, I could derive the Patrol, Chase and Sleeping states from a single Vulnerable Super-State, since the object can be damaged in any of these states, which would cause it to transition to the Hurt State.
Like this:
public abstract class VulnerableState : State
{
    protected override void OnHurt()
    {
        sc.ChangeState(sc.hurtState);
    }
}
Likewise, I could further group the Patrol and Chase states into a single Moving group, since the same functionality is likely to apply to both of those states, and then have them both inherit from the Vulnerable state.
Like this:
public class MovingState : VulnerableState
{
    protected override void OnUpdate()
    {
        base.OnUpdate();
        Debug.Log("Move!");
    }
}
Unlike the very first base state class, where the state controller was responsible for triggering an isolated set of core functions, meaning that they couldn’t be overridden, states that inherit from one or more parent states generally can’t be set up in this way.
Meaning that, because each layer is overriding the function of the previous layer, it’s important to call the core functions on the previous layer using Base, if you want them to trigger as well.
Hierarchical State Machines allow you to group common behaviours together.
Hierarchical state machines can be extremely useful for organising the logic in your game’s scripts, into sensible groups and layers.
However, while this can be extremely useful in the right circumstances, hierarchical state machines, and state machines in general, can easily become more complicated than they’re worth.
Generally speaking, there are a limited number of use cases in which a state machine is genuinely helpful, and if you try to force your game’s logic into one when it’s not a good fit, then it’s entirely possible that your game will be harder to work with than when you started.
So, while it is possible to use state machines to solve many different kinds of problems, how difficult they are to work with can have a huge impact on how effective they are.
Particularly if you build the state machine yourself.
State Machine Assets
For some problems, it just doesn’t make sense to create your own state machine system, when there may be a ready-made alternative available.
Such as PlayMaker, for example.
PlayMaker State Machines (great for fast results)
PlayMaker uses state machines to control Unity.
Which, if you’re new to Unity, or even if you’re not, can make building some systems much easier than if you were to write them yourself using a script.
PlayMaker combines a powerful state machine with easy-to-use logic.
PlayMaker combines its easy-to-use state machine system with a large variety of Actions, which are the behaviour elements that allow you to control what Unity does, and when.
And while it can be limiting if the action you want isn’t available, PlayMaker is widely used, well-supported and can be extremely fast to work with.
Unity Animator State Machines (a must for animation)
The built-in Unity Animator allows you to build complex, layered state machines.
It is, of course, ideal for animation, and allows you to trigger, and transition between, multiple animation states using a relatively simple visual interface.
Typically, you might use the Animator to respond to scripted behaviour passively, where a small number of logical states drives a larger number of animation states using Parameters, which allows scripts and other objects to pass data to the Animator, which can then change its own state in response.
Node Canvas (state machines & more)
While PlayMaker is ideal for creating finite state machines, and the Animator is great at animation, Node Canvas, in addition to state machines, provides tools to create Behaviour Trees and Dialogue Trees, which can be extremely useful for building AI or if you’re dealing with any kind of conversational logic in your game.
Now it’s your turn
Now I want to hear from you.
How are you using state machines in your project?
Are you using inheritance, interfaces or something simpler?
And what have you learned about using state machines in Unity that you know someone else would find useful?
Whatever it is, let me know by leaving a comment.

John French writes all of the Unity tutorials for Game Dev Beginner, and specialises in deep-dive guides teaching game development basics.

Comments
Great, insightful article as always 🙂 Thank you for your work!
I noticed a minor mistake.
In the section “How to make a State Machine (using Inheritance)”, when you show how the state controller can provide a reference to itself, it should be:
currentState.OnEnter(this);
OnStateEnter method does not appear until the next section.
Well spotted! Thank you!
I have used solutions such as Playmaker, Bolt (Visual Scripting), Node Canvas for FSM.
Currently, I am using the solution below.
https://github.com/thefuntastic/Unity3d-Finite-State-Machine
It is very simple and clear and faithful to its purpose.
Other solutions had advantages in visualization, but they had their own disadvantages due to the increased overhead.
Monster Love FSM has a disadvantage that visualization is difficult.
But it is programmer-friendly, simple, and powerful enough not to matter.
ps.
I always enjoy reading your blog. 🙂
It may be inappropriate to post such reply on this post…
Can I look forward to your insight about Addressable?
I would like to see your in-depth article about Addressable.
I think the following article introduced by Unity is good.
https://blog.unity.com/technology/tales-from-the-optimization-trenches-saving-memory-with-addressables
But this alone was not satisfactory.
I’m curious about your standards and thoughts on how you manage and load/release groups/labels.
Thank you always! Have a nice day!
Thanks for sharing Sy and yes, an article on Addressables is definitely on my to-do list so keep an eye out for that in the future.
Cool! I’m looking forward to it.
I hope your day is full of happy things!
+1 to this topic, addressables are definitely something I would love to see a post about
Consider it bumped higher up the to-do list!
My beginner’s guide to Addressable Assets in Unity is now live. Enjoy!
Great article, thanks! I think while understandably every application will be different and unique, it would be nice to have rough guidelines to help determine if you should use a state machine or something else, or use cases where state machines are preferable to anything else. I mean, there gotta be more to it than “if you can’t easily split the behavior into states, then state machine is probably isn’t for this”.
Absolutely, for example, there will probably be scenarios where you do have states but you don’t care what can cause a state to change, i.e. any state to any state, in which case all an object needs to do is listen for an enum or similar and turn itself on or off accordingly. I think the main considerations for a full blown state machine are you have states and you want limited exit routes out of each one.
Hi John !
Thanks for this content. It’s relevant and deeply analyzed.
On the Section of implementing FSM by Interface, I’m a little bit confused that you didn’t use the keyword “override” for functions inside Classes that implement IState.
As an example:
public class PatrolState : IState
{
public void OnEnter() // instead of public override OnEnter()
{
// “What was that!?”
}
public void UpdateState()
{
// Search for player
}
[…]
}
Thank you! So, in that example, the PatrolState class implements the functions in the interface, it doesn’t inherit from them as a base class, so there’s no need to override them.
Ok, I got it !
Actually Unity already includes a component called Finite State Machines, which you only mention at the end, and the link is not even active anymore.
It’s not clear to me: if the player has to fire?
You can fire while standing still, while walking or running, you could be injured while doing so. How do I manage states under two or more conditions?
Yet usually state machines are used precisely to manage player behavior.
Are you referring to the built-in State Machine component? Or something else? Because that component is part of Unity Visual Scripting, so not everyone will want to use it. To answer your question, I would suggest that in the example you described, if you try to include combat states with movement states then you don’t have clearly defined states anymore. Instead, a different approach would be to have multiple state machines, such as movement, combat, health etc. that are influenced by other state machines. So, for example if the player can fire in any movement state, except for one or two where they can’t, have those states change a value that the combat state machine can check. But, if using state machines is making things more difficult, not easier, then I’d suggest that’s a clear sign to consider a different system. Hope that helps, feel free to email me at [email protected] if you want to discuss it more.
Hi, I was wondering if you could do an article on making behaviour trees? I find the way you teach as you go over all the possibilities and explain the pro’s and con’s of each.
Regardless, great article! I learnt a lot.
Thanks, I’ll see what I can do!
Hi John,
Is it possible, in the interfaces method, to make the states monobehaviours too? e.g. IChase : MonoBehaviour, IState.
I’m finding that each state is handling a lot of logic and needs to read data from other scripts. However, as it isn’t a monobehaviour it cannot reference scripts in Awake() through GetComponent() so the reference needs to be passed as a parameter through a function in the StateController script. My OnEnter and OnUpdate are therefore passing a ton of parameters just to get the necessary data into the state scripts. It works but it feels rather messy.
What effect would making the states a MonoBehaviour have? Or is the inheritance approach more suitable to solve this problem?
I’m also using a Composition over Inheritance approach with SOLID principles and I’m struggling to conceptualise how this could work. For instance my IRoam state handles random movement and line of sight checks. According to the SRP this should therefore be split into two scripts. If down the line I wanted an NPC who only did random movement I would have to duplicate the code, which wouldn’t be good right? Does a behaviour tree solve this issue?
Sorry for the long question. BTW: Your resources are significantly better than the vast majority. Explaining a variety of approaches and why they are used in each case. Most youtubers don’t follow good principles or explain poorly. You (and Jason Weimann) do otherwise.
Many thanks,
Adam
So the difference between making the states a Monobehaviour and not a plain class is that, as a monobehaviour, it would need to be attached to an object in order to be used. In this example, because they’re plain classes, they exist in the state controller script as new memory allocations (which is why you have to instantiate them). It sounds like you’re having to put a lot into the states to get them to work, which is probably going to make it hard to follow. There are lots of ways you could split this out but if you’re thinking about reusing the logic in the state machine, or at least parts of it, then yes a behaviour tree might be a better fit. The difference between a state machine and a behaviour tree is that a bt is modular and reusable, but fsm’s typically aren’t. If you have more questions, feel free to email me at [email protected]
Thanks for guide. I am a bit confused. How can I access MonoBehaviour classes in states. Assume that, player moves like Subway Surfers so moving on z axis in update method (transform.Translate(Vector3.forward * distance * Time.deltaTime)). So I have to move player in state’s update. How can I do that?
One way to do this is to include a reference to the State Controller in the state’s update function. The State Controller sits on the object, so it can access its transform. e.g. stateController.transform… for more information there’s a section on this in the interfaces section in the article. Hope that helps.
You are doing an absolutely amazing job with these articles man. It’s difficult to find advanced topics covered with high-quality explanations.
Keep going please!