
When you start making your game, managing your project’s assets, such as models, textures, objects and audio can be pretty straightforward.
Drag whatever it is you want to use into the editor, connect it to your object and you’re done.
But, while working with assets in a small project can be easy enough, as your project gets bigger, it can start to become much more difficult.
For example, as your scenes get bigger, loading all of the asset data you need for a particular stage of your game into memory, as Unity does by default, may not be possible.
Or, you might want to reduce the size of your game by delivering optional content over a server, instead of a local directory.
However, while memory management in Unity can be very important, for now, it might not be at the top of your to-do list.
Especially if you’re still working out how to put your first game together.
But, if you’re releasing your game on multiple platforms, if you plan to include any kind of optional content, or if you’re building a game for a memory-limited device, such as a mobile game then, chances are, you will have to deal with some kind of asset management at some point in your game’s development.
Which means that understanding how it works now will probably make it easier to deal with later on, when you’re much more likely to need it.
While there are many ways you could manage your game’s assets, Unity’s Addressable Asset System provides a complete solution for building, loading and managing the data content of your game.
In this article, you’ll learn how addressable assets in Unity work, how they can help you manage what your game does and doesn’t load and why it’s a good idea to start using them as early in your project as you can.
Here’s what you’ll learn on this page:
- What are Addressable Assets in Unity?
- How to use Addressable Assets in Unity
- Should you use Addressable Assets in Unity?
What are Addressable Assets in Unity?
Unity’s Addressable Asset System is an asset management system that allows you to manage and load game assets more easily.
Typically asset management refers to how your game’s non-code content, such as prefab objects, audio clips, textures, models and other assets will be loaded into your project and where they will come from.
Which, depending on how large your scenes will be, or how memory-limited your target platform is, can have a huge impact on your game’s performance.
This is because, by default, Unity loads all of the assets it needs for a scene into memory, meaning that every reference to an asset is loaded, even if it doesn’t actually exist in the scene yet.
What’s more, if you’re building a game for multiple platforms, or if you’re hoping to support multiple languages, working out how to deliver variations of the same assets could, otherwise, be very difficult to do.
So, how does asset management solve these problems?
How Asset Management in Unity works
Generally speaking, there are two reasons why you might want, or need, to use an asset management system in Unity.
- To separate assets from the objects that use them, making it easier to change which asset a particular object, or version of a project uses, or…
- To group asset content together, so that it can be organised separately to the game’s main content, either to deliver it in a different way, such as remotely, or to include or exclude assets in a particular version of the game.
Unity’s addressable asset system solves both of these problems.
Instead of directly accessing the asset file in a local folder, an addressable asset is identified using an Asset Reference which is stored in an Asset Group.
An object can load an asset using its reference but, exactly where the asset comes from depends on its group’s settings.
For example, some groups may be downloaded while others are locally available, groups can modify assets before passing them to an object and entire groups can be included or excluded from particular versions of the game, making localisation and platform-specific changes easier to do.
All without changing how the object requests an asset.
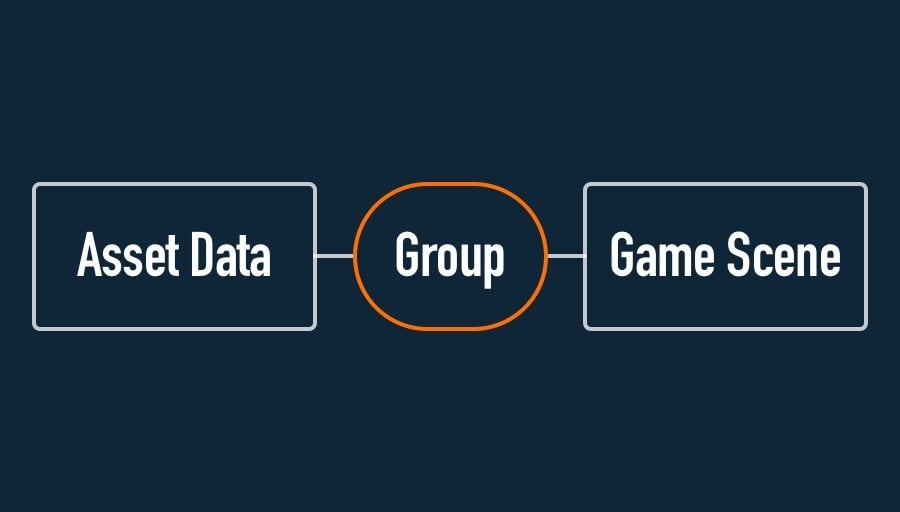
The Asset Group acts as a middle-step between asset data and objects and scripts in your scene.
The game doesn’t care where the asset comes from, and the group doesn’t care what it’s going to do with it once it’s loaded.
Both are separated by a layer of abstraction, the asset reference in the group.
Which can be extremely useful, as it allows you to easily change where data comes from, selectively include entire asset sets and even makes it possible to change an asset in a game that’s already been built.
All without changing a single line of code.
However, asset management isn’t a new concept.
Previously, you might have used the Resources folder to decouple an asset from an object or, to separate your data into groups, you might have used Asset Bundles.
So how does the Addressable Asset System compare to older asset management options, and are any of them relevant to you?
Resources vs Addressable Assets
Separating an asset from the script that uses it allows you to selectively load data into your project without attaching it to an object first.
This can be useful when you want to use data in a scene, but you don’t want it to load automatically.
In the past, you might have solved this problem by using the Resources folder, which allows you to load an asset using a path name instead of an asset reference.
However, Unity generally recommends that you don’t use the Resources folder in anything other than small prototypes, since using it in the wrong way can significantly increase a project’s size and cause memory problems.
The Addressable Asset System can be used in a similar way to the resources folder but with better memory management.
Instead of using a direct reference to an asset, which must then be loaded, addressable assets can be identified using a different kind of asset reference or, when using a string, their name, both of which point to an addressable asset in a group, instead of the actual file in the local directory.
But how is that different from using the resources folder?
One of the main problems with the resources folder is that it can increase the size of a build and the startup time of an application.
This happens because all of its contents will be included and initialised, whether they’re used in the game or not.
Meaning that, while the resources folder can make managing memory a little easier in some cases, it can also make managing what is and isn’t included in your project harder to do.
Which is a problem you would normally solve with Asset Bundles.
Asset Bundles vs Addressable Assets
Organising non-code content into groups allows you to manage what data is included in a build and deliver new downloadable content on demand.
For example, you might group together assets that are specific to a certain platform. Or you might use groups to separate the data that should be shipped with game from optional downloads, such as in-game purchases or DLC.
Typically, you might use Asset Bundles to do this, which is Unity’s existing asset management system, and that allows you to organise content into different bundle groups from a control in the Inspector.
However, while asset bundles can be extremely useful, they can also be tricky to work with, as many of their features can, typically, only be accessed via scripting.
Addressable Assets, essentially, build on top of the asset bundle system, extending it with a simplified workflow and interface that’s easier to use.
As a result, building your asset groups (which are basically asset bundles) can be much more straightforward and getting an asset is much easier, as you don’t need to know which bundle it’s in, just the name of the asset, or its addressable reference.
Addressable assets are an evolution of asset management in Unity and, if you need to manage content in your game then, chances are, they can help you do it.
So how do they work? And how can you use them in your project?
How to use Addressable Assets in Unity
Before you can use addressable assets in Unity, first you’ll need to import the Addressables Package from the Package Manager.
Then, once it’s installed, open the Addressables Groups window, which you can find under Window > Asset Management > Groups and click Create Addressables Settings.

This will create a default Asset Group and Addressables Settings profile so that you can start working with addressable assets.
Generally speaking, there are two steps to using the addressable asset system.
- First, build asset content by organising your assets into groups and deciding where they will be loaded from…
- Then, load data into your game using asset references to load and unload assets when you need them
How to use Addressable Asset groups
Addressable Asset Groups are the containers for each category of asset and, as a result, the Groups Window is where you will spend most of your time working with the addressables system.
Just like asset bundles, addressable asset groups allow you to change how sets of assets are loaded and where their data will come from.
This works by adding assets to one or more groups and then using the group’s settings to decide how they will be loaded, whether that’s locally, remotely or not at all, as groups can be used to exclude content from a game as well as include it.

It’s possible to exclude a group from an asset build if the data it contains isn’t going to be used.
What to put in each asset group
When working with asset groups it’s important to think of them as an editor tool.
This is because it’s generally not possible to distinguish between asset groups in scripting, meaning that the only difference between them is the settings that are applied to them and the dependent assets that they may need to load.
For example, you can exclude an entire group from an asset build, such as the data for a level you’re no longer using, or you can change where a group’s files come from, such as to download extra languages or purchasable items, but, generally, you can’t load an entire group into your game.
As a result, when deciding what to put in each group, it can help to think about how you’re going to use the group in the context of your finished project.
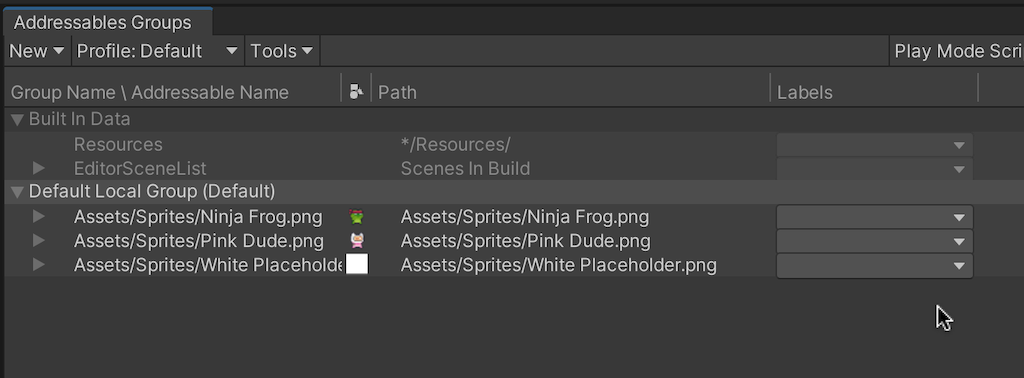
To add an asset to a group simply drag and drop it into the Addressables Groups Window, onto the group that you want to place it in.
You can add an individual file, a prefab that’s made up of many different objects, or an asset that, itself, contains multiple other assets, such as a 2D Texture that is made up of multiple Sprites, to an addressable group.
When you do this, the asset becomes Addressable, and is given an Addressable Name which, by default, is the path name of the file it relates to.
This can then, optionally, be changed to something that’s easy to use and identify.
When you add an asset to an addressables group, if it relies on other assets that are not, themselves, addressable, then they will be copied into the group as Dependencies.
For example, a Prefab object that references other assets, such as materials and sprites, will copy the data that it needs into its group when it’s built.
Which works, but can cause an issue if the asset that’s copied is supposed to be unique, especially if other objects are using the non-addressable version of that asset directly, as it means that both the original and the copy inside the group, will exist separately.
What’s more, different objects in different addressable groups that each depend on non-addressable assets will copy their own version to their group, increasing the size of each group when it’s built.
Normally, this might not matter if the asset will be the same throughout the game as it was when the asset group was built.
But it can cause problems if the asset is going to change in some way over time after it’s loaded, since loading an addressable version, while another version exists as a local asset, can mean that each individual copy is different from one another.
This can be fixed by adding a dependent asset to any addressable group as, once it’s known to the addressables system, groups will be able to use the same, shared version, without having to create their own duplicate copies.
The addressable system’s built-in analysis tool, the Analyze Window, available using the Tools dropdown in the groups window, can automatically check if duplicate dependencies exist in both addressable groups and in the scene and even fix them for you.
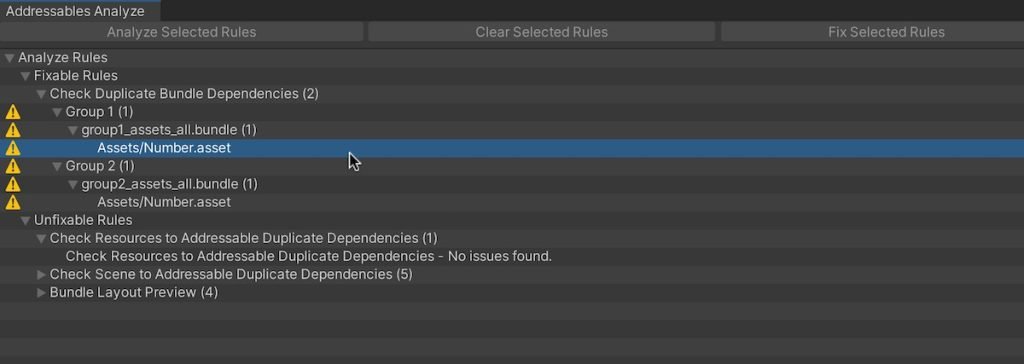
The Analyze Window can automatically highlight dependency problems that may cause increased bundle size or confusion between assets.
Running Analyze Selected Rules will flag Fixable dependency issues, such as two groups referencing the same non-addressable asset, and Unfixable rules, such as mixing addressable and direct asset references.
Addressable Scriptable Objects
You can typically place any non-code assets, such as audio, models, textures and prefabs into an addressable group.
However, you won’t be able to include C# scripts, which are compiled into assemblies when the project is built.
One exception is Scriptable Objects, which can be used to create script assets, which are instances of classes that exist in your project, not your scene.
Because the instances of a scriptable object are, technically, assets, they can be included in an addressable group, while the script that was used to create them is compiled into an assembly like everything else.
However, depending on how you’re using scriptable objects in your game, this can cause a problem.
For example, if an addressable prefab depends on a Scriptable Object to pass data around your scene, and other, non-addressable, assets use the same scriptable object, they may each end up pointing to different data as the scriptable object will be copied into the asset group.
As a result, if you plan to use scriptable object data and addressable assets in your game, you should probably be careful not to mix addressable and non-addressable objects that both rely on the same scriptable object data.
Once you’ve added assets to your groups, in order to actually use them, you’ll need to build the asset content using the Build control from Addressables Groups window.
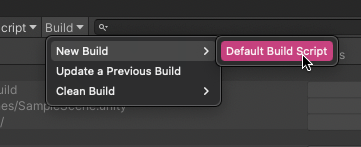
Doing so packages your assets in a platform-specific build, ready to be used by your game.
Normally, Unity will build your asset data every time the game is built but, it’s possible to change this so that you can build the game without also building your assets.
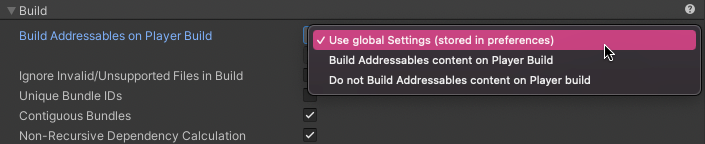
It’s possible to build your game without rebuilding your assets, which can be useful if they already exist and haven’t been changed.
While, when working in the editor, to use the most up-to-date version of your addressable asset content, you’ll need to build it every time you change something.
However, in the editor, Unity won’t use addressable assets by default.
This is because it’s possible to change what data Unity will use in play mode, using the Play Mode Script setting.
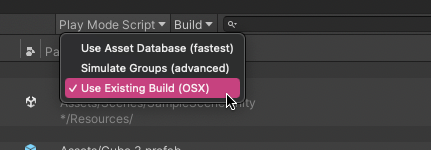
The Play Mode Script setting controls if built addressable assets are used when working in the editor.
This can be used to switch between the Use Asset Database option, which effectively bypasses your addressable assets, and an Existing Build of your asset content, allowing you to test if your addressable assets are working as you expect them to.
Which can be useful, especially when you’re trying to load an asset group remotely, and want to make sure that it actually works.
Local vs Remote loading
One of the main reasons for organising your assets into groups is that it allows you to change how they’re loaded.
Or, more specifically, where they’re loaded from.
This is decided by the group’s Build and Load paths, where the Build Path specifies where the assets will be placed when the data content is built and the Load Path is where the asset will be loaded from when the game needs it.
For each group, the build and load path pair can either be Local or it can be Remote, allowing you to load some assets from a different location, such as a web server, while others are included in the initial installation.
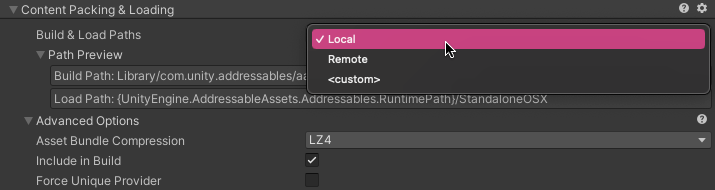
The Local or Remote build and load paths are decided on a per-group basis, allowing you to change where a group loads its files from.
In total, there are, typically, four locations you’ll need to manage:
- The Local build path
- The Local load path
- The Remote build path
- The Remote load path
The actual location that these paths point to depends on the Addressables Profile you’re using.
How to use Addressables Profiles
Addressables Profiles allow you to change the location of the local and remote build and load paths.
This typically works by creating an additional profile, or by modifying an existing one, so that it points to a different set of locations.
You can change a profile’s settings by selecting Manage Profiles in the Inspect System Settings window of the Addressables Tools dropdown, or by selecting Inspect Top Level Settings from any of the addressable groups.

For each load type, local or remote, you’ll be able to choose one of four options:
- Built-In
- Editor-Hosted
- Cloud Content Delivery
- Custom
The Built-In option builds and loads files locally, from your project directory.
While the Editor Hosted setting simulates loading over a network, but within a local environment.
To use this option, you’ll need to also create a new local host in the Addressables Hosting window, which can be accessed via the Addressables Tools dropdown in the groups window.
While you won’t need to enter the details of the hosting service yourself, you will have to enable it, at which point the host will be assigned a port.
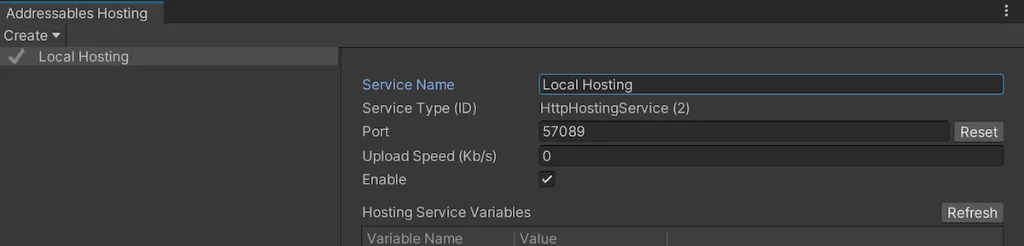
To use Editor Hosting, you must create a new Local Host and enable it.
Editor hosting allows you to simulate remote asset loading, which can be useful when you’re trying to work out if your asset loading system is actually working the way you expect.
Cloud Content Delivery is a Unity Gaming Services subscription that allows you to host asset content remotely.
It’s a charged service but offers a free plan, allowing up to 50GB of bandwidth per month, and essentially offers a service that’s similar to S3 cloud storage, from providers such as Amazon AWS or Digital Ocean, but more tightly integrated with Unity.
The Custom option allows you to specify your own remote location, such as a server or cloud storage location.
This works in a similar way to Unity’s cloud content option, except using a third-party provider, such as Digital Ocean or Amazon AWS.
How to load addressable assets from a remote server
Loading addressable assets from a server can be surprisingly straightforward but there are a few pitfalls you’ll want to avoid when setting it up.
First, you’ll need to create a new Addressables Asset profile, or modify an existing one, where the Remote Load Path is the location of your files.
For example, to get a location, you could create a storage space using a service like Digital Ocean, where the load path will be the location’s public URL followed by the Build Target.
Like this:
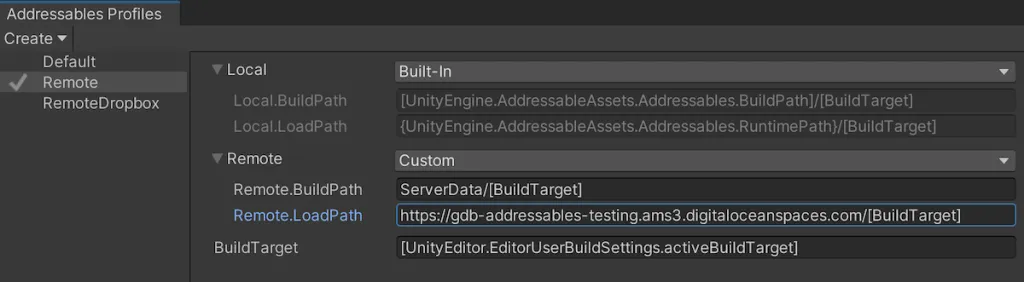
To load assets remotely, you’ll need to enter the path of the directory you intend to upload the assets to, followed by the build target identifier.
You’ll also need to select Build Remote Catalog in the addressable system settings.
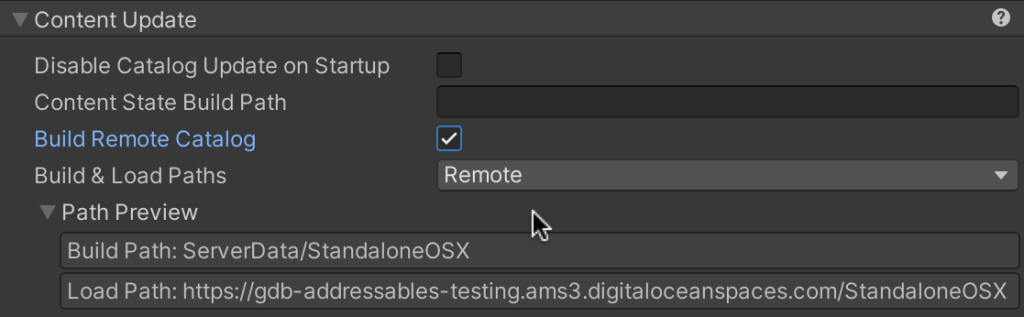
Make sure to select Build Remote Catalog when building for a remote server.
Checking this box will make sure that the files that are required for your server are actually generated when the asset content is built.
Next, make sure that the asset group that you want to load remotely is set to use Remote build and load paths.
Then, after you build your assets, find the Server Data folder in your project directory (which was the build path).
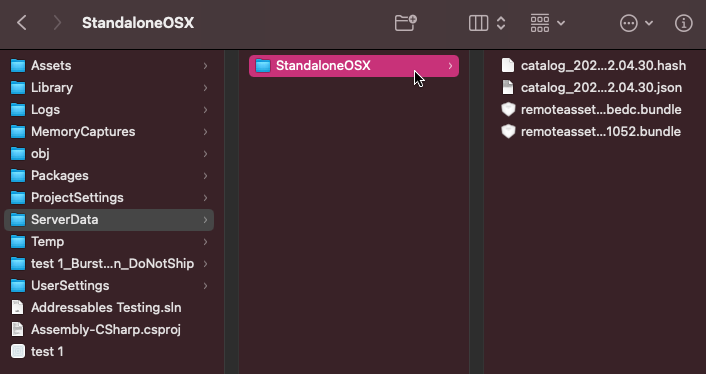
Once you build your content, your remote assets will appear in the Server Data folder in your project directory.
Next, upload the build platform folder to your remote location, making sure that it’s publicly available.
For example, if you’re building for Mac, like in this example, upload the StandaloneOSX platform folder from the Server Data folder in your project.
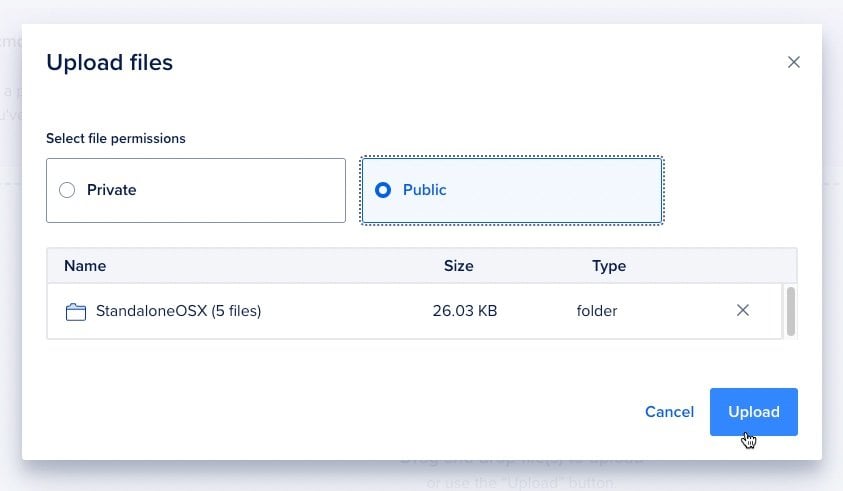
In this example, I’ve uploaded the built assets for the Mac build platform to a public storage location hosted with Digital Ocean spaces.
Your project will then use the server location to load assets from, instead of loading them directly from your local project directory.
This can be extremely useful, as it allows you to change asset content remotely, without rebuilding your project.
Meaning that it’s possible to change the material or the sprite that a prefab uses, for example, even if the game has already been built, by simply uploading new asset content.
However, for this to work, you will need to update your built content, not replace it.
To do this, instead of building new asset data, select Update a Previous Build.

Then, when prompted, select the Content State binary file for the platform that you want to update.
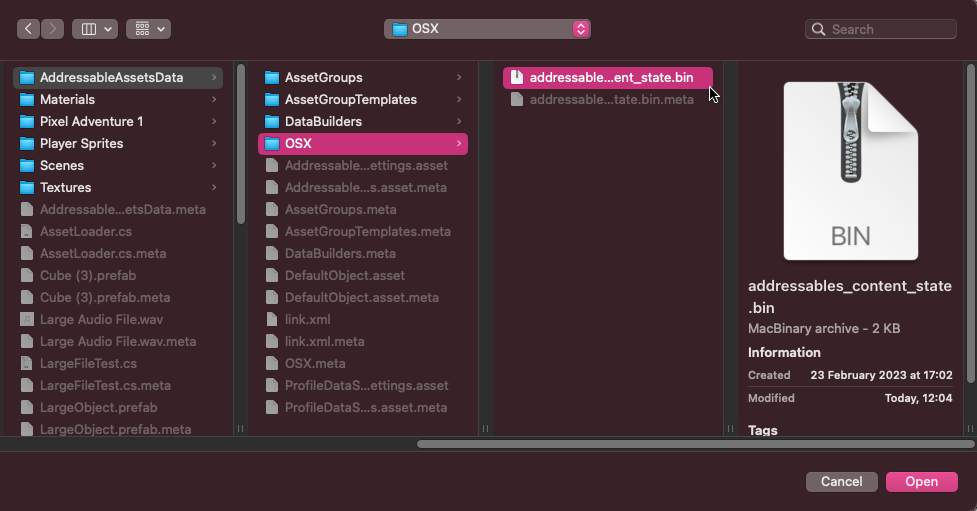
To update a previous build, select the Content State binary file for the platform you want to update in the Addressable Asset Data folder
This will generate new catalog and asset files in the Server Data folder which, once uploaded, will allow an existing project, even one that was built before the asset was changed, to use new modified assets.
The process of organising your assets into groups is completely separate from actually loading data into your project, and for good reason, as it means that, when you come to load an asset into your scene, you won’t need to worry about where that data is going to come from.
So long as you know which asset you want, your asset group will take care of the rest.
But how do you actually load and use addressable assets in your scene?
How to load Addressable Assets
After you’ve added the addressable assets you want to use to their groups, you’ll need to actually load them into your game.
Unlike objects that already hold existing references to local data, the point of using an addressable asset is that it doesn’t already exist.
Meaning that if you want to use one, you’ll need to load it first and then assign it to an object or to a component using a script.
This is because addressable assets are identified by their asset reference, which in turn delivers a file, but is not the file itself.
As a result, it’s best to think of an asset reference as a type of request, a loading operation that can be used to return a Result, the actual asset file.
Meaning that, as a general rule of thumb, you should only think about making an asset addressable if you’re also willing to load it in yourself, manually.
So how does loading work?
First, you’ll need to add the Addressable Assets namespace to your script.
While you’re there, you may also want to add the Async Operations namespace, as you’ll need this to be able to work with asynchronous operations, such as the loading process of an addressable asset.
Like this:
using System.Collections;
using System.Collections.Generic;
using UnityEngine;
using UnityEngine.AddressableAssets;
using UnityEngine.ResourceManagement.AsyncOperations;
You’ll then need a reference to the asset that you want to load.
Generally speaking, there are two different ways to do this, either by string, which allows you to type in the Key or Label of the asset you want.
Like this:
[SerializeField] string assetKey;Or by reference, which allows you to choose a specific asset, or asset label, from any of your asset groups.
Like this:
[SerializeField] AssetReference assetReference;
[SerializeField] AssetLabelReference assetLabelReference;
This works a little differently from selecting an asset directly as, instead of dragging a file to the field, or finding it using the circle select button, you’ll need to choose it from a dropdown list instead.
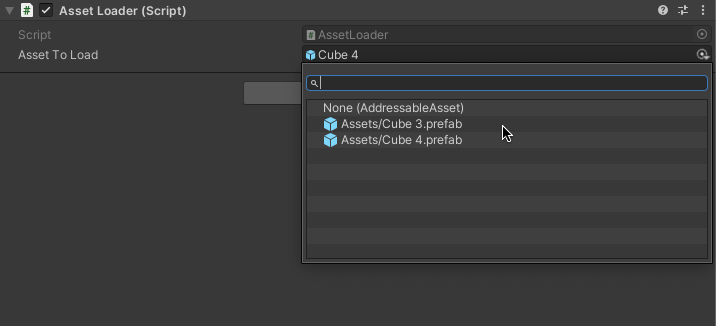
The assets shown here will be those already in your asset groups that match the reference type.
Normally, the reference type is implicit. However, if you want to limit the type of asset that can be selected, simply choose one of the ready-made reference types or enter your own using the generic Asset Reference T variable type.
Like this:
[SerializeField] AssetReferenceGameObject gameObjectReference;
[SerializeField] AssetReferenceSprite spriteReference;
[SerializeField] AssetReferenceTexture textureReference;
[SerializeField] AssetReferenceT<AudioClip> audioClipReference;
Once you have a reference to the asset you want to use, you can then load it by using the Load Asset Async function which returns an asynchronous operation handle of the same type.
Like this:
AsyncOperationHandle<Material> loadingOperation = Addressables.LoadAssetAsync<Material>(material);If you’re new to asynchronous loading then it’s important to understand that the value that’s returned from the load function is not the asset that you’re trying to load.
Instead, it’s the operation that’s loading it, and getting a reference to it allows you to wait until it’s done before trying to do something with it.
Typically you might do that in a coroutine, where the coroutine is yielded until the loading operation is finished.
After which the loading operation’s Result, which is the loaded asset, can be used in place of the audio clip, texture or sprite that you were trying to load.
Like this:
using System.Collections;
using System.Collections.Generic;
using UnityEngine;
using UnityEngine.AddressableAssets;
using UnityEngine.ResourceManagement.AsyncOperations;

public class MaterialLoader : MonoBehaviour
{
    [SerializeField] AssetReferenceT<Material> material;
    [SerializeField] SpriteRenderer sprite;

    IEnumerator Start()
    {
        AsyncOperationHandle<Material> loadingOperation = Addressables.LoadAssetAsync<Material>(material);
        Debug.Log("Loading has started.");
        yield return loadingOperation;

        Debug.Log("Loading is finished.");
        sprite.material = loadingOperation.Result;
    }
}
However, when loading using an Asset Reference, not a string, there is a slightly easier method than creating your own asynchronous loading operation.
Instead, it’s possible to call Load Asset Async on the asset reference itself, instead of via the Addressables class.
Like this:
[SerializeField] AssetReferenceT<Material> material;
[SerializeField] SpriteRenderer sprite;

void Start()
{
    StartCoroutine(LoadAssetReference());
}

IEnumerator LoadAssetReference()
{
    yield return material.LoadAssetAsync();
    Debug.Log("Loading is finished");
    sprite.material = (Material)material.Asset;
}
In this case, the Asset property of the asset reference is, essentially, the same as the Result property of a loading operation, and can be used to use the asset that was loaded in your game.
This method is slightly easier than using a loading operation and means that, once an asset is loaded, you can use the asset property to add it to your scene however you want.
That is, unless you’re creating objects, where the process of using a loaded asset is slightly different.
This is because the different methods of loading an asset can affect how an asset is unloaded when it’s no longer needed.
For example, while it is possible to load a Prefab Asset and then Instantiate copies of it, because the addressable asset will have, itself, only been loaded once, only one reference will be known to exist.
What this means is that the addressable system won’t be able to tell if the asset is still being used or not.
Meaning that, if you then release it, while objects created from it continue to exist in the scene, their dependencies may break.
One way to avoid this is to instantiate an instance of an addressable object by using the Instantiate Async function.
Like this:
public AssetReferenceGameObject assetToLoad;

void Start()
{
    Addressables.InstantiateAsync(assetToLoad);
}
This will load and instantiate a copy of the addressable object and is, typically, the recommended way to add new addressable objects to a scene.
This is because the reference is known to the addressable system, meaning that its dependencies are protected.
While they work in different ways, the three methods of loading an addressable asset, by reference, by loading operation and by instantiating an object, all generally do the same thing.
But, depending on your game, you might be more interested in what you load rather than how you load it.
For example, you may need to swap out certain assets depending on the capability of the device, the version of the game, or even the part of the world your player is in.
So how can you do that, without changing all of the assets yourself?
How to load addressable asset variants using a label
Loading a single addressable asset can be relatively straightforward.
However, if you’re using addressables to deliver different types of the same content to your player, then it can be useful to identify a specific asset by its name, such as a player sprite, for example, but then actually deliver a different version of it based on the asset’s label.
Asset Labels work in almost exactly the same way as asset names and, when passing them in as a string, not a reference, it’s possible to use them interchangeably.
Meaning that it’s possible to identify an asset by its key, but filter it using its label.
This works by passing in two strings to the load asset function.
One for the asset name, which is the asset that you want to load, such as a player sprite, for example, and one for the variation, which could relate to a different character type.
The two strings are then stored in a list that can be passed to the Load Assets Async function.
This will return an IList of loading operations that match Both of the strings that were passed in.
Like this:
[SerializeField] AssetLabelReference character;
SpriteRenderer spriteRenderer;

private void Start()
{
    spriteRenderer = GetComponent<SpriteRenderer>();
    StartCoroutine(LoadCharacterSprite("Idle", character.labelString));
}

IEnumerator LoadCharacterSprite(string pose, string character)
{
    List<string> keys = new List<string> { pose, character };

    AsyncOperationHandle<IList<Sprite>> loadingOperation = Addressables.LoadAssetsAsync<Sprite>(
        keys, null, Addressables.MergeMode.Intersection);

    yield return loadingOperation;

    spriteRenderer.sprite = loadingOperation.Result[0];
}
This works by using the Intersection Merge Mode, which means that any returned assets must include both of the strings that were passed in, either as labels or in the asset’s name.
Then, once it’s finished, the script will retrieve the first entry that’s returned from the loading operation.
This can only work, however, because there’s no expectation, in this example at least, there will be more than one asset returned.
However, this wouldn’t normally be the case when loading multiple assets, which is why the Load Assets Async function also allows you to attach a callback method for each asset that’s loaded, that’s triggered when each loading operation completes.
In the example above, the callback was simply set to null, since it wasn’t being used.
However, normally, you would use this callback to actually do something with each asset as it’s loaded, by attaching an anonymous function to the action when it’s triggered.
Because the callback uses an Action, which is a type of delegate function that triggers other functions when it’s called, there’s no need to use a coroutine to wait for it.
Instead, you can simply attach a function to it, in this case by using an anonymous function, which gets triggered as soon as the operation completes.
Like this:
[SerializeField] AssetLabelReference character;
SpriteRenderer spriteRenderer;

private void Start()
{
    spriteRenderer = GetComponent<SpriteRenderer>();
    LoadCharacterSprite("Idle", character.labelString);
}

void LoadCharacterSprite(string pose, string character)
{
    List<string> keys = new List<string> { pose, character };

    AsyncOperationHandle<IList<Sprite>> loadingOperation = Addressables.LoadAssetsAsync<Sprite>(
        keys,
        callback => { spriteRenderer.sprite = callback; },
        Addressables.MergeMode.Intersection
        );
}
Loading an asset manually can be extremely useful when you don’t want Unity to fill the device’s memory with data that it’s not using yet, or that it might not use at all.
Which it will, by default, for any non-addressable asset that’s referenced by the scene.
However…
Taking responsibility for the memory use in your game is a two-way street.
What’s loaded, must be unloaded and, typically, if you’re loading your game’s data using addressable assets, you will need to manually unload that same content when you don’t need it anymore.
So how does unloading data work?
And how can you make sure that you’ve done it properly?
How to release an addressable asset
Normally, when you load a scene in Unity, every asset that’s referenced by it gets loaded into memory until you close it, typically by loading a new, non-additive, scene.
At which point, all of its objects are destroyed and the memory they were using is released.
Which is how Unity is supposed to work since, typically, you’d want to load all of the data that a scene might use in one go at the start and then unload it at the end, so as to avoid loading it in the middle of your game.
However, sometimes your scene is going to be too big for that to be realistic or, if large chunks of data may not actually be used at all, letting Unity load it all in can be extremely inefficient, especially on memory-limited platforms, such as mobile phones and tablets.
But, if you load data into your scene using addressables, you must take care to unload it when you’re finished with it.
Otherwise, it’ll stay in memory, even after the scene closes, causing higher memory use, not less.
So how can you release an addressable asset after you’ve loaded it?
Generally speaking, there are three different ways to release an addressable asset in Unity.
- Release the asset using its Operation Handle
- Unload the Asset Reference directly, using Release Asset
- Or you can Unload and Destroy an addressable game object using Release Instance
Which method you use depends on how you loaded the asset in the first place.
For example, if you used an Async Operation Handle to load the asset, then you will need to use the same handle reference to release it again.
Like this:
[SerializeField] AudioClip loadedClip;
[SerializeField] AssetReferenceT<AudioClip> clipAsset;
AsyncOperationHandle<AudioClip> loadingOperation;

IEnumerator LoadAssetHandle()
{
    loadingOperation = Addressables.LoadAssetAsync<AudioClip>(clipAsset);
    yield return loadingOperation;
    loadedClip = loadingOperation.Result;
    Debug.Log("Loading is done");
}

void ReleaseAssetHandle(AsyncOperationHandle operation)
{
    if (operation.IsValid()) // Checks to make sure that handle hasn't already been released.
    {
        Addressables.Release(operation);
        Debug.Log("Released");
    }
}
However, exactly how this works can be a little unintuitive at first.
For example, if you load the asset once, the data will load into memory, and if you release the asset once, it will be released from memory.
Simple, right?
But, if you accidentally load the asset more than once, and don’t properly release the data, it won’t be removed from memory.
Loading the asset multiple times doesn’t load more data.
In fact, it’ll actually be much faster the second time you request it, since it’s already been loaded.
But, if you then only release the asset once, it will stay in memory.
It’s only when you release the asset a second time that the memory will finally be freed up.
This happens because each new loading operation increases the reference count for the asset, whereas releasing an operation decreases it.
Which can be confusing and, potentially, bad for performance, as it can mean that asset data you thought had been released is actually still taking up memory.
This is the intended behaviour for loading an addressable asset, as it means that, when loading multiple instances of the same asset into your game, unloading one doesn’t necessarily affect the other.
But, as a result, it also means that to completely remove an asset from memory, you’ll need to release as many loading operations as you start.
So what’s the alternative?
If you loaded an asset using its Asset Reference then the loading operation is embedded into the asset itself.
Meaning that it’s possible to release it by calling the Release Asset function on the asset directly.
Like this:
[SerializeField] AudioClip loadedClip;
[SerializeField] AssetReferenceT<AudioClip> clip;

IEnumerator LoadAssetReference()
{
    if (clip.Asset != null)
    {
        Debug.Log("The asset is already loaded.");
        yield break;
    }

    yield return clip.LoadAssetAsync();

    loadedClip = (AudioClip)clip.Asset;
    Debug.Log("Loading is done");
}

void ReleaseReference()
{
    if (clip.Asset)
    {
        clip.ReleaseAsset();
    }
}
However, the Release Asset function will only work if the asset was actually loaded using its reference and not using the loading operation method, otherwise, it won’t work and you’ll get a warning that there’s nothing to unload.
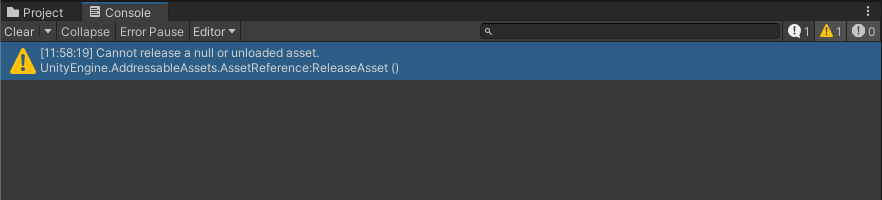
This happens because, when using the asset reference there is only one loading operation, the one that loaded the asset in the first place, so it’s generally not possible to keep track of multiple asset references using this method.
To avoid errors, it can help to check if the Asset Property of the asset reference, which is similar to the result of a loading operation, is null before trying to load the asset, and that it isn’t null when you try to release it.
Like this:
private void OnDestroy()
{
    if (clip.Asset)
    {
        // Releases the asset when its object is destroyed
        clip.ReleaseAsset();
    }
}
Whichever method you use, if you’ve loaded assets manually, it’s extremely important to make sure that you remove that same data from memory while you have the chance as otherwise, when you load a new scene, it can mean that, even if the object that loaded the asset is gone, the data may still be there.
That is, unless you created addressable objects using Instantiate Async.
Unlike other addressable assets, objects created using this method are automatically unloaded when the scene is changed.
However, if you’re loading them manually to save data in a scene then, chances are, you may also want to unload them again while you’re still in that scene.
In which case, it’s possible to both destroy and unload an object that was created using Instantiate Async by using the Release Instance function, passing in the object that you created.
Like this:
[SerializeField] List<GameObject> createdObjects;
[SerializeField] AssetReferenceGameObject largeObject;

IEnumerator LoadObject(AssetReference newObject)
{
    AsyncOperationHandle<GameObject> operationHandle = Addressables.InstantiateAsync(largeObject);
    yield return operationHandle;
    createdObjects.Add(operationHandle.Result);
}

void ReleaseAllInstances()
{
    foreach (GameObject go in createdObjects)
    {
        largeObject.ReleaseInstance(go);
    }
    createdObjects.Clear();
}
If you want to remove an object from a scene that you created using an addressable asset, and you also want to release the memory it’s using, it’s important to use the Release Instance method and not Destroy.
Otherwise, the asset’s data will remain in memory until the scene is closed.
Should you use Addressable Assets in Unity?
Chances are, if you’ve made it this far then you probably already suspect that you may need to use addressable assets in your game.
Either that, or you’re just really interested in how they work.
But should you use them?
Generally speaking, projects that were a good fit for asset bundles are probably also going to be a good fit for addressable assets.
Or, if you’ve been using the resources folder up until now, and you’re concerned about performance, switching to addressables is definitely going to be beneficial for all but the simplest of prototypes.
But…
If you’re not sure yet if you’re going to need to use addressable assets in your game, then it’s worth thinking about what your project is going to involve as it gets bigger.
For example, anyone building a large game, or even just a medium-sized game on a memory-limited platform, should probably be thinking about how they’re going to manage all of that data.
Or, if you know that parts of your game are entirely optional, such as cosmetic items, purchases or downloadable content, leaving that data out of your main build can reduce your installation size and the amount of memory that each scene uses.
Whereas, for the rest of your game, or for projects that don’t require this kind of active management to work, there’s nothing wrong with organising your assets locally.
It can be simpler and easier to work with, especially on your first project.
However, even if you can’t imagine now how your project might use addressables, keep in mind that there are many, simple, use cases, such as swapping out console-specific logos, or delivering assets in different languages, that could apply to any project.
Meaning that, even if you don’t think you’re going to need to use addressable assets right now, at least knowing that they’re there, and how they work, can save you a lot of time and effort in the future.
Now it’s your turn
Now I want to hear from you.
How are you managing assets in your game?
Are you using addressables, asset bundles, or something else?
And what have you learned about asset management in Unity that you know someone else would find useful?
Whatever it is, let me know by leaving a comment.

John French writes all of the Unity tutorials for Game Dev Beginner, and specialises in deep-dive guides teaching game development basics.

Comments
Please keep doing what you do until now,you are making one of the best content for unity learning path in the internet,the quality of your posts is in the same level as the official unity ressources,i wish if you can start making more specific contents for how to make games especially trending hyper casual for example and teach us something about their mechanics and gameplay or any content related to,i hope the best for this blog and your youtube channel sir.
Thanks so much!
Wow, this is a doozy. Feel like this is a bit over my head for now, but a kind of thing that I’ll need to read a year or two down the road from now. Thanks!
I asked for an address a while ago.
Thank you for being able to see your writing so quickly. 🙂
Thank you so much for using your precious time to share good information.
I hope more people can see the good information you write.
In fact, what I was most curious about was
– standard for the group
– dependency file of Scene itself.
Q1) What groups are you using?
There are various assets in the game.
Texture, material, various prefabs, sounds etc..
Some share each other’s dependencies, and some are independent in themselves.
By what standard are you tying up “Group”?
Is it based on a Scene group that uses the same assets?
Or did you divide groups according to the type of assets such as texture/material/sound/FBX/prefab?
Q2) Dependencies of the Scene file itself
For example
SceneA has NPC A, B.
SceneB has NPC B, C.
NPC A, B, C are addressable.
First. Load SceneA.
There are probably NPC A and B in the memory.
Then Load SceneB as Additive.
In this case, will the memory and load costs for NPC B be reduced?
Wouldn’t it only increase the count of the same reference and actually affect memory or load time?
There’s also a slightly more demanding example.
NPC B has metal materials, wood materials, and cloth materials as dependencies.
Scene C has NPC C.
NPC C has metal materials and glass materials as dependencies.
First SceneA is loaded, and load SceneC as Additive.
In this case, will the memory and load costs for NPC C’s metal materials be reduced?
In both of these cases,
when unloading the first loaded SceneA,
“Resources.UnloadUnusedAssets();”
Wouldn’t this cause a problem?
Thanks! So to answer your questions as best I can:
Q1. How you group is up to you, however, what may affect what you put in each group is a) differences in load settings (i.e. remote vs local), b) if two different groups reference a non-addressable asset, in which case they will both each copy a version to their group and c) grouping of assets (i.e. per level) as it may be the case that the asset bundles that are used behind the scenes are not fully unloaded until the whole bundle can be unloaded (see my answer to Q4 for more on this).
Q2. To answer your question about addressable NPCs, as I understand it, in the example you described, NPC B should not load into memory a second time, it’ll be cached and the addressables system will use the asset that was already loaded and increment its reference count (when using Addressables.LoadAssetAsync).
Q3. To answer your question about materials, how these are pulled in depends on the groups. If NPC B and NPC C are in different groups, their asset dependencies are pulled in separately, creating multiple copies. If, they are in the same group, they are only copied once, and both NPCs use the same assets, if they are in different groups, but the assets they are dependent on are in any addressable group (i.e. they’re known to the addressables system), then they are not duplicated, both NPCs use the same assets.
Q4. About Resources Unload Unused Assets. As far as I can tell, the idea is using Resources Unload with addressables isn’t recommended. It would unload assets that have been released, but can cause problems if they are loaded again. instead, once an asset bundle (group) no longer has any references to it, the addressables system unloads it, saving you the performance hit of running Resources Unload yourself, which can be heavy. However, I haven’t tested this at all so I don’t know for sure yet if this is the case.
Thank you for your questions, they’ve highlighted some missing information that I think needs to be in this article so I’m going to do some testing around memory usage behind the scenes and publish an update in the near future.
John.
Best and easy article about Addressables within whole internet, thank you!
You’re welcome!
Wow, this article is really awesome.
I came across your blog while looking for a good solution for remote assets and asset management.
Adressable Asset is already present in my projects, because the language system needs it. But I haven’t done anything more with it yet, rather looked at it, but mostly I didn’t have the time or the right documentation on this topic, which made me say “I’ll look at it later”. After reading your blog, I’m now more interested in the subject and want to tackle the whole thing. I especially like the additional information, if you do this this happens and if you do this this happens.
Small note: A small example project would be perfect, e.g. hosted at GIT or here as a download link to get a better understanding of the whole topic. It usually clicks better in your head when you see the whole thing in a project and not just in small snippets.
At the moment, I’m still unsure how best to do this with the loading things at all, too much input at the moment 🙂 .
Question about remote assets: Are the downloaded assets deleted after a while and have to be downloaded again from the server or do these assets remain persistent on the device? I had read somewhere a long time ago that they disappear after a certain time.
Thank you! I’m not aware of if assets are purged from memory. I would assume that they survive the game session, however on a mobile device, I can see why they might be cleared. I’ll look into it.
I hope this comment (or question) isn’t too stupid. Your article was wonderful by the way. An example. In a slot app, can each scene/slot machine be an addressable object that can be loaded and unloaded from a lobby per se?
Off the top of my head, yes I believe it’s possible to make a scene an addressable asset. The drawback of making such a large item addressable is that its dependencies get bundled with it, which can increase their size, especially if different scenes from different bundles use the same assets, as they would have to create duplicates in their own bundles.
First of all, congrats on your work, these deep dives into a specific topic are awesome!
I still have a question though:
Is it possible to specify an AssetReferenceT for a custom script attached to the prefab?
Something like this:
Reference: public AssetReferenceT reference;
and then the referenced GameObject would have (among other stuff), the “MyScript” script attached to it.
Thank you! To answer your question, as far as I understand it, no it’s not possible to create an asset reference for a script specifically, because scripts are compiled when the game is built, meaning they’re not assets.
This is so cool, I am a would-be game developer from China and I have a lot to learn from this article
If I want an enemy Script to get the Scriptable Object Instance with the same name as the enemy without setting it in the Inspector for every enemy manually, would Addressable Assets be useful for that?