
If you’re new to game development, or even if you’re not, visual scripting tools can be a great way to create logical behaviours easily, without needing to write code.
Which can be extremely useful for beginners, design-focused professionals, or even for people who are comfortable with scripting, but want to visualise game logic in a different way.
But is visual scripting the right option for you?
Does it make game development easier? Or will it simply cause you more problems further down the line?
And, if you’re going to use visual scripting in Unity, which tool should you use?
There’s a lot to consider, but don’t worry.
In this article, I’ll show you how to get started with visual scripting in Unity, how it can help you to create game logic more easily and I’ll compare two of Unity’s most popular tools, PlayMaker and Unity’s built-in visual scripting tool, formerly known as Bolt.
Here’s what you’ll find on this page:
- Visual scripting in Unity
- Unity Visual Scripting (previously Bolt)
- PlayMaker in Unity
- PlayMaker vs Unity Visual Scripting (Bolt) – Which should you use?
Let’s get started…
Visual scripting in Unity
Generally speaking, visual scripting is an alternative method of creating game logic using graphical flow charts instead of writing code.
One of the main benefits of using a visual scripting tool is the ease of use, as visual scripting works as a translation layer between the editor and the underlying scripting language.
This allows beginners, designers, artists and developers of all kinds to create game behaviours more easily, without needing to write code to do so.
For beginners, visual scripting provides a way to create complex game behaviours without needing to know the required scripting syntax first.
However, visual scripting is not necessarily a beginner tool.
Visual scripting empowers development professionals from other disciplines to create gameplay behaviour, even if they’re unfamiliar with the engine’s scripting language.
Additionally, the graphical layout can be extremely useful for visualising the flow of logic, no matter how experienced you are with scripting.
Which is why it’s little surprise that visual scripting has been used to make all kinds of games, both big and small.
So how can it help you?
Visual scripting tools in Unity
There are several different visual scripting tools available in Unity and they all work in different ways.
However, chances are you will have already heard of the two most popular tools, PlayMaker, by Hutong Games, and Bolt, which is Unity’s built-in visual scripting tool.
So how do they compare?
PlayMaker is, by far, one of if not the most popular assets ever released on the Asset Store, and with good reason.
It’s a powerful state machine and visual scripting tool that simplifies gameplay creation in Unity. It’s well-supported, fully-featured and has been used to power countless, hugely successful games.
Bolt is a visual scripting tool, originally created by Ludiq, which in 2020 was acquired by Unity. Originally available on the Asset Store for free, Bolt is included as a core part of Unity as of Unity 2021.
Although it works in the same way as Bolt, it is now provided under a new name, now simply Unity Visual Scripting.
But which should you use?
And how do they work?
Let’s start with Unity’s built-in visual scripting tools.
Unity Visual Scripting (previously Bolt)

Bolt, or simply Visual Scripting as it’s known in Unity 2021 and later, is a complete visual scripting interface for Unity that allows you to create gameplay behaviours without writing code.
It works by creating flow chart logic that can be used to manage data and create functionality, just like you would in a script, using a highly visual graphical interface, instead of writing out lines of code.
How to get started with Unity Visual Scripting
If you’re using a version of Unity between 2018 and 2021 then visual scripting is available as Bolt, which can be downloaded from the Asset Store for free here. Once you import Bolt into your project, you’ll need to install it.
If you’re using 2021 and later, visual scripting is provided as a built-in feature of Unity, now simply called Visual Scripting, that is already installed and available to use.
Generally speaking, apart from a couple of minor naming differences, the two systems are nearly identical and work in the same way.
What’s the difference between Bolt and Visual Scripting in Unity 2021?
Visual Scripting in Unity 2021 is, for the most part, exactly the same as Bolt.
Which is great, as it means that anything you could do in Bolt, and any tutorials or videos that are made using Bolt, will still work in Unity Visual Scripting.
There are just a few minor changes that you might notice.
For example, when installing Bolt, you’re given a choice between human and programmer naming types, which affects how Units are named, either to match their original function name or a more human-friendly description. In Unity Visual Scripting, this choice is removed and all Units use human naming by default.
Other advanced options in the Bolt’s installation menu, which is no longer required since Visual Scripting is already installed in Unity 2021, can be found in the Project Settings.
Flow Machines and Flow Graphs in Bolt are now called Script Machines and Script Graphs in Unity Visual Scripting. However, they work in the exact same way, where the Script Machine is the component that you add to enable visual scripting on an object, and the Script Graph is the flowchart you’ll use to build logic.
So how does it work?
How Visual Scripting in Unity works
Visual scripting in Unity uses Script Graphs (previously called Flow Graphs in Bolt) and State Graphs to create and manage gameplay logic using a flow chart style graphical interface.
Put simply, Script Graphs allow you to create the same functionality that you might create using a script, visually, using a series of units that connect together to create logical behaviour and manage data.
For example, let’s say that I want to create a movement function for a tank object:
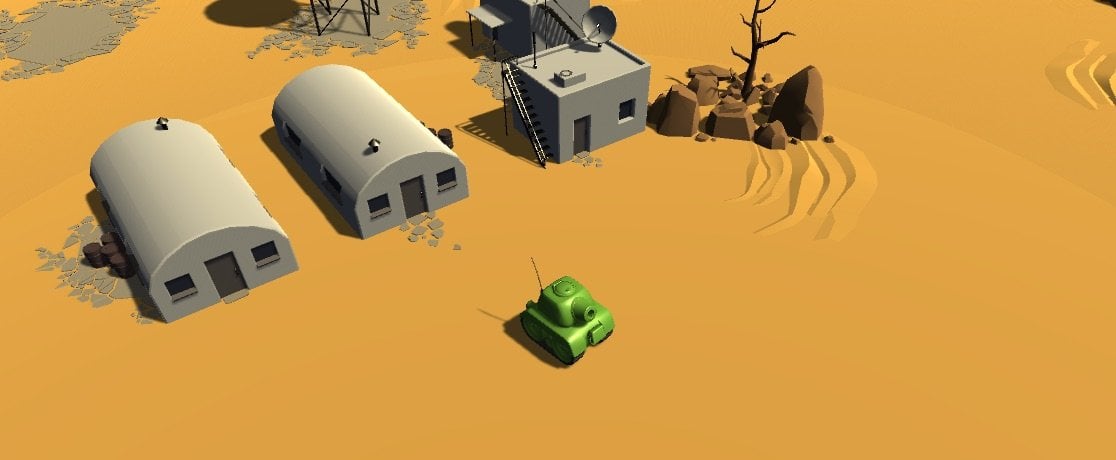
In this example, I want the Vertical input axis to move the tank forwards and backwards, while the Horizontal axis turns the tank.
In a script, I could set that up by placing some logic in the Update function, that gets called every frame.
Like this:
public class TankMovement : MonoBehaviour
{
    float moveSpeed = 10;
    float turnSpeed = 90;

    // Update is called once per frame
    void Update()
    {
        float moveAmount = Input.GetAxis("Vertical") * moveSpeed;
        float turnAmount = Input.GetAxis("Horizontal") * turnSpeed;

        transform.Translate(Vector3.forward * moveAmount * Time.deltaTime);
        transform.Rotate(Vector3.up, turnAmount * Time.deltaTime);
    }
}
This works by getting the value of the Vertical and Horizontal axes, which returns a float between -1 and 1, multiplying that value by a speed modifier and then applying it to the object, using Delta Time to create ‘per second’ movement.
Using a Script Graph, I can create the same type of behaviour using Units instead of code.
Like this:
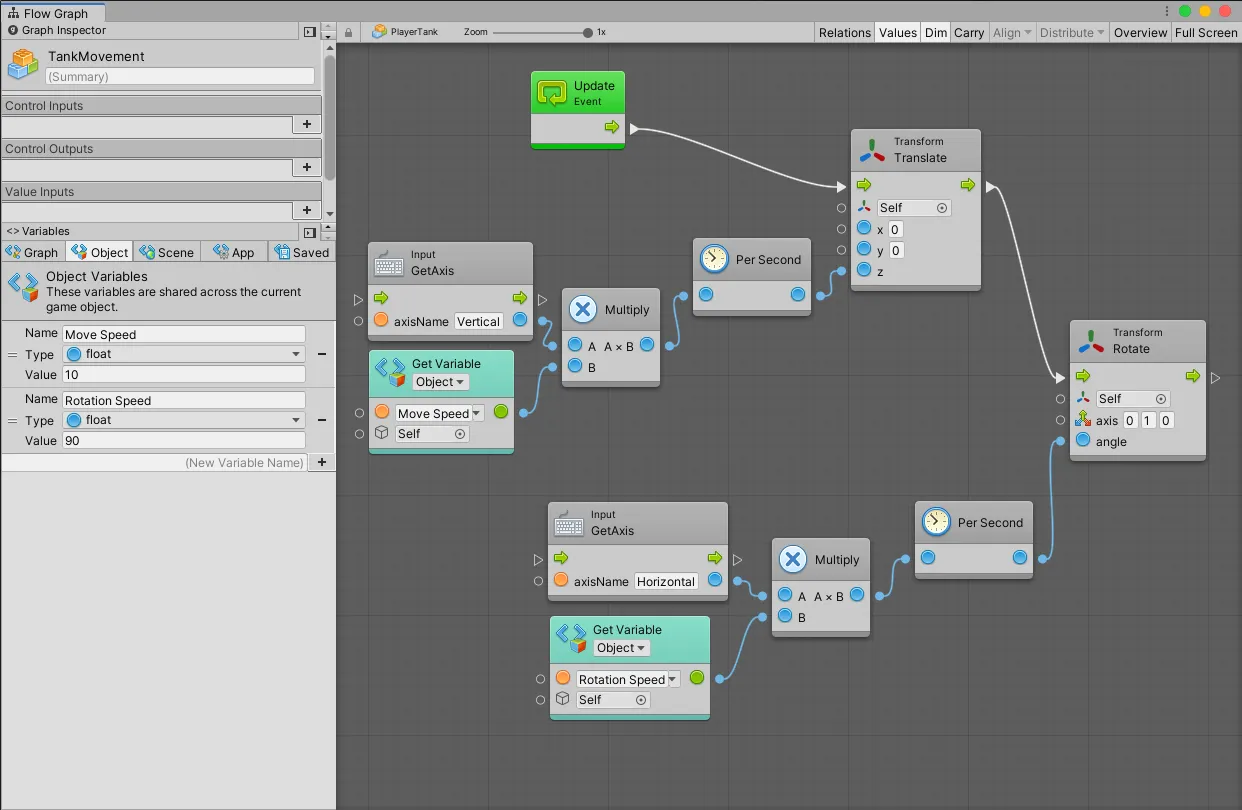
Using visual scripting, it’s possible to create the same functionality as with a script, except in a graphical flowchart.
This works in the same way as the script.
The Horizontal and Vertical input axes are multiplied by a speed value, scaled by Delta Time, using the Per Second Unit, and then applied to the game object that the graph is attached to, moving and turning the object.
Unlike the script, however, the flow of data and logic is clearly visible.
It’s easy to see where the data comes from, how it’s used and, when the game is running, what values are being passed through:
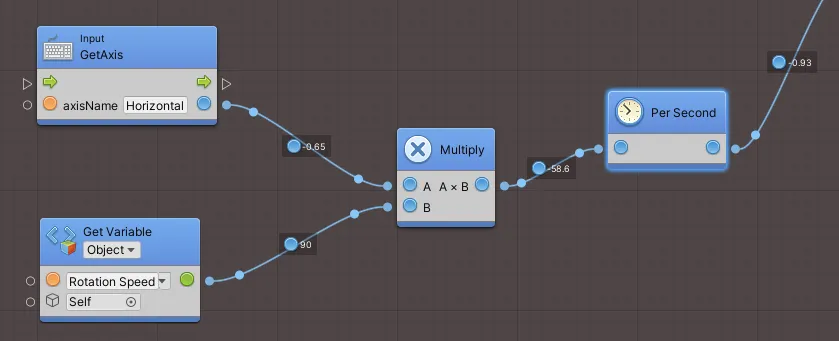
While running, the values that each Unit passes on can be seen inside the Graph.
Which can be extremely useful for debugging.
Most of Unity’s built-in functions exist as ready to use Units.
However, when creating logic using scripts, as well as writing single lines of code, you would normally write your own custom functions to create reusable blocks of logic with inputs and outputs.
So how can you create a function using visual scripting?
That’s where Super Units come in…
Create functions with Super Units
Super Units are used to create custom Units in visual scripting.
They use the same logical building blocks as Script Graphs except that, instead of creating a single sequence of logic, they can be used to create a function that can accept parameters in, perform a specific task and return data out again.
Just like functions in scripting.
For example, I could use a Super Unit to hold all of the logic that calculates the forward and backwards movement of the tank.
Which would look like this:
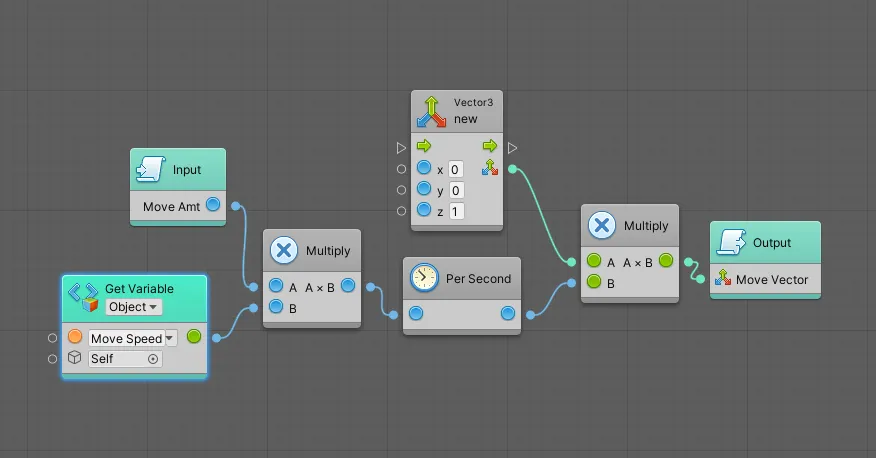
Super Units are the visual scripting equivalent of making your own functions.
Then, all I’d need to do is pass in a single float value, such as the Vertical input axis, and the Super Unit would return a Vector 3 result that can be used with the Translate function, creating movement.
Like this:
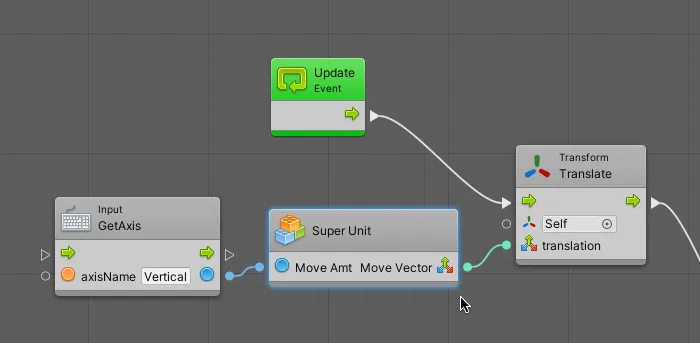
Once the Super Unit is set up, all I need to do is pass in a single float value.
In the same way that functions in scripts can help you to organise and reuse blocks of code, Super Units allow you to create reusable graphs that can help to avoid a simple flowchart from becoming spaghetti.
Create state machines with State Graphs
While Script Graphs are used to create gameplay in visual scripting, State Graphs can be used to move between sets of gameplay logic, changing how an object behaves, depending on what state it’s in.
If you’ve ever used Unity’s Animator Controller, you’ve already used a state machine before. Typically, they’re useful for managing multiple behaviours on a single object.
Just like PlayMaker, which is, at its core, a state machine tool, Visual Scripting in Unity allows you to create state machines by building Script Graph logic inside State Graphs.
Which can be extremely useful for quickly building complex behaviours, such as enemy AI and player characters.
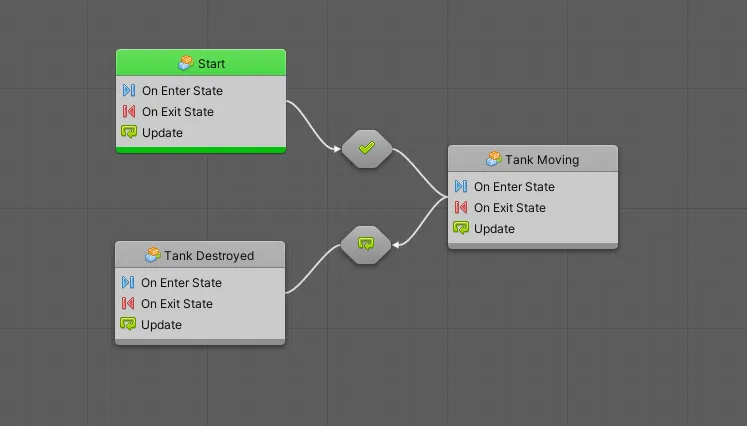
State Graphs allow you to transition between behaviour sets on an object when certain conditions are met.
Using Script Graphs and State Graphs, it’s possible to create most of, if not all of your game’s logic using visual scripting.
But should you?
Should you use Unity Visual Scripting?
Visual Scripting can be a great way to create and work with gameplay logic in Unity and is a useful alternative to scripting.
For beginners, visual scripting provides a way to work with Unity’s various functions without needing to know how to write them out in code.
And even if you are comfortable with written scripts, visual scripting can still be extremely useful as an alternative method of planning and working with logic.
Working with a flowchart, instead of a wall of text, makes it much, much easier to see how data and functions are being used, which can be especially useful for finding and fixing problems.
So, while you might assume that visual scripting in Unity is designed to make development easier for beginners, it may be more appropriate to consider visual scripting as an organisational tool instead.
After all, when creating logic with visual scripting, you’ll often be setting up the exact same functions and data as you would with a script.
The difference is that, instead of using written code, you’ll be using visual Script Graphs instead.
So what’s the catch?
Put simply, visual scripting is an alternative interface for written scripting.
Much of what you will do with a Script Graph is the same as what you’d do with a script.
Which can be both a good thing and a bad thing.
While it can be helpful for a beginner to visually work with the same functions and data types that they would otherwise learn using scripts, visual scripting doesn’t replace the need to understand how they are designed to work.
So, while the interface is clearer and easier to use, there is still a learning curve and people who are new to Unity will still need to learn how specific functions and data are used together to get results.
There are also some limitations to visual scripting.
For example, some basic functions that are easy to write out in a line of code can be trickier to achieve with a visual script.
Mathematical functions and arithmetic, for example, can be very simple to write out, but achieving the same result in a Script Graph, while not difficult, can take longer, requiring several clicks and actions.
Also, as your game grows in size, you may find that some features that are designed to make scaling your project more manageable, such as using delegates in scripting, are harder to do with visual scripting.
And while there will no doubt, be workarounds, fixes and examples that you can learn from in the future, Visual Scripting in Unity is, at the moment, still relatively new, meaning there are fewer resources to help you.
So what about PlayMaker?
Is PlayMaker easier to use than Unity’s Visual Scripting?
PlayMaker in Unity
PlayMaker combines a powerful state machine with easy to use logic.
While Visual Scripting in Unity, is a dedicated visual scripting tool, PlayMaker is technically only a state machine, creating functionality through the use of PlayMaker FSMs, or finite state machines.
So while Unity’s built-in visual scripting tool offers Script Graphs to create behaviour and State Graphs to manage states, PlayMaker only offers state control.
Plus, PlayMaker is a paid asset, while visual scripting in Unity is now completely free.
So… surely there’s no contest between PlayMaker and Bolt, right?
Well, not exactly.
While PlayMaker is a finite state machine tool, it’s not fair to describe it as only that.
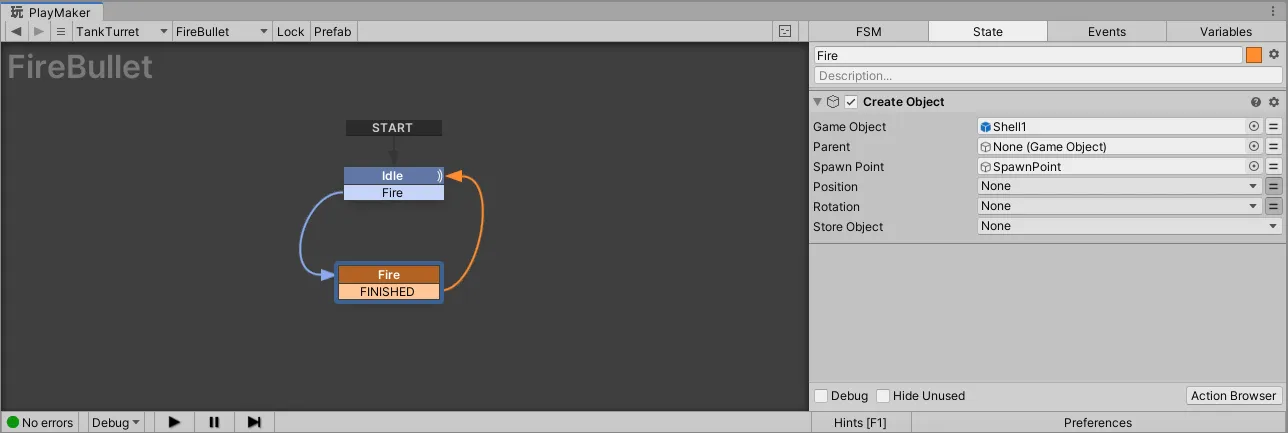
PlayMaker uses Actions to create behaviours inside of each state, meaning that you can use a PlayMaker FSM to create logic.
So, as well as being able to create state basic logic using different states and Actions combined, it’s also possible to create script-like behaviour using a PlayMaker FSM with just one initial state.
So while PlayMaker is a state machine tool, it can also be used to create game logic, using its built-in Actions.
Which, as it turns out, can be extremely easy to work with.
How to get started with PlayMaker
PlayMaker is available to download from the Unity Asset Store (you can get it here) so, if you don’t already have it, you’ll need to purchase and download it before you can use it.
Once PlayMaker is imported into your project, you’ll need to install it.

Once you’ve imported PlayMaker, you’ll also need to install it.
From the quickstart menu, you’ll also be able to access getting started guides and add-ons
How PlayMaker works
PlayMaker works by using finite state machines (via PlayMaker FSM components) to manage sets of Actions, which are pre-built function components that create gameplay.
Actions work in a similar way to Inspector components and allow you to use Unity’s functions in a more convenient format.
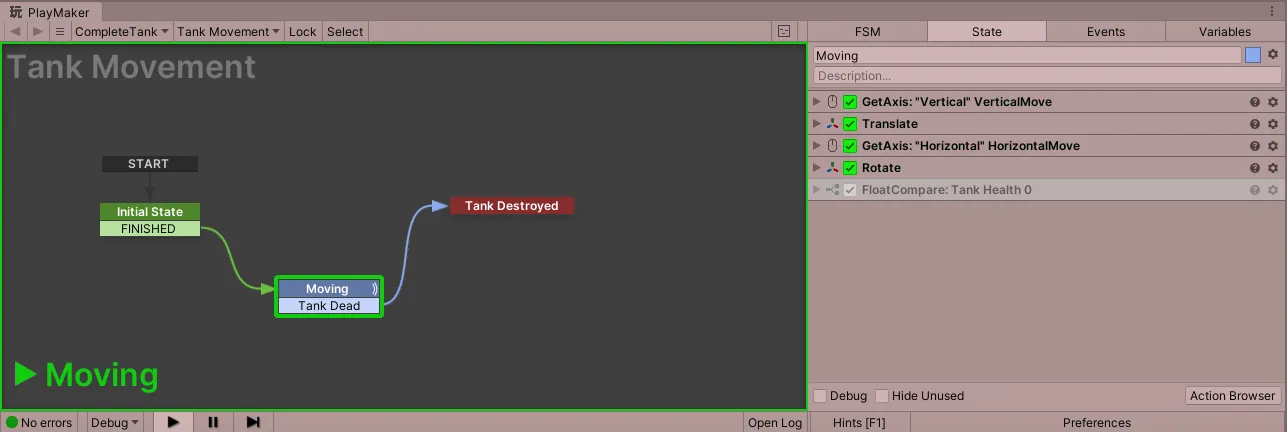
For example, to create simple movement in PlayMaker, all I need to do is use the Get Axis Action, use the dropdown option to store the result in a variable, and then pass that into the Translate Action below it to move the object.
Like this:
Using PlayMaker, it’s possible to create basic movement using only two Actions.
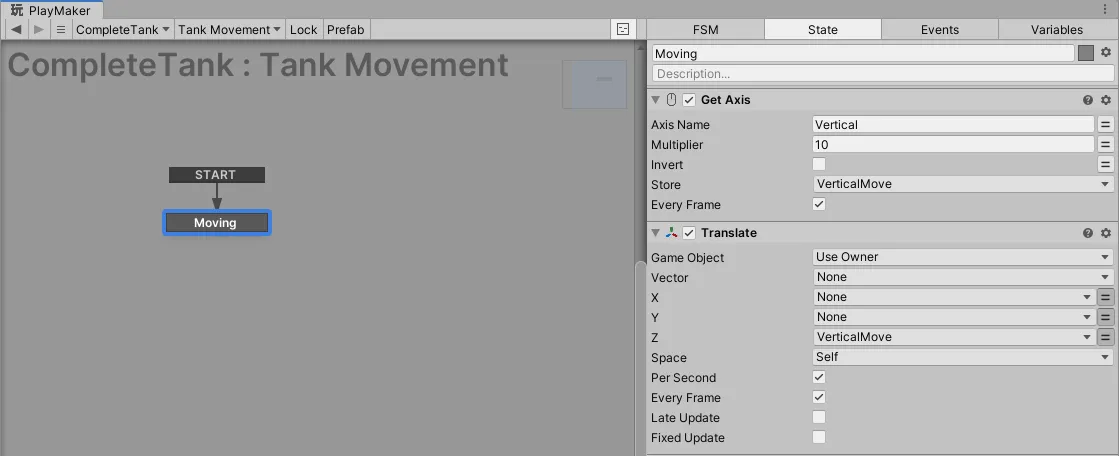
What makes PlayMaker’s Actions more convenient than visual scripting or coding is that each Action is pre-configured with useful options that make it simpler to use.
For example, I don’t need to multiply the movement amount by Delta Time, I can simply check the ‘Per Second’ checkbox.
I don’t need to create a new Vector 3 variable to create one axis of movement, I can simply pass the float I stored straight into the Z field of the Translate Action.
By including commonly used features as configurable options, creating basic gameplay can be faster and easier using PlayMaker.
And that’s not even PlayMaker’s most powerful feature.
State machines in PlayMaker
At its core, PlayMaker is a finite state machine, which can be an extremely useful tool in game development.
Why are state machines so useful?
Generally speaking, a state machine groups an object’s different behaviours, making them more manageable.
A state machine is a behaviour model that allows you to change what an object does at any given moment, depending on what state it’s in.
For example, imagine a character controller that, amongst other things can be in a running state or a sleeping state.
A running state requires different behaviour to a sleeping state, however, both states may animate the character, play audio, and perhaps process some kind of logic that affects the player’s stamina.
Both states affect the same aspects of the character, just in different ways.
But, the player cannot be both asleep and running at the same time, so separating the two sets of behaviour into different states makes sense, and allows you to more easily manage the behaviour in each.
It also allows you to manage how a player enters each state, and from which state they are able to enter another, using Transitions.
As a result, using states makes it significantly easier to manage an object’s many different behaviours and the connections between them.
However, doing this in code is difficult.
Even if you’re familiar with scripting, trying to create even basic state machines using written code can be counter-intuitive, as it can be difficult to visualise the connections between each state.
Given the importance of state machines in game development, and how much easier they can be to use with PlayMaker FSMs, it’s not surprising that PlayMaker is as popular as it is and that it has been used by so many developers in all kinds of projects.
Games made with PlayMaker

David Wehle used PlayMaker to help build his game, the First Tree.
PlayMaker is a well-established tool for simplifying the development of gameplay elements and has found its way into all kinds of projects.
Such as The First Tree, where creator David Wehle has described using PlayMaker to build the bulk of the game’s functionality without writing code.
Or in Hollow Knight, where Team Cherry used PlayMaker to build enemy AI logic very quickly.
Other games built using PlayMaker include Inside, Firewatch and, famously, Hearthstone.
Should you use PlayMaker?
PlayMaker can be extremely useful for both beginners and experienced developers.
It combines a powerful state machine with easy to use behaviour Actions that make sense and save time.
But, compared to Unity’s, now built-in, visual scripting tool, is PlayMaker still worth it?
When I researched this article I tried PlayMaker and Unity Visual Scripting (as Bolt) for the first time.
I made a simple scene using both systems, with some basic behaviours, such as object movement, input control and a camera that follows the player.
And going in, I’ll admit, I was a little bit biased.
I had already assumed that there was no reason to use PlayMaker now that Bolt is free and integrated into Unity as Visual Scripting.
However, when using Bolt, I basically created the same logic that I would have done with a script, only using Bolt’s visual interface instead of code.
Which took a while…
This is because I was trying to do the same thing as I would have done otherwise, just with a new tool that I hadn’t used before.
Using PlayMaker, however, I found that creating common functionality, such as object movement, was actually easier when using PlayMaker’s pre-configured Actions.
Commonly used features are built into each Action, making it possible to get faster results in fewer steps.
However, there are some drawbacks.
While Bolt, and now Unity Visual Scripting, is a near-complete visual scripting solution, PlayMaker is limited by the Actions that are available to you.
Meaning that, if an Action doesn’t exist, you may find it more difficult to create the behaviour you want.
And while it is possible to create custom Actions, you will need some scripting knowledge to be able to do that.
However, this may not be a problem for you.
Because PlayMaker is so well supported and is so widely used, any Action you might want is either likely to be available in the PlayMaker Ecosystem, which allows you to search and download new, additional Actions from inside Unity, or as an example from one of the many developers that have used PlayMaker to build their games.
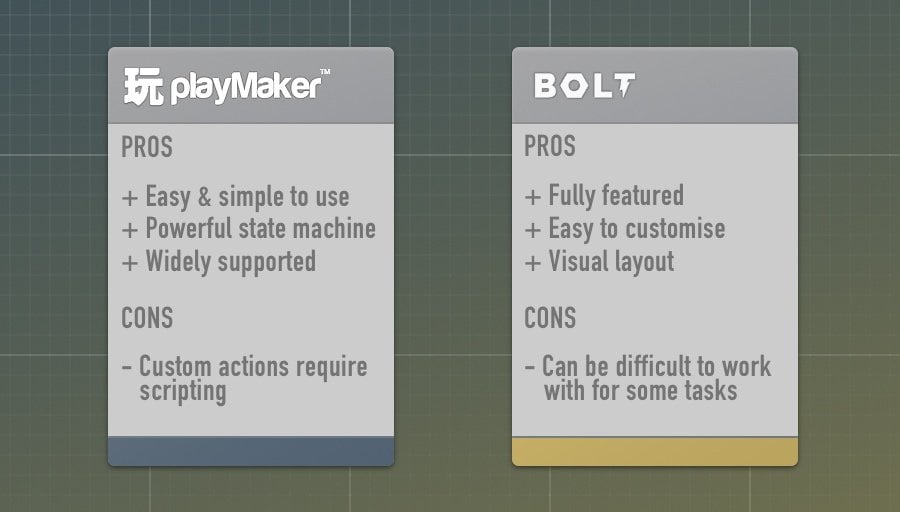
PlayMaker vs Unity Visual Scripting (Bolt) – Which should you use?
PlayMaker and Unity Visual Scripting are both extremely useful visual scripting tools that can help you to build games more easily in Unity.
Which one you use, if you should use either of them, will depend on the type of help you could use the most.
For example, if you’re completely new to Unity, and you don’t know how to code, Visual Scripting is a great way to learn and use Unity’s functions in a language that’s easy to understand.
It’s fully featured, flexible and will allow you to become familiar with Unity’s core concepts, without the added difficulty of learning a scripting language as well.
Alternatively, PlayMaker provides a powerful state machine and easy to use Actions that makes development much faster and much simpler. It’s, arguably, one of the quickest ways to get started with Unity.
And while PlayMaker Actions can be limiting, in that they can’t be customised without writing code, the huge amount of support, asset integrations and additional Actions that are available from the PlayMaker Ecosystem means that it’s unlikely you’ll find something that you can’t do in PlayMaker.
But which should you use?
What’s the best visual scripting tool for a beginner?
While it’s possible to build a game using only PlayMaker, Visual Scripting or just written code alone, in practice you’ll get best results when using a combination of tools that support your strengths and minimise your weaknesses.
For example, if you don’t know code, at all, and you wouldn’t enjoy learning it, then Visual Scripting will allow you to use Unity without needing to write it.
If you’re unfamiliar with how Unity works, PlayMaker simplifies its functions into easy to use Actions.
And even if you’re comfortable with writing code, managing logic visually using a state machine or seeing the flow of data using a Script Graph can make much more sense than trying to do it inside of a script.
While there are many other considerations to make, such as performance, advanced features and compatibility with other tools, the reasons that you might choose to use one visual scripting tool over another depends entirely on how useful it will be to you and how useful it will be to your project.
Meaning that the best visual scripting tool for you is the one that helps you the most, that will make it easier for you to make a game that’s fun to play, and that will help you to finish your game and release it.
Where to learn more
Official support
Udemy Courses
Now it’s your turn
Now I want to hear from you.
How are you using visual scripting in your game?
Are you using PlayMaker, Unity Visual Scripting or a different option?
And what experiences have you had with visual scripting in Unity that you know others will find useful?
Whatever it is, let me know by leaving a comment.
Image information
- Bolt Logo © Unity Technologies
- PlayMaker Logo © Hutong Games LLC
- The First Tree © David Wehle

John French writes all of the Unity tutorials for Game Dev Beginner, and specialises in deep-dive guides teaching game development basics.

Comments
If you are forced to choose one I would take Playmaker. Bolt is useless writing code is not only fasterand creates faster executable, but you can refactor code etc., what is unavailable in bolt. Playmaker is more handy, it’s actions are more complex and useful, but it has it’s limitations – and I mean not only custom actions you may require, but other limitations, like saving game. If you need something more complex than saving bunch of basic variables – you are done. Even in Unity this task is not trivial, but playmaker makes it even worse. So I would say – write code, damn it!
Thanks for your feedback. And I agree that, personally, having tried both now, and even as somewhat of a beginner myself, writing code can be easier. But, for a lot of people, I think it’s more of a workflow decision than what will deliver ultimate potential. After all, It’s entirely possible to use PlayMaker to build a full, successful, game that runs well, and most asset providers, Easy Save included if i understand right, integrates with it. So while I agree that learning to write code can be easier, if it’s the difference between making a game or not, then a game made in PlayMaker is always going to run better than an unfinished game written using code.
I strongly disagree with Bugaga here (for the most part). You can easily create very complex logic with Playmaker. You are not limited to using actions – you can call methods, get and set properties of virtually any custom script. This way I got into coding – I used the awesome state machine features of Playmaker to call small, custom methods I wrote. If you can understand the documentation of any given asset you can use it in Playmaker which is very powerful. If you use something a lot, write a custom action for it and reuse it. There are also array lists and hashtables, XML and JSON parser + it has support for many third party assets out of the box.
The main difference that isn’t even mentioned in the article is that Bolt is slower than Playmaker. Playmaker actions are basically prewritten C# while Bolt needs to reflect the code in runtime which is quite a bit slower.
Saving a game can be achieved without a third party asset (writing to text files etc.) but Easy Save is a great way to do it. It is fully integrated with Playmaker and I never had an issue working with it. There are even networking solutions for it which is quite impressive.
Thanks for your feedback, great to hear about your first-hand experience with Playmaker.
Bonjour,
J’ai fait un jeu entièrement avec Playmaker et ça marche plutôt pas mal.
J’ai une question : Est-il possible d’installer les 2 systèmes sur un projet ? Car j’ai un tuto d’animation assez complexe en Bolt que je veux utiliser mais je ne trouve pas l’équivalent avec Playmaker.
I haven’t tried it, but off the top of my head yes I believe it should be possible to install Playmaker and Bolt at the same time, although you could always try it in a test project first to make sure they work ok together.