
Creating interactions in your game can be a relatively simple thing to do.
For example, it’s possible to create a door that opens when you use it, or a collectable that gives you points when you collide with it, by searching for the class that you want to use on that object.
Such as a door class or a collectable class, for example.
However, chances are, that doors aren’t going to be the only interactable object in your game and there’s probably going to be more than one type of collectable item for your player to pick up.
Which can be a problem, because checking to see if an object is a door, or a switch, or an item that you can pick up, before you try to use it, can be difficult to manage.
So how can you interact with different types of objects in Unity?
One option is to use an Interface.
Interfaces allow scripts to interact with each other based on the functionality that they implement, not what they are.
Which is useful, as it allows you to interact with different scripts in a generic way, by using the same, universal, commands to use objects, deal damage or pick up collectable items.
But…
While interfaces can be simple to use, knowing when to use them can sometimes be tricky, and using them in the wrong way, or trying to use them for something they’re not good at, can cause you more work, not less.
But don’t worry,
In this article, you’ll learn how interfaces in Unity work, what they’re good at, and how you can use them to make creating interactions in your game easier to do.
Here’s what you’ll learn on this page:
- What are interfaces in Unity?
- How to create an interactable object in Unity
- How to make a damage system in Unity using an interface
- When to use an interface in Unity (instead of something else)
- How to make a state machine in Unity (using interfaces)
So, what exactly is an interface in Unity?
What are interfaces in Unity?
An interface in Unity is a type of script that defines functionality.
Essentially, it’s a list of functions that will be required by any class that implements the interface.
When a class implements an interface, it must include all of these functions, publicly, using the same method names, parameters and return types as written in the interface script.
What this does is create a kind of contract, a compatibility requirement that the script must meet in order to implement the interface correctly.
Put simply, an interface forces you to include certain functions in a script so that other scripts will be able to use them.
But why is that useful?
When different classes implement the same interface, they can be treated as if they’re the same type of class by other scripts, even if they’re not.
This works because an interface allows a class to be defined by what it does, not what it is.
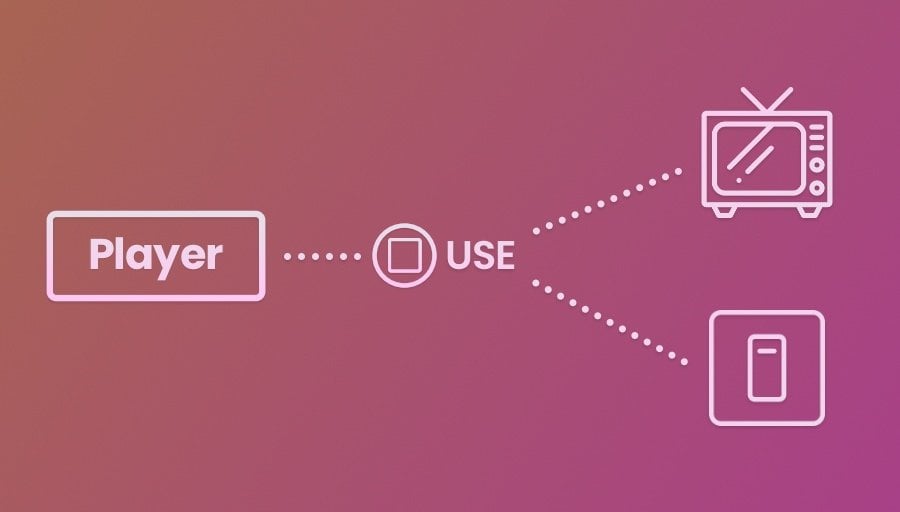
For example, a TV and a Light Switch both do different things and operate in different ways.
However, in a game, you might use the same button, and the same Use Function, to switch either one of them on.
Put simply, their interaction is the same, even if the end result is different.
Interfaces allow you to do this by forcing a class to include a particular function call, meaning that other scripts can depend on it being there.
This allows a script to call the same function in different classes that implement the same interface, without needing to know what the class actually is.
While the body of the function, what actually happens when it’s called, is the responsibility of the class itself.
Meaning that different classes, even though they’re being triggered in the same way, can perform different actions in response.
Interfaces allow the same command to interact with different classes in different ways.
This makes interfaces ideal when you want to use the same function call to do different things.
Such as interacting with an object, picking up a collectable or dealing damage.
So how does it work?
How to create an interactable object in Unity
A common use for interfaces is for making interactable objects.
This works well because there are likely to be many different types of interactable objects in your game, but, typically, only one method of actually using them.
Such as pressing a use button, for example.
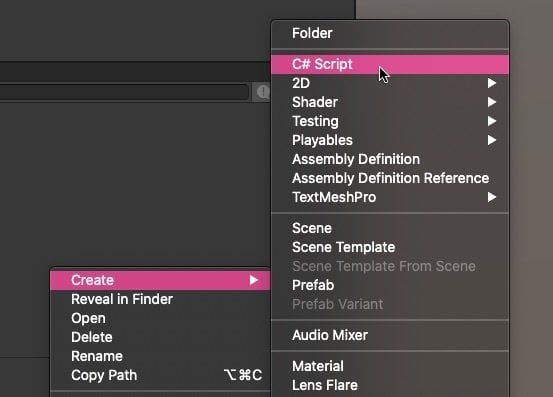
To create an interactable object, you’ll need to create an interactable interface, and to make an interface, you’ll need to create a new C# Script.
While you might normally do this by adding a new script as a component, interfaces can’t be attached to game objects, so you’ll need to create it inside the project using the right-click create menu.
Like this:
At this point, you’ll also need to name the interface.
While it doesn’t technically matter what you call it, a common naming convention for interfaces is to describe the ability that it enables, such as ‘Selectable’ or ‘Interactable’, preceded by a capital I1.
So, for example, if you wanted to create an interface to allow objects to be interacted with by clicking on them, you might call it IClickable, or IUsable, so that it’s clear, at a glance, that the script is an interface and what it’s supposed to enable an object to do.
Inside the script, you’ll need to change the type from a class to an interface and remove the default inheritance from Monobehaviour.
So that it looks like this:
public interface IClickable
{

}
Then, in the body of the interface, declare any functions that you want to be included.
These will be the methods that any class that implements the interface will have to include in order to use it.
For example, you might force classes that implement an IClickable interface to provide an Interact function.
Like this:
public interface IClickable
{
    void Interact();
}
Just like when writing a function in a regular class, you’ll be able to specify a return type and the arguments that the method will accept.
However, you don’t need to make the function public and you can’t include a function body2, which is why there are no curly brackets after the function’s declaration, like when writing a method in a regular class.
This is because it’s up to the class that implements the interface to decide what the function will actually do when it’s called.
For example, if you wanted to use the IClickable interface to make a door open when it’s clicked on, simply implement the interface by adding IClickable after the inheritance statement, separated by a comma.
Like this:
public class Door : MonoBehaviour, IClickable
{

}
Then, to fulfil the requirements of the interface, add the Interact function.
Like this:
public class Door : MonoBehaviour, IClickable
{
    public void Interact()
    {
        // The door was opened!
    }
}
It needs to be named exactly as it was in the interface, publicly accessible, and use the same return type and parameter pattern.
But, the body of the function is unique to the class, not the interface, meaning that, inside the method, you can add whatever code you want, such as to open the door and play a door opening sound effect, for example.
How to implement multiple interfaces
One of the advantages of interfaces when compared to similar structural systems, such as inheritance, is that a class can implement multiple interfaces.
For example, it’s possible to make a door both interactable and damageable by adding more than one interface to the class declaration, separated by a comma.
Like this:
public class Door : MonoBehaviour, IClickable, IDamageable
{
    public void Interact()
    {
        // The door was opened!
    }

    public void Damage(float damage)
    {
        // The door was damaged!
    }
}
Adding the Interact method fulfils the functionality contract between the class and the interface, meaning that other scripts, when they try to interact with a clickable class, will be able to call the function on it, without needing to know what it actually is or what will happen as a result.
This works because the interface forces the class to include its required functions, meaning that, in any clickable class, the Interact function will be there, wether it’s a door, a switch or a lamp:
public class Lamp : MonoBehaviour, IClickable
{
    public void Interact()
    {
        // The lamp was switched on
    }
}
This can be extremely useful, as it means that a player can interact with different classes as clickable classes, instead of their actual type.
But how does that work?
In the same way that it’s possible to search for a specific type of class on an object using Get Component, it’s also possible to search for a class that implements a particular interface.
For example, you could use Try Get Component to search for a class that implements the IClickable interface and, if there is one, call the Interact function on it.
Like this:
void InteractWithObject(GameObject objectToInteractWith)
{
    if (objectToInteractWith.TryGetComponent(out IClickable clickableObject))
    {
        clickableObject.Interact();
    }
}
To do this, you’ll typically need a reference to the object which can be retrieved using a Raycast or a collision event.
For example, in a first-person game, you could fire a ray from the centre of the camera to get a reference to the object that’s directly in front of the player’s view.
Like this:
public class Player : MonoBehaviour
{
    private void Update()
    {
        if (Input.GetMouseButtonDown(0))
        {
            Ray ray = Camera.main.ViewportPointToRay(new Vector3(0.5f, 0.5f, 0));

            if (Physics.Raycast(ray, out RaycastHit hit, 2))
            {
                InteractWithObject(hit.collider.gameObject);
            }
        }
    }

    void InteractWithObject(GameObject objectToInteractWith)
    {
        if (objectToInteractWith.TryGetComponent(out IClickable clickableObject))
        {
            clickableObject.Interact();
        }
    }
}
Interfaces are ideal when you want different scripts to respond to common triggers.
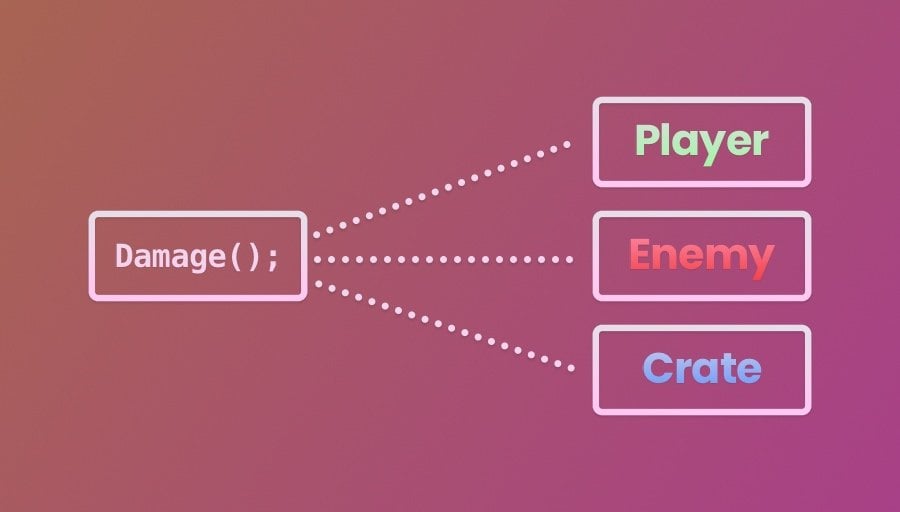
For example, when a projectile or an explosion collides with another object, you’re probably going to want to try to damage that object in some way.
However, there are many different types of objects that can be damaged, such as the player, other enemies or destructible environments, so it doesn’t make sense to try to work out what the object is, only if it can be damaged or not.
How to make a damage system in Unity using an interface
Using an interface, it’s possible to make many different classes damageable, without changing how damage is caused.
Interfaces allow you to call the same generic Damage function in multiple different classes.
To make a basic damage system, you’ll need to create a new damageable interface that includes a Damage function.
Like this:
public interface IDamageable
{
    void Damage(int damageTaken);
}
In this example, the damage function takes a integer parameter, to allow a damaging object to pass in more or less damage.
Then, to create an object that can be damaged, simply implement the IDamageable interface and a damage function.
Such as on a Player, for example.
Like this:
public class Player : MonoBehaviour, IDamageable
{
    [SerializeField] int health = 100;

    public void Damage(int damage)
    {
        health -= damage;
        // The player was damaged!

        if (health <= 0)
        {
            Destroy(gameObject);
            // Restart the game
        }
    }
}
Or on a damageable object,
Like this:
public class Box : MonoBehaviour, IDamageable
{
    [SerializeField] int health = 25;

    public void Damage(int damage)
    {
        health -= damage;
        // The box was damaged!

        if (health <= 0)
        {
            Destroy(gameObject);
            // Drop some loot
        }
    }
}
Then, when you want to try to damage an object, you can simply search for any class that implements the IDamageable interface.
Like this:
public class Explosion : MonoBehaviour
{
    [SerializeField] int explosionDamage = 50;

    private void OnTriggerEnter(Collider other)
    {
        if (other.gameObject.TryGetComponent(out IDamageable damageableObject))
        {
            damageableObject.Damage(explosionDamage);
        }
    }
}
Passing information to an interface
In this example, damageable classes accept a simple number value with the damage function, to allow different types of damaging object to deal different amounts of damage.
This works because the damage function that’s triggered only really affects the object that’s being damaged, while the object that’s doing the damaging probably doesn’t care too much about what it hit.
However, there may be times when you want to use an interface to talk back to a script that is interacting with it.
Such as when picking up different types of collectable item, for example.
A collectable that gives you points works in a different way to a collectable that gives you health, however, both are likely to be picked up in the same way, making them a good fit for an interface.
However, both collectables, when they’re collected, will need to interact with the player that interacts with them, to be able to give them points or health.
So how can the interface get a reference to the class that’s interacting with it?
One method is to simply insist that any collectable interface function requires a reference to the player that is calling it.
Like this:
public interface ICollectable
{
    void Collect(Player player);
}
That way, when a player does collect an item, the collectable class can call a function on the player class, giving it points or health, as needed.
Like this:
public class HealthPickup : MonoBehaviour, ICollectable
{
    [SerializeField] float healthValue = 50;

    public void Collect(Player collectingPlayer)
    {
        collectingPlayer.AddHealth(healthValue);
        Destroy(gameObject);
    }
}
A damage system can be a good fit for interfaces, as it typically involves performing the same kind of generic action on a number of different types of class.
However, there’s a problem with this method.
The benefit of interfaces is that each implementing script can interpret the same function in a different way.
But, when multiple classes use the same interface for similar reasons, you may end up duplicating your code.
Such as in the damageable example above, where, even though each of the two damage functions ultimately do different things, part of the damage function is still being duplicated, specifically the part that removes the object’s health, in basically the same way, in both scripts.
Which is, generally, bad, as it means, if you wanted to change how health is removed when an object is damaged, you’d need to do it in two different places, which as your project gets bigger, could be difficult to manage.
So, is it ok to use an interface in this way? or should you be using a different method?
When to use an interface in Unity (instead of something else)
The purpose of an interface is to allow a class to interact with classes of different types, but in a generic way.
They create abstraction, by separating what the class is from what it can do, making it easier to connect scripts together anonymously.
However…
Interfaces cannot solve every problem and sometimes using an interface, instead of something else, can be more trouble than it’s worth.
So when should you use an interface, and when should you use a different solution?
Interfaces vs abstract classes in Unity
Abstract classes are a feature of inheritance, that allow you to implement different versions of a parent class’s functionality in the scripts that inherit from it.
What this means is that individual classes, such as a Player, or an Enemy who, for example, could both inherit from a parent Human class, could be considered to be types of human, allowing other scripts to treat them as if they’re the same, even though they’re not.
Inheritance allows you to create versions of the same object, which can be useful for sharing common functionality between classes.
An example of this can be seen in the way that Unity handles colliders, where each specific collider type, such as a box collider or a sphere collider, inherits from a generic collider class, allowing other functions to deal with a type of collider, without knowing, specifically, what it is.
However, there are differences in the way that inheritance works when compared to interfaces.
Inheritance is an ‘is a’ relationship, where the class is a version of its parent, meaning that a class can only inherit from one parent class.
This can cause organisational problems when you want two classes to implement the same type of behaviour, but they are hierarchically different objects.
For example, an enemy and a box may both be damageable but, apart from that, they have little else in common.
Meaning that having them both inherit from the same class doesn’t make much sense and can make organising your scripts harder to do, not easier.
Whereas an interface, which describes what an object can do, not what it is, can allow a class to implement damageable behaviour, and be treated as a damageable object, but not be defined as only that.
This is because a class can implement multiple interfaces, allowing one class to include many different types of behaviour.
But which method should you use?
Inheritance or interfaces?
The answer depends on what it is you’re trying to create and how you want other scripts to be able to interact with it.
Inheritance allows scripts to share functionality because they are versions of the same kind of entity.
While interfaces allow you to give a class a particular ability, so that other scripts can easily interact with it on that basis.
However, it’s rarely a case of exclusively choosing one over the other and, chances are, there will be times when you want to use both interfaces and inheritance together.
Using interfaces with inheritance in Unity
Interfaces and inheritance both solve similar problems, in similar ways but their use cases are usually different and neither is a complete solution.
Meaning that there may be times when using a combination of inheritance with interfaces is the best solution for you.
For example, one of the advantages of interfaces is also, potentially, a drawback. Specifically, the fact that you need to define the body of a function in every class that implements an interface.
Which, if you’re using interfaces to deal damage, for example, might mean you end up rewriting the same code in a player class as you did in an enemy class.
Using a combination of inheritance and interfaces allows you to give the same kinds of objects shared functionality, avoiding duplication, but while also allowing other scripts to easily interact with them on a functional basis.
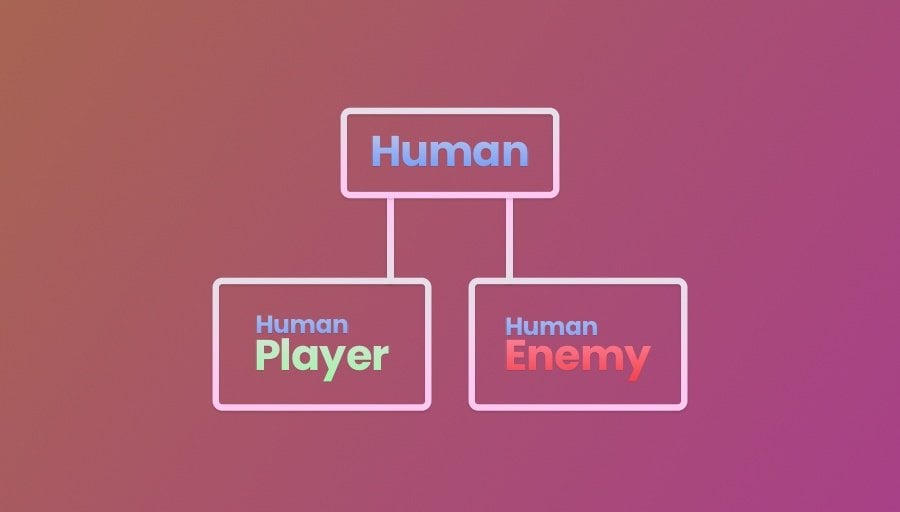
For example, a Player class and an Enemy class might both inherit from a Human class, which would be a sensible place to manage health, since it’s a feature that is common to both players and enemies.
The human class could then implement a Damageable interface, allowing any human to be hurt and lose health, but without having to duplicate the code in its children and without having to search, specifically, for a human class when trying to damage something.
Allowing you to reuse the damageable interface elsewhere, while also minimising duplication.
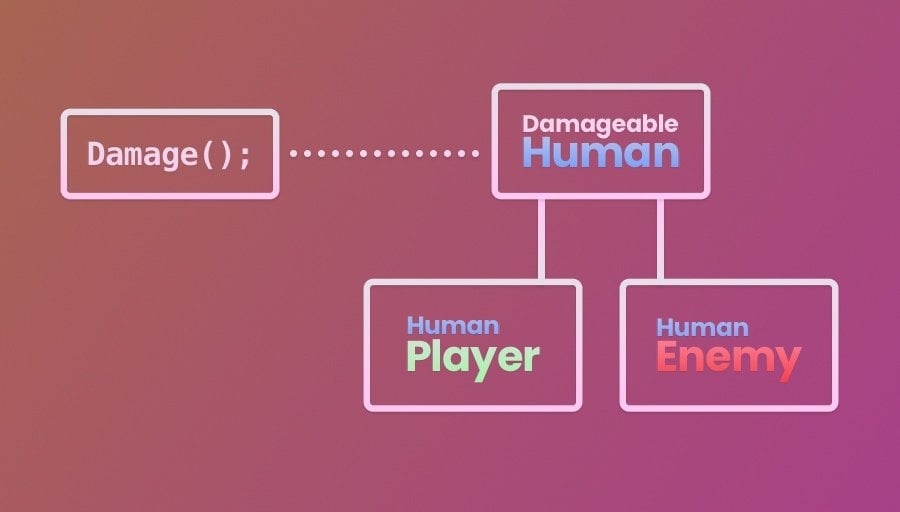
In this example, the Human class is damageable, thanks to the IDamageable interface, but, thanks to inheritance, the object’s health only needs to be managed in one place.
However, this still only makes sense when the inheriting objects are versions of the same thing.
If your objects are all very different, but you want to deal with them in a similar way, how can you do that without duplicating code in every script that implements the interface?
One approach is the Script Composition method, which allows you to give objects ability components, such as the ability to be selected, damaged or interacted with, making it easier to customise how each object, will behave.
So how does script composition compare to using an interface?
Interfaces vs script composition in Unity
Composition is, put simply, an approach to scripting that involves splitting up your game’s functionality into smaller, single-purpose classes, allowing you to build up custom sets of behaviour on each object.
It’s typically used as an alternative to inheritance, for the same reasons that you might choose interfaces over inheriting from a single parent class.
For example, just like when using an interface, you could use composition to create an Interactable script that accepts an incoming Interact function and raises an event when it’s called, such as an event delegate, or a Unity Event which can then be connected with other local scripts to create a response that is different from object to object.
Just like interfaces.
So why would you use an interface instead of composition and which method is better?
Generally speaking, interfaces and composition work to solve very similar problems, specifically using a common input to trigger variable functionality.
However, while interfaces are integrated directly with the class that is implementing them, composition is much more modular, which can both a good and a bad thing.
For example, the composition method can be easy to work with as it typically means adding or removing functionality is as easy as adding or removing a component.
One of the drawbacks of this, however, is that you’ll typically have to find a way to connect each script together, such as with an event delegate that the responding script can subscribe to or by using a Unity Event in the Inspector.
And while this can be good, as it makes your scripts more design-focussed, it can also make recreating the same functionality on other objects more labour-intensive, particularly if you’ve used a large number of inter-connected scripts.
Alternatively, interfaces allow you to build a script’s response directly into a class. Which can be useful, as it allows you to keep both the trigger and the response in one place.
But, because interfaces can’t use a default implementation, you may find yourself writing the same code more than once if a number of classes implement the interface in the same way.
Usually, it would be possible to solve this problem with inheritance, however, this can’t help when the objects are fundamentally different, when doesn’t make sense.
Whereas the composition method, because it completely separates the interactable trigger from the script that will respond to it, allows you to create a middle step, a standardised script in between the trigger and the response, that can help to avoid duplication of code.
Which method is right for you ultimately depends on your project and how you like to work.
However, as a very general rule of thumb, inheritance and script composition can help you to avoid duplicating code, while interfaces are ideal when you want one class to work with many different types of script.
But, that’s not all that you can do with interfaces.
While the typical way to use an interface is to have one script communicate with another, this same feature can be used within the same class to create different states of functionality.
Here’s how…
How to make a state machine in Unity (using interfaces)
In Unity, it’s possible to use interfaces to create a finite state machine.
A state machine is essentially a behaviour controller that switches between different sets of functionality, states, when certain conditions are met, allowing an object to perform different sets of tasks depending on which state it’s currently in.
This is useful, as it allows you to limit what an object does depending on the state it’s in, while ignoring functions in other states that are, currently, irrelevant.
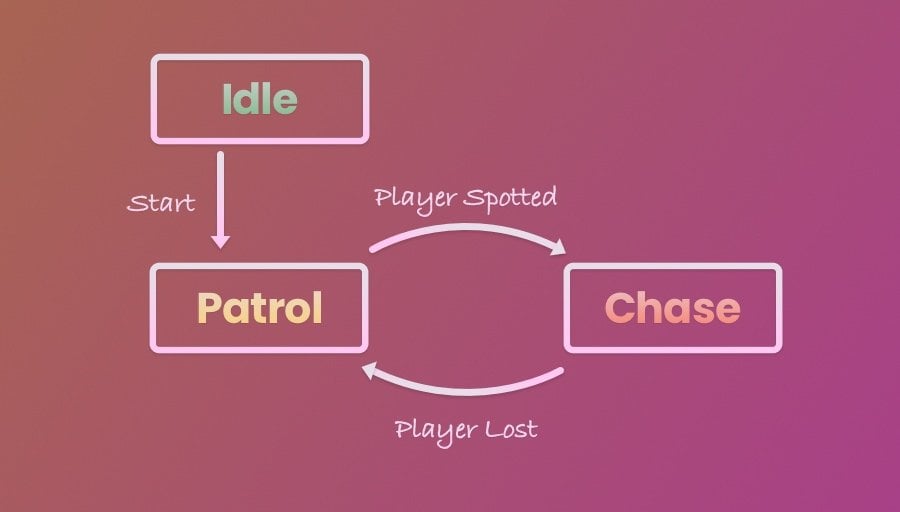
For example, a simple enemy object might have three states:
- an Idle State, when it’s not really doing anything,
- a Patrol State, when it’s moving between a fixed set of positions and looking for the player,
- and a Chase State, when it’s engaging the player and trying to damage them.
A state machine allows you to change the behaviour of an object based on certain conditions, which makes it easier to manage what an object should do at any given time.
Interfaces can be useful for building state machines, as they allow you to implement different sets of behaviour, but all triggered by a common function.
So how does it work?
To create a basic state machine, create a State interface that requires an Entry, Exit and Update function.
Like this:
public interface IState
{
    void OnEntry(StateController controller);

    void OnUpdate(StateController controller);

    void OnExit(StateController controller);
}
These will be the methods that are common to every state in the state machine and that can be called on any of them.
The general idea is that a State Controller, which is a regular Monobehaviour class that’s attached to an object, will hold an IState variable, which can be any class that implements the state interface.
This field will be set to one of three state classes contained within the state controller and will act as the current state.
The State Controller:
public class StateController : MonoBehaviour
{
    public IState currentState;

    public IdleState idleState = new IdleState();
    public PatrolState patrolState = new PatrolState();
    public ChaseState chaseState = new ChaseState();

    void Start()
    {
        ChangeState(idleState);
    }

    void ChangeState(IState newState)
    {
        if (currentState != null)
        {
            currentState.OnExit(this);
        }

        currentState = newState;
        currentState.OnEntry(this);
    }

    void Update()
    {
        currentState.OnUpdate(this);
    }
}
In it’s own Update function, the State Controller can call the On Update method of whichever state is currently active.
When it does this, it passes a reference to itself.
This is important, as it allows the current state to change the controller’s state, such as moving from a patrol state to a chase state when the player is spotted for example.
When the state is changed, it will call the On Exit function in the old state, and the On Entry function in the new one, allowing you to perform one-time tasks inside each state script.
This can be useful for giving the state a reference to the controlling object’s transform, so that it’s able to move the player around, for example.
But why would you need to do it like this, why not access the object’s transform from the state class like you would with any other script?
The current state can, technically, be any class that implements the IState interface, but, because each state class is unique, and executes code specific to that state, it can help to identify each one specifically inside the class, by listing each possible state as a new instance.
However, this only works because the Idle State, Patrol State and Chase State classes are not Monobehaviours, they are plain classes, which allows them to be created as new instances inside the state controller, instead of needing to be added to the object as a component.
What this does mean, however, is that the states are unable to access information about their object, such as the ‘transform’ or ‘gameobject’ properties that you might normally use to work with an object or move it around.
Passing a reference to the controller when calling each function fixes this problem, as it gives the state a way to work with the object it’s associated with, via the state controller reference.
Each of the state classes contains a unique implementation of the interface, using the same functions but executing different code.
For example, not much may happen inside the Idle State, and most of its interface functions are unused, except for a simple input check, for the purpose of this example only, that switches the controller to the Patrol State.
The Idle State:
public class IdleState : IState
{
    public void OnEntry(StateController controller)
    {
        // This will be called when first entering the state
    }

    public void OnUpdate(StateController controller)
    {
        if (Input.GetKeyDown(KeyCode.Space))
        {
            controller.ChangeState(controller.patrolState);
        }
    }

    public void OnExit(StateController controller)
    {
         // This will be called on leaving the state
    }
}
While in the Patrol State, the enemy looks for the player by checking for a tagged object using a raycast and moves between a number of waypoints, marked out using object transforms.
The Patrol State
[System.Serializable]
public class PatrolState : IState
{
[SerializeField] float patrolSpeed = 5;
[SerializeField] int waypoint;
[SerializeField] List<Transform> waypoints;
Transform myTransform;
RaycastHit hitInfo;
public void OnEntry(StateController controller)
{
myTransform = controller.transform;
}
public void OnUpdate(StateController controller)
{
Patrol();
if (LookForPlayer())
{
controller.chaseState.SetTarget(hitInfo.transform);
controller.ChangeState(controller.chaseState);
}
}
public void OnExit(StateController controller)
{
// This will be called when first entering the state
}
bool LookForPlayer()
{
if (Physics.Raycast(myTransform.position, myTransform.forward, out hitInfo, 3))
{
if (hitInfo.collider.tag == "Player")
{
return true;
}
}
return false;
}
void Patrol()
{
if (myTransform.position != waypoints[waypoint].position)
{
myTransform.position = Vector3.MoveTowards(myTransform.position, waypoints[waypoint].position, patrolSpeed * Time.deltaTime);
}
else
{
waypoint++;
if (waypoint >= waypoints.Count)
{
waypoint = 0;
}
}
}
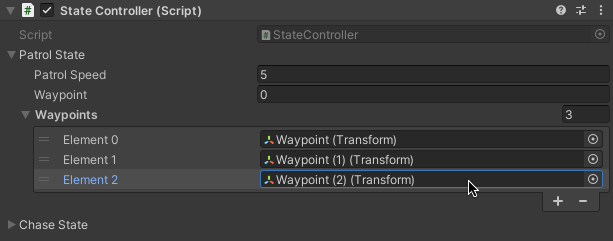
}This class has been made Serializable, meaning that its public fields will be accessible in the Inspector.
Which is useful, as it allows you to set the enemy’s patrol waypoints manually by dragging game objects directly to them.
Like this:
If the enemy spots the player in the patrol state, it sets the Chase State’s target to the player’s and changes the controller’s current state.
The Chase State:
[System.Serializable]
public class ChaseState : IState
{
    [SerializeField] float chaseSpeed = 8;
    [SerializeField] float loseDistance = 3;

    [HideInInspector] Transform myTransform;
    [HideInInspector] public Transform target;

    public void OnEntry(StateController controller)
    {
        myTransform = controller.transform;
    }

    public void OnUpdate(StateController controller)
    {
        if (PlayerLost())
        {
            controller.ChangeState(controller.patrolState);
        }
        else
        {
            Chase();
        }
    }

    public void OnExit(StateController controller)
    {
        // "Must've been the wind"
    }

    public void SetTarget(Transform targetTransform)
    {
        target = targetTransform;
    }

    void Chase()
    {
        myTransform.position = Vector3.MoveTowards(myTransform.position, target.position, chaseSpeed * Time.deltaTime);
    }

    bool PlayerLost()
    {
        if (!target)
        {
            return true;
        }

        if (Vector3.Distance(myTransform.position, target.position) > loseDistance)
        {
            return true;
        }

        return false;
    }
}
In the Chase State, the enemy constantly moves towards the player’s position until, either, the reference to the player’s transform no longer exists, because it’s been destroyed, for example, or if the enemy loses the player, by dropping further than 3 units away.
At which point, the Chase State will set the current state back to the Patrol State.
Now it’s your turn
Now I want to hear from you.
How are you using interfaces in your game?
Are you using them to create basic interactions, or as part of a larger system, such as a state machine?
And what have you learned about interfaces in Unity that you know others will find helpful?
Whatever is, let me know by leaving a comment.

John French writes all of the Unity tutorials for Game Dev Beginner, and specialises in deep-dive guides teaching game development basics.

Image Attribution
- Vintage icons created by Freepik – Flaticon
- Light switch icons created by Pixel perfect – Flaticon
- Unity icons created by Freepik – Flaticon
Notes
- Interfaces are commonly named by ability, and will typically, but not always, use a word that ends in ‘able’.
- .Net Standard 2.0, which Unity uses, doesn’t support default implementation in interfaces, however, this may change in the future.
Comments
Dude, as always its a perfect article. I had a Lot of questions about when to use interface and composition. and trying to find another usage of interfaces than IDamageable etc. And this article covered them all. Especially the part about duplicating. İnterfaces are good but if they are all dferent objects but exact same behaviour like spawning resource when particular condition met. Like harvestables and enemy. They can both spawn resource when dead. Like a tree when cut. So i tried to use interface, but at some point its completely code duplicating . Well tree is inherited from harvestables and enemy is from Base Enemy so the best solution here is a Composition or creating a singleton class that spawns things with some parameter. I dont know which one is the best though. Thanks for this article, its good to know that we are on same path. And i am following you
Thank you so much! Really happy to hear it’s been helpful.
Making interfaces serializable like that to expose the values to the editor is a genius idea! However, the hardcoded aspect of it makes it hard to extend. For example, another enemy might not have a chase state or has a whole other state.
So how would you design a system where you can assign different states in the editor and tweak their values. Off of the top of my head I’ll probably use Scriptable Objects for different states (eg. IState SO that is extended by ChaseStateSO, etc.). Any ideas?
If you want your states to have the same data template, but with different values, then yes Scriptable Objects is the way to go with that. The oversimplified way that I see it is that Interfaces work well for making different scripts talk to each other, while scriptable objects work well for creating instances of the same kind of data, outside of the scene. The reason Interfaces can be so useful for states is that the code inside can be completely different, but it’s treated the same as other states like it.
Thanks for your feedback!
Dude , this is pretty good article . Thanks for all
Thanks!
It’s quite nice and helps a lot in my works.