
When you create an object in your game with any kind of automatic behaviour, such as an enemy or an NPC, you’re going to need a way to control what it does.
Put simply, you’re going to need to create Artificial Intelligence in your game.
But, AI can mean a lot of different things.
It can refer to language models or machine learning, voice recognition or other kinds of automated tasks.
However, in your game, AI is generally going to involve making an otherwise inanimate object want to do something, giving it the ability to do so and, importantly, allowing it to change its mind based on what’s happening around it.
So how can you build your own artificial intelligence in Unity?
There are a number of different ways you could build an object that thinks and acts for itself, such as with a State Machine, a Behaviour Tree, or even just a simple Switch Statement in a script.
But, while there are many different methods for implementing AI in Unity, how you actually do it depends entirely on what it is you want your object to do in the first place.
Which means that deciding what you want your AI to think about is usually more important than choosing the system that allows it to think in the first place.
In this article, you’ll learn how enemy and object AI in Unity works, the basics of making automated decisions and the different methods for actually building an AI system in your game, so that you can decide which method is going to work best for your project.
Here’s what you’ll find on this page:
- How does enemy AI in Unity work?
- How to manage the state of an AI object
- Enemy AI Actions
- AI best practice
So how does enemy AI in Unity work?
How does enemy AI in Unity work?
Enemy AI, in this case, generally refers to the ability of any non-player object, whether it’s hostile or not, to change its behaviour in response to the events of your game.
Meaning that an AI object could be anything that thinks or acts for itself in some way.
Such as enemies, allies, NPCs, or even engine objects, such as the camera.
However, typically, you’ll use AI to allow other objects to essentially play the game with you, either against you or cooperatively.
And, as a result, building an AI system in your game can be an extremely complex process.
But, it doesn’t always have to be.
Typically, unless you’re building something that’s very complicated, there are only Three basic components to an AI object:
- The AI’s current State, which is essentially its goal, and is what it’s trying to do right now.
- Input, such as parameters or events that may influence or change the AI’s state,
- And Actions, which are the tasks that the AI will actually carry out in order to try to achieve its goal.
While this is, by no means, a definitive description of what makes up an AI object in a game, it does, at least, help to visualise the different elements that you might need to manage in order to make an object do something on its own.
Put simply, the object needs to know what it wants to do, it must be able to change its mind in response to new information and it will need the means to actually try to complete its goal.
But how do you build that?
First, you’ll need a way to manage the AI’s state.
How to manage the state of an AI object
Generally speaking, an AI object will always be in one state or another.
Even if the AI is able to change its state frequently, or if multiple AI systems are running alongside each other, working in parallel, there will typically always only be one thing that an AI system is trying to do at any given moment.
This is the current goal of the AI. It could be a broad objective, or something very specific but, in any case, it’s what it wants to achieve right now and it will determine what the AI does.
How you manage the AI’s state depends on the type of system you’re building.
For example, the state could be as simple as an if condition or a Switch Statement, that executes a different block of code based on the value of another variable.
It might use a State Machine, which moves between different states of execution like a flow chart.
Or it could be a modular element, such as a node in a Behaviour Tree, which can be used to execute different branches of logic based on prioritised checks and tasks.
In all cases, clearly defining what an AI object wants to do is important, as it will determine what actions it will take and, importantly, what could cause it to change its mind.
So how does that work?
How to change the state of an AI object
Input, in this context, refers to the external factors that could cause an AI system to change its state.
Put simply, it’s what could change in the world or on the object that would cause an AI to want to do something else.
This is, arguably, the most important part of an AI system.
While the State determines what an AI wants to do, technically it’s nothing more than a framework for your AI to be able to do different things. It’s the practical method you use to separate and execute different blocks of code.
Whereas managing how the state is actually changed and what could cause that to happen is, essentially, how your AI will make decisions.
It’s the part of the artificial intelligence that is actually intelligent.
So how does it work?
The input that an AI can use to make decisions is usually going to be similar to the information that a player might use to change their behaviour.
For example, it could respond to events in the world, changes in its own data, such as having low health, or ammo, or by seeing or hearing things that happen in your game.
What can vary is how the input is used to change the behaviour of the object, which typically depends on which method you’re using to manage your state.
For example, one of the simplest ways to read a value and change what happens as a result is with a Switch Statement.
Creating AI with Switch Statements
AI systems don’t necessarily need to be complex.
Sometimes, all you may want to do is have an object do one thing, or another, based on a simple conditional check.
An easy way to do this is using a Switch Statement, which allows you to specify which block of code should be executed based on the value of a condition or variable.
Like this:
public class SwitchExample : MonoBehaviour
{
    public State currentState = State.Idle;

    void Update()
    {
        switch (currentState)
        {
            case State.Idle:
                Debug.Log("Waiting...");
                break;

            case State.Attack:
                Debug.Log("Attacking!");
                break;

            case State.Retreat:
                Debug.Log("Run Away!");
                break;
        }
    }
}

[System.Serializable]
public enum State { Idle, Attack, Retreat}
This works in a similar way to an if statement except that it’s generally a little easier to keep track of and allows you to set up multiple states of execution in a simple way.
Essentially, a switch statement is a kind of state machine except that switch statements are typically controlled using a common external variable while state machines manage their own conditions for change.
Creating AI with State Machines
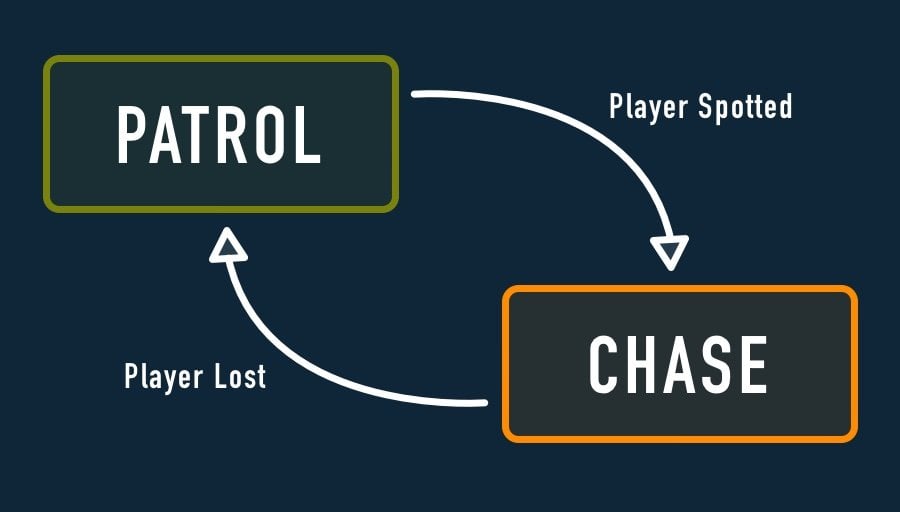
State Machines typically alternate between a number of finite states of execution, where each state is responsible for evaluating the possible exit routes from that state.
This makes state machines ideal for simple AI behaviour that is easily separated into different types of activity, such as Idle, Patrol and Attack states, for example.
However, for complex behaviours, state machines can sometimes be limiting.
This is because states, typically, represent one task.
One state of being from which the system can move to one of a number of other predetermined states, like a flow chart, where what happens next is entirely dependent on the current state’s interpretation of what’s happening right now.
However, the problem with this approach is that it doesn’t necessarily reflect a more complex decision-making process.
Even in the case of Hierarchical State Machines, where sub-states can inherit shared behaviour from their parents, the main issue with state machines is that it’s up to each individual state to decide what happens next, and not, typically, the machine itself.
States typically manage their own transitions, where each state is responsible for interpreting the events of the game and choosing which state to enter next.
So what’s the alternative?
While state machines can be useful for managing states, if you want your AI to actually make decisions, it will need to be able to consider multiple possible goals and prioritise them.
Such as with a Behaviour Tree.
Behaviour Trees in Unity
Behaviour Trees are a type of modular AI system that can be used to create a more natural decision-making process.
They differ from state machines in that they evaluate a number of different conditions, in order, before deciding what the AI will do next.
This allows the AI to continuously consider a number of factors when trying to complete a task, as opposed to simply switching from a handful of predetermined states with rigid entry and exit routes.
For example, imagine that an AI object wants to open a chest that’s locked.
It understands its goal but, in order to achieve it, it needs to find a key.
The key is a prerequisite to opening the chest, having it is a priority, meaning that, even after the AI object has found it, it needs to keep hold of it in order to complete its goal of opening the chest.

However, the AI values its life more than it wants treasure.
Protecting itself from attack is, rightly, more important than trying to open the chest, so it should only really try to do that if it’s not in any danger.
With a behaviour tree, this is relatively easy to do.
By preceding the looting behaviour with a process that checks if the object is safe or not it’s possible to prioritise one goal over another.
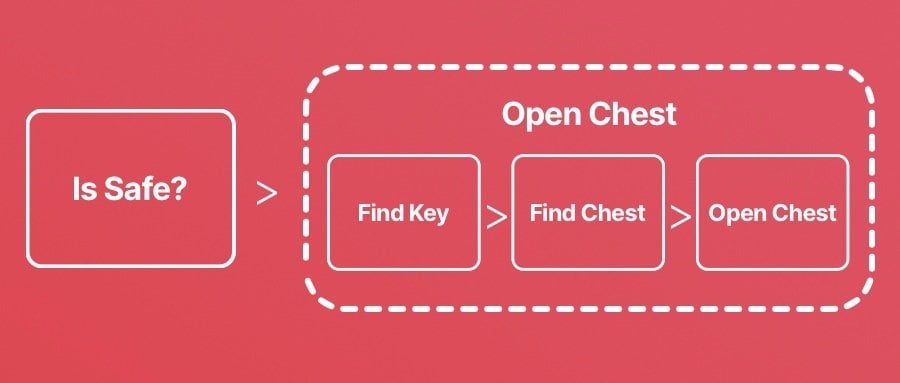
In this case, the AI would wait until it’s safe before trying to open the chest and, if that changes at any point, will switch what it’s doing as a result.
But, if you were to build a system like this using a state machine, because each state is responsible for where the logic goes next, you’d need to be able to evaluate if the player is being attacked in both of the logical states, so that you could move between the two.
This isn’t necessarily an issue when your state machine is simple, but if you want your AI to be able to consider a number of different factors then, due to the fact that states are typically directly linked, building a system like this using a finite state machine could quickly become difficult.
Behaviour trees, however, are evaluated by priority.
Meaning that, apart from the fact that doing one thing is more important than the other, each task is not linked.
Which makes it much easier to add, remove and reuse states of execution in a behaviour tree, without affecting other logic.
As a result, a behaviour tree, or something like it, can be ideal if you know that you’re going to need something that’s more complex than a basic set of states, but that might change or be reused throughout your project.
But how do they actually work?
How Behaviour Trees in Unity work
Behaviour Trees are typically made up of Nodes, where each node, when it’s Evaluated, can return one of three possible statuses: Success, Failure, or Running.
The definition of a node, and the type of status it can return, is universal and interchangeable in the behaviour tree, meaning that many different types of node can be pieced together to form a complete set of logic that, all together, forms the entire tree.
But how is the logic in the tree evaluated, and how can it be used to determine an object’s behaviour?
Typically, a node can be used to perform an action, just like any other function can be and, when it does, will return a success, failure or running status.
For example, you could use an action node to look for an object.
While it’s searching the node is Running, which simply means that the action hasn’t succeeded yet, but only because it’s not finished.
Once it does find the object it’s looking for, the node can return a Success status, after which it can act on the information by processing another node.
Or, if it can’t complete its task, for example, because it took too long to try to find the object, it can return a Failure instead.
This allows you to break up an AI’s tasks into small modular pieces that can easily be changed and reused around your project.
But, breaking up an AI’s behaviour into such small tasks can make it harder to manage a broader state, such as attacking, defending, or running away.
Which is where Control Nodes come in.
Behaviour Tree Control Nodes
Control Nodes allow you to organise multiple action and other conditional nodes into a containing node, a control node, that allows you to decide if a general task has been completed or not, based on the status of its children.
This is useful, as it allows you to organise entire sets of tasks into a branch of behaviour, and then decide if it has been successful or not.
Generally, there are two types of control node, Selectors and Sequences.
Like other nodes, they also return the same kinds of status, such as Success, Failure or a Running response, when evaluated.
Except that, the status they return depends on the status of their child nodes.
For example, a Selector Node typically returns success or running if any one of its nodes returns success or running as well.
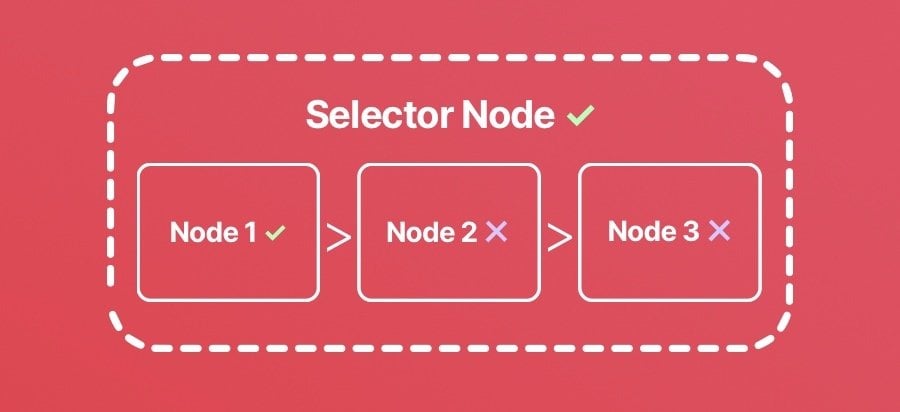
A Selector Node typically returns successful or running if any one of its nodes are.
This works in a similar way to an if/or statement, where only one of the conditions needs to be true in order to continue.
After which you might typically process an entirely different branch of logic in response.
While a Sequence Node will usually only return a success if all of its children do as well, and will fail, or return running, if they don’t.
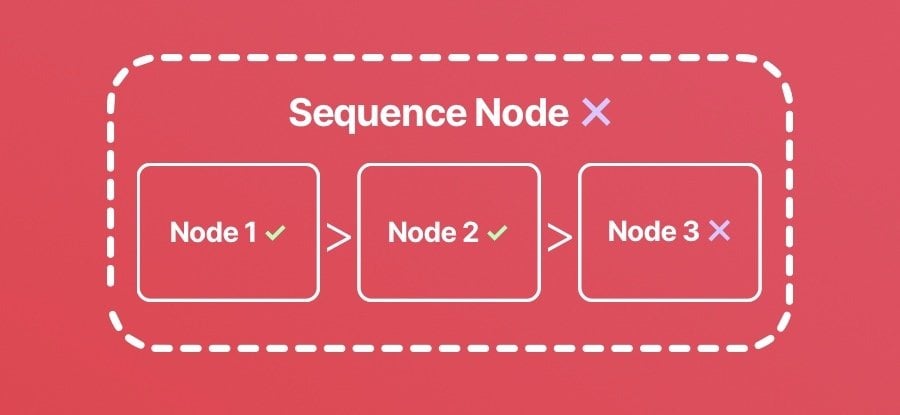
A Sequence Node is generally only considered a success once all of its containing tasks are also successful.
This can be useful for specifying a number of tasks in order, where the AI must do one thing after another before a task can be considered complete.
Each task inside of a control flow node can, itself, be a sequence or a selector, allowing you to create complex branches of nested logic easily.
When organising a behaviour tree, you’ll usually want to arrange your nodes so that the least important tasks are run after more important ones.
Which means that your AI object’s default behaviour, which is what it will do when it can’t do anything else, will typically be evaluated last, on the right side of the tree.
This allows more important behaviours to be evaluated and processed first, if possible.
For example, if your AI object is looking for loot, it may be performing a number of different actions.
First, it needs to find a container to open.
Then, if it’s locked, it will need to find a key to open it with.
Once it’s open, the AI no longer has a target to open anymore, and the sequence begins again.
That is unless, you create a prerequisite check ahead of the entire looting sequence, that considers if the AI object even needs loot in the first place.
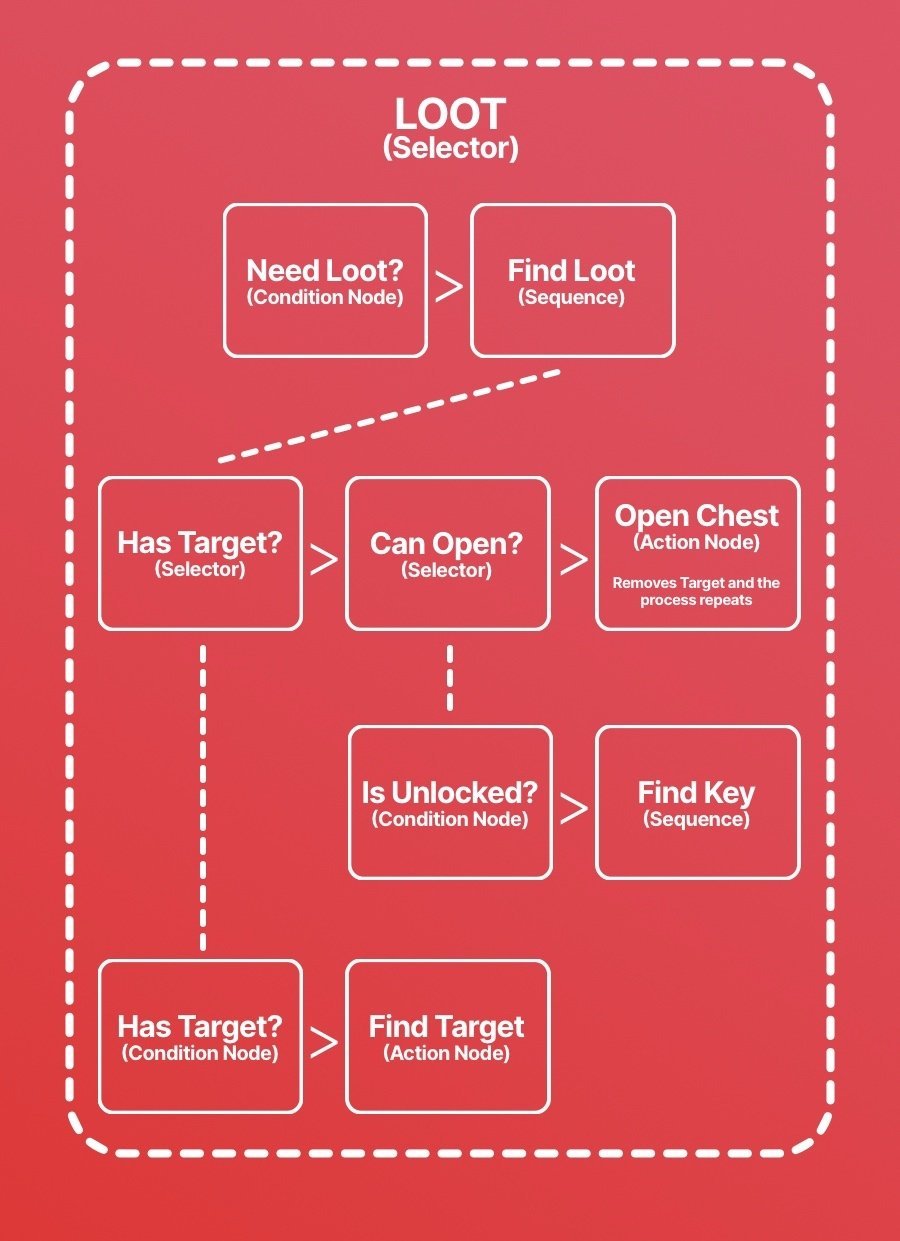
In this basic example, the AI will find loot over and over again, working through the steps required to locate and open treasure chests.
The point of behaviour trees is to be able to organise and prioritise tasks and conditional checks in a modular way.
Making it easy to change what an AI does, and wants to do, without needing to change other scripts in the process.
However, while behaviour trees can be extremely useful, they can be difficult to build.
Particularly if you’re building your own behaviour tree system from scratch, and especially if you’re not able to view, and modify the tree in a visual way.
As a result, unless you’re set on building one yourself, the best way to implement a behaviour tree system is to use a ready-made option, such as Node Canvas, or Behaviour Designer.
Giving an AI the ability to change its mind about what it wants can be one of the most important parts of an artificial intelligence system, since all of the AI’s behaviour will ultimately depend on what it thinks it wants to do.
But…
There’s no point in giving an AI the ability to decide what it wants, if it doesn’t actually have the means to act on its decisions.
So how do you make an AI actually do stuff?
Enemy AI actions
Once an AI object knows what it wants to do, and has decided that it’s going to do it, it will need to perform an Action in order to try to complete its goal.
This might involve moving an object towards another, jumping over a gap, or trying to shoot the player with a weapon.
So how do AI actions in Unity work?
How to make enemy AI movement in 3D
One of the most common things an AI object will need to do is move around your world.
In open space, this can be relatively straightforward.
Just move the object towards its target using a movement function, such as Move Towards, or by calculating the direction towards your target, and then moving the object manually.
Like this:
void Update()
{
    Vector3 direction = (target.position - transform.position).normalized;
    transform.Translate((direction * moveSpeed) * Time.deltaTime);
}However, it’s entirely likely that your scene isn’t just a large open space.
There might be obstacles in your game that you need the AI to navigate around.
How you do this depends on the type of movement that you want to create.
For example, if an AI simply needs to avoid a hazard, creating a simple detection system, using Raycasts for example, may be all you need to do.
But, if you need your AI to work out how to traverse the geometry of your game in order to reach a target position then, chances are, you’re going to need to use some kind of pathfinding system.
Such as a Nav Mesh, for example.
How to use the AI Navigation package in Unity
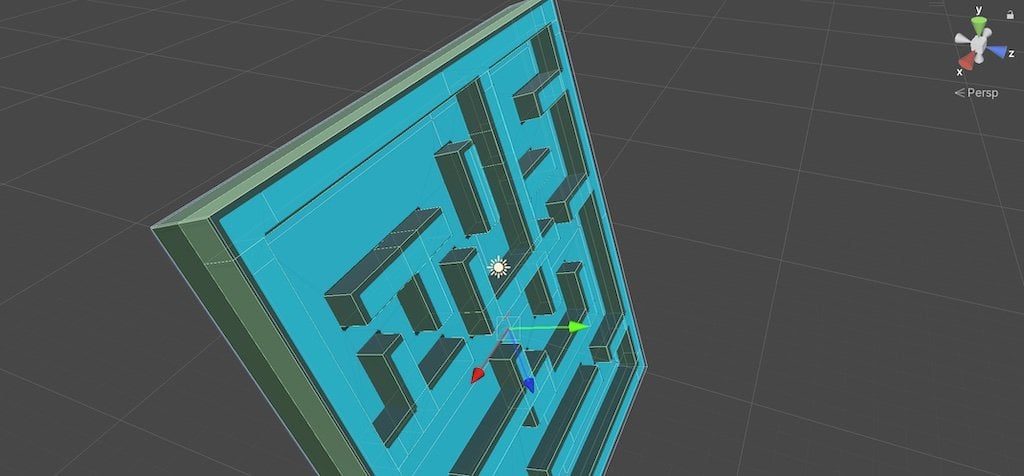
A Nav Mesh is a predetermined area that an AI object, referred to as an Agent, can move around on.
It allows an object to find a path towards a target on walkable surfaces and around obstacles automatically.

The Nav Mesh component works out where a type of object, the Agent, would be able to move in your scene, mapping it out as a walkable area.
This can be extremely useful for creating enemy and non-player movement in a 3D scene as it allows you to calculate where an AI object is supposed to be able to go.
Which allows them to work out how to get to a particular position in the world, in a natural way.
Nav Mesh components have been a common feature of Unity for many years now.
Older versions of the Nav Mesh system were previously available from Unity’s Git Hub repository.
Now, however, you’ll find it as part of the AI Navigation Package instead, which is included in Unity 2022.2 by default.
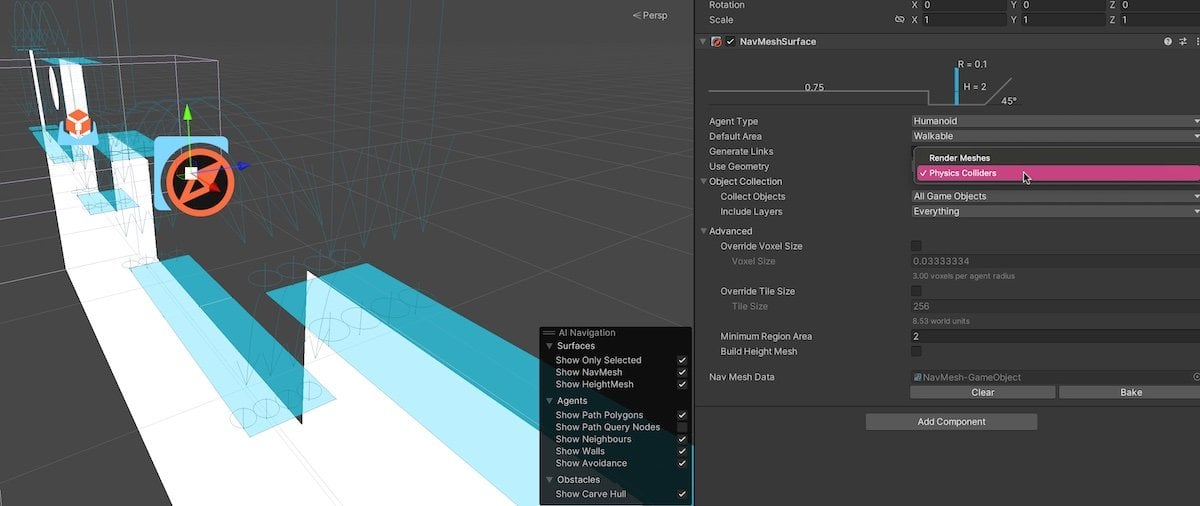
The Nav Mesh Surface is a component that allows you to choose where a particular type of AI object will be able to move.
It can be placed on an object, or separately in the scene, and uses either colliders or render meshes to identify the geometry in your game and map out walkable areas.
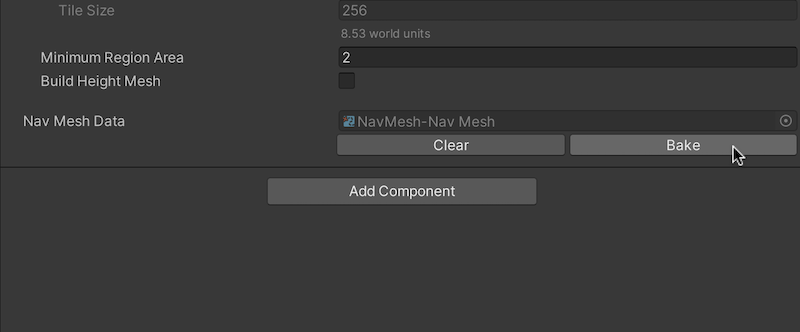
To generate walkable areas on your objects, you’ll need to Bake the nav mesh first.
What is walkable is defined by the type of agent that will be using the nav mesh.
A default type, humanoid, specifies how large the AI object is, what kind of slope it’s able to move up and how high it’s able to step up an object before it should be considered a wall.
However, it’s possible to create different types of agent that are designed to move around your scene in a different way.
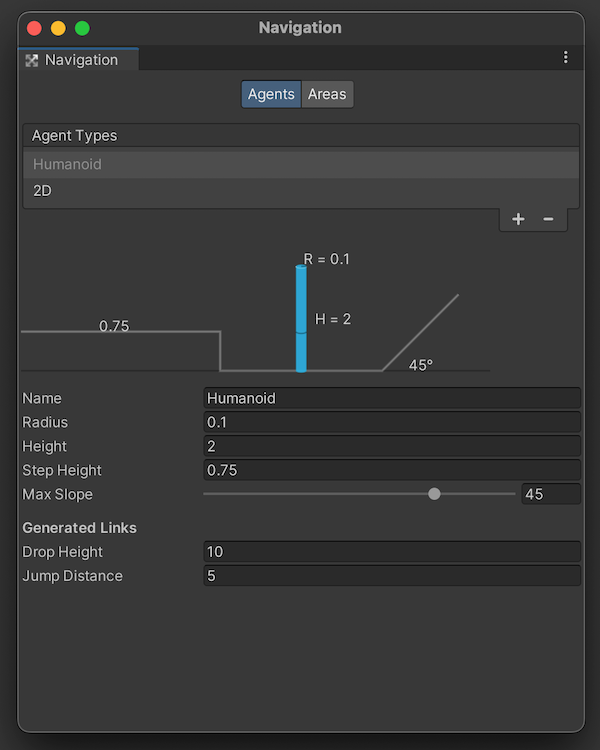
The Nav Mesh Agent settings determine what type of object will be moving on your surface and how big it is.
The surface component will evaluate all of the objects in the scene or, optionally, an area within a given volume, and map out walkable zones for your AI objects to move on.
Typically, these will be the top layers of an object, including any lower layers that have enough clearance for the agent type to move through.
However, it’s important to remember that the nav mesh doesn’t necessarily use the game’s physics system to work out where the top of an object is.
For example, the direction of the nav mesh itself is determined by its orientation, not the gravity in the scene.
Meaning that, if you move or change the rotation of the Nav Mesh component separately to the object that it’s based on, what is considered to be down will be relative to the nav mesh, not the world.
This can be useful, such as if you want to create a walkable area on a wall or ceiling for example.
But, because the nav mesh can be freely moved around, it also means that it’s possible to accidentally offset a Nav Mesh component from the objects that were used to calculate it.
As a result, it’s generally a good idea to place your Nav Mesh Surface component on the root object of the geometry that it uses, as it will mean that any reorientation will be reflected in the nav mesh as well, even if you don’t bake it again.
Because the nav mesh data can be moved and rotated, it can help to keep it attached to the geometry you’ve used to generate it.
The Agent component allows an object to use compatible nav meshes in the scene, traversing around obstacles to make its way to each new target.
It allows you to specify some of the object’s movement characteristics, while others, such as how far an object is able to drop or jump, are determined by the agent type.
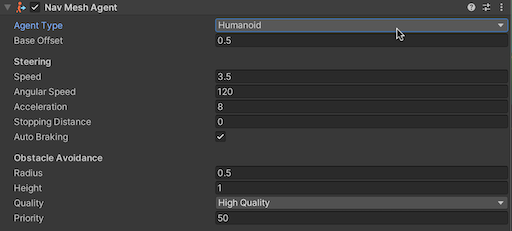
The Nav Mesh Agent component is what allows an object to move on the Nav Mesh.
The Target that your agent will move to can be set in code by using the Set Destination function.
Like this:
using UnityEngine.AI;

public class SetNavTarget : MonoBehaviour
{
    NavMeshAgent agent;

    void SetNewTarget(Vector3 targetPosition)
    {
        agent.SetDestination(targetPosition);
    }
}
Which will cause the agent to move on the nav mesh, towards the target position.
The AI Navigation system is ideal if you want any kind of non-player object to be able to move around your 3D world automatically.
However, while creating artificial movement in 3D can be surprisingly straightforward, doing it in 2D can be a lot more difficult.
How to make enemy AI movement in 2D
Unfortunately, there isn’t a 2D pathfinding system in Unity.
At least, not one that’s already built in.
Which means that, if you want to navigate an object through a 2D scene, you’re either going to have to create your own pathfinding system, use a ready-made asset or, alternatively, force Unity’s 3D nav mesh system to work with a 2D game.
For example, it’s possible to create a 2D world, but that’s put together using the 3D physics system.
How to use the Nav Mesh component in 2D
Unity’s nav mesh doesn’t work in 2D, but it’s possible to build 3D physics into a 2D game, so that you can use it as if it does.
To do so, simply use a 3D collider in place of a sprite’s 2D collider.
Then, make sure that the nav mesh is set to detect physics colliders, not render meshes, so that it recognises the geometry you’ve created.
By using 3D colliders with 2D sprites, Unity’s Nav Mesh can be forced to work with 2D geometry.
The benefit of this is that Unity’s nav mesh is already able to recognise gaps and drops for you, depending on the settings of the agent type.
Which can be useful for navigating an AI through a 2D platform game, where calculating a route could, otherwise, be extremely difficult.
Essentially, this is a similar approach to making a 2.5D game, where a 3D world is presented side on, but isn’t technically 2D.
The only difference is that, in this case, you’re presenting the world using 2D sprites, even though objects are being moved and are colliding with each other using an invisible 3D physics system behind the scenes.
And while it’s not a complete solution, since you’ll still need to account for the possible rotation and depth of your ‘2D’ objects, it can make getting started much, much easier.
The same approach could also be used to find 2D paths in a top-down game, where the nav mesh is calculated using invisible 3D physics.
But, for top-down pathfinding, there are alternative options you can use.
Such as A Star Pathfinding, for example.
A Star Pathfinding in Unity
A Star is a fast and efficient pathfinding system for Unity that works in both 2D and 3D.
It uses a number of different methods to navigate around obstacles and, as a result, is extremely flexible.
The benefit of using A Star instead Unity’s nav mesh is that you won’t need to build your game in an unusual way, such as adding 3D physics to 2D objects, just to get pathfinding to work in your 2D game.
It’s available as a premium tool on the Unity Asset Store, however, the developer Aron Granberg, also provides a limited free version on his website.
But, while A Star is extremely flexible, and can be used as a starting point for a lot of different pathfinding applications, there are some types of movement that it doesn’t support out of the box.
For example, while it’s ideal for top-down movement, it doesn’t support 2D platform movement by default.
But that doesn’t mean that it’s not possible to create platform-based pathfinding with A Star.
How to create platformer movement with A Star
Even though A Star doesn’t support platformer-style movement by default, it is still possible to combine the pathfinding aspect of A Star with local obstacle avoidance, to create a kind of platformer AI that moves towards a target using a calculated path, but that avoids obstacles itself.
This can be done by evaluating the path that A Star creates, moving the object towards its next target position on that path, while checking to see if it requires the object to jump.
Like this:
using Pathfinding;

public class EnemyMovement : MonoBehaviour
{
    [Header("Movement Controls")]
    public Transform target;
    public LayerMask obstacleLayer;
    public float moveSpeed = 5;
    public float jumpForce = 4;
    public float jumpCooldown = 0.25f;

    [Header("Gap Calculation")]
    public float calculationInterval = 0.25f; // How often should the path be recalculated
    public int lookAhead = 6; // How many nodes to use when checking for gaps. Larger values may mean gaps are recognised too early.
    public int gapDetection = 3; // the number of unsupported nodes required to recognise a gap. A larger value means that smaller gapes will be ignored.
    public float heightTolerance = 0.5f; // How much higher should a node be to require a jump
    public float unsupportedHeight = 1; // How far down to check before deciding there's nothing there

    public Seeker seeker;
    public Rigidbody2D rb;
    Path currentPath;

    Vector3 moveDirection;
    bool followPath;
    int nextNode;
    float jumpTimer;
    float timer;

    private void Awake()
    {
        timer = calculationInterval + 1; // Forces a first time calculation
    }

    private void Update()
    {
        CalculatePath();
        FollowPath();
    }

    void CalculatePath()
    {
        if (timer > calculationInterval)
        {
            followPath = false; // prevents the object from trying to follow the path before it's ready
            seeker.StartPath(transform.position, target.position, OnPathComplete);
            timer -= calculationInterval;
        }
        timer += Time.deltaTime;
    }

    void OnPathComplete(Path path)
    {
        currentPath = path;
        nextNode = 0;
        followPath = true;
    }

    void FollowPath()
    {
        if (followPath)
        {
            Vector3 targetPosition = (Vector3)currentPath.path[nextNode].position;
            targetPosition.z = transform.position.z;
            moveDirection = targetPosition - transform.position;

            if (Vector2.Distance(transform.position, targetPosition) < .5f)
            {
                nextNode++;
                if (nextNode >= currentPath.path.Count)
                {
                    followPath = false;
                }
            }

            if (CanJump() && ShouldJump())
            {
                rb.AddForce(Vector2.up * jumpForce, ForceMode2D.Impulse);
                jumpTimer = 0;
            }
        }
    }

    private void FixedUpdate()
    {
        rb.AddForce(new Vector2(moveDirection.x, 0) * moveSpeed);
    }

    bool CanJump()
    {
        jumpTimer += Time.deltaTime;
        return (jumpTimer > jumpCooldown && Physics2D.Raycast(transform.position, Vector2.down, transform.localScale.y / 2 + 0.01f, obstacleLayer));
    }

    bool ShouldJump()
    {
        int unsupportedNodes = 0;

        for (int i = 0; i < lookAhead; i++)
        {
            bool unsupported = false;

            if (nextNode + i < currentPath.path.Count)
            {
                Vector3 nodePosition = (Vector3)currentPath.path[nextNode + i].position;
                unsupported = !Physics2D.Raycast(nodePosition, Vector2.down, unsupportedHeight, obstacleLayer);
                unsupported = !((nodePosition.y + heightTolerance) < transform.position.y);

                if (unsupported)
                {
                    unsupportedNodes++;
                }
            }
        }

        return (unsupportedNodes >= gapDetection);
    }
}
This method works by moving the object on a horizontal axis towards the direction of the next available point.
It will then periodically recalculate the route to its target, which is likely to change as the object falls off of ledges, or otherwise moves off of the calculated path, which in this example is every 0.25 seconds.
Because the path is a series of points, it’s possible to test what the object is going to have to traverse by examining the geometry of each position and where it is in relation to the object.
This works by looking ahead, at a limited number of positions on the path, to see if a significant proportion of them are Unsupported, meaning that they have nothing beneath them, and are not lower than the object (which would require it to drop down instead of trying to jump).
This creates a kind of automatic obstacle avoidance where the enemy kind of knows what is ahead of it and can act in response.
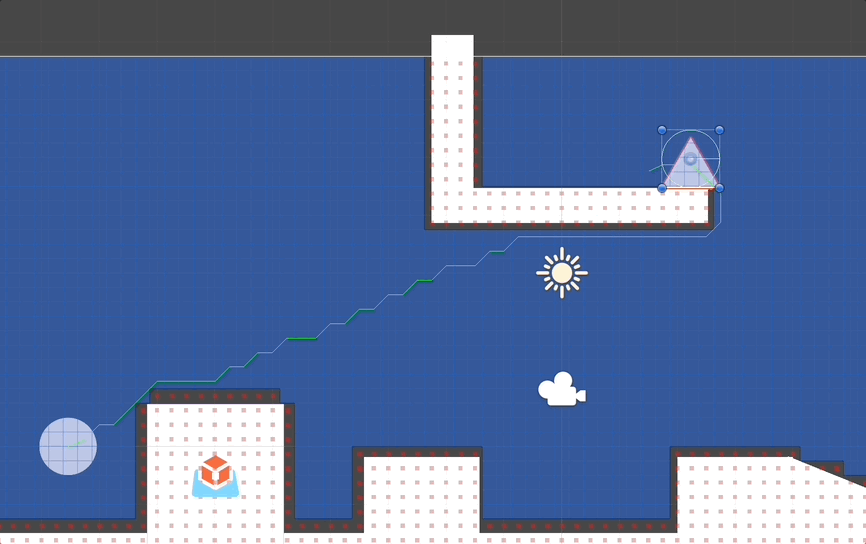
In this example, the object constantly recalculates the path and tries to move towards the next position on it. As it does, if 3 or more of the points in front of it are either higher, or don’t have anything underneath them, the object will know it probably needs to jump.
The effect is basic but it can be used as a starting point to identify the geometry in your game.
After which, all you need to do is decide how your AI will deal with obstacles when they reach them.
How to fire at the player using AI (with prediction)
If the enemies in your game fire projectiles at your player, then you’re going to need a way for them to work out where to aim when they shoot.
This is because projectiles in many games, as opposed to realistic bullets, are often quite slow, which allows the player to actually stand a chance of avoiding them.
Which means that choosing where to fire can be a little more complicated than simply using the player’s current position, as slow projectiles that are aimed at a moving object will more than likely miss by the time they get there.
In order to make your game more challenging, your enemies will need to predict where the player is going to be next, just as you would do when firing at them, giving their shots a greater chance of landing.

By working out the movement delta of an object, and the approximate time it will take for a projectile to reach it, it’s possible to predict where the player will be at a given time, allowing an enemy to shoot at them accurately.
So how can you do that?
It’s possible to predict where an object will be by multiplying its current trajectory by the amount of time that a projectile would take to reach it.
This works by comparing the position of an object now to its position in the previous frame.
Like this:
public GameObject projectile;
public Transform target;
public float marginOfError = 1.5f; // By up to how many units could the projectile miss
float projectileSpeed = 25;

Vector3 targetLastPosition;
float interval = 5;
float timer;

private void LateUpdate()
{
    Vector3 trajectory = (target.position - targetLastPosition) / Time.deltaTime;
    targetLastPosition = target.position;
}
Subtracting the last position from the current position creates a direction vector for the previous frame. While dividing that value by delta time creates a trajectory in units per second.
This can be used to work out where the object will be in a number of seconds time, based on its current trajectory.
The amount of time that a projectile will take to reach a target can be calculated by dividing the distance it has to travel by the speed that it will move at.
Like this:
float TimeToReach()
{
    float distance = Vector3.Distance(transform.position, target.position);
    return distance / projectileSpeed;
}
This will return a value in seconds that can be used to calculate where the target will be in the future.
Then it’s just a matter of aiming the enemy’s projectile at that position.
Like this
public GameObject projectile;
public Transform target;
public float marginOfError = 1.5f; // By up to how many units could the projectile miss
float projectileSpeed = 25;

Vector3 targetLastPosition;
float interval = 5;
float timer;

private void Start()
{
    targetLastPosition = target.position;
}

private void LateUpdate()
{

    Vector3 targetPosition = target.position + (Trajectory() * TimeToReach());

    if (timer > interval)
    {
        ResetTimer();
        FireProjectile(targetPosition);
    }

    timer += Time.deltaTime;
}

void ResetTimer()
{

    timer -= interval;
    interval = Random.Range(1f, 4f);
}

Vector3 Trajectory()
{
    Vector3 trajectory = (target.position - targetLastPosition) / Time.deltaTime;
    targetLastPosition = target.position;

    return trajectory;
}

float TimeToReach()
{
    float distance = Vector3.Distance(transform.position, target.position);
    return distance / projectileSpeed;
}

void FireProjectile(Vector3 targetPosition)
{
    GameObject newProjectile = Instantiate(projectile, transform.position, Quaternion.identity);
    projectile.GetComponent<Projectile>().speed = projectileSpeed;
    newProjectile.transform.LookAt(targetPosition + AimError(marginOfError));
}

Vector3 AimError(float amount)
{
    return Random.insideUnitSphere * amount;
}
By default, this script will aim at exactly the position in the world where the target is expected to be.
However, this can be a little unrealistic, so it can be useful to create a margin of error around the target that will cause the enemy to miss.
This works by using the Random Inside Unit Sphere function, which returns a position inside a sphere with a radius of 1.
That value can then be scaled to reflect the maximum distance in units that the enemy might miss by, and then added to the target position when the projectile is fired.
How to find the player
If you’re moving an AI object towards the player, then it helps if the object actually knows where the player is in your scene.
To do this, you’ll typically need to get a reference to the player, which means that the AI object and the player will need to interact in some way, such as colliding together, or being detected by the object’s line of sight.
However, this type of interaction might not be appropriate or efficient, especially if you have a lot of enemies in your scene that only need to respond to the player’s presence in a basic way.
In which case, it may be easier to make the player’s position publicly available, such as with a static value, and then simply check to see where an AI object is in relation to it, such as if it’s close enough to chase the player, for example.
Enemy AI best practices
There are a lot of different ways to make non-player AI objects in Unity.
And in all cases, the best way to do it is going to heavily depend on what kind of behaviour you’re trying to create.
However…
Generally speaking, your AI system doesn’t need to be complicated to be effective and, depending on what it is you’re trying to do, it might actually be easier than you think to build.
Which is why one of the best ways to create an AI object in Unity is to start with the problem, the goal that you want your AI to be able to achieve, and work backwards from there.
Allowing you to decide what it is you want your AI to be able to think about just a little more easily.
Now it’s your turn
Now I want to hear from you.
How are you using AI in your game?
Are you using state machines, behaviour trees, or something else?
And what have you learned about AI in Unity that you know someone else would find useful?
Whatever it is, let me know by leaving a comment.

John French writes all of the Unity tutorials for Game Dev Beginner, and specialises in deep-dive guides teaching game development basics.

Image Attribution
- Invention icons created by Vectors Market – Flaticon
Comments
I needed this tutorial greatly! But what are your thoughts and ideas on the A* algorithm. I’ve heard a lot about it and am curious.
My only experience with it has been when researching for this article however if I was making a 3D game, I’d probably use Unity’s AI navigation, however if I was making a 2D game, I’d probably use A Star, even if it requires extra work (i.e. for a platformer).
Please also post a article on Unity DOTS.
Will do!
I appreciate your work 🙂 You should make a way for donations, I would love to send a small amount in bitcoin or something.
Thank you! I might explore providing that option in the future, at the moment though I’m just happy to hear you like the article.
Great !
This article come to me on the right time.
What do you think about the Goal Oriented Action Planning (GOAP) Pattern ?
Add seek, flee, purchase and some like behaviour are relatively easy. It becomes more challenging while AI must jump, climb, swim and do cooperation action. As you explain, it’ll be more convenient to use a pattern.
I’m not familiar with it, but I’ll look it up. Thanks.
Excellent article!
I had an idea of what I would find but you went way further.
It is very complete and sets a great baseline for all the new AI that is coming.
Thank you very much.
You’re welcome!
Your content has been extremely helpful. Your information is detailed but not overwhelming. I really appreciate the way your tutorials slow down and explain scalable ways of achieving tasks rather than just quickly hooking up things in the inspector. I’ve learned more from watching your videos than I have from any other creator.
I always hate to offer suggestions to content creators, but I’d certainly love to see some discussion of scene changing and the best ways of transferring data between scenes. Thank you again for everything you do!
Thanks! I have an older article on loading scenes if that’s any help to you?