The Player Prefs class in Unity is used to save small amounts of data from your game to disk, which allows you to store and recall single string, integer and float values between gameplay sessions.
This can be extremely useful for saving and loading basic sets of data, such as option settings or simplified game saves.
However, if you’ve tried to use Player Prefs before, particularly to save a game, you may have read or been told not to use them for anything more advanced than basic preference values.
And while there’s some truth to that, there are also many reasons why you would choose to use Player Prefs, so long as you understand how they work.
But don’t worry, in this article I’ll show you how to use Player Prefs in Unity, how they work and how you can use them to save different kinds of data, so that you can decide for yourself how to use them in your own project.
Here’s what you’ll find on this page:
- How to use Player Prefs in Unity
- Using default values with Player Prefs
- When to use the Player Prefs Save function
- How to save options settings using Player Prefs
- Saving and loading multiple settings with Player Prefs
- Saving to multiple slots with Player Prefs
- How to save a boolean using Player Prefs
- How to save a colour using Player Prefs
- Using Player Prefs for game saves
- Finding Player Prefs in Unity
Let’s get started…
How to use Player Prefs in Unity
The Player Prefs class in Unity allows you to save basic data between gameplay sessions, such as options settings, that can be saved and reloaded, even after a game has been closed.
It works by storing a string, float or integer value to disk with a key, which is a text string that’s used to store and recall a preference.
For example, to save an integer, simply call the Set Int function of the Player Prefs class and pass in the key you want to use to retrieve it again.
Like this:
public void SaveNumber()
{
    PlayerPrefs.SetInt("myNumber", 100);
}
This will create a new stored preference under that name or, if the key already exists, it will overwrite it, using the new value.
To load the preference again, all you need to do is call Get Int, passing in the same key.
Like this:
public void LoadNumber()
{
    int loadedNumber = PlayerPrefs.GetInt("myNumber");
}
The Set Int function allows you to save and load an integer value however, similar methods are also available to store other data types, such as a float.
Like this:
public void SaveFloat()
{
    PlayerPrefs.SetFloat("myFloat", 0.1234f);
}

public void GetFloat()
{
    float loadedFloat = PlayerPrefs.GetFloat("myFloat");
}
Or a text string,
Like this:
public void SetString(string value)
{
    PlayerPrefs.SetString("myString", "Hello!");
}

public void GetString()
{
    string loadedString = PlayerPrefs.GetString("myString");
}
The Player Prefs values are stored locally on the device in a preferences file, meaning that they will exist after the game is closed.
This means that, if you want to remove a preference key, you’ll need to manually delete it using a script, even when working in the editor.
To delete a key that you’ve created, simply call the Delete Key function of the Player Prefs class, passing in the key you want to remove.
Like this:
PlayerPrefs.DeleteKey("myString");This will clear a specific key from Player Prefs file.
Alternatively, to delete all created keys, use the Delete All function.
Like this:
PlayerPrefs.DeleteAll();Delete All clears everything, so it should be used with caution, especially if you’re saving any kind of progress data using Player Prefs.
However, if you’re using Player Prefs to only store options settings, you might use Delete All to reset everything, returning all custom settings back to their default values.
Using default values with Player Prefs

When loading a preference value, if the key that you enter doesn’t exist, the default value for the data type will be returned instead, which will either be 0 for float and integer values or blank for a string.
However, it’s also possible to specify a custom default value that will be used if the key doesn’t exist.
For example, when getting a float value for a volume setting, if the preference doesn’t exist, instead of using 0, I could use a custom default value of 0.75 instead.
Like this:
float volume = PlayerPrefs.GetFloat("masterVolume", 0.75f);This can be useful for loading settings where using an automatic default might be a bad thing, such as setting the volume to 0, simply because no player preferences exist.
Alternatively, it’s possible to check that a key exists before trying to load it, using the Has Key method.
Like this:
float volume;

if (PlayerPrefs.HasKey(key))
{
    volume = PlayerPrefs.GetFloat("masterVolume");
}
This can be useful for checking that a key exists before trying to do anything with it.
But… there’s a slight problem with this method.
While the Has Key function will reliably check to see if the key exists in the Player Prefs file, it doesn’t check what type of value is stored.
This means that, if you save a key as a float, for example, using the Set Float function, and then try to find it with its key, the Has Key function will correctly find it, and return true, showing that a key exists under that name.
However, if you then try to retrieve the key, which in this case is a float value, using either the Get Int or Get String functions, no key of that type will be found and a default value will be used instead.
This means that if you accidentally try to retrieve the wrong type of value, you’ll get a default value back as if it doesn’t exist, even if you check using the Has Key function first.
This happens because only one key value can exist for a single preference, but that key can be any one of the supported types, either a string, a float or an integer. This means that it’s possible to overwrite a key with a new data type, causing any other Get function to return nothing.
When to use the Player Prefs Save function
Most of the time, you won’t need to do anything to save Player Prefs changes to disk.
While they only exist in the game while it’s running, they’re automatically written to disk when the application quits.
However, if the game crashes, or is forced to close unexpectedly, you may lose any changes that were made.
This can be avoided by using the Save function, which will manually write all Player Prefs changes to disk when it’s called.
Like this:
PlayerPrefs.Save();This can cause a slight pause, so it’s generally a good idea to only use the Save function occasionally and when it makes the most sense to do so.
Such as when exiting out of an options menu, for example.
Typically, the Player Prefs class is meant for storing options settings and similar preferences.
Which, for single, simple values, can be very straightforward.
However, while many options fit comfortably into a float, string or integer data structure, there are many types that don’t.
Realistically, if you’re using Player Prefs to store options settings, the values you save might include many different types of data.
So how can you manage a whole set of options values, that might include unsupported or complex data types?
How to save options settings with Player Prefs
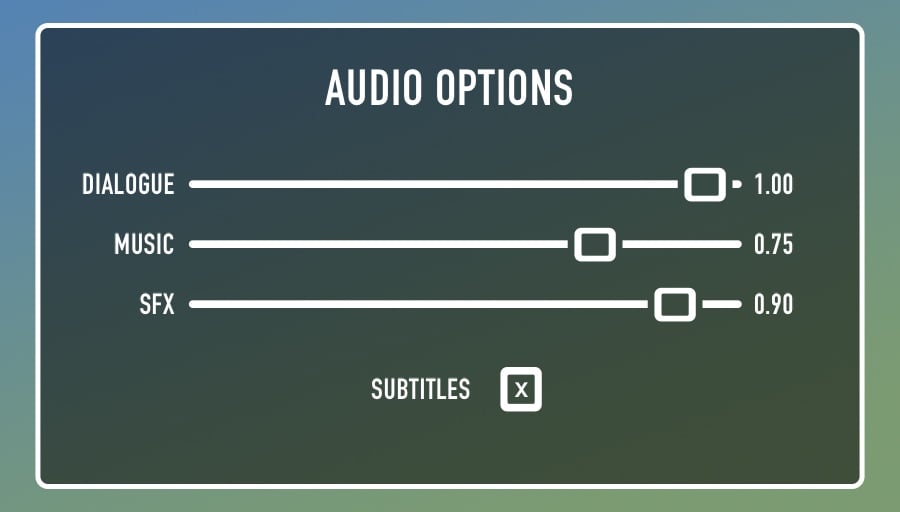
Player Prefs is ideal for saving and loading options settings.
While the Player Prefs class makes it easy to save and load a single float, string, or integer value, chances are, if you’re using Player Prefs to manage a set of options, you’re probably going to need to save other kinds of value as well.
So how can you manage multiple options with different, unsupported, data types?
Saving and loading multiple settings with Player Prefs
It’s relatively straightforward to save and load multiple settings using Player Prefs.
All you really need to do is group each preference that you want to use in a Save function and a Load function.
Like this:
public float sfxVolume;
public float musicVolume;
public float dialogueVolume;

public void LoadSettings()
{
    sfxVolume = PlayerPrefs.GetFloat("sfxVolume");
    musicVolume = PlayerPrefs.GetFloat("musicVolume");
    dialogueVolume = PlayerPrefs.GetFloat("dialogueVolume");
}

public void SaveSettings()
{
    PlayerPrefs.SetFloat("sfxVolume", sfxVolume);
    PlayerPrefs.SetFloat("musicVolume", musicVolume);
    PlayerPrefs.SetFloat("dialogueVolume", dialogueVolume);
    PlayerPrefs.Save();
}
This will allow you to load and save an entire set of options for a player whenever you need to.
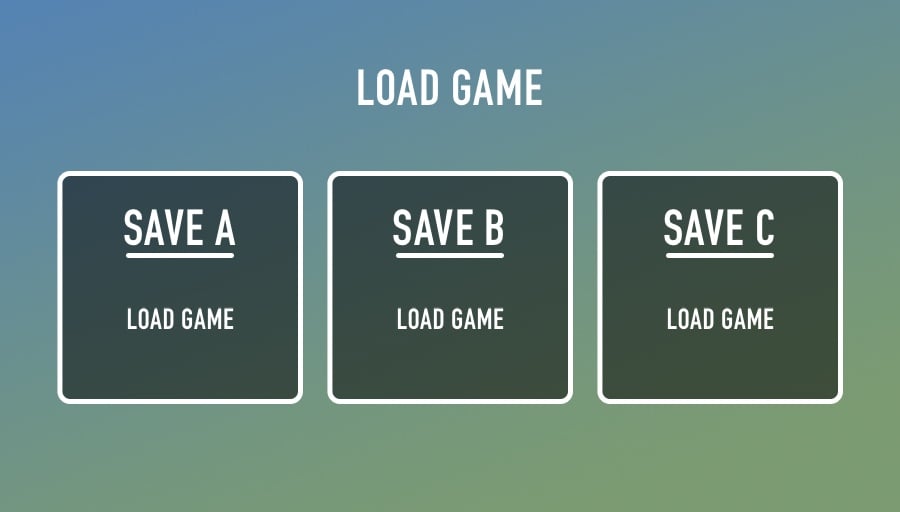
Saving to multiple slots with Player Prefs
A lot of the time, you may only need to create a single set of Player Pref values.
Typically, Player Prefs are user-specific, meaning that different settings will be used for different user accounts, for example when logging into a computer with a different account.
However, there may be times when want to support multiple instances of the same preference value. Such as to allow multiple users to save custom settings within the same profile, or to create settings presets that can be stored in different slots.
Exactly how you do this will depend on how you manage different player slots or presets in your game.
However, a simple method of creating multiple versions of the same data set using Player Prefs is to simply add an index to every key.
Like this:
public int slot;

public float sfxVolume;
public float musicVolume;
public float dialogueVolume;

public void LoadSettings()
{
    sfxVolume = PlayerPrefs.GetFloat("sfxVolume" + slot);
    musicVolume = PlayerPrefs.GetFloat("musicVolume" + slot);
    dialogueVolume = PlayerPrefs.GetFloat("dialogueVolume" + slot);
}

public void SaveSettings()
{
    PlayerPrefs.SetFloat("sfxVolume" + slot, sfxVolume);
    PlayerPrefs.SetFloat("musicVolume" + slot, musicVolume);
    PlayerPrefs.SetFloat("dialogueVolume" + slot, dialogueVolume);
}
This allows you to save and load different versions of the same data, without changing the key.
While it’s relatively straightforward saving supported data types using Player Prefs, not all settings fit so neatly into a string, float or integer.
What if you want to store a boolean value for example?
How to save a boolean using Player Prefs
While there isn’t a built-in method of storing a boolean value using Player Prefs, it’s still possible to save and load booleans by converting their true or false value to an integer.
This works by simply checking the boolean when you save it, passing in a 0 if it’s false, or a 1 if it’s true.
Like this:
bool myBool;
PlayerPrefs.SetInt("myBool", myBool ? 1 : 0);
In this example I’ve used the Ternary Operator, which is a shorthand method of returning one of two values, depending on the condition of another.
Then, when you want to load the boolean value, all you need to do is check to see if the saved integer is equal to 1.
Like this:
myBool = PlayerPrefs.GetInt("myBool") == 1;If it is, the boolean will be set to true, and if it’s not it’ll be set to false.
So, while this method doesn’t actually store the boolean value, it stores an equivalent integer that can be checked against to set the boolean to true or false accordingly.
This approach of converting a value into a supported type can be used to store all kinds of variables that aren’t natively supported by Player Prefs.
Such as colours for example.
How to save a colour using Player Prefs
It’s possible to store a colour variable using Player Prefs by converting the colour’s values to a readable string, which can be saved and then recalled.
This works by using the Colour Utility class, which can convert a colour to a string that represents its Red, Green and Blue values.
Like this:
Color myColor = Color.red;
string colorString = ColorUtility.ToHtmlStringRGB(myColor);
This converts the value into a Hex colour code, which is a six-character code preceded by a number sign (#), that can be stored as a string.
Like this:
PlayerPrefs.SetString("myColor", ColorUtility.ToHtmlStringRGB(myColor));To recall the colour, simply use the Colour Utility class to parse the string (remembering to add a leading #), passing the resulting colour out to the variable you’d like to store it in.
Like this:
public Color myColor;

public void LoadSettings()
{
    ColorUtility.TryParseHtmlString("#" + PlayerPrefs.GetString("myColor"), out myColor);
}
The Colour Utility class is convenient for converting colour values to a format that can be used with Player Prefs.
And while not all data types have a function that can be used to convert the value in this way it’s often possible to convert the individual components of a complex variable into a supported format in some way.
Such as Vector 3 values which, by default, are not supported, but can be recreated using the individual floats of the X, Y and Z position values.
Like this:
public GameObject player;

public void LoadPosition()
{
    Vector3 loadedPosition = new Vector3(
            PlayerPrefs.GetFloat("posX"),
            PlayerPrefs.GetFloat("posY"),
            PlayerPrefs.GetFloat("posZ")
        );
    player.transform.position = loadedPosition;
}

public void SavePosition()
{
    Vector3 playerPosition = player.transform.position;

    PlayerPrefs.SetFloat("posX", playerPosition.x);
    PlayerPrefs.SetFloat("posY", playerPosition.y);
    PlayerPrefs.SetFloat("posZ", playerPosition.z);

    PlayerPrefs.Save();
}
This method of deconstructing a variable, storing it as separate values and reconstructing it when it needs to be loaded, can be a useful way of storing complex data using Player Prefs.
Which means that it’s possible to use Player Prefs to store more than just settings.
For example, you could use Player Prefs to create a basic save state, that loads a player’s position, health or number of coins.
So why shouldn’t you?
Is it ok to use Player Prefs for game saves?
And if not, why not?
Using Player Prefs for game saves
You may have heard that using Player Prefs for game saves is a bad idea. So… is it?
While it is possible to store game-related data using the Player Prefs class, it’s not really designed for storing any kind of complex information that’s important to the player’s progress in the game.
So what’s the problem?
Mainly the problem with using Player Prefs for game saves is to do with the technical limitations of the Player Prefs class and how the file is saved to disk.
For example, while it is possible to deconstruct a complex variable into smaller parts that can be saved using Player Prefs, this can quickly become inconvenient and can cause complications when data needs to be grouped.
A high score entry, for example, that could include a combined name and score, might typically be stored in a single class which then might be stored in a list, containing all the high scores. Saving and loading the list object would make it easy to load and sort all of the scores that exist, allowing you to display the top ten.
While recreating the same functionality with Player Prefs is technically possible, it’s not convenient and can take a lot of work. Since one of the main reasons to use Player Prefs is for its simplicity when dealing with basic values, if you’re going to put in the extra work required to save object data in this way, then you may as well use a more suitable option for saving to disk, as it will likely involve a lot of the same processes anyway.
Another reason that Player Prefs may not be suitable for game saves is to do with how they’re stored.
For example, by default, Player Prefs are not encrypted. A player could, technically, change the Player Prefs document to give themself more gold, a higher score, or to modify their progress through the game.
Also, while many platforms store the Player Prefs document in a file, on Windows, Player Prefs is saved to the Registry.
While this isn’t an unusual practice for storing a game’s configuration, you wouldn’t normally expect to find game saves there, as storing large amounts of data in the registry could, potentially, contribute to poor performance or could cause players to lose their game saves if they move a game’s installation folder.
For basic game saves, using smaller amounts of data, it’s not necessarily a huge problem to use Player Prefs to save your game. So long as you can accept that it’s not what the system was designed for, and that, on PC, some users may not expect to find their game save data in the Registry.
However, while it is technically possible to use Player Prefs as a method of saving complex data, if you need to save larger amounts of information, you may be better off using an alternative option.
Alternatives to Player Prefs
Using the Player Prefs class is one of the most convenient methods of saving data in Unity, however, it’s not always the most suitable.
Luckily, it’s not the only option for saving persistent data in Unity.
For example, saving data to a file using JSON or XML, can be very straightforward and is extremely useful for storing more complex data types, such as a list of high scores with names.
However, one of the most convenient methods for saving and loading game data of all kinds is to use a dedicated asset. Easy Save, for example, which has been an Asset Store favourite for many years, allows you to save just about anything to a file, easily. It also includes encryption, visual scripting support and cloud support, making it an extremely convenient and fully-featured option.
Finding Player Prefs in Unity
When working with Player Prefs, because you normally can’t view the preference values that are stored from inside the editor, it can be difficult to know what has been saved and where.
So how can you make working with Player Prefs easier?
One option is to find the stored Player Prefs file on your device.
So where are Player Prefs saved?
The Player Prefs location
The location of the Player Prefs file depends on the device that’s being used and whether or not the preference was set from the editor or a standalone build.
Here’s where you’ll find the Player Prefs file:
Player Prefs location (working in the editor)
- MacOS: /Library/Preferences/unity.Company.Project.plist
- Windows (in the Registry): HKCU\Software\Unity\UnityEditor\Company\Project
Player Prefs location (in the finished game)
- MacOS: ~/Library/Preferences/com.Company.Project.plist
- Windows (in the Registry): HKCU\Software\Company\Project
- Windows Store Apps: %userprofile%\AppData\Local\Packages\ProductPackageId\LocalState\playerprefs.dat
- Linux: ~/.config/unity3d/Company/Product
- Android: /data/data/pkg-name/shared_prefs/pkg-name.v2.playerprefs.xml
- iOS: /Library/Preferences/BundleIdentifier.plist
For more information on where and how Unity stores Player Prefs files, see Unity’s official documentation here.
Once you’ve found the Player Prefs file, you’ll be able to manually check it for changes and make sure that your preferences are saving as expected.
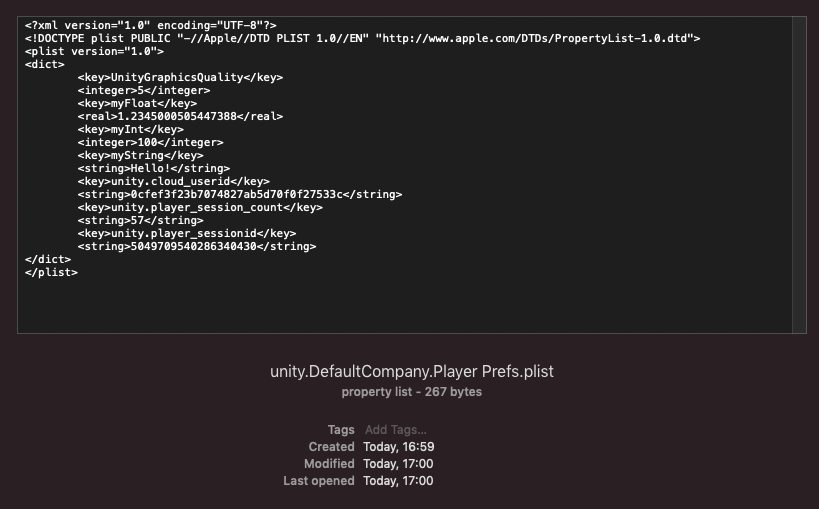
Finding the Player Prefs file on your system can make working with them easier to visualise.
Checking Player Prefs files for changes
Player Prefs are normally saved during On Application Quit, so you may not notice the preferences change until a game is closed or until you exit play mode.
It can be much easier, however, to simply view and manage all of your project’s Player Prefs from inside the Unity editor, using an asset.
How to view a list of all Player Prefs
While there isn’t a built-in method of viewing a project’s saved Player Prefs, other than manually finding the file and opening it, it is possible to view and manage all of a project’s stored preferences by using a free asset from the Unity Asset Store.
PlayersPrefs Editor and Utilities is a free, simple to use asset, that shows you a list of all of your Player Prefs.
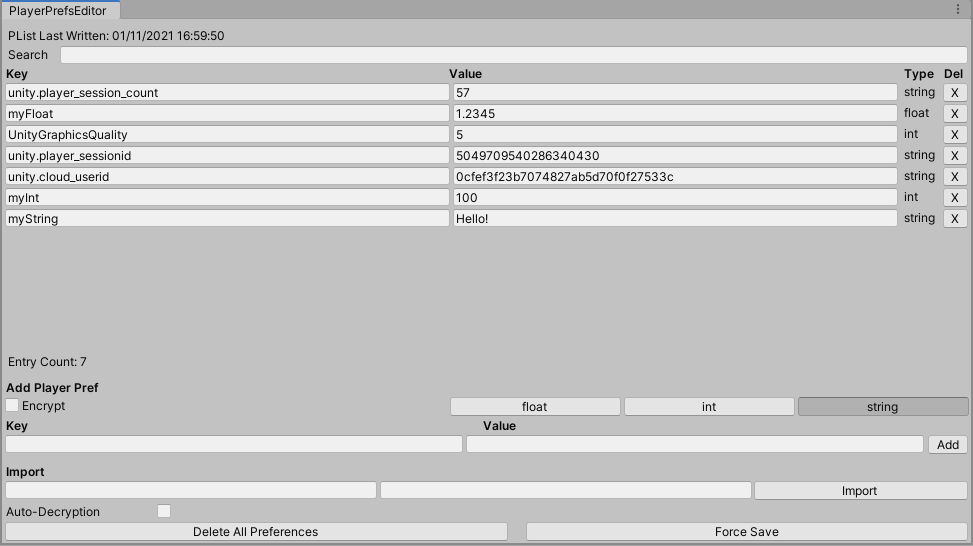
The easiest way to work with Player Prefs is by using a free viewer plugin from the Asset Store.
From there you can delete, add and even encrypt the Player Pref values.
It’s an incredibly useful tool and takes all of the guesswork out of working with Player Prefs.
Now it’s your turn
Now I want to hear from you.
How are you saving data in Unity?
Are you using Player Prefs? Or a different option?
And what have you learned about working with persistent data that you know someone else will find useful?
Whatever it is, let me know by leaving a comment below.

John French writes all of the Unity tutorials for Game Dev Beginner, and specialises in deep-dive guides teaching game development basics.

Comments
Fantastic content and very very helpful ! I didn’t know about the PlayerPrefs utility plugin, just started using it, its very handy.
Thank you!
I am very happy when I see gamedevbeginner while searching for the solution on google at a point where I get stuck. Because I know it is a useful article prepared in detail.
This was one of them, thank you very much John French.
So glad I could help!