
In Unity, the process of destroying an object can be very straightforward.
Simply call the Destroy Method, passing in a reference to the object that you want to remove, and the object will be destroyed from the scene.
And, most of the time at least, destroying an object in Unity can be as simple as that.
However, it can sometimes be useful to understand a little more about what’s happening behind the scenes.
For example, exactly when is an object destroyed?
What if you want to remove a component from an object?
And is there a difference between destroying an object or component instead of simply turning it off?
In this article, you’ll learn the basics of destroying objects and components in Unity and what happens behind the scenes when you do.
So, how do you destroy an object in Unity?
How to destroy an object in Unity
To destroy an object in Unity, simply call the Destroy function, passing in a reference to the object that you want to destroy.
Like this:
Destroy(Object objectToDestroy);This could be an object in the scene that you have a reference to, or you could have an object destroy itself, by passing in its own Game Object Property.
Like this:
Destroy(gameObject);It’s also possible to pass in a float delay value when calling the destroy method.
This will cause the destroy function to trigger in a number of seconds, which is specified by the float you pass in, instead of right away.
Like this:
// Destroys the object in 4 seconds
Destroy(gameObject, 4);
However, even if you destroy an object immediately, without a delay parameter passed in, it won’t actually be removed right away.
So when, exactly, does a destroyed object… get destroyed?
When are destroyed objects removed in Unity?
It may surprise you to know that, when you destroy an object, it isn’t removed from the scene immediately.
Instead, it’s marked for deletion and removed after the current round of event functions that it’s destroyed in.
For example, it’s possible to call the destroy function on an object and then, immediately after “destroying” it, access the object in some way, without causing an error.
Like this:
void Update()
{
    Destroy(gameObject); // Even though the object is destroyed here...
    Debug.Log(gameObject + " hasn't beed destroyed yet!"); // this won't cause an error!
}
It’s also possible for other scripts to reference the object from their own Update calls, even if they take place after the destroy function has been triggered.
This works because the object doesn’t get destroyed until after the round of event functions that it’s destruction was triggered in.
So, for example, if an object is destroyed in Update, it will still exist for the rest of the Update function in that script, and in any other Update functions on other scripts during that frame.
But, by Late Update, the object will be destroyed and it will no longer be accessible.
And, if you call Destroy earlier than Update, such as in Fixed Update or in one of the initialisation methods, it won’t make it to Update at all.
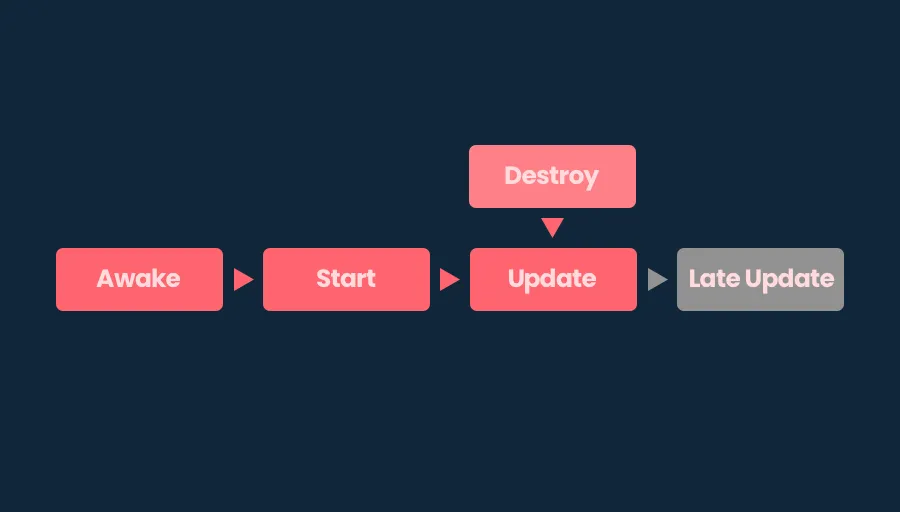
An object that’s destroyed in Update will appear to still exist until the next round of event functions, in this case, Late Update.
This can be useful for working with an object that’s just been destroyed, as it allows you to still access information about it, even though it’s been marked for destruction.
However, once the object has been destroyed, while it is technically inaccessible, it’s still possible to perform final, decommissioning functions on the object itself, before it’s permanently removed, using the On Disable and On Destroy event functions.
On Disable vs On Destroy
On Disable and On Destroy can be used to decommission an object before disabling it, either before turning it off or before it’s destroyed.
void OnDisable()
{
    // Called when an object is turned off
}

void OnDestroy()
{
    // Called when an object is destroyed
}
But which one should you use?
On Disable is called as soon as an object is turned off.
Along with On Enable, which is called when an object is turned on, On Disable can be useful for managing the object’s connection with other objects in the scene, such as subscribing and unsubscribing functions to event delegates, for example, or for resetting its own data.
It will be called as soon as the object is disabled, either by turning it off in the Inspector, or by calling the Set Active function from a script.
Like this:
gameObject.SetActive(false);When an object is destroyed, On Disable and On Destroy will both be called in its scripts, starting with On Disable, which is called at the same time as the initial Destroy function, and ending with On Destroy at the end of the frame.

On Disable is called when the object is destroyed, while On Destroy is called at the end of the frame.
However, while both destroying an object and simply turning it off will cause the On Disable function to be called, there is a slight difference between how the two methods work.
When disabling an object using the Set Active function, the game object will report itself to be disabled immediately.
What’s more, even though it’s turned off, other scripts with a reference to the object will be able to check if it is active or not for as long as the object still exists.

A disabled object immediately becomes inactive, but is not inaccessible. Other objects can check to see if it’s turned on or not.
However, when destroying the object, even though On Disable is called at the same time as the Destroy function, the object will still report that it is active, both in On Disable, and during the round of event functions it was destroyed in.
The object will then become inaccessible meaning that, if another script tries to check if it’s active, in a later event function, such as Late Update, for example, it’ll cause an error.
It’s only then, at the end of the frame, in On Destroy, that the object will finally show as inactive, after which it will be removed.
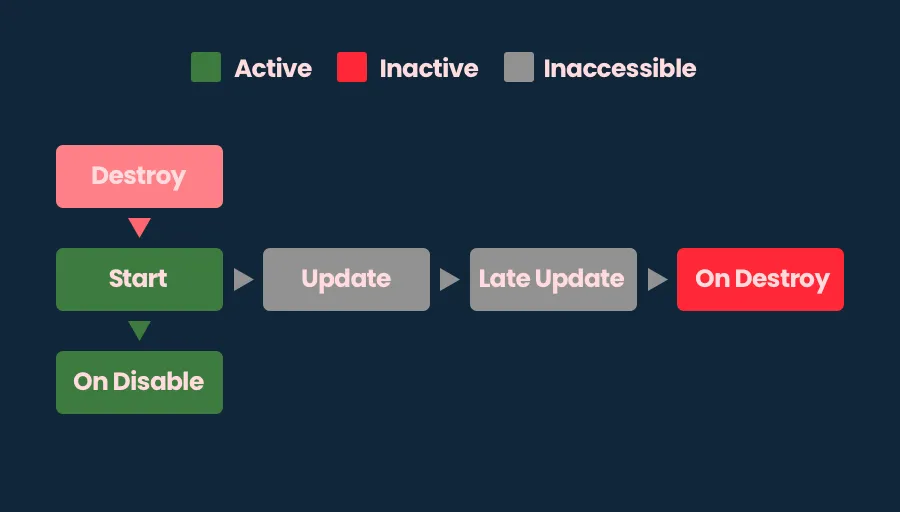
A destroyed object will report that it is still active, even in On Disable, until the next event function, when it will become inaccessible. It’s only at the end of the frame, in its On Destroy call, a function that other scripts aren’t able to use, that the object reports itself as inactive.
Most of the time, this might not be a problem for you.
But, knowing that the process of destroying an object and the process of turning it off works in different ways, even though they involve similar steps, might save you some frustration later on when you’re trying to work out why an object that you’ve destroyed is telling you that it’s still active.
Should you destroy or disable an object?
Generally speaking, it’s usually better to turn an object off than to destroy it, if you can.
Turning objects off instead of destroying them is the basic idea behind Object Pooling, which allows you to reuse objects over and over without having to recreate them, saving performance.
What’s more, because disabled objects still, technically, exist, turning an object off can sometimes be easier to manage than destroying it.
For example, if a script in your scene still holds a reference to a disabled object, it’s possible to check if that object is still active or not, by checking the Active Self or Active in Hierarchy properties.
Like this:
bool active = gameObject.activeSelf;
bool accessible = gameObject.activeInHierarchy;
Active Self will return true or false depending on if the object is, itself, turned on or off, while Active in Hierarchy only returns true if the object is active and accessible, as an active object can still be inaccessible if its parent is turned off.
Which can be useful if you need to keep a reference to an object that’s disabled, but that you may need later on.
Destroyed objects, on the other hand, can’t be checked in this way as, even after the On Disable function is called, the object will appear to still be active, until it’s destroyed and no longer accessible, at which point trying to check it’s status will return an error.
And while you can, of course, check to see if a reference to an object still exists before trying to do anything with it, sometimes simply turning objects off when you don’t need them, can be easier to do.
However…
While disabling an object typically prevents any built-in components on it from being used or interacted with, Scripts on the object may still have their functions called if the object is disabled, or even if it’s destroyed.
So how can you actually remove a script component in Unity?
How to remove a component from an object in Unity
Removing a component in Unity works in the exact same way as destroying an object, by using the Destroy function.
Like this:
Destroy(audioSource); // Removes the referenced component
Destroy(this); // Removes this script
This is because components that are attached to game objects, such as your own scripts, or audio source components, all inherit from the same Object base class, allowing you to remove a component in the same way as any other object.
The process of when, exactly, a component is removed is similar to the process of destroying an object, in that it will be removed after the current event function loop, such as Update or Late Update.
However, there are some differences in how a component is decommissioned compared to an object.
For example, Game Objects that are being destroyed still appear to be active when their scripts’ On Disable event functions are called but, if they’re turned off, using Set Active, they report themselves as inactive straight away.
Meaning that objects can show different active states, depending on if they’re being turned off or destroyed.
Script Components, however, are always disabled straight away, and their Enabled property will return false in the On Disable function, regardless of if you’re removing the component or just disabling it.
Should you destroy or disable a component
Disabled components can’t be used, and will usually return a warning, not an error, if you try to do something with them.
Removed components, however, are missing and trying to access them in any way will typically result in an error.
However, scripts tend to work in a different way to Unity’s ready-made components.
Disabling a script means that its event functions, such as Update and Fixed Update, won’t be called.
But that doesn’t mean that other functions in the script can’t be used even when it’s turned off.
They can…
In fact, it’s even possible to access, and use a script on a destroyed object if a reference to that class still exists.
This means that you can call a function on a script, that’s attached to an object that no longer exists and it will work so long as you don’t try to reference the actual object the class is attached to, or the script as a component of the object, as doing so will cause an error.
This is possibly to do with how Unity manages scripting memory, where the class that’s attached to the object still exists on the Managed Heap because it’s referenced by another script.
So what can you do about it?
Generally, if you think that a connection between two scripts might cause a problem for you, either because it’s possible that the connection will be broken or because it won’t be when really it should, the simplest way to manage potential errors is to check that the component reference still exists in the scene and that the component is still active and enabled.
Like this:
public OtherScript otherScript;

void Start()
{
    if (otherScript && otherScript.isActiveAndEnabled)
    {
        // Do something with the component
    }
}
This example checks the reference twice.
First to see if the instance of the script it points to still exists and then, if it does, if that script is active and available in the scene.
Unlike the Enabled property, which only reports if the script itself is enabled or not, the Is Active and Enabled property will only return true if both the script and the object it’s attached to are turned on.
Meaning that, when double-checking like this, it’s generally possible to check if a script is unavailable as soon as it’s first disabled, no matter how the object or component was removed.
Now it’s your turn
Now I want to hear from you.
How are you destroying objects in your game?
Are you removing them, or are you turning them off?
And how are you managing the connections between objects that might be removed or disabled?
Whatever it is, let me know by leaving a comment.

John French writes all of the Unity tutorials for Game Dev Beginner, and specialises in deep-dive guides teaching game development basics.

Comments
I didn’t know, Destroy process is so complex. Thanks, very clear and useful.
You’re welcome!
Sorry if this is covered but how would you recommend checking if an object is still alive before calling Destroy() i.e. only call Destroy if it hasn’t already been called?
It’s possible to try and Destroy an object that no longer exists without causing an error. For example, if two scripts try to destroy the same object, it will be destroyed but no errors will be raised. I’m assuming that there may be a null reference check built into the Destroy function already. However, during the event function that the object is destroyed, it will still be accessible. The only way to avoid this is with DestroyImmediate, which destroys the object there and then. However, Unity advises against using this function.