Generating a random value in Unity can be very simple.
Which is useful, because in many games, random numbers are extremely important for creating varied gameplay and behaviours.
However…
While generating a random number in Unity can be very straightforward, actually randomizing different parts of your game can be more complex.
For example, perhaps you want to place an object at a random position.
Maybe you want to create weighted probability, so that enemies drop rare loot less often than they drop common rewards.
And what if you’re using random values to generate objects and worlds. How can you recreate predictable results, using random data?
There’s a lot to consider…
But don’t worry, because in this article I’ll show you everything you need to know to get started with random values in Unity and how you can use them to add variation to different parts of your game.
Here’s what you’ll find on this page:
- Random numbers in Unity
- Random Vector 3 position in Unity
- Random rotation in Unity
- Random Colours in Unity
- Picking a random item from a List in Unity
- Weighted random decisions in Unity
Random numbers in Unity
Generating a random number in Unity is, generally, very straightforward.
For most uses, the Random Range function, which returns a random value between two numbers, will be all you need to use.
Here’s how it works…
How to use Random Range in Unity
To create a single random number using the Random Range function, simply pass in the minimum and maximum values that you want to use.
Like this:
// returns a random number between 0 and 10
float randomNumber = Random.Range(0, 10);
The Random Range function is available in two versions, which will return either a random float value or a random integer, depending on the type of values that are passed into it.
So, for example, to generate a random integer, simply pass in whole numbers when using the Random Range function.
Like this:
float randomNumber = Random.Range(0, 100);This works even if the target value is a float, because the random number that is returned is a whole number, an integer.
Which looks like this:

To get a random integer value, pass whole numbers into the Random Range function.
To generate a random float, simply pass float values into the function instead.
Like this:
float randomNumber = Random.Range(0f, 100f);
Using float variables, or direct values marked as floats (e.g. 100f) will return a random float number.
Inclusive vs exclusive number ranges
Both of the overload methods of the Random Range function work in the same way, by accepting minimum and maximum values to return a random float or a random integer between two numbers.
However, what Unity considers to be the upper limit of the random range will be different depending on if you’re getting a float or an integer.
For example, when getting a random float, the minimum and maximum values you pass in are inclusive of the range, meaning that, if you pass in 0 and 10, you could get 0 or 10 back, as well as everything in between.
However, when getting a random integer, while the minimum value is inclusive, just like with the float, the maximum is not. It’s exclusive, meaning that passing in 0 and 10, when using integers, could return any value from 0 to 9, but not 10.
This can be inconvenient in some cases, as you may need to specify a range that’s 1 number higher than what you actually want.
However, at other times it can be helpful, such as when getting a random Array element, as it would allow you to use the Array’s Length property as an upper limit (even though the highest index would be one lower) without overshooting.
Random numbers that don’t repeat
There may be times when generating a random number that you’d like to avoid picking the same number twice in a row.
There are lots of reasons you might want to do this but, generally speaking, it’s useful for avoiding repetition when you’re trying to create variation.
So, how does it work?
Typically, it involves storing the last value that was picked and simply picking again if it’s chosen twice in a row.
Like this:
int randomNumber;
int lastNumber;

void NewRandomNumber()
{
    randomNumber = Random.Range(0, 10);

    if (randomNumber == lastNumber)
    {
        randomNumber = Random.Range(0, 10);
    }

    lastNumber = randomNumber;
}
Most of the time, checking once and picking again if the value is the same will be enough to avoid repeated random results.
However… if there’s a high chance that the same number could be picked twice in a row, because you’re picking from a small range, for example, one check may not be enough to reliably avoid repeated results.
Instead, if it’s more likely that a number will be repeated, making multiple attempts to pick a new value can avoid repetition.
Like this:
int randomNumber;
int lastNumber;
int maxAttempts = 10;

void NewRandomNumber()
{
    for(int i=0; randomNumber == lastNumber && i < maxAttempts; i++)
    {
        randomNumber = Random.Range(0, 10);
    }

    lastNumber = randomNumber;
}
This works by checking to see if the new random number is the same as the last and, if it is, makes multiple attempts to pick a new number, up to a maximum of ten.
It’s often a good idea to limit checks like this to a maximum number of attempts.
That way, if a different number can’t actually be picked, the process is allowed to fail, avoiding an infinite loop.
How many attempts you should make will depend on how likely it is that a value could be repeated and whether or not it’s actually a problem if it is.
Random Range is extremely useful for generating a random number inside a range of values.
However, there may also be times that you only want to generate a single float value between 0 and 1.
In which case, you don’t need to use Random Range to do it.
Random float values (between 0 and 1)
Many of Unity’s settings, properties and values, typically accept a float value that’s between 0 and 1.
Because of this, it can be convenient to build float variables into scripts using the same scale, where a value can be 0, 1 or anything in between.
So, it makes sense that Unity’s Random Class also provides an option to generate a random float between 0 and 1, using Random Value.
Like this:
// returns a float between 0 and 1 (inclusive)
float randomFloat = Random.value;
Using the Random Value property of the Random class is more convenient, and can be more efficient, than specifying a range between 0 and 1.
What’s more, the Random Value property can easily be checked against to create simple probability.
For example, I could use Random Value to test an outcome with a 30% chance of success.
Like this:
if(Random.value < 0.3f)
{
    // Success !!
}
The same method can be used to create probability with a 50/50 chance of success, which can be useful for randomly deciding if something is true or false.
Here’s how…
Randomly set a boolean value to true or false
Using Random Value, it’s possible to randomly set a boolean value to true or false.
Like this:
bool randomBool = Random.value > 0.5;This works by simply checking if the Random Value is more than 0.5, to create a 50/50 probability, setting the boolean to true if it is or false if it’s not.
Random Seeds in Unity
You may already know that random numbers in Unity are not truly random.
Instead, the numbers that Unity’s Random Class uses are generated from a starting number, a Seed, which is an integer value, that’s set when the game starts.
The seed that Unity uses is always different, generating a different set of random numbers every time the game starts.
However…
The Seed value can also be set manually using the Init State function.
Like this:
int customSeed = 1234;
Random.InitState(customSeed);
Which generates a set of random numbers that are specific to that Seed.
What this means is that one Seed will generate the same random numbers, in the same order, whenever it’s used.
So, for example, setting the Seed to “1234” before generating three random values will produce the same results every time.
Like this:

By manually setting the starting Seed value to 1234, I can produce the same random numbers over and over again.
Which means that a specific set of random numbers can be accurately recreated using the same Seed value.
Generating predictable random results in this way can be very useful, as it allows you to recreate supposedly random objects, so long as the Seed, and the process used to create the object, are the same.
However…
Because Unity’s Random Class is Static, any script can access the same set of random values.
And while this doesn’t necessarily cause a problem in isolation, in a more complex project any other script could easily alter the order of the randomly generated numbers, simply by requesting a random number or by resetting the Seed value.
For this reason, if predictable randomness is important to you, it can make sense to use a local instance of the Random Class, not the Static class that other scripts can access, so that it can be used, and controlled, in isolation.
For more information, try Edward Rowe’s article on predictable number generation here.
Random numbers are the foundation of randomisation in Unity.
But, chances are, that to create real variation, you’ll likely want to use those numbers to modify actual objects in your game, such as how they look, where they are, or how they behave.
So how can you use random numbers to change an object’s position, its rotation, or even its colour?
Random Vector 3 position in Unity
While there isn’t a convenient function to randomise Vector 3 values in Unity, to create a random position for example, it is possible to create a random Vector 3 by randomising each of its values independently.
This works by randomising each of the floats that make up its X, Y and Z values, one by one.
However…
For this to work, you’ll still need to know the possible range of each float value which, when combined, will define the area in which the random position can be picked.
One way to do this is to pick two points in the world, a minimum position and a maximum position.
Like this:
public Vector3 minPosition;
public Vector3 maxPosition;
The distances between these positions essentially form a cube-like area:
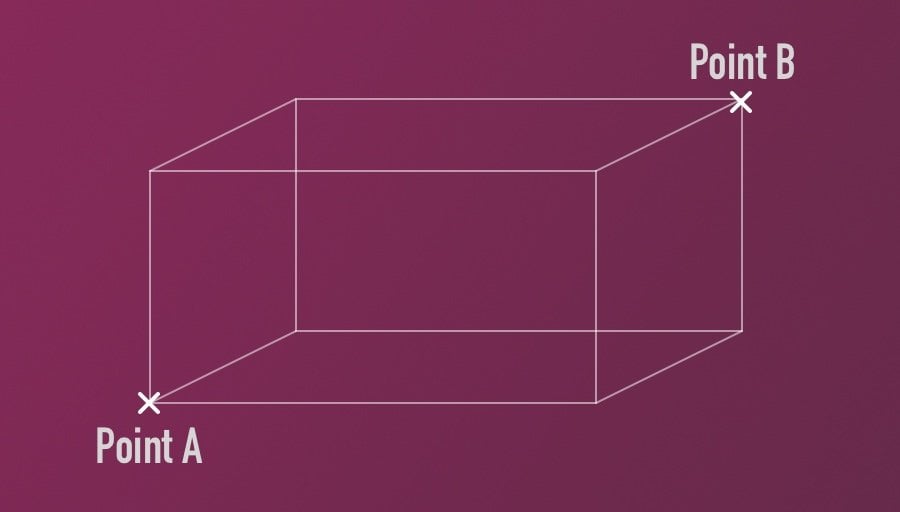
Defining two points in the world allows you to draw a volume, inside which a random position can be chosen.
Then, when the individual parts of the Vector 3 are randomised, a random position that’s inside the cube area will be returned.
Like this:
public Vector3 minPosition;
public Vector3 maxPosition;

void Start()
{
    Vector3 randomPosition = new Vector3(
        Random.Range(minPosition.x, maxPosition.x),
        Random.Range(minPosition.y, maxPosition.y),
        Random.Range(minPosition.z, maxPosition.z)
    );

    transform.position = randomPosition;
}
But what if you don’t want to place an object randomly in a cube?
What if, for example, you’d like to generate a position in a sphere instead?
How to create a random position (inside a sphere)
While there isn’t a built-in method for creating random Vector 3 values, the Random Class does include functions for generating a random point inside a unit sphere (3D) or a unit circle (2D).
The Inside Unit Sphere function, for example, will return a point inside a sphere with a radius of 1 unit, up to and including the sphere’s surface.
So, all you need to do to create a random position within a sphere area is multiply the random unit position that’s returned by the radius of the sphere area that you want to create.
Like this:
public Vector3 origin;
public float radius = 2;

void Start()
{
    transform.position = origin + Random.insideUnitSphere * radius;
}
This works by defining a point of origin, which is where you want the sphere to start from, and a radius, which is the distance from the origin to the edge of the sphere, in this case, 2 units.
Which, when used with a large number of objects, looks like this:

Inside Unit Sphere returns a random position inside of a sphere area.
The Inside Unit Sphere function will return a random point inside of a sphere area.
However, it’s also possible to return a random position on the outside of a sphere only, using the On Unit Sphere function.
Picking a random direction (using On Unit Sphere)
The On Unit Sphere function works in the same way as Inside Unit Sphere, except that the random position that’s returned will be somewhere on the sphere’s surface, instead of inside it.

While Inside Unit Sphere returns a position inside of a sphere area, On Unit Sphere returns a position on a sphere’s edge.
This can be useful for picking a random direction.
Like this:
Vector3 direction = Random.onUnitSphere;Both On Unit Sphere and Inside Unit Sphere can be used to generate a random direction vector.
The difference is that On Unit Sphere will always produce a vector with a magnitude of 1, whereas Inside Unit Sphere will generate a random direction vector with a magnitude of up to 1.
This means that if you used the direction vector that was generated to create movement, the value returned by Inside Unit Sphere would also randomise the movement speed, while On Unit Sphere would return a consistent speed in a random direction.
While using Inside Unit Sphere and On Unit Sphere can be useful for creating a direction vector at random, if all you want to do is create a random rotation, there’s already a function for that.
Random rotation in Unity
Unity’s Random Class already includes a built-in function for generating a random rotation.
It returns a Quaternion value, which means that it can be used directly with the rotation property of an object to set a new, random, rotation.
Like this:
transform.rotation = Random.rotation;Alternatively, a higher quality random rotation function, Rotation Uniform, is also available:
transform.rotation = Random.rotationUniform;This generally returns a more uniform result but at the cost of performance, as it’s reportedly 40% slower than Random Rotation.
Just as it’s possible to randomise positions and rotations in Unity, you can use the Random Class to generate random colours as well.
Here’s how…
Random Colours in Unity
There are two ways to generate a random colour in Unity.
This works by using either the built-in Random Color HSV function or by setting a new colour using randomised RGB values.
Each method randomises colours in a slightly different way, producing different results.
Here’s how it works…
How to generate a random HSV colour
The first method uses the built-in Random Color HSV function, which will return a random colour based on HSV values
Like this:
Color randomColour = Random.ColorHSV();Which you can then use to change the colour of an object’s Renderer Material.
Like this:
public Renderer myRenderer;

void Update()
{
    myRenderer.material.color = Random.ColorHSV();
}
HSV colours in Unity are made up of 3 float values, for Hue, Saturation and Value (brightness), ranging between 0 and 1.
- Hue, determines the colour, measured as a point on a spectrum that starts and ends with Red.
- Saturation affects how much of the colour is added, from 0, which is white, to 1, which is fully saturated.
- Value, controls the brightness of the colour, between 0, which is black, and 1, the colour’s full brightness.
By default, the Random Color HSV function randomises all of the elements of the HSV colour, which creates colours of all hues, saturation and brightness.

By default, Random Color HSV will randomise the Hue, Saturation and Brightness (Value) of a colour.
However, this can sometimes appear to produce colours that are closer to white, grey and black, more frequently than other colours.
This is because, while colour is decided by one value (Hue) the amount of White and the brightness of the colour (i.e. the amount of Black) are decided by individual values.
However, it’s possible to control how much each element of the HSV colour value is randomised by limiting its range.
Like this:
public Renderer myRenderer;

public float minH = 0;
public float maxH = 1;

public float minS = 0;
public float maxS = 1;

public float minV = 0;
public float maxV = 1;

void Start()
{
    myRenderer.material.color =
    Random.ColorHSV(minH, maxH, minS, maxS, minV, maxV);
}
Bringing the Minimum Saturation and the Minimum Value variables up, closer to 1, removes the possibility of creating White and Black.
This can be useful, for example, if you want to create random, bright colours, that are always fully saturated.
Which looks like this:

Randomising just the Hue creates vivid, bright colours.
Or, if you want to randomise a colour’s Hue and its Saturation, but not its brightness, you’ll get colours that are vivid or pale, but not dark.
Like this:
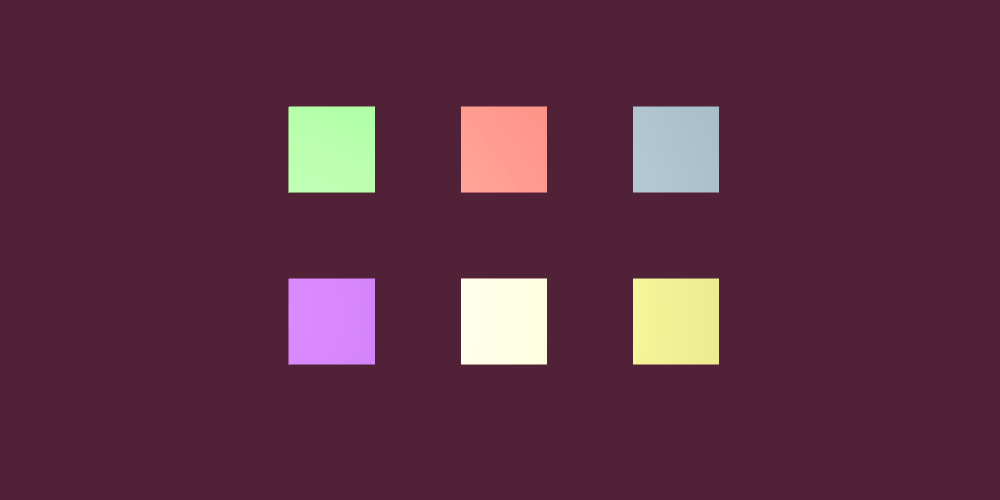
Randomising the Hue and Saturation creates different shades of colours that are equally bright.
Excluding, or limiting some parameters of the HSV colour value can create random colours within controlled limits.
However, what can you do if you want to also include Black and White as possible colours?
How can you randomise a colour in a way that includes Black and White as equal options, that have as much chance of being generated as Blue, Red, or any other colour?
How to generate a random RGB colour
Just like with Vector 3 values, there’s no built-in function for creating a random RGB colour, but it is possible to randomly create one by randomising its individual Red, Green and Blue values.
This works by passing a Random Value, between 0 and 1, to each of the parameters of a new Color variable.
Like this:
Color randomColour = new Color(
    Random.value,
    Random.value,
    Random.value
    );
Randomising colours in this way, as opposed to using the built-in Random Color HSV function, generates colours that are generally more vivid, but that can also include Black and White.
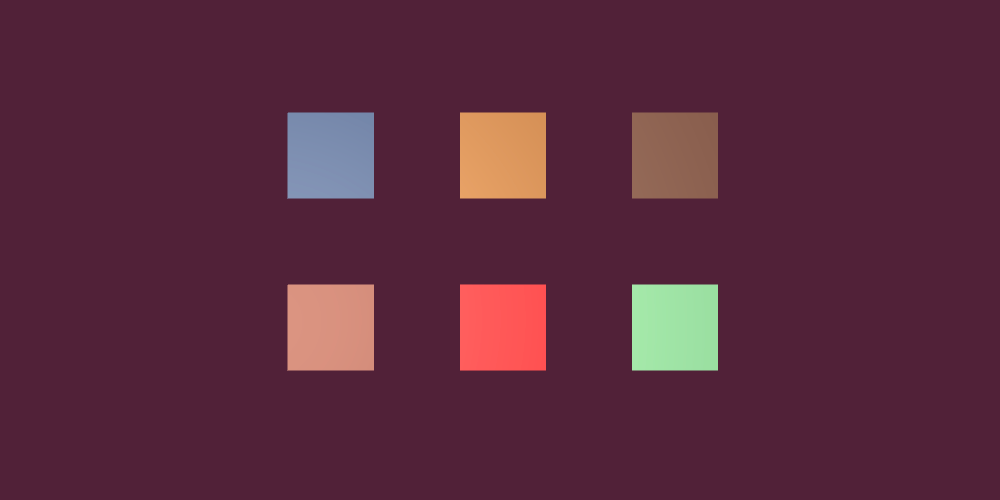
Randomising RGB values instead of using the built-in Color HSV function usually creates less washed-out or dark colours.
This is useful for creating random colours that can include Black and White, but with an equal chance alongside other colours.
Picking a random item from a List in Unity
While the Random Class in Unity is useful for creating variation, you can also use the random numbers it generates to make probability-based decisions.
For example, you can use Random to choose an item from a list, make weighted decisions or test if an action succeeds or fails based on a probability percentage.
For example, using a random number to choose an element from an Array, such as a list of names, for example, is fairly straightforward.
It works by generating a random number between 0 and the Length of the Array, and using it as an Array index number.
Like this:
public string[] names;

void Start()
{
    int randomIndex = Random.Range(0, names.Length);
    string randomName = names[randomIndex];
    print("Good morning " + randomName);
}
This works because the last index of an Array is one lower than the value of its Length so, because the range of random integers is exclusive, it won’t overshoot.
Choosing a random element from a List works in the same way, by using the List’s Count as an upper limit instead of Length.
Like this:
public List<string> names = new List <string>();

void Start()
{
    int randomIndex = Random.Range(0, names.Count);
    string randomName = names[randomIndex];
    print("Good morning " + randomName);
}
However, when using a List, you also have the option of removing an element once it’s been selected.
This is because Lists, unlike Arrays, can be dynamically resized.
Which means that, by taking an option out, you can create a random selection process that works through all of the available options, until there aren’t any left.
Like this:
public List<string> names = new List <string>();

void PickName()
{
    if (names.Count > 0)
    {
        int randomIndex = Random.Range(0, names.Count);
        string randomName = names[Random.Range(0, names.Count)];
        print("Good morning " + randomName);
        names.Remove(names[randomIndex]);
    }
    else
    {
        Debug.Log("The list is empty: ");
    }
}
This works by using the same index to read and remove the List element, until there are none left.
Selecting an item randomly from a List is useful for picking an element from a range of options, equally.
However, what if you want to select an item based on probability, where one item is more likely to be picked than another?
Weighted random decisions in Unity
Generally speaking, there are two main approaches to making weighted decisions in Unity.
Which one you use will depend on what it is you’re trying to do.
For example, one method is to determine a probability percentage that an item can be chosen and then check against it.
Managing loot drop probability in Unity
In Unity, basic probability can be created by deciding how likely something is to happen, expressed as a percentage, and then simply checking against it with a random number.
This is useful for creating loot drops, for example, where there’s a chance that an item could be dropped, but also a chance that you could get nothing.
So how does it work?
Let’s say, for example, you created a Loot Item Class, in which each item has a Drop Chance, which is the likelihood, out of 100, that it will be dropped when an enemy is defeated.
Like this:
public class LootItem
{
    public string itemName;
    public int dropChance;

    public LootItem(string newItemName, int newItemDropChance)
    {
        itemName = newItemName;
        dropChance = newItemDropChance;
    }
}
You could use a random number between 1 and 101 (which, when using integers, includes 100 but excludes 0) to check if that item was dropped.
Like this:
List<LootItem> loot = new List<LootItem>();

void Start()
{
    loot.Add(new LootItem("Common Item", 80));
    loot.Add(new LootItem("Rare Item", 30));
    loot.Add(new LootItem("Legendary Item", 10));

    // Gets the dropped item
    LootItem droppedItem = GetDroppedItem();
}

LootItem GetDroppedItem()
{
    int randomNumber = Random.Range(1, 101);
    List<LootItem> possibleItems = new List<LootItem>();

    foreach(LootItem item in loot)
    {
        if(randomNumber <= item.dropChance)
        {
            possibleItems.Add(item);
        }
    }

    if (possibleItems.Count > 0)
    {
        LootItem droppedItem = possibleItems[Random.Range(0, possibleItems.Count)];
        return droppedItem;
    }
    Debug.Log("Nothing was dropped");
    return null;
}
This works by checking which of the droppable items are eligible, by comparing each of the items’ drop chance against the random number that was selected.
For example, a random number of 50, could return a common item, whereas 90 will return nothing.
However, a low value, such as 5, could return a common item, a rare item, or a legendary item.
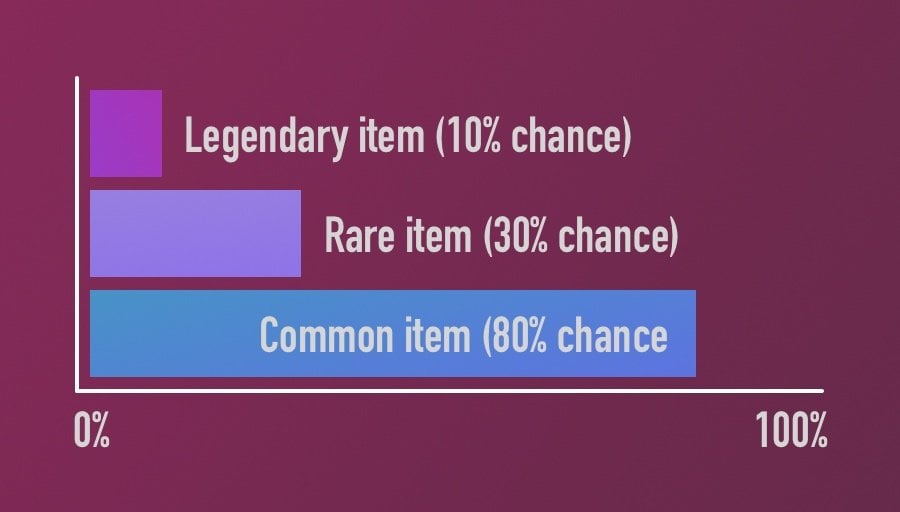
You can use probability to decide if a player gets a reward or nothing at all.
In this example, when more than one item can be dropped, one of the possible choices is then returned at random.
However, you could choose instead to let the player have all 3 items or just the best one, by sorting the remaining results.
This method of determining probability is useful for deciding how likely it is that something should happen.
There’s a probability that it could happen, and an item could be dropped, but there’s also the possibility that the player gets nothing.
Weighted choices, on the other hand, are typically relative probabilities.
The chance of one thing happening is balanced by the weight of an alternative option.
So how can you make weighted random decisions in Unity?
Random weighted options in Unity
Choosing between weighted options in Unity works in a similar way to checking against probability.
Except that, instead of checking against a percentage chance that an option will be picked, an option’s weight is relative to the other options alongside it.
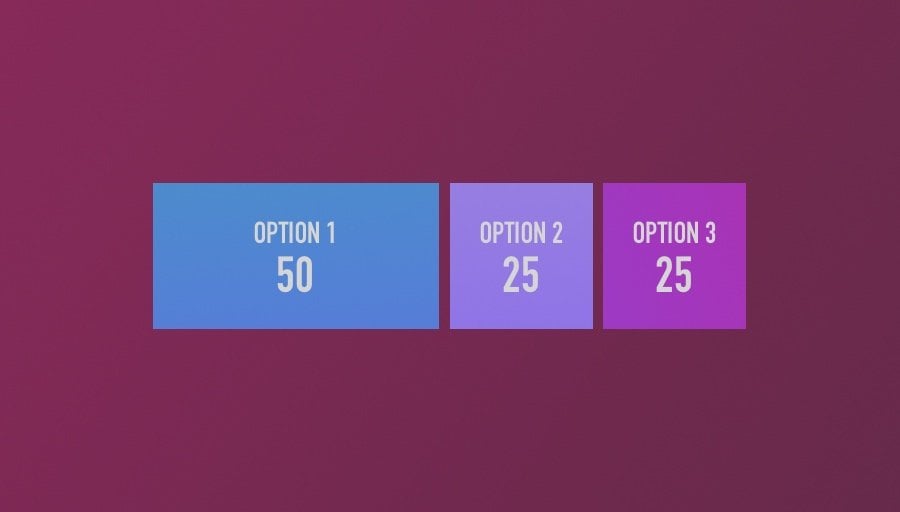
Weighted options are more or less likely to be picked based on the weight of other options.
This means that, instead of a total of 100%, the total value against which a probability is checked is the sum of all of the options’ individual weights.
So how does it work?
In this example, each Choice is an individual class, containing a string for its name and a Weight.
Which looks like this:
public class Choice
{
    public string choiceName;
    public int weight;

    public Choice(string newChoiceName, int newChoiceWeight)
    {
        choiceName = newChoiceName;
        weight = newChoiceWeight;
    }
}
For this to work, the total weight of all of the options needs to be known before choosing from them.
So you may wish to keep track of the weight of each choice as it’s added to the list.
Like this:
List<Choice> choices = new List<Choice>();
int totalWeight;

void Start()
{
    choices.Add(new Choice("Choice 1", 2));
    choices.Add(new Choice("Choice 2", 2));
    choices.Add(new Choice("Choice 3", 1));

    foreach(Choice entry in choices)
    {
        totalWeight += entry.weight;
    }
}
Then, to choose an option, simply generate a random number between 1 and the total weight plus 1 (to include the highest value) and seek through each option, adding up the weight as you go.
For each entry in the list, if the random number that was generated is less than the weight of the current option, plus the sum of any options before it, that’s the one to return.
Which looks like this:
List<Choice> choices = new List<Choice>();
int totalWeight;

void Start()
{
    choices.Add(new Choice("Choice 1", 2));
    choices.Add(new Choice("Choice 2", 2));
    choices.Add(new Choice("Choice 3", 1));

    foreach(Choice entry in choices)
    {
        totalWeight += entry.weight;
    }

    // Returns a choice
    Choice selectedChoice = ChooseFromOptions();
}

Choice ChooseFromOptions()
{
    int randomNumber = Random.Range(1, totalWeight + 1);
    int pos = 0;

    for (int i=0; i < choices.Count; i++)
    {
        if(randomNumber <= choices[i].weight + pos)
        {
            return choices[i];
        }

        pos += choices[i].weight;
    }

    Debug.Log("nothing to choose from");
    return null;
}
Weighting available options like this works well when one choice must be selected, but the probability of each entry isn’t supposed to be equal.
Now it’s your turn
Now I want to hear from you.
How are you using randomisation in your game?
Are you using minor variations to tweak colours and positions, or complex algorithms to generate worlds based on seed values?
And what have you learned about random values in Unity that you know others will find useful?
Whatever it is, let me know by leaving a comment.



Comments
Thank you for this and the other articles. I have learned so much. You are better than any book on Unity. Keep up the good work and thanks again.
Thanks so much!
Amazing article! I have learned so much. Many thanks!
Thank you!
Very nice writeup!
In the section “Random weighted options in Unity”, I would like to know how to hook up a GameObjects array to the selected choice that comes out of the code.
If I have an array of GameObjects in my Unity inspector that I want to spawn based on the weights specified in the Choice class, how does that all get hooked up?
One method would be to put a reference to a Game Object inside the Choice class. Depending on how you’re generating the data for each option, you may want to make the Choice class serializable and make the list public so you can manually add entries.
Like this:
Nice article!
To find a random number different from the last, a more direct way would be this:
randomNumber = (lastNumber + Random.Range(1, 10)) % 10;
Thanks for the tip!
this really helped thank you
You’re welcome!
Please? help me search the error?
private int age;
void Start(){
Debug.Log(GenerateRandAge());
}
private int GenerateRandomAge(){
age = Random.Range(1/101);
}
In the Random Range function, you’re using a forward slash where a comma should be. Also, GenerateRandomAge returns an int but you’re not returning a value, you’ll need to either change the return type to void (in which case put ‘age’ in your debug log message) or add ‘return age;’ to the end of the function.
Hope that helps.
I don’t know but I have a problem ,When I put random.range it shows me an error I tried all ways but it doesn’t work for me , Can you help me please
I’ll help if I can. What error are you getting?
I am trying to understand the Random Weighted Options in unity example.
Does the ordering of the choices effect the outcome of what choice is selected?
Do we have to order the choices by their weight from high to low as a result to fix this?
So the order should not affect the likelihood of an item being dropped. In that example, unless I’ve made a mistake, it generates a scale that is the total of all weights, and then picks a random point on the scale. As it checks through each item it adds its weight to a total (so basically just working through the scale).
My worry was that say for example we keep the same choices and weights used in your example. If the random number generated is 3. The order of the choices would determine which choice is selected.
Because the math would run as follows.
1st iteration: is 3<= 2. Answer no.
2nd iteration: is 3<=4 (4 being the sum of both choices 1 and 2). Answer yes therefore selected is Choice 2.
However if we flip the choice order so that our choices now run as Choice 1, choice 3, choice 2, the math would run as follows.
1st iteration: is 3<=2. Answer no.
2nd iteration: is 3<=3 (3 being the sum of both choices 1 and 3). Answer yes therefore selected is choice 3.
The only differing factor here is in what order the choices are placed in the list, yet the outcome of what choice is selected changes.
That’s right, in that sense the order does make a difference, but it doesn’t affect the probability of that choice being selected.
Nice article! Just noticed a small issue in the code:
“`cs
public List names = new List ();
void PickName()
{
if (names.Count > 0)
{
int randomIndex = Random.Range(0, names.Count);
string randomName = names[Random.Range(0, names.Count)];
print(“Good morning ” + randomName);
names.Remove(names[randomIndex]);
}
else
{
Debug.Log(“The list is empty: “);
}
}
“`
On line 8, I think you might want to use the `randomIndex` variable instead of calling `Random.Range` again — otherwise, you might print one name and remove another.