
Loading a new Scene in Unity can be very straightforward, requiring only a single line of code.
However,
Despite being simple to do, the best technique for loading new Levels will vary depending on how you want to do it.
For example, you may want to display a loading screen, a progress bar, or show tips or other information while the player waits for a Level to load.
Likewise, how you structure your game may affect how you load and move between Scenes.
If your game is small, you might only need a few different Scenes.
However, if you’re making a larger game, you might need to split your game, and even each level, into many different Scenes.
There is no one size fits all, but understanding the different options that are available to you, and seeing examples of how to actually use them, can make it much easier to pick the right method of moving between Scenes for your game.
Which is exactly what you’ll learn in this article.
What you’ll find on this page:
- How to load a new Scene in Unity
- Load the next Scene in order
- Load Scene vs Load Scene Async
- How to make a Loading Screen in Unity
- How to make a Loading Progress Bar
- How to fade the Loading Screen
- Example 1: The Prefab Method
- Example 2: The Persistent Method (using Don’t destroy on load)
- Example 3: The Loading Scene Method
- How to pass data between Scenes in Unity
First, let’s start with the basic method of loading a new Scene in Unity
How to load a new Scene in Unity
To load any Scene from a script in Unity, first, you’ll need to make sure that the Scene you want to load is included in the build.
Otherwise, if the Scene hasn’t been added to the Build Settings, or the Asset Bundle hasn’t been loaded, none of this will work and the Scene won’t load.
To check, select File > Build Settings and, if you can’t see the Scene listed, simply drag it to the list of Scenes from the Project View.
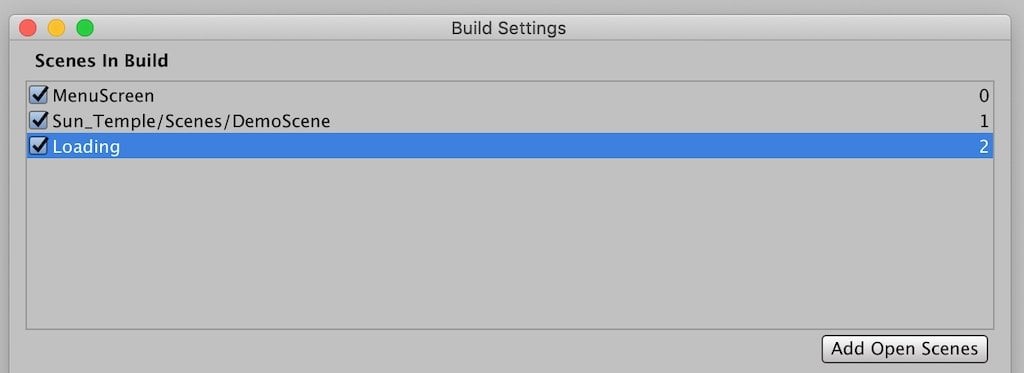
Remember to add the Scene you want to load to the build, otherwise, none of this will work.
Next, you’ll need to add the Scene Management namespace to any script that you want to load Scenes from.
Simply add “using UnityEngine.SceneManagement;” with the other using directives.
Like this:
using System.Collections;
using System.Collections.Generic;
using UnityEngine;
<strong>using UnityEngine.SceneManagement;</strong>
This will allow you to use functions from the SceneManager class.
Finally, to load a new Scene, call the Load Scene function, passing in the name of the Scene you’d like to load.
Like this:
SceneManager.LoadScene("DemoScene");Alternatively, you can use the Scene’s index instead.
Like this:
SceneManager.LoadScene(1);If you don’t know the index of the Scene you want to load, you can look it up by opening the Build Settings. You can also reorder Scenes to change their index number.
Loading by a Scene’s index can be especially useful if you want to load Scenes in order; For example, if you want the player to proceed to the next Scene in the list at the end of each level.
If it suits the structure of your game, loading the next Scene instead of a specific Scene can be easier to manage, as you won’t need to explicitly name the Scene to be loaded.
So how do you load the next Scene on the list?
How to load the next Scene in Unity
To load Scenes in order, i.e. load whatever Scene is next on the list after the current Scene, all you need to do is get the current Scene index and add 1.
Simple, right?
Here’s what it looks like in scripting:
using System.Collections;
using System.Collections.Generic;
using UnityEngine;
using UnityEngine.SceneManagement;

public class LoadScene: MonoBehaviour
{
    public void LoadNextScene()
    {
        SceneManager.LoadScene(SceneManager.GetActiveScene().buildIndex + 1);
    }
}
All this does is get the index of the active Scene and increment it by one, which is ideal for advancing to the next Scene at the end of every level.
Keep in mind, however, that this only really works when your game structure allows for it (i.e. players are meant to experience every Level in order) and only when each Scene is in the correct order in the build list.
Because of this, you’ll need to be careful to avoid accidentally reordering Scenes in the Build Settings.
However…
This can also be a benefit.
While you will need to be careful to keep the Scenes in the order you want them, it also means you can move Scenes to a different position very easily.
When using this method, changing the order of Scenes in your game is as easy as reordering the build list.
Load Scene vs Load Scene Async
There are two different methods available for Loading a scene.
Load Scene and Load Scene Async.
So what’s the difference?
Load Scene, as used in the earlier example, loads the Scene directly with loading taking place during the next frame:
SceneManager.LoadScene(sceneToLoad);While the Scene loads, the game will freeze.
Music and audio will continue to play but the game will be unresponsive until the load has finished.
Depending on the amount of time that’s required to load the next Scene, this pause can give the impression that the game has crashed, unless you hide the pause with a Loading Screen (more on that later).
However, it’s also possible to load the next Scene in the background, asynchronously, while still allowing the game to run, using Load Scene Async.
Load Scene Async works in a similar way to Load Scene, except the loading takes place as a background operation and is spread over multiple frames:
SceneManager.LoadSceneAsync(sceneToLoad);There are a few reasons that you might want to do this.
For example, you might want to keep the current Scene running until the new Scene is ready.
Or, if your loading screen includes animated elements, such as tooltips or a loading icon, these can only work when loading the Scene in the background.
Also, as an Asynchronous Operation, you have the option to check when the loading has finished using AsyncOperation.isDone. You can even get the current progress of the load, which is useful when making a loading progress bar.
How to get the Load Scene Async progress
To access the progress of the load, cache a reference to the Asynchronous Operation when you call it.
Like this:
AsynchronousOperation loadingOperation = SceneManager.LoadSceneAsync(sceneToLoad);You can then access the operation’s properties.
For example the progress:
float loadProgress = loadingOperation.progress;Which returns the progress of the load as a float value between 0 and 1.
Or to check if loading is finished.
Like this:
if(loadingOperation.isDone)
    {
        // Loading is finished !
    }
These additional properties are only available when using Load Scene Async.
Why does Unity still freeze and stutter when using Load Scene Async?
Load Scene Async, while described as a background operation, is still a heavy task to perform.
You may find that it will still cause the game to stutter or even freeze while loading takes place.
However…
If this is happening in your project, you might not actually have an issue.
Loading a new Scene in the editor will bring most Scenes, even very basic ones, to a complete halt.
However, if you build the project first you’ll find that the loading process, and speed, is significantly better than when previewing it in the editor.
So, if you’re having issues with how smoothly your Scenes load, and you haven’t tried building your project yet, try running a finished build first.
This will help you to get an idea of what the loading process is actually like in your game.
How to make a Loading Screen in Unity
Regardless of which loading method you use, it’s often a good idea to use a Loading Screen to disguise the loading process.
And while you may prefer to avoid Loading Screens altogether, every game needs to load something at some point and using one can make the experience of transitioning between menus and levels much smoother.
So what should you add to your Loading Screen?
In its most basic form, you’ll need something to cover the screen with that can also be used as a background for a loading message or other information.
For example, a UI image, set to black and stretched to fill the screen, works well for this:
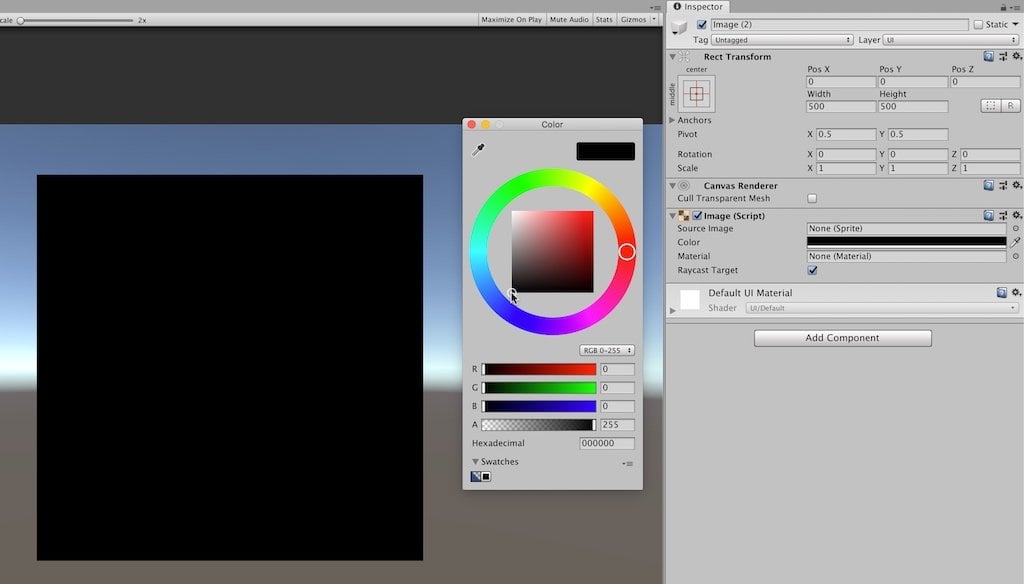
Add a UI Image to act as a background for your Loading Screen.
Better yet, why not add a custom image that sets up the Level that’s being loaded.
Here I’ve used an in-game image of the Sun Temple asset that I’ve been using to test with, with a faded area at the bottom to leave some space for messages.

Using a custom background image can help set the scene for the Level that’s being loaded.
Speaking of messages, there should be something to indicate that loading is taking place.
Why?
The point of using a Loading Screen at all is to communicate that the game has not, in fact, crashed. So it’s a good idea to include some sort of indicator that there is something going on behind the scenes.
This could be a simple “Loading” message or some kind of animated icon.

I added a Text object and a rotating Image to make this loading message.
While an animated icon tells you that the game is loading, a progress bar or a percentage display is a great way to show how much of the Level is loaded.
So how do you do that?
How to make a loading Progress Bar in Unity

Here’s how to make a loading Progress Bar in Unity.
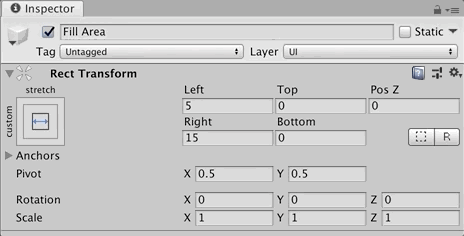
1. Set up a Slider to act as a Progress Bar:
- Create a UI Slider

- Remove the handle
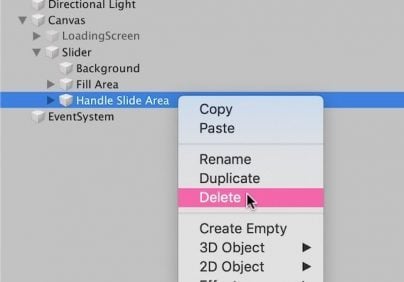
- Set the left and right values in the Rect transform to zero on both the Fill Area object and the Fill object
2. Load the Scene Asynchronously
- When loading the Scene use Load Scene Async, otherwise this won’t work
- Cache a reference to the Asynchronous Operation when you call it, like this:
public string sceneToLoad;
AsyncOperation loadingOperation;

   void Start()
    {
        loadingOperation = SceneManager.LoadSceneAsync(sceneToLoad);
    }
3. Update the Slider during the load
- Get a reference to the Slider (remember to add using UnityEngine.UI; to the script)
- Get the loading progress, which is a float value between 0 and 1 (using AsyncOperation.progress)
- Using Mathf.Clamp01, convert the progress to a value between 0 and 0.9, like this:
public string sceneToLoad;
AsyncOperation loadingOperation;
Slider progressBar;

 void Start()
    {
        loadingOperation = SceneManager.LoadSceneAsync(sceneToLoad);
    }

void Update()
    {
        progressBar.value = Mathf.Clamp01(loadingOperation.progress / 0.9f);
    }
Why do you need to convert the progress to value between 0 and 0.9f?
This is because the loading operation’s progress is only measured up to 0.9, with the last 0.1 being used for activation (which won’t be visible on the Slider).
Doing it this way means the bar will fill up completely.
For a really good explanation on how this works, try Brackeys’ video (Youtube).
Keeping the final value between 0 and 1 makes it a little easier to also convert the loading progress to a percentage, which is useful if you’d like to display a percentage value as well.
Display the load progress as a percentage
To display the load progress as a percentage, just like before, when creating the Progress Bar, take the Async Operation Progress value and convert the value to a float between 0 and 0.9:
float progressValue = Mathf.Clamp01(loadingOperation.progress / 0.9f);Then, to display it as a percentage, simply round the value, multiplied by 100, to the nearest integer.
Like this:
public String sceneToLoad;
AsyncOperation loadingOperation;

public Text percentLoaded;

    void Start()
    {
        loadingOperation = SceneManager.LoadSceneAsync(sceneToLoad);
    }

    void Update()
    {
        float progressValue = Mathf.Clamp01(loadingOperation.progress / 0.9f);
        percentLoaded.text = Mathf.Round(progressValue * 100) + "%";
    }
How to fade the Loading Screen
Fading in the Loading Screen is a great way to smooth out the transitions between screens.
But, while single UI elements can be faded by setting the Alpha of their Canvas Renderer, chances are your Loading Screen is made up of multiple elements.
Luckily, there’s a simple solution.
A Canvas Group component makes it easy to apply settings to a number of UI elements all at once.
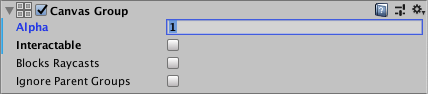
Control multiple UI elements with a Canvas Group
For example, to create a Loading Screen you might use multiple UI objects, such as a background image, some text and a slider.
Using a Canvas Group makes it easy to apply the same settings to all of those objects, so long as they’re Child objects of the Parent Loading Screen.
To fade the screen, Lerp the Canvas Group Alpha value between 0 and 1 in a Coroutine.
Like this:
public CanvasGroup canvasGroup;

    void Start()
    {
        StartCoroutine(FadeLoadingScreen(2));
    }

    IEnumerator FadeLoadingScreen(float duration)
    {
        float startValue = canvasGroup.alpha;
        float time = 0;

        while (time < duration)
        {
            canvasGroup.alpha = Mathf.Lerp(startValue, 1, time / duration);
            time += Time.deltaTime;
            yield return null;
        }
        canvasGroup.alpha = 1;
    }
When fading during loading, just as with other animation, you’ll need to use Load Scene Async.
That is, if you want loading to start at the same time as the fade.
However, if you’re using the basic Load Scene method, and you still want to fade the screen, you can.
Just make sure to perform the fade before starting the load.
Make it interesting
Once you know how to build the different elements, it becomes easier to create a Loading Screen that’s unique to your game.
And, personally, I think that it’s worth taking extra time and effort to create a Loading Screen that is engaging, nice to look at or that smoothes out the transitions between menus and levels in your game.
Why?
Because loading is waiting and waiting, even in small bursts, is rarely fun.
And, while it’s inevitable, in many cases at least, to have to wait for some part of your game to load, that doesn’t mean it can’t be a pleasant experience, or informative or, especially in tricky games, a chance to familiarise the player with some of the controls or concepts of the game.
So why not make the most of it.
Adding the Loading Screen to your game (3 examples)
Once you’ve designed a Loading Screen, it’s time to implement it.
And while there’s no one way to do this, there are a few options that may be more or less suitable, depending on the how you organise your game’s structure.
Below are three different options for adding the Loading Screen to your Unity project.
Example 1: The Game Object method (using a Loading Screen Prefab)
This is, potentially, the simplest of the three methods in that it requires very little set up.
You simply create your Loading Screen as you want it, store it as a Prefab, and then add to any Scene that requires a Loading Screen.
Like this:
Using a Loading Screen Prefab makes it easier to manage the object from one place.
using System.Collections;
using System.Collections.Generic;
using UnityEngine;
using UnityEngine.SceneManagement;

public class LoadScene : MonoBehaviour
{
    public GameObject loadingScreen;
    public string sceneToLoad;

    public void StartGame()
    {
        loadingScreen.SetActive(true);
        SceneManager.LoadScene(sceneToLoad);
    }
}
The benefit of this method is that it’s very simple and easy to manage, and any changes to the Loading Screen can be made to the Prefab object.
However, you’ll still need to add the Loading Screen object, and get a reference to it, in every Scene that uses it, which could become difficult to manage.
And while this isn’t necessarily an exclusive problem (after all there will be other objects that are common to every Scene too, such as the player) you may find it easier to manage only a single Loading Scene object in one location.
Such as in the Persistent Method.
Example 2: The Persistent Method (using Don’t Destroy on Load)
This method works in almost the same way as the Game Object method, with one difference.
Instead of using multiple Loading Screen objects (one for each Scene) that all derive from a Prefab, this method uses a single object that is reused for every Scene.
This is made possible by using Don’t Destroy on Load, a function in Unity that prevents an object from being Destroyed when a new Scene is loaded, as is the default.
To use it, call the Don’t Destroy on Load function, passing in the Game Object you want to carry over to the next Scene.
In this case, pass in the Loading Screen Object
Like this:
public void Awake()
    {
    DontDestroyOnLoad(gameObject);
    }
This is useful for creating more complex Loading Scene transitions that continue until after a Scene is loaded.
For example, this jigsaw loading transition from Banjo Kazooie: Nuts and Bolts overlaps both Scenes, starting before and ending after the switch. In Unity, using Don’t Destroy on Load allows you to create similar animations across two Scenes with just one Loading Screen object.

This loading sequence from Banjo Kazooie: Nuts and Bolts overlaps two Scenes. (Source)
In the example below I use the Persistent method to fade in a Loading Screen, before fading the same Loading Screen out again once the new Scene is loaded.
using System.Collections;
using System.Collections.Generic;
using UnityEngine;
using UnityEngine.SceneManagement;

public class SceneLoader : MonoBehaviour
{
    public GameObject loadingScreen;
    public string sceneToLoad;
    public CanvasGroup canvasGroup;

    public void Start()
    {
        DontDestroyOnLoad(gameObject);
    }

    public void StartGame()
    {
        StartCoroutine(StartLoad());
    }

    IEnumerator StartLoad()
    {
        loadingScreen.SetActive(true);
        yield return StartCoroutine(FadeLoadingScreen(1, 1));

        AsyncOperation operation = SceneManager.LoadSceneAsync(sceneToLoad);
        while (!operation.isDone)
        {
            yield return null;
        }

        yield return StartCoroutine(FadeLoadingScreen(0, 1));
        loadingScreen.SetActive(false);
    }

    IEnumerator FadeLoadingScreen(float targetValue, float duration)
    {
        float startValue = canvasGroup.alpha;
        float time = 0;

        while (time < duration)
        {
            canvasGroup.alpha = Mathf.Lerp(startValue, targetValue, time / duration);
            time += Time.deltaTime;
            yield return null;
        }
        canvasGroup.alpha = targetValue;
    }
}
Create a separate Canvas just for your Loading Screen
When using the Persistent method, you may wish to create your Loading Screen on its own Canvas.
The Canvas object stores and displays UI elements for your game. It’s automatically created when you add a UI element and is the parent object for everything that you add to your menu, hud and, in this case, Loading Screen.
However, it’s also possible to create Canvasses manually, that are separate from others in the Scene.
And while creating your Loading Screen on its own Canvas isn’t required for this method, it can make managing it easier.
This is because Don’t Destroy on Load only works at the root level of an object, so it makes sense to separate the Loading Screen Canvas from other UI elements that you don’t want to take through to other Scenes.
Separating the Loading Screen Canvas in this way means you may end up using multiple Canvas objects in your Scene.
To make sure that your Loading Screen Canvas renders above other UI elements, set its Sort Order higher than other Canvas objects.
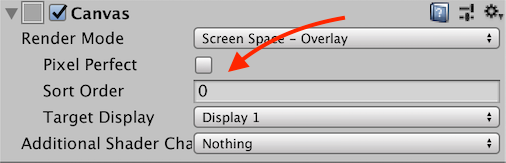
When using multiple canvases in Unity, the Canvas sort order decides which will be displayed on top.
Example 3: The Loading Scene method (using static data)
The Loading Scene Method involves using a dedicated Scene to display the Loading Screen instead of an in-game object.
This method is great for building really complex Loading Screens, with game tips, rotating 3D models, animated visuals etc.
And while you can do all of that with an in-game object, it’s much neater and easier to manage in a separate Scene.
So how does it work?
- Create a Scene, called “Loading” or something similar, and build it just like you would using any other method.
- Then, when you want to load a new Scene, instead of directly Loading the target Scene, transition to the dedicated Loading Scene.
- Inside the Loading Scene, add a script to load the next level of the game as soon as the Loading Scene starts.
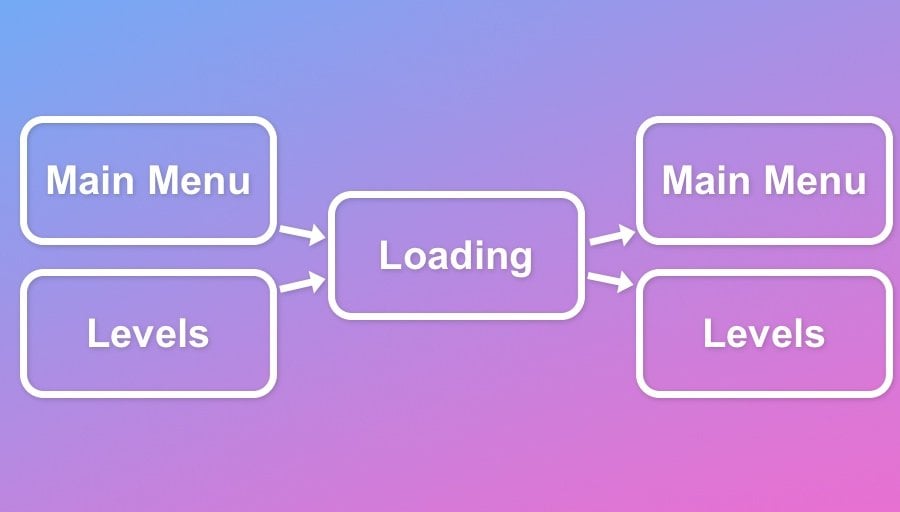
Creating one special Loading Scene can be an easy way to manage Loading Screen objects in Unity.
Simple, right?
Except, there’s a problem.
Assuming that your game is made up of many different Levels, how will the Loading Scene script know which Scene to load next?
Luckily there’s a simple method for passing data to a new Scene when you load it.
How to pass data and variables between Scenes in Unity
There are several options for saving data that can be reused at a later time. For example, Player Prefs or by saving information to a file.
However, for the purpose of transferring data from one active Scene to the next, a Static Class, that’s created solely for passing data when loading, is one of the more appropriate options available.
This involves creating a public static class with public static variables that can be used to store the data that you want to transfer between Scenes.
In this case a static string variable can be used to store the name of the Scene that needs to be loaded next.
Then, when the loading script in the Loading Scene launches, it can read the same value and load the required Scene.
This is helpful because the loading trigger doesn’t need to get a reference to a Loading Screen object or the Loading Data class.
Because it’s a publicly accessible static class, all you need to do is type the class name. Any object can set the value directly for the Loading Screen script to read.
Here’s how to do it:
- Create a new C Sharp script inside your Project View (remember there will not be an instance of this script in any Scene). Call it LoadingData or something similar
- Remove the Start and Update functions, as you won’t need them
- Remove “: Monobehaviour” as static classes can’t derive from Monobehaviour
- You can also remove the “using” directives from the top of the script, as you won’t need them
- Add the “static” keyword between public and class
- Finally, add a public static string variable called sceneToLoad or similar
Your script should now look something like this:
public static class LoadingData
{
    public static string sceneToLoad;
}
In the Loading Screen Scene, create a script on a Game Object to read the Loading Data and load the target Scene.
Like this:
using UnityEngine;
using UnityEngine.SceneManagement;

public class LoadScene : MonoBehaviour
{
    void Start()
    {
        SceneManager.LoadSceneAsync(LoadingData.sceneToLoad);
    }
}
Finally, when you want to trigger a Scene load from the game or from a menu, add the following script, setting the string value to the name of the new Scene you want to load.
Like this:
using UnityEngine;
using UnityEngine.SceneManagement;

public class SceneLoadTrigger : MonoBehaviour
{
    public string targetScene;

    public void LoadScene()
    {
        LoadingData.sceneToLoad = targetScene;
        SceneManager.LoadScene("Loading");
    }
}
This sets the scene name in the static Loading Data class and then immediately loads the Loading Scene which, in turn, reads the scene name and loads the final target Scene.
Like this:

Using a Static Class makes it easy to pass data from one Scene to another, such as the name of the next Scene.
What’s more, this method can be used to display additional information about the loading Scene.
For example, you could configure the Loading Screen to display a custom image or message based on which Scene was being loaded.
Now it’s your turn
How are you loading Scenes in your game?
Do you have many Scenes to deal with, or only a few? And how are you managing them?
Or maybe you’ve got a great tip for loading Scenes in Unity that other people would love to know.
Whatever it is, let me know by leaving a comment below.

John French writes all of the Unity tutorials for Game Dev Beginner, and specialises in deep-dive guides teaching game development basics.

Comments
Simple, good.
Did you ever manage to get LoadAsync smooth?
These fancy loading screens are inspiring but back in Unity 4.7 stutter fest, how is it nowadays in 2017LTS?
I used Unity 2018 to test with and, when building the project first, the async loading was pretty smooth. I imagine 2017 LTS would be similar. However, what’s being loaded, CPU and drive speed will probably affect loading performance massively so your mileage, and everyone who plays the game, may vary massively regardless.
So I loaded scenes async but my application still freezes on the built version, I read somewhere my awake method might be the problem, is there a way I can run the awake method smoothly without having the entire program freeze. I had this issue with my vr project and also my AR mobile project
Are you doing anything in awake that could be stalling the main thread? As you say, it may not be related to scene loading at all.
Thanks a lot for these amazing examples. I was looking for a way to pass parameters from menu screen to loading screen.
You’re welcome!
How could I slow down or speed up how fast the scene loads async? I want to make the loading screen smoother by slowing down how fast it loads the scene but also speed it up if it takes too long or if the user’s hardware isn’t fast.
I’m not sure that’s possible with Unity’s built-in loading operations. I think that you might need to consider what it is you want to load (i.e. mthe next part of a level etc.) and then find the best way to bring that in smoothly. for example, I believe there are assets that can help you load in new areas on demand.
got Fanned(if that’s a word) by a single post, been making games for over 2 years no but there were some things here which were very useful to me, this is the first time I’ve seen a blog/tutorial site where I’ve subscribed (and I’ve seen a lot).
Thanks so much! Glad it helped.
I loved your website tutorial, I am a new game developer in this field, Thanks.
Please whatever you know about unity put it on your website.
Your article is so much clean and easy to follow it
Thanks so much!
I absolutely love these articles. Easy to follow, extremely important/useful information, and very well put-together. Are you going to continue to write these types of articles on this site? I definitely hope so!
hey John, your articles are exceptional! Thank you so much for providing this amazing free resource, your writing has transformed my understanding of designing for and developing with Unity 3D. You’ve made it so much easier to create my first ever Unity VR game this year. Seriously appreciate it!
Thanks so much! I’m really glad that it’s helped you. Best of luck with your game!
I prefer to do it with the “base” scene that contains all the common elements throughout the game (settings, loading screen, etc.). All other scenes are loading asynchronously in additive mode, and the base scene is responsible for loading screen.
Great tip! Thanks.
Oh that’s actually an awesome idea!
do you control where to exactly spawn the next scene?
“Load Scene Async, while described as a background operation, is still a heavy task to perform.
You may find that it will still cause the game to stutter or even freeze while loading takes place.”
Actually, it’s because Unity’s implementation is horrible and quite amateur in its implementation. It’s barely Asynchronous at all.
Synchronous holds the thread up until it’s completely loaded, Async breaks that down into a 5 or a dozen chunks where it frees up the thread just a few time. This is of no use where anything smooth is needed during loading.
AAA titles have far heavier loading and can manage silky smooth animations during loading of assets.
Thanks, this was a really well written, informative piece for both novices and advanced users. You saved me a lot of time!
Thank you! Glad it helped.
From Unity’s documentation:
public static SceneManagement.Scene LoadScene(string sceneName, SceneManagement.LoadSceneParameters parameters);
Please explain “parameters”. Can we use them to pass information to the scene that is being loaded?
Your article nicely explains the use of a static variable, but it would be so much cleaner if we could just pass information through the LoadScene statement itself.
I believe that the parameter that’s referring to is the Load Scene mode. Whether to load it additively or not (i.e. combine multiple scenes). https://docs.unity3d.com/ScriptReference/SceneManagement.LoadSceneParameters-ctor.html
Great article – full of useful tips and instructions. Good job!
Thanks Alex!
Hi. Just wanted to say that I’m a total beginner and figuring out how to link scenes has been killing me for days. This blog post was so informative and demystified scripting for me a lot. I still don’t know anything, but I’m a lot less intimidated than I was. Do you have a “virtual tip jar” of some kind?
Really glad to hear it helped you!
Great article & site. Very helpful to have the material in a written format. I would purchase if there was an option to. Thanks
Thank you!
Great article. Thank you.
You’re welcome!
Thanks for great information. Since we waited until the scene loaded, we loaded next scene. But we didnt delete the previous scene in example. How can we remove the previous scene when we loaded async?
As I understood it, the scene should be unloaded when the new one finishes loading. But I’ll look into this and update the article.
In the meantime, it’s possible to unload unused assets and unload a specific scene manually.
Can you do something on When/where to use separate scenes? My game is pretty simple and I don’t think it NEEDS scenes, But I guess that’s what’s normally done
Noted. I have noticed that some people find it much easier to only use a single scene, so if your game is more suited to that then I’d suggest trying it.