
A lot of the time, audio in Unity takes care of itself, often requiring less optimisation than other areas of performance, such as graphics for example.
But… as your project becomes more and more ambitious and begins to grow in size, the amount of audio in your Scene can start to have an impact on performance, especially when using large Audio Clips, heavy audio effects and a lot of Audio Sources all at once.
So, to help you get the most audio performance from your game, here are my 10 best Audio Optimisation tips for Unity.
Let’s go!
- Learn how to use the Audio Profiler
- Use Force to Mono for 3D sounds
- Understand Max Real and Virtual Voice limits
- Manually pause unused Audio Sources
- Use Audio Source Priority correctly
- Match the right Load Type with the best Compression Format
- Use Load in Background for non-essential sounds
- Use Preload Audio Data to save memory
- Disable Audio Source Components instead of using Mute
- Look out for Unity’s new DOTS based audio system
1. Learn how to use the Audio Profiler
You probably already know about the Profiler in Unity.
It’s a special window in the editor that allows you to monitor and debug how your game is using resources.
You may also know that, within the Profiler, is a module that’s dedicated to Audio. It can be used to monitor:
- How many Audio Sources are Playing
- How many Audio Sources are Paused
- The total number of Voices
- The number of Audio Clips being used
- The amount of memory being used for audio
- The Audio thread CPU usage
This is incredibly useful for working out the impact of your game’s audio on performance.
But did you know you can also use the Audio Profiler to debug and monitor individual Audio Sources?
With the Audio Profiler selected, click the dropdown labelled ‘Simple’ and switch to the ‘Detailed’ view (in older versions of Unity, the detailed tabs are already visible).
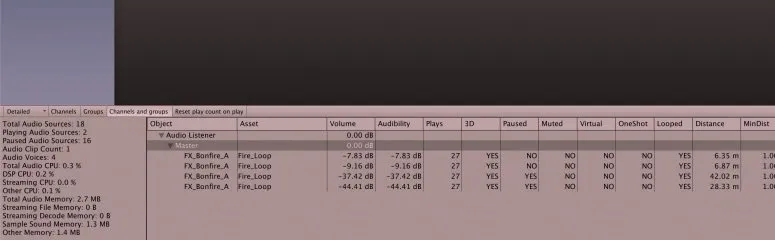
The Audio Profiler is useful for debugging Audio Sources.
You’ll be able to view the details of every (currently) playing sound in the scene. For example: if the audio is playing or not, if it’s virtualised, the time position of the Audio Clip, as well as distance related information that affect how audible the sound is.
This is incredibly useful for debugging Audio Sources to see if they’re working as you expect them to, or to check if sounds are being virtualised or paused for optimisation (more on that later).
Probably the most useful feature, however, is simply the ability to debug if sounds are playing at all.
Should a sound have played? Did it actually play? Did you miss it or is it just too far away to hear? Is there a mistake in the script you just wrote?
To check, select the Audio Profiler’s Channels tab to view every currently playing sound, along with the total number of plays (remember to select Reset Play Count on Play to avoid any confusion).
The live Profiler only shows currently playing sounds so, if you want to know if a sound has previously played, simply scrub back through the Profiler Timeline to view recent playback information.
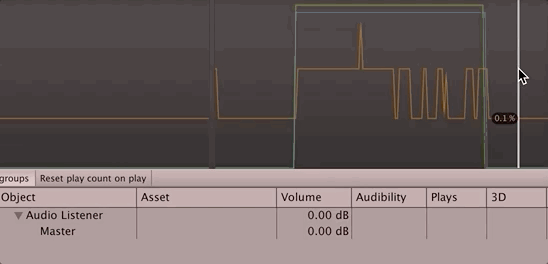
Missed a sound? Just scrub back and see if it played as expected.
It’s sometimes easy to attribute a simple audio issue to another problem. The seemingly innocent Mute Audio button in Unity, for example, is a regular troublemaker (especially as some users have reportedly found it enabled by default). Using the Audio Profiler takes out the guesswork.
2. Use Force to Mono for 3D sounds
In Unity, Audio Sources that are fully 3D (the Spatial Blend is set to 1) are essentially playing back audio in mono.
This is because, even if the Audio Clip is stereo, the two audio channels still originate from the exact same point in world space, in just the same way as a mono, one channel, Audio Clip would do.
Without the left and right separation of the two stereo channels (like with a 2D, or partially 2D sound), there’s no benefit to using a stereo file.
This means, to save memory, it’s best to use mono files for 3D Audio Sources.
But what if you only have stereo clips, or if you’ve been adding stereo audio files to 3D Audio Sources without realising.
While the audio will sound fine, it wastes memory, as a stereo Audio Clip is twice as large in size as a mono clip. So if you use a stereo Audio Clip on a 3D sound source you’ll be using double the memory for no additional benefit.
Fortunately, if you already have there’s an easy solution.
Simply select Force to Mono in the Audio Clip import settings to mix down the stereo clip to a mono file.
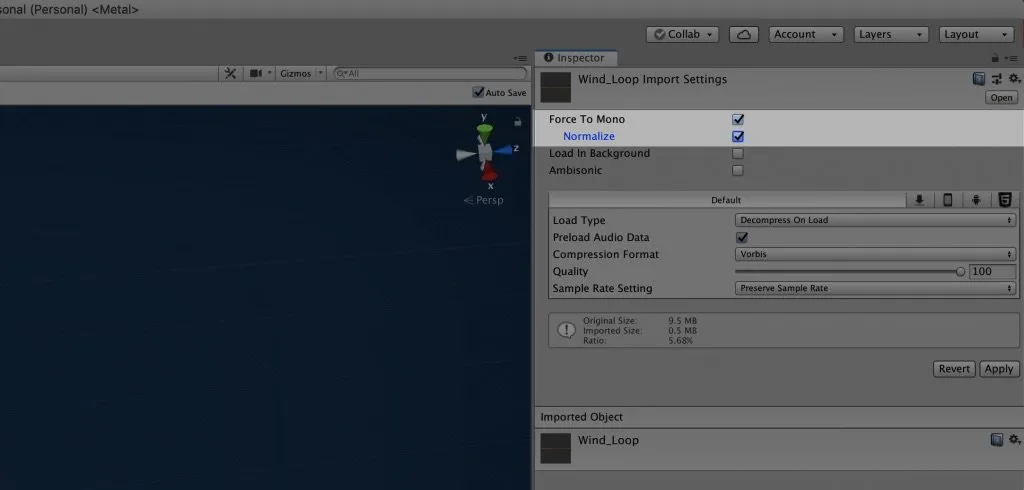
If the clip becomes much louder after down-mixing, deselect Normalize.
Using Force to Mono halves the size of a stereo Audio Clip so, if you’re using multiple 3D sounds, it’s an easy way to make significant performance gains just by changing a setting.
3. Understand Max Real and Virtual Voice limits
In Unity, and in many other applications as well, voices refers to the number of sounds being played simultaneously.
This is slightly different to the number of Audio Sources as each Audio Source can actually support multiple voices when using Play One Shot.
If the voice limit is exceeded, Unity will begin to cull voices based on the Audio Source’s priority. It will do this first by using the actual priority setting on the Audio Source (0 is highest). If the priority level is the same between two Audio Sources then Unity will decide which is heard by how audible the sound is (e.g louder sounds get priority).
What’s the audio voice limit in Unity?
By default Unity limits the number of voices to 32, however, while it used to be a hardcoded limit, it can now be changed in Project Settings > Audio. Where you’ll find options to change the max ‘real’ and ‘virtual’ voice limits.

Previously a fixed limit, you can change the max voice count in the Audio Settings.
What’s the difference between Real and Virtual Voices in Unity?
The real voice limit in Unity refers to the total number of actual audible sounds. For example, if you reduced the real voice limit to one, you would only be able to hear one sound at any one time. Once the real voice limit is reached, additional sounds are prioritised and virtualised.
What is a Virtual Voice in Unity?
Virtual voices are inaudible. They are sounds that continue to run in the background but will not be heard, even if they are within range of the Audio Listener. The benefit of a virtual sound is that it keeps the audio going in the background when there’s not a real channel free to play it. Once there is a spare channel, the virtualised voice becomes a real voice and picks up from the correct position, as if it had been playing this whole time.
If the virtual voice limit is exceeded, the lowest priority sounds will be paused or won’t be started at all. You’ll see a warning in the console if this happens.
What settings should you use?
So when, if at all, should you change the voice limit settings in Unity?
In most cases, unless you’re experiencing issues with the number of voices in your project, you can keep these settings just as they are.
However…
If you do find that voices are being culled you can raise the real voice limit to allow for more simultaneous sounds (up to a maximum of 255).
It’s good practice, however, to keep this limit as low as possible. This is particularly true when developing for less powerful systems, where you should probably keep the maximum real voices to about 40 or fewer. Even with more powerful systems, if you find that you need more than around 80 real voices, it will probably be better to find other methods of optimising the voice count first (source).
It’s unlikely that you will need to raise the virtual voice limit which, by default, is 512. However, if you do need more virtual voices you can increase it all the way to 4095.
Make sure that your virtual voice limit always exceeds your real voice limit, as it refers to the total maximum voices, including real voices.
4. Manually pause unused Audio Sources
While Audio Source virtualisation will usually take care of optimising inaudible sounds for you, it’s also possible to manually pause and unpause Audio Sources that can no longer be heard by the player.
This can be done by checking if an Audio Source is further away than its max distance and, if it is, pausing the Audio Source. The Audio Source can then be unpaused if the Audio Listener comes within audible range again.
Like this:
using System.Collections;
using System.Collections.Generic;
using UnityEngine;

public class CheckIfAudible : MonoBehaviour
{
  AudioListener audioListener;
  AudioSource audioSource;
  float distanceFromPlayer;

  void Start()
  {
    // Finds the Audio Listener and the Audio Source on the object
    audioListener = Camera.main.GetComponent<AudioListener>();
    audioSource = gameObject.GetComponent<AudioSource>();
  }

  void Update()
  {
    distanceFromPlayer = Vector3.Distance(transform.position, audioListener.transform.position);

    if (distanceFromPlayer <= audioSource.maxDistance)
    {
      ToggleAudioSource(true);
    }
    else
    {
      ToggleAudioSource(false);
    }
  }

  void ToggleAudioSource(bool isAudible)
  {
    if (!isAudible && audioSource.isPlaying)
    {
      audioSource.Pause();
    }
    else if (isAudible && !audioSource.isPlaying)
    {
      audioSource.Play();
    }
  }
}
Just add this script to any Audio Source that you want to be optimised.
Why would you want to do this?
Well, normally you wouldn’t need to as virtualisation automatically produces a similar effect, with roughly the same performance benefits.
However…
While Unity intelligently prioritises sounds when the Real Voice Limit is reached, it does very little to optimise the number of voices that are being played when there are actually channels to spare.
For example, if the real voice limit is 32 (the default) and if there are 32 playing Audio Sources in the scene, but only one is actually audible, Unity will play all 32 sounds regardless.
Because it can.
Normally this isn’t a problem as, depending on your load type settings, the processing power required to play 32 Audio Sources is actually pretty low.
But…
If you’ve increased the Max Real Voice limit, the Audio CPU usage will increase. Unity will use all of the channels it can to play back as many sounds as it can, even if it doesn’t actually need to play all of them, all of the time.
This can cause high CPU usage if you’re using a compressed load type for multiple Audio Clips that don’t actually need to be playing (more on Load Types later on)
So, while I realise that this is a niche use case, if you do find yourself increasing the Max Real Voice count, and want to optimise Audio Source prioritisation as much as you can, then this method will help to save some performance at times when fewer voices are required.
5. Use Audio Source Priority correctly
You may already know about Audio Source Priority, which is an Audio Source control that allows you to specify which sounds are more important than others.
It’s used to help Unity decide which sounds should be culled first if the voice limit is reached, which is useful for making sure that essential sounds, such as dialogue, music, player effects and UI sound effects, are never accidentally cut off.
But what’s the best way to actually use it?
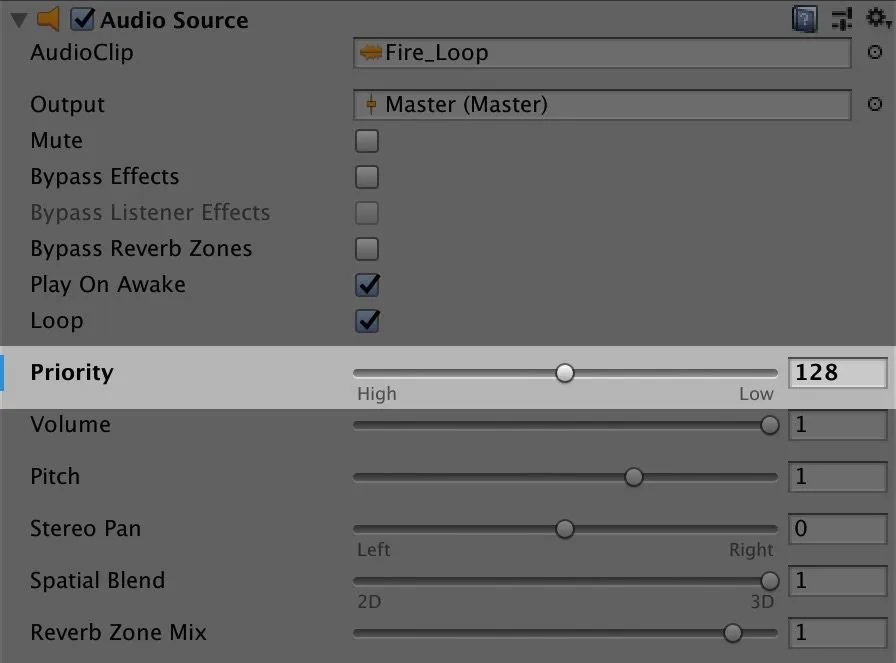
The Audio Source Priority scale goes up to 256, but you may not need that many.
Audio Source Priority takes a value between 0 and 256, where 0 is most important and 256 is least important. In many cases, particularly when you’re unlikely to exceed the voice limit, the default value of 128 is fine to use.
Raising it higher will make no difference if the limit is never reached.
However…
If there’s a chance that the voice limit could be reached or exceeded, setting Audio Source Priority correctly can be vital, while setting it incorrectly can, ironically, lead to the wrong sounds being cut.
How Audio Source Priority works
When Unity needs to virtualise or pause a sound it does so by checking the priority setting first, ranking sounds by their importance, with the least important sounds getting culled.
If two sounds hold the same priority, but one of them still needs to be cut, then the most audible sound will be kept.
How audible a sound is relates to how well you can actually hear the sound, and not necessarily whichever sound is closest or loudest. Unity uses a combination of factors to determine a sound’s Audibility: The Audio Source’s volume level, the distance from the Audio Listener and the Audio Mixer fader level (if one’s being used).

Unity is able to determine which sounds in a scene are more audible than others.
In principle this all makes perfect sense however, in practice, there’s an issue.
Higher priority sounds are always kept over lower priority sounds regardless of how audible they are. This means that, technically, it’s possible for a sound in a distant part of the level, that cannot be heard at all, to be deemed more important than a sound that’s right next to the player at full volume, if that sound has a lower priority ranking.
So how should you actually use Audio Source Priority?
Because Unity already does such a good job of prioritising sounds that are of the same priority by how audible they are, for many sounds, it’s best to leave Audio Source Priority well alone.
While you definitely should increase the priority of certain sounds, such as player sounds and UI effects, it’s a good idea to keep the majority of other sounds on a single priority tier (the default setting for example) so that Unity can intelligently prioritise their importance for you.
The large range of priority values that are available on the 0-256 slider suggest that you should use multiple tiers of importance however, in reality, you may be better off simply using two: A default setting for most sounds and a priority setting for special sounds that you never want to be interrupted.
6. Match the right Load Type with the right Compression Format
For each Audio Clip you can select a platform specific Load Type that changes how the Audio Clip is loaded into memory.
These options balance processing power with memory. Which option you should select depends on what the Audio Clip is going to be used for, and the platform you’re targeting.
Put simply…
- Decompress on Load – Unpacks the Audio Clip data, so it will be stored in memory at its full, original, size.
- Compressed in Memory – Decompresses the Audio Clip at run time, trading memory use for Audio CPU.
- Streaming – Doesn’t load the Audio Clip into memory at all, instead streaming it from disk. This uses the least memory, at the expense of the highest CPU load.
For a really detailed article on different load types and other import settings, try this article on the Gamasutra blog.
Which Load Type offers the best performance?
When using default settings, playing back one Audio Source, here’s how each option compares:
One Audio Source playing a single Audio Clip (default compression settings)
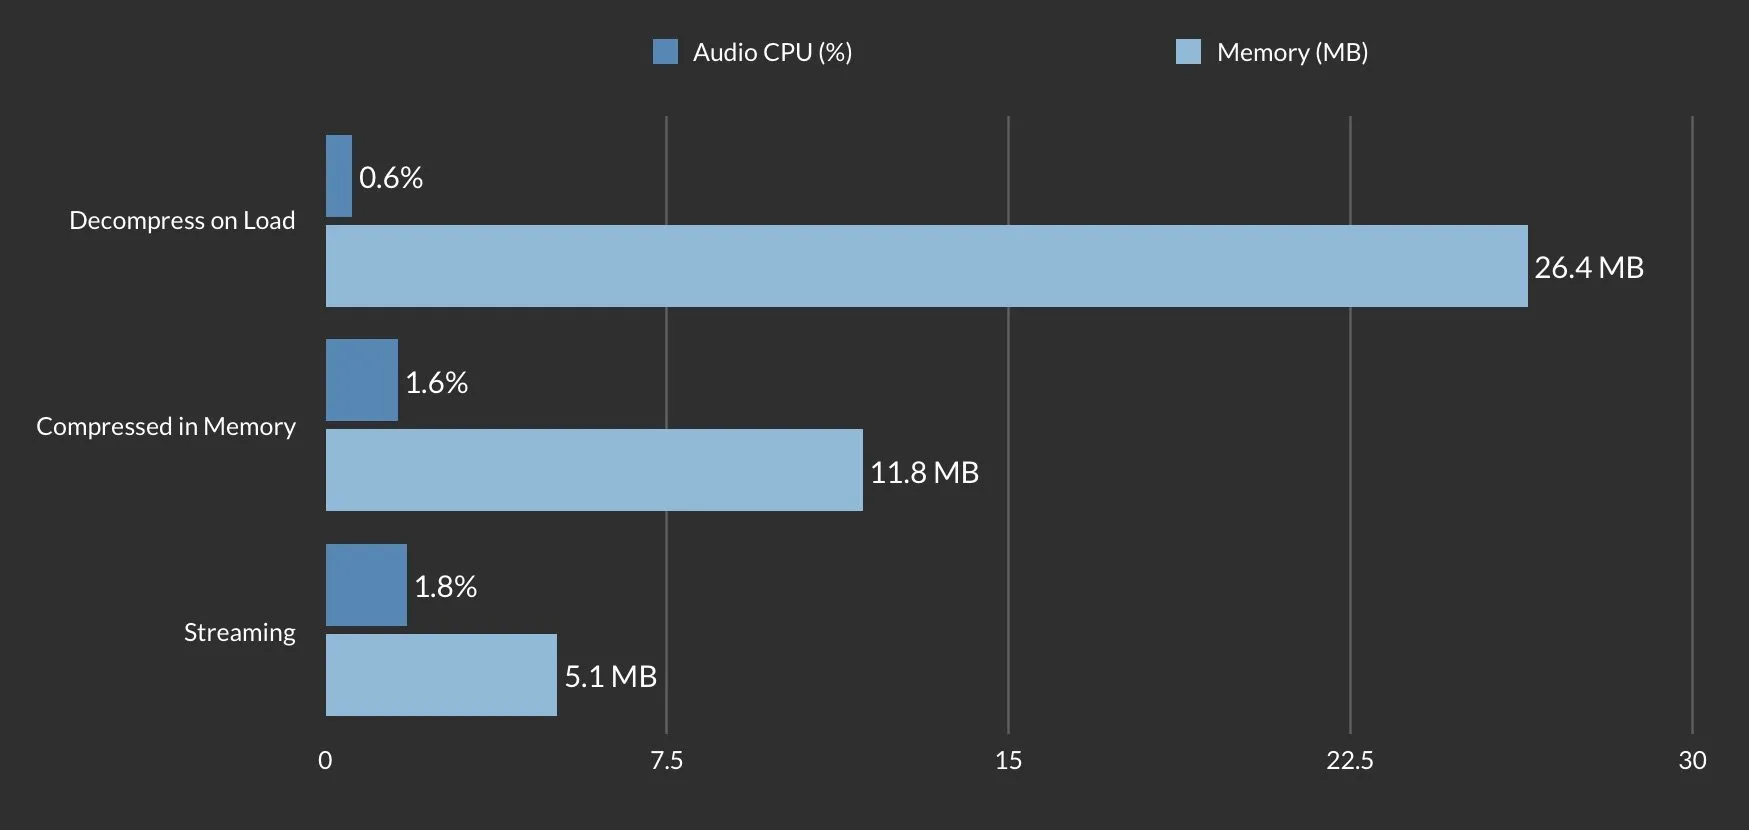
Unity’s different load types allow you to swap CPU overhead for memory.
Generally, each option trades an amount of memory for increased Audio CPU use.
Because of this, I have seen many recommendations to use Decompress on Load for short sounds and to use Compressed in Memory for longer sounds and that, for music, you should use the Streaming option.
This does make sense and, in many situations, it’s good advice
However, there’s just one problem…
When recommendations like this are made out of context it’s easy to ignore other settings that can have a big impact on how well each option actually performs.
And perhaps the biggest of these is which Compression Type to use with which Load Type for the best compression/loading combo.
So, for each of the three Load Types, what’s the best Compression Type to use?
What’s the best Compression Type to use with Decompress on Load?
Usually the default setting, Ogg Vorbis.
The Compression Type you select when using Decompress on Load will have no effect on the amount of memory that’s used in the Scene. It will, however, affect the size of the application itself.
Choosing PCM, for example, will increase the total size of the installed application while using the default OGG Vorbis will reduce it, at the expense of needing to decompress the file when the Audio Clip is loaded.
The additional overhead of needing to decompress the Audio Clip when it is loaded into memory is unlikely to be noticeable, so the default setting is probably best in most cases.
What’s the best Compression Type to use with Compressed in Memory
Using ADPCM is better than OGG Vorbis, unless you’re willing to reduce the quality setting.
Compressed in memory offers fantastic memory savings at the expense of increased Audio CPU load.
But…
How well this works depends on which Compression Type you choose.
For example, choosing Ogg Vorbis (the default option) as the Audio Clip Compression Type offers the greatest memory savings, especially if you’re willing to adjust the quality slider to reduce the size of the Audio Clip even further.
If, however, you would rather leave the quality setting unchanged (at 100), then it may not make sense to use Ogg Vorbis at all. In my tests, choosing ADPCM used less memory than Vorbis at 100 quality and, importantly, used much less Audio CPU to decompress. As always, your mileage may vary however, potentially, ADPCM is a great option for saving some memory, with a much lower CPU hit.
Whatever you do though, just make sure you don’t use PCM with Compressed in Memory. Nothing will break, but PCM is uncompressed audio, so you’d be using the Compressed in Memory option, without the Compressed in Memory benefits.
What’s the best Compression Type to use when Streaming Audio Clips
Use PCM for massive memory savings with almost no increase in Audio CPU load.
Streaming offers the greatest memory benefits, using only a small amount to buffer the file, at the cost of, typically, the highest CPU use of the three options.
Except, there is a way to benefit from Streaming’s huge memory savings without loading the CPU.
Just like with Compressed in Memory, changing the Compression type can reduce the extra Audio CPU use required to decompress the file.
The same works here, as switching to ADPCM will reduce the CPU load significantly, keeping the benefits.
But, with Streaming, that’s not all.
Switching to PCM, the uncompressed Compression Type, dramatically decreases the CPU use, nearly to the same level as Decompress on Load (the lowest of all the options) all while using nearly no memory.
The only drawback here is an increased size on disk.
This makes Streaming a great option for reducing the size of very large files without increasing memory use or compromising on audio quality.
But be careful…
Some users have reported high CPU use on mobile platforms when streaming multiple Audio Clips at once so be mindful of the resources you’re using.
Speaking of mobile…
What’s the best Compression Type to use on mobile platforms?
iOS and Android build platforms also offer MP3 as an option.
In my limited tests, I wasn’t able to find a benefit to using MP3 as, when using default settings, the file size and audio CPU use was higher than both OGG Vorbis and ADPCM. It also has looping issues so I usually strongly recommend against using MP3 at all.
So, for those reasons, my recommendations are the same for mobile platforms.
But, maybe you know something I don’t? Know of a good reason to use MP3 on mobile platforms in Unity? Let me know in the comments below.
7. Use Load in Background for non-essential sounds
Selecting Load in Background moves the loading of Audio Clips off of the main resource thread when loading a Scene, which can improve load times.
Generally speaking, it means that Unity won’t wait for sounds to be fully loaded before starting the Scene, which is the default behaviour.
This means that, even though audio will still take roughly the same amount of time to load, the Scene will start faster.
To demonstrate, I measured the difference in load time when using Load in Background compared to the default settings. In this slightly unscientific experiment, I loaded around 90 Audio Clips (some small, some massive) and a large number of prefabricated models in to an empty scene.
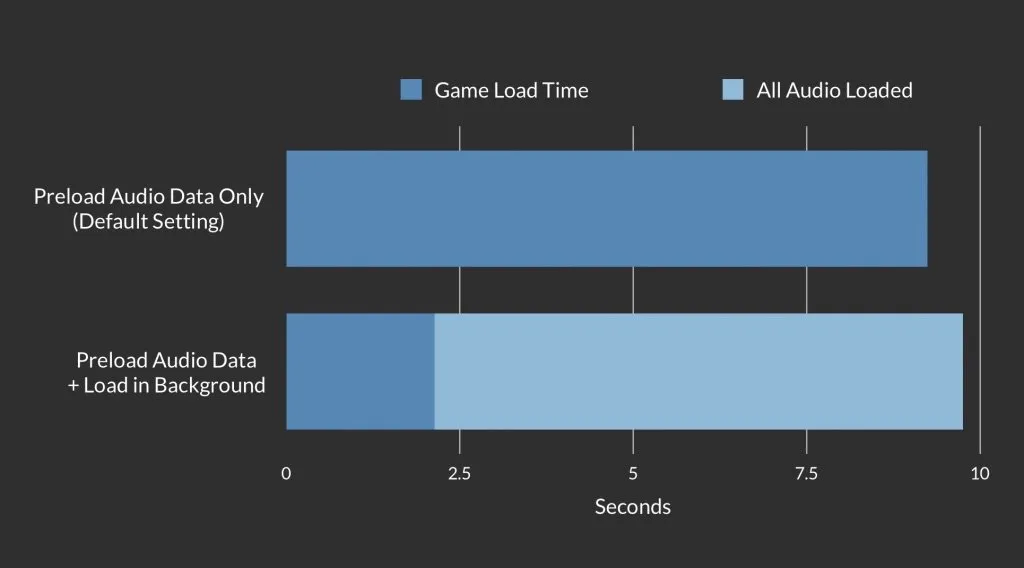
Load in Background doesn’t reduce the time take to load Audio Clips, it just stops Unity from waiting around for them.
The game load time, which I measured from the start of the application to the first Update, is much lower when using Load in Background. While you may want certain sounds to always load in time for the start of the scene (in which case, the default settings are best), using Load in Background for sounds you don’t need right away can help to optimise load times.
The option to Load in Background is found in the Import Settings for each Audio Clip.
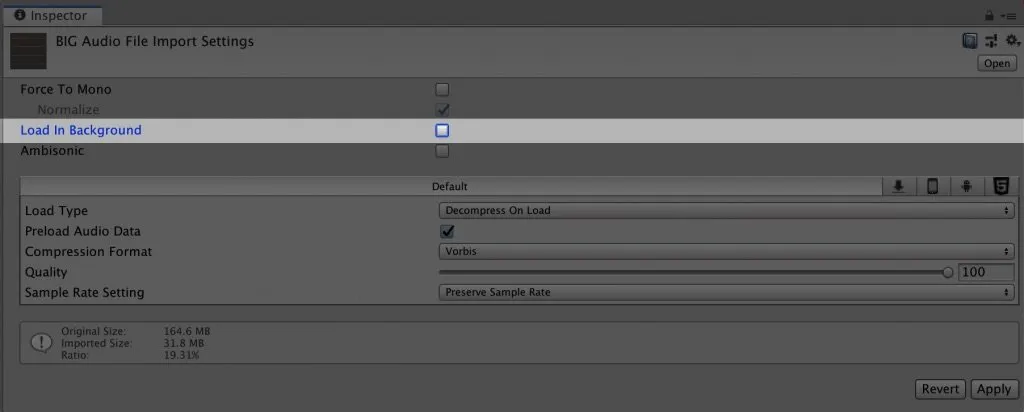
Load in Background is unchecked by default, but can improve loading time.
When should you use Load in Background?
It’s best to use Load in Background when loading multiple or large audio files that aren’t immediately required but do still need to be loaded into memory when the Scene starts.
Examples could include any sound effects in the Scene that won’t play straight away, such as enemy sounds, win condition effects that will occur at the end of the Scene, or even ambience in other areas of the level.
Keep in mind that Load in Background works best when Preload Audio Data is also checked (which it is by default). I was unable to measure any improvement by using Load in Background on its own, which makes sense.
Speaking of Preload Audio Data…
8. Use Preload Audio Data to save memory
Preload Audio Data works much as you might expect it to. It’s a feature to defer loading the audio data of a clip until it’s actually needed.
By default, Unity loads all of the audio sample data with an Audio Clip, but you can change that.
When unchecked, the information about an Audio Clip, such as the clip’s length for example, is still available but the actual audio data is not, which saves memory.
However, there’s a catch. Triggering an unloaded Audio Clip to play will cause a noticeable delay while Unity loads the audio data.
How does Preload Audio Data work
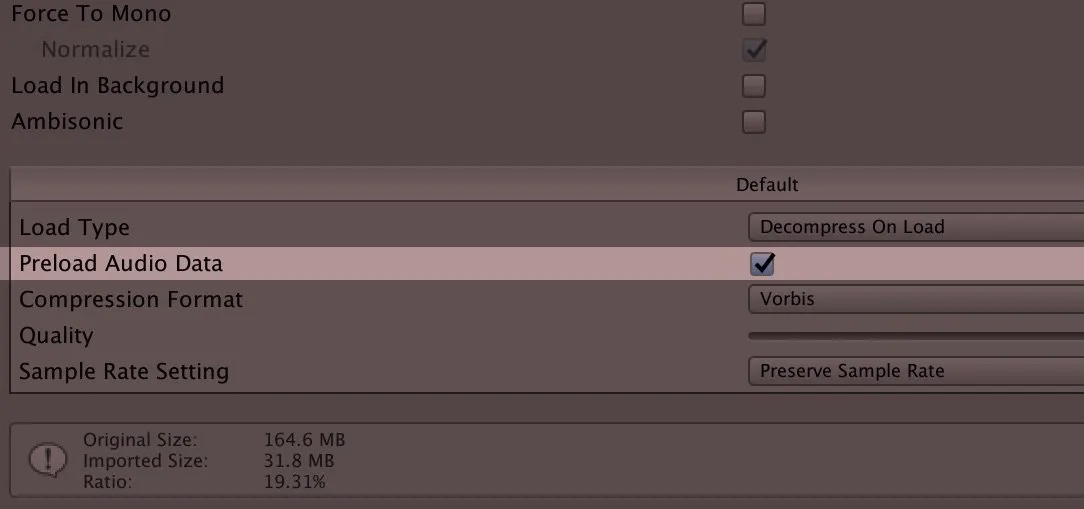
By default the audio data is loaded with an Audio Clip, however deselecting Preload Audio Data prevents this from happening.
The Preload Audio Data option is available per Audio Clip in the Import Settings. This behaviour can also be set differently for different build platforms.
As soon as the Audio Clip is triggered in the Scene, the data is loaded but this takes time, delaying the start of the clip. Once it’s been loaded once, it will stay loaded just like a preloaded Audio Clip.
To leverage the benefits of Preload Audio Data, but without the delay, you can manually load the audio data instead of waiting for the Audio Clip to be called.
In scripting it looks like this:
audioClip.LoadAudioData();To optimise the amount of memory being used, you can also unload Audio Clips that aren’t being used:
audioClip.UnloadAudioData();This is particularly useful for unloading Audio Clip data that is no longer needed, which Unity does not appear to do by default (even if there are no more instances in a Scene that use the Audio Clip).
When would you use Preload Audio Data
Preload Audio Data is useful for keeping control of memory use when Audio Clips are not being used but are still required in the Scene.
Exactly how you implement it depends entirely on the structure and nature of your game however, as an example, you could use Preload Audio Data to unload environment sounds as the player moves through a level. Reloading the audio again if they choose to backtrack.
9. Disable Audio Source Components instead of using Mute
You’d be forgiven for thinking that muting an Audio Source would save some performance.
After all, it’s no longer producing any sound.
But, that’s not actually true.
All the Mute checkbox on an Audio Source does is disable the volume. The audio playback, as well as any calculations relating to position, effects etc. are still taking place, and still using CPU.

This will Mute the Audio Source, but won’t improve performance.
Unless you need the true functionality of the Mute function – i.e. you want to mute an Audio Source and maybe unmute it in a bit – it’s more efficient to disable the Audio Source Component.
What’s more, even if you remove the Audio Source component, and even if you destroy the entire Game Object, the Audio Clip that was loaded will still be stored in memory.
While this is convenient in some cases, for example a sound for a Game Object that is repeatedly destroyed and instantiated (like an enemy for example), you may wish to manually unload an Audio Clip’s data if you know it is no longer being used in the Scene.
10. Look out for Unity’s new DOTS based audio system
Unity is currently working on a new audio system that’s built on DOTS (Data-Oriented Technology Stack) which promises high performance and incredibly scalable audio.
It’s built on top of DSP Graph, explained here at Unite Copenhagen (YouTube), a new low level audio engine that’s currently available in preview and was used to power 10,000 3D and spatial sound emitters in Unity’s Megacity demo.
It may be some time before the new DOTS based audio system becomes a permanent part of Unity. However it offers potentially massive audio performance gains, particularly for large projects, at some point in the future.
Now I want to hear from you
Hopefully this article helps you to manage audio performance in your game more easily.
Which of these tips will you use on your game?
Or have you run into your own performance issues, bugs or quirks when dealing with audio in Unity?
Or maybe you’d like to share your own advice for getting the most out of Unity’s audio system.
Whatever it is, let me know by leaving a comment.

John French writes all of the Unity tutorials for Game Dev Beginner, and specialises in deep-dive guides teaching game development basics.

Comments
As usual super helpful.
Particularly the compression types info was helpful to me.
Thanks a lot for taking the time to write these articles!
Thanks Philipp, you’re welcome!
Great and super helpful article.
I was a bit worried about optimization as I am about to start a project in Unity and we decided to go with Unity’s own audio system.
Now, I am not!
Thank you so much for your articles, always a great resource!
You’re welcome Carlos, glad it helped!
Great info, thanks a lot.
I’m actually using pooling for audio sources. I activate and position them whenever I need them and deactivate them as soon as the sound is finished. Not sure if there’s a better approach on audio performance though. Would be great to know your ideas on that.
Your other post on audio clip stitching was super useful as well.
Thanks for sharing!
Thanks Alfonso, you’re welcome. To answer your question, pooling could be helping you. Probably with voice counts or CPU from decompression but probably not so much with memory. It entirely depends on your specific use case, email [email protected] if you want to discuss any of it in detail. Happy to share my thoughts if they would help.
Thanks for those great tips
You’re welcome!
Hello John,
Thank you for all your work and contributions!
I am using your Ultimate Music collection in my hobby game (love it) and now following this guide I have reduced my app size by almost 30mb (I have a lot of music files) and initial load time from 5s to almost instant!
Following this article, I used different compression modes for sounds and music and enabled “Load in background” for all of them (this one greatly reduced load time).
Kind Regards,
Marko
Thanks Marko, glad I could help!
thank you for your very helpful article
You’re welcome!
I’m really glad for your blog, my only audio skill is the ability to play on Piano.
It’s so hard to find good and detailed audio tips for game dev besides use this or that cos it’s the best setting then provides no details why.
Your tips and tricks on the other hand are explained quite well thanks for them!
You’re welcome!
Thanks a lot!
You’re welcome!
Great article. I have been getting into Unity audio programming lately. I am a career developer with several years of C# (and more of other languages) and an amateur composer/producer. I wrote a class that does vertical orchestration, which really compounds any memory issues. I am limiting it to 3 levels in most usage (it will support more) – ambience, danger and battle. So I might have a flute & lute tune for walking around, strings fade in when you get near an enemy and drums come in if you engage. I am using the streaming setting on AudioClips to hopefully limit memory, starting them with playScheduled to sync them. If I swap out to another set, will the clips still be in memory? I am not sure what the streaming setting buys me.
If I remember right, audio clips get loaded and unloaded as they’re required from the scene but that shouldn’t make much of a difference when using the streaming option. You can always check the audio profiler to see how much memory you’re using.
About using mp3 in Unity, there are some cheap chinese android phones that does not have the license to play mp3 files (like the “Tesla” named phones in the balkans), these devices will have issues playing any mp3 sounds, they also have problems playing some video formats, if I remember good it is mp4 but I’m not 100% sure.
I’ve inherited a codebase where the audio files are mp3s containing a person speaking. Some are lengthy; The longest clip is 1 minute 40 seconds. On top of that, each of these mp3s is being loaded via its own individual asset bundle. So in a few instances, There is considerable lag (a few seconds) before the audioclip even plays. What settings would you recommend I use?
Usually, for long files, I’d suggest using the streaming option. Alternatively, preloading the audio data should prevent the lag, same as streaming should, however, I don’t know off the top of my head how the asset bundle might affect all of that. Feel free to email me at [email protected] with more details and I can try to help.
Amazing post btw! Can’t thank you enough.
Hi, Grat article. I have a question. ¿what’s better, to have one audiosource per gameobject or one gameobject with some audiosources and use it for play all sounds?
Thank you! To answer your question, it depends what you need from your audio. E.g. having an audio source on an object gives you 3D positioning, doppler etc. but if you don’t need any of that then do it in whatever is easier for you to manage. i.e. play one shot from a single source if that works for you. If you want more than a general recommendation email me with more info at [email protected] and I’ll give you my thoughts.
Article was very very Interesting and concise and just superb overall. Things were to the point like any developer desired.
Cheers Man!
You’re welcome!
Very helpful! Thank you!
Hi John .. just wanted to say thanks
You’re welcome!
That was simple and complete.Thanks
My concern with using streaming on mobile is the power consumption of reading data from storage. A desktop ssd uses 2x-4x more power to read data then when idle and I suspect flash storage on mobile has a similar ratio.
Basically, for stutter-free gameplay:
1. Load In Background + Decompress On Load + Preload Audio Data.
2. clip.LoadAudioData on everything to make sure.
3. Pool AudioSources and use Play/Stop. (Note, no issues with PlayClipAtPoint stuttering so far).