
Unity’s new Input System is now out of preview and is an official part of Unity.
Built as an alternative to the old Input Manager, the new Input System is fully featured, highly customisable…
…and confusing.
While the new Input System can be more intuitive than the old Input Manager, it also has many more settings, options and moving parts.
Some of which you might need, but some of which you might not.
And while it offers many new and sought-after features, such as dynamic rebinding, local multiplayer and built-in support for modern controllers, it can be a little complicated to get to grips with at first.
So is it worth it?
Or is Unity’s old system, the Input Manager enough?
Or maybe an Asset Store plugin such as Rewired is a better option than either of Unity’s built-in systems?
If you’re not sure what the best option is for you, don’t worry.
Because in this in-depth guide you’ll learn everything you need to know about getting started with Unity’s new Input System, how it compares to the old system and whether or not you’d be better off using one of the Unity Asset Store’s purpose-built solutions instead.
There’s a lot to cover, so let’s get started!
Here’s what you’ll find on this page:
- How to manage input in Unity
- The old Input Manager in Unity
- Using the new Input System in Unity
- How the new Input System works
- How to connect Input Actions to game objects
- Input System alternatives
Other articles in this series
How to manage input in Unity
What is the best way to handle input in Unity?
Do you need to use an input management system at all?
After all, it’s possible to listen for and detect key inputs using just the Input Class.
Like this:
void Update()
{
    if (Input.GetKeyDown(KeyCode.Space))
    {
        // Spacebar was pressed
    }
        if (Input.GetMouseButtonDown(0))
    {
        // Left mouse was pressed
    }
}
While this method does work, there’s a problem.
The input trigger, in this case, the mouse click or the Spacebar, is directly linked to the function it performs.
This means that, if you ever want to change which button, key or input triggers that function, you’ll have to go back into the script to do it.
Which could easily become difficult for you to manage later on as your project grows.

Directly attaching device controls to the script functions they trigger could cause you issues later.
But that’s not the biggest problem…
Directly connecting the input trigger to the script in this way basically makes it impossible for the player to change.
For many players, not being able to modify the controls might mean they enjoy it less but, for some players, it may make it impossible to play at all.
So what’s the answer?
How can you make an input system that’s easy for you to manage and comfortable for your players to use?
The answer is to use a modular input system.
Meaning that the input that triggers an action is kept separate from the script that actually makes it happen.
For example, instead of having a script listen for an input trigger, such as the player pressing a specific key, the script listens for an action that is, in turn, bound to one, or more, real buttons, keys or other input devices.
The script doesn’t need to know what triggered the action and the input isn’t directly attached to the script.
Which means that you can easily change the binding that triggers an action without needing to change the script that implements it in the game.
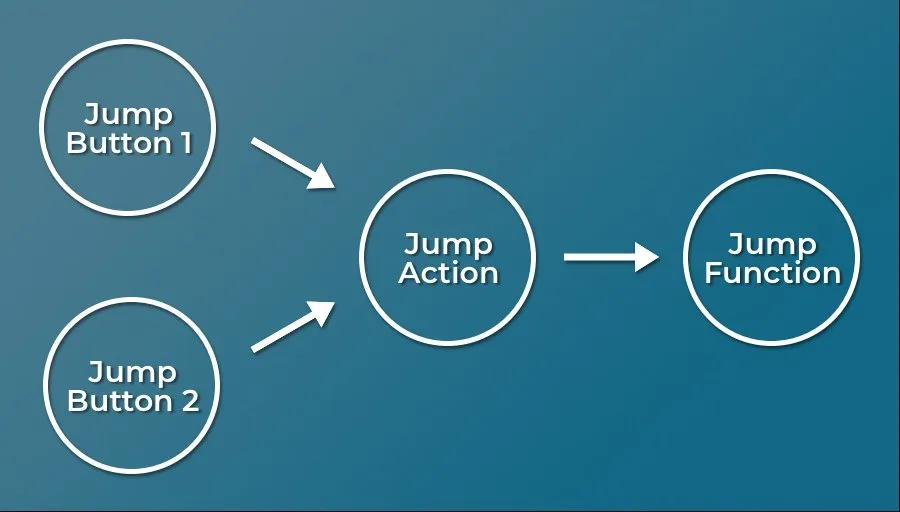
Creating a middle step, an Action, separates the real device that triggers an action and the function that will make it happen in-game.
That’s the theory, but how can you actually do it?
Let’s start with how things used to work in Unity…
The old Input Manager in Unity
If you’ve done anything with input at all in Unity, you’ve probably already been using a modular input management system: Unity’s old input system, the Input Manager.
The Input Manager is the original input system for Unity and, at the time of writing, is still the default method for managing input.
While it’s basic, it still works in a modular way, by assigning real keypresses to virtual inputs which can then be detected in scripting.
Which is good, as it means that you wouldn’t need to change every script that responds to an to input, even if you changed the button that triggered it.
What’s more, the Input Manager is simple to use and fast to set up, making it easy to add basic controls quickly.
How to use the Input Manager in Unity
For more information on how the Input Manager works and how to use it, try my in-depth article here:
But should you still be using it?
Is the old Input Manager still a good option?
The old Input Manager is ideal for simple projects or prototypes, as it allows you to set up basic controls very, very easily.
But, if you want to support newer control devices, re-mappable controls or manage input for different types of gameplay, you will probably be better off using a more advanced plugin or Unity’s new Input System.
Using the new Input System in Unity
Unity’s new Input System, which has been in preview up until recently, is now an official part of Unity.
The new system, which is offered as an alternative to the legacy Input Manager, was created to address many of the old system’s shortcomings.
Issues like compatibility across platforms, not being able to easily customise and remap controls and limited extensibility are all problems that the new Input System aims to solve.
Which is great!
There’s just one problem.
Although the new Input System is definitely much more capable than the old Input Manager; at first glance, it can seem like it’s much more difficult to set up and use.
But it doesn’t have to be…
While there are many different ways to set up, use and modify the new Input System (which is a deliberate move on Unity’s part to make the new System as transparent and customisable as possible), you don’t need to know how to use all of them to still get the most out of it.
In fact… setting up basic controls can be very straightforward.
So… how does it work?
How to set up an input using the new Input System in Unity
At the moment, the new Input System is not the default method of handling input in Unity.
So, before you do anything, you’ll need to install it from the Package Manager.
Here’s how…
How to install the new Input System
You’ll need to make sure you’re using Unity 2019.1 or newer. You can then download and install the Input System using the Package Manager.
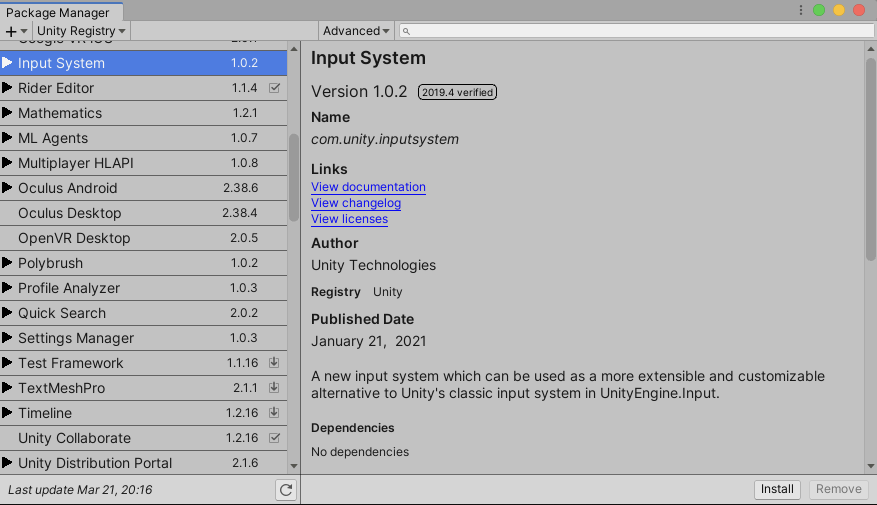
Unity’s new Input System is out of preview, but still needs to be downloaded from the Package Manager.
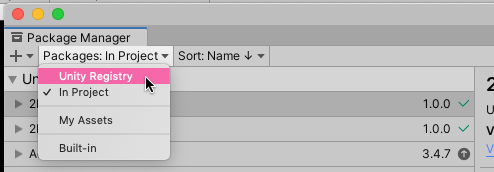
- Open the Package Manager (Window > Package Manager)
- If it’s not already selected, choose Unity Registry:

- Find and select the Input System
- Click Install!
- You’ll then see a warning asking you to switch Input handling from the old system to the new one
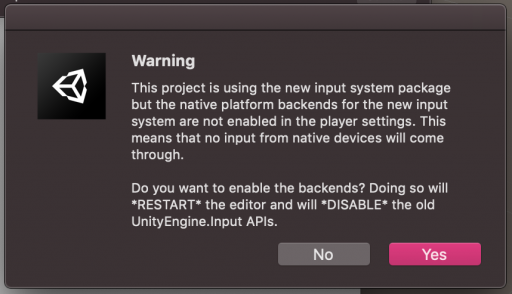
Select when you see this warning to switch over to the new system. If you don’t. you change which system you’re using in the Project Settings window.
Switching to the new Input System disables the old Input Manager and Input Class. This means that anything that uses the Input Class, which includes functions that get Raycasts with the mouse position, won’t work anymore.
If you want to be sure of which input system you’re using, go to Edit > Project Settings then Player > Other Settings and look for the ‘Active Input Handling’ setting.
You can also use this option to switch back to the old system or enable both systems at the same time.
How the new Input System works
There are a number of different parts that make up the new Input System and, while they’re all useful in their own way, you don’t necessarily need all of them.
In fact, just as it was previously possible to use the old system to get input directly from a device (e.g. with Get Key Down), you can also get device input directly from the current keyboard, mouse or gamepad using the new Input System, without setting up any Actions or Control Schemes.
Like this:
using UnityEngine;
using UnityEngine.InputSystem;

public class ReportMousePosition : MonoBehaviour
{
    void Update()
    {
        Vector2 mousePosition = Mouse.current.position.ReadValue();

        if(Keyboard.current.anyKey.wasPressedThisFrame)
        {
            Debug.Log("A key was pressed");
        }

        if (Gamepad.current.aButton.wasPressedThisFrame)
        {
            Debug.Log("A button was pressed");
        }
    }
}
Essentially this is the new Input System Equivalent of Get Key, Get Button and Input.mousePosition and is an easy way to get the new Input System working quickly.
However…
While this method of adding input is fast and convenient, which certainly has its uses, all it does is emulate the way the old Input Manager used to work.
Which means, if you plan to use the new Input System in this way across your entire project, you may as well use the old system.
Unity’s new Input System can seem a little complex at times, as it includes many different moving parts, each with a designed purpose.
However, understanding what each part is designed to do and which parts you actually need will help you to get the most out of the new system without overcomplicating things.
So what makes up the new Input System?
Typically, there are six main parts to the new Input System:
- Input Actions Assets – which store sets of Control Schemes, Action Maps, Actions and their Bindings.
- Control Schemes – which define device combinations that the player can use (e.g. keyboard and mouse, gamepad etc.).
- Action Maps – which separate different types of activity (e.g. Menu Controls, Gameplay, Driving).
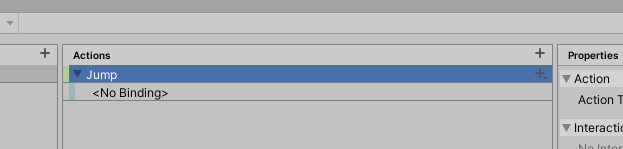
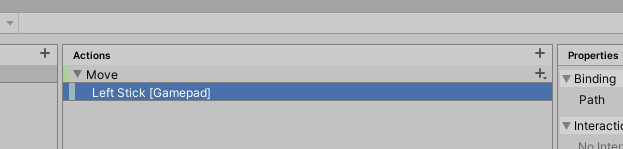
- Actions – single events that will trigger functions in the scene (e.g. Jump, Fire, Move)
- Bindings – the physical controls, specific to a Control Scheme, that will trigger Actions (e.g. spacebar, left stick etc.).
- Player Input Component – which can be used to connect all of the above to a player object
Before you can do anything, however, you’ll need to create an Input Actions Asset.
Input Actions Assets
The Input Actions Editor, where you’ll create the Actions for your game and the input controls that will trigger them.
While it’s possible to create Actions in code, or embed actions directly into Monobehaviours, the Input Actions Asset editor is a convenient way to manage all of your games input from a central location.
Different to the Input Manager, the Input Actions editor isn’t a menu accessible from the Project Settings (although, confusingly, you will find an Input System Package menu item in the Project Settings, but those settings are optional and you can ignore them for now).
Instead, Input Action Assets, which can contain an entire set of inputs and controls, sit in your project as an asset.
So, before you can get started you’ll need to create one.
To do that, right-click in the Project window and click Create > Input Actions, or select Assets > Create > Input Actions from the menu.
Like this:
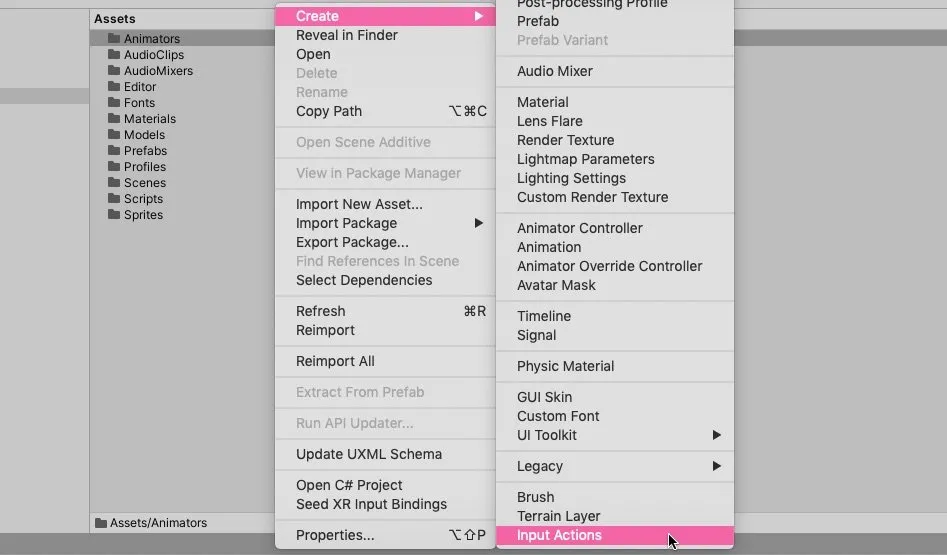
To create an Input Actions asset, right click or select Assets > Create > Input Actions in the menu.
Once it’s created, double click, or select edit in the Inspector to open the Input Actions editor.
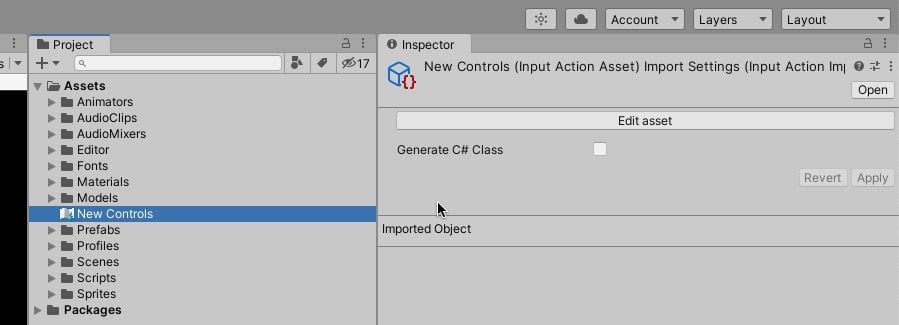
To edit Input Action Assets, double click the asset or select edit in the Inspector.
Once the Input Actions editor is open, you’ll probably also want to select Auto Save at the top of the window.
Without Auto Save checked, you’ll need to manually save the asset to apply any changes which, as someone who’s new to the Input System, I found easy to forget.
Don’t forget to check Auto Save when using the Input Actions Editor.
With the Input Actions Asset open, it’s time to start adding controls, starting with a Control Scheme…
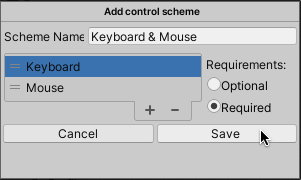
Control Schemes
Control Schemes define the different types of device, or combination of devices, that people might use to control your game.
For example:
- Keyboard & Mouse
- Gamepad
- Steering Wheel etc.
Setting up different Control Schemes allows you to keep one set of controls separate from another.
And, later, as you create Actions and add device bindings, you’ll be able to decide which Bindings belong to which Control Schemes.
You don’t, technically, need to create separate Control Schemes to support different devices.
In fact, you don’t need to create a Control Scheme at all. You can just add all of your Actions, with Bindings from all of the types of device you want to support, without adding an explicit Control Scheme.
However, there are benefits to keeping different device types separate.
So when would you use separate Control Schemes and why?
When to use Controls Schemes with the new Input System in Unity?
One benefit of using different Control Schemes in the new Input System is to explicitly separate different device setups from one another.
There are a couple of reasons you might want to do this.
For example, this is useful when you want to know that the player is either using one set of controls or another.
You can use this information to display in-game prompts correctly, for example:
- “Press Space to jump”.
- “Press Y to wait”.
- “Rotate Left Stick to cartwheel”.
You get the idea.
By knowing which Control Scheme is currently in use, you can give the player the correct prompt for contextual actions at any given time.
Being able to differentiate between Control Schemes is also useful for local multiplayer.
If Unity can understand what makes up a set of controls, it can assign devices to players automatically based on the devices that are connected.
Let’s say, for example, you want to set up a game with player 1 using the keyboard and player 2 using a gamepad.
If you add both keyboard and gamepad controls to a single Control Scheme, Unity won’t know that one player is only likely to use one device to control the game.
Both devices are considered to be part of one player’s control set up and won’t be made available to player 2.
Separating them out means that Unity knows that, while player 1 uses the keyboard, player 2 can use the gamepad, and assigns them automatically.
Keeping the Control Schemes separate helps to define which devices go together so, even if they’re not immediately useful, setting them up now might help you to keep your controls organised later on.
How to create a Control Scheme
To create a new Control Scheme, click the Control Scheme dropdown in the top left-hand corner of the Input Actions editor.
If you haven’t created a Control Scheme yet, it’ll read No Control Schemes, otherwise, it will show the current selection.

Next, you’ll be able to add devices to the Control Scheme.
For example a Keyboard and a Mouse:
Or a Gamepad:
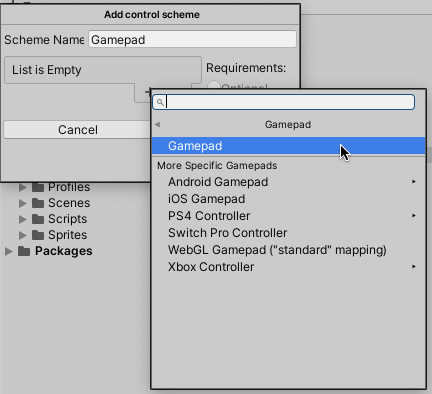
Gamepad or Joystick?
In Unity’s new Input System, a Gamepad typically refers to a controller with a modern layout, such as thumbsticks, triggers and a set of four face buttons.
This allows you to add a general Gamepad controller, and assign buttons to it, without needing to know exactly what it is.
This means that later when you map controller buttons to in-game actions, you’ll be able to specify a button by its face position (North, South, East and West) which makes it easier to keep game control layouts consistent across different platforms and gamepad types.
However, this won’t always work for third-party controllers on desktop systems, where the controller may be seen as a Joystick and not a Gamepad (Unity considers a Joystick to be any control device with at least one stick and a button).
Because of this, you may wish to add a Joystick Control Scheme to support third-party controllers on desktop platforms.
Required vs Optional devices in Control Schemes
When creating a Control Scheme, you’ll need to specify what types of devices it should accept input from.
Setting a device as required means that a device of that type will need to be connected and available for the Control Scheme to be usable.
For example, it would be impossible to use a Keyboard Control Scheme without a keyboard, and likewise a Gamepad Control Scheme without a gamepad of some sort.
You might add an optional device to a Control Scheme if you want to allow an additional device to be used, but not be required for the Control Scheme to work.
For example, using the keyboard and, optionally the mouse as well, where the keyboard is required to play but the mouse isn’t.
In that scenario, the Control Scheme would still be usable with just a keyboard.
Generally, if you’re using Control Schemes to define device configurations you’ll want to set devices as required.
However… be careful to not create two Control Schemes in the same asset that each require the same type of device.
If you do, Unity will expect two devices of that type to be connected in order to satisfy the requirements of either of the Control Schemes.
So, if you want to include the same type of device in multiple Control Schemes, make it optional.
Assigning Action Bindings to Control Schemes
Later, as you add Bindings to Actions, you’ll be able to assign them to the Control Schemes you create.
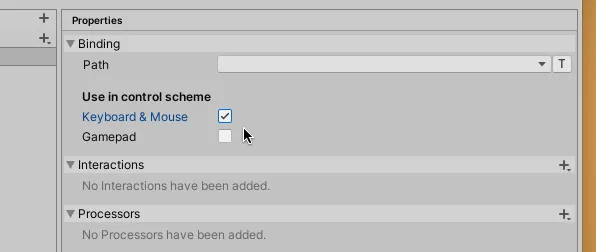
Most bindings will be specific to only a particular Control Scheme however there are some general bindings that can be used across multiple Control Schemes.
Before you can assign a Binding to an Action, however, you need to create an Action.
And before you can do that, you’ll need to create at least one Action Map.
So let’s do that next.
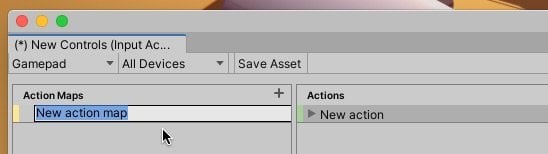
Action Maps
An Action Map contains a set of related Actions.
Click the + icon at the top of the Action Map column to create a new one.
What should I call this thing?
If you’re anything like me, when you first create an Action Map, you might struggle to think of a sensible name for it.
This happened to me because, when I first made one, I didn’t know what it was meant to be for.
Why make different Action Maps? What are they for?
What are Action Maps used for?
Action Maps hold all of the Actions for a certain type of behaviour.
For example, you might place all of your Character’s general Actions, such as movement, jumping, firing weapons etc, in one Action Map called Player or Gameplay. whatever makes most sense to you.
That Action Map, and the Actions you set up in it, will then be used to trigger all the gameplay functions in the game.
Simple, right?
So why bother making multiple Action Maps if you can put everything in one?
Should you be splitting gameplay actions across different Action Maps?
And if you do, how should you split it up.
Movement, weapons, combat?
Turns out, the reason why you’d use multiple Action Maps, and how you can decide what goes where is actually pretty simple.
When to use multiple Action Maps
So when should you use multiple Action Maps in Unity’s new Input System?
Let’s say, for example, that you’ve made a first-person game that involves a lot of shooting but also some driving.
While you might use one Action Map to handle all of the player’s Actions (such as running around and firing etc.) you might want to use another, different Action Map, to handle driving controls.
But why?
It makes sense to place all of the actions that control the player in a single Action Map, as it’s highly likely that they will all be used together.
Y Button jumps, Right Trigger fires and pressing B slides you along the floor.
Which is fine…
Until the player gets in a car.
Because now Right Trigger needs to accelerate, B uses the Handbrake and, instead of jumping, Y rolls you out of the car.
Spectacular.
Now, this isn’t necessarily a problem.
After all, you could simply map those existing actions (Fire, Slide & Jump) to the car’s controls and that’ll work.
However… one reason that you might want to keep them separate is so that the player can rebind the driving controls without affecting the player controls.
Later, when you come to connect the Input Actions with the player object in your game, you’ll be able to switch between different Action Maps at runtime, allowing you to enable and disable an entire set of controls.
For now though, all you need to remember is that controls that go together should typically be added to a single Action Map.
Such as separating gameplay and menu controls, for example.
The Input System UI Module already includes a Default Input Actions asset that handles basic button and menu navigation for you.
However, if you decide to set up menu controls manually, giving them their own Action Map, separate from the game’s controls, makes a lot of sense.
Actions
In Unity’s new Input System, Actions connect the physical inputs of a control device with something that happens in the game.
It’s how you make certain buttons, do certain things.
Examples include moving the player, jumping, firing a gun, etc.
Basically, anything that the person playing the game can do in the game.
In Unity’s new Input System, Actions are the middle step between scripts and real devices
Actions are specific to Action Maps, while the Bindings that you apply to Actions are specific to individual Control Schemes.
How to add a new Action
To add a new Action, simply click the + symbol at the top of the column.
Once you’ve created an Action, you’ll need to set the Action Type, which determines how an Action should be triggered.

The Action’s Type decides how often it will be triggered.
There are three different types:
- Button – The default setting, for one-shot actions triggered by a button or key press.
- Value – Which provides continuous state changes as they happen, switching to whichever one is most dominant if there are multiple inputs set up. Use this for analogue controls, like movement.
- Pass Through – This works in the same way as Value except that the disambiguation process, where the most dominant device is selected, is ignored.
Which Action Type should you use?
Generally, pick Button whenever you need to trigger an Action once with a control.
Value and Pass Through are suitable for continuous analogue controls, such as movement or accelerator controls.
Which one you choose depends on how the active input source should be selected. Value will prioritise the strongest value, while Pass Through prioritises the most recent regardless of how strong it is.
Input System equivalents for Get Key and Get Key Down
Using Unity’s old Input Manager, working out if a key was pressed once or if it was held down (for movement for example) was done by checking for Get Key for a held button or Get Key Down for a single press.
In the new Input System, you would typically do this by setting the Action Type, which decides how the Action will be triggered. For example, a Button Action Type will typically only be triggered once, the equivalent of Get Key Down, while a Value Action Type gets triggered continuously as the control value changes, the equivalent to Get Key in the old system.
When using the Value or Pass Through Action Types, you’ll see an additional option to set the Control Type.
This allows you to specify what type of input you’re expecting to get from the input and affects which Bindings are available.
In many cases, you can leave it set to Any. If, however, the Binding you want to assign is greyed out, it may help to change this setting to match the Binding you’re targeting (for example, a Thumbstick typically outputs a Vector 2 value). Setting this value can also be helpful when rebinding controls, as the Dynamic Rebinding Operation uses the Control Type to decide what type of input controls can be assigned to it.
Once you’ve created an Action and set the Action Type, it’s time to actually connect it to a real input device by adding a Binding.
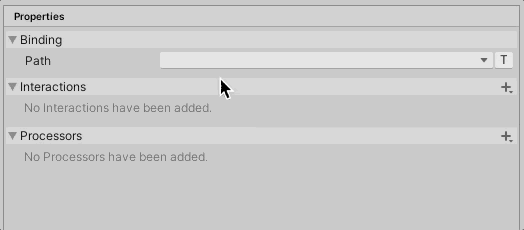
Bindings
Input Bindings are the specific keys, buttons and directional controls that your player will use to physically play the game.
The basic type, simply called a Binding and added by default when creating a new Action, connects a single control via its Binding Path.
The Binding Path could be a button, a keyboard key or an analogue trigger, or it could be a more general control, such as the left stick of a controller.
Or it could be a composite of several bindings to create composite directional movement, such as for WASD keys.
How to create a Binding
To add a new Binding, right-click the Action you want to assign it to or click the + symbol to the right of the Action name.
To set the Binding Path, find the control you want to use from the list or click the Listen Button and use the control you want to assign to find it quickly.
The Listen Button makes finding the right binding quick and easy.
Button Action Types generally accept single inputs, such as a specific key or one direction of a thumbstick, whereas Value and Pass Through Action Types can accept a general control, such as a thumbstick or the d-pad.
It’s possible to assign a general control, such as a thumbstick, without setting up a composite binding.
This is useful for quickly creating directional controls without manually setting up a Composite Binding.
Rebinding controls in the new Input System
Unlike the old system which, by default, only allowed control remapping from a Unity splash screen (which is now deprecated) it’s possible to remap controls dynamically using the new Input System.
There are a number of ways to do this, including performing a rebinding operation that listens for the new Binding from the player.
However, a quick and easy method is to simply set a new Override Path for a binding (which is a non-destructive method of changing the Binding for an Action).
Like this:
using UnityEngine;
using UnityEngine.InputSystem;

public class BasicRebinding : MonoBehaviour
{
    public InputActionReference triggerAction;

    void ChangeBinding()
    {
        InputBinding binding = triggerAction.action.bindings[0];
        binding.overridePath = "<Keyboard>/#(g)";
        triggerAction.action.ApplyBindingOverride(0, binding);
    }

}
In this example, I’ve changed the first Binding of my example Trigger Action to the G key on a Keyboard.
For more information on how to use Runtime Rebinding with the new Input System, see Unity’s official guidance here, or try the Package Manager demo.
As well as specific, device-based controls, it’s possible to assign a standardised Usage to an Action.
Binding path Usages
When selecting a Binding Path you’ll see an additional menu marked Usages.
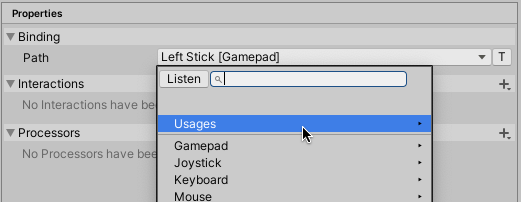
Usages are common commands that are standardised across some devices.
The Usages list defines a number of commonly used commands that are typically bound to specific buttons on different devices.
For example, the Back command is commonly the B Button and Circle Button on Xbox and Playstation controllers while, on Keyboard, it’s the Escape key.
Or the Primary Action, which is typically the A Button or Cross Button on Xbox and Playstation controllers respectively.
Or, on a Keyboard, the Submit command, which is the Return key.
These common Usages allow you to specify a control without knowing what will actually trigger it.
But why use this feature? And when is it useful?
One example would be the buttons that are used to move forward and backwards through menus.
For example, you might be tempted to assign a menu select button to the bottom button, the South button, for controllers (A on Xbox, Cross on PlayStation).
Pretty standard right?
Except, not on Switch…
As you probably already know, the A Button on Switch is the Rightmost button on the gamepad, the East button, not the South like with Xbox and PlayStation.
This would make your in-game navigation inconsistent with OS navigation on that platform.
Using Usages, however, you can assign Menu Select to the Primary Action and Menu Back to Back, which would keep menu navigation consistent with whatever platform the game is on while keeping gameplay controls consistent across different platforms.
You can see examples of some common Usages in the Default Input Actions asset that is created with the UI Input Module.
While you’ll be able to use general control paths for some inputs, you will often need to create custom Bindings yourself.
Examples of when you’ll need to do this include when adding WASD movement, creating an Axis across two buttons or when setting up key combinations.
Luckily, there are Binding types that you can use to do exactly that.
1D Axis Composite
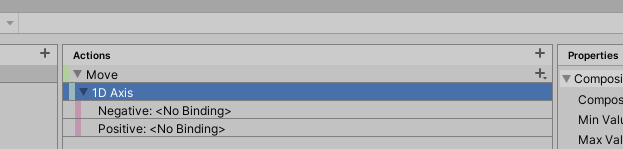
A One Dimensional Composite Axis basically charts a point between two bindings, one positive and one negative.
An example of a 1D Axis would be forward and back on a keyboard, bound to the W and S keys.
As a Composite Input, the input values are combined, meaning if you were to press both at the same time, they will cancel each other out (unless you specify otherwise).
It’s also possible to change the minimum and maximum values of the Axis from the default of -1 to 1.
However changing the maximum value doesn’t change what the input device delivers, which is typically a value between 0 and 1, or 0 and -1 when assigned to the negative.
For example, if you change the maximum value to 2, the W Key will still, by default, deliver a value of 1, although you can use a Scale Processor to change that.
Also, it’s worth noting that uneven values, for example, an Axis between -1 to 2, even if the positive value has been scaled up to meet the maximum value, will still cancel out at zero, and that the progression along the axis scale between the middle and the two extremes will be the same.
Put simply, the middle will always be the middle.
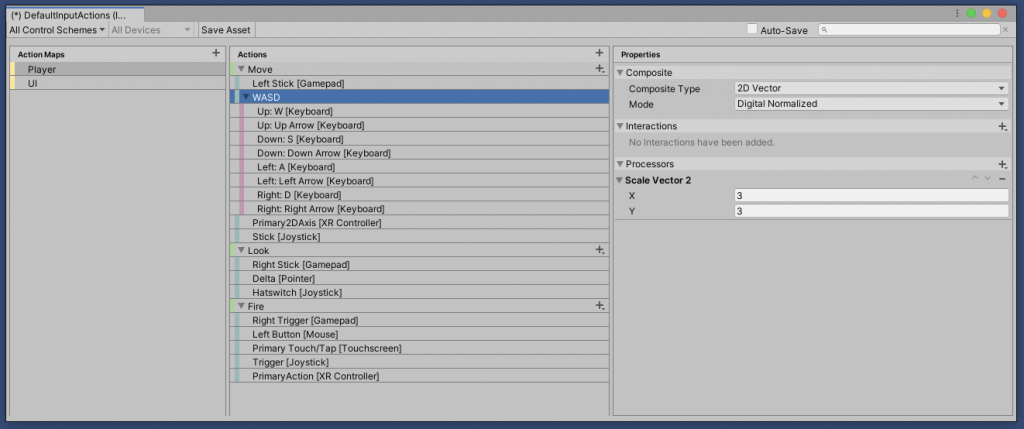
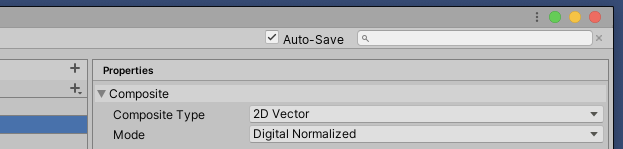
2D Axis Composite
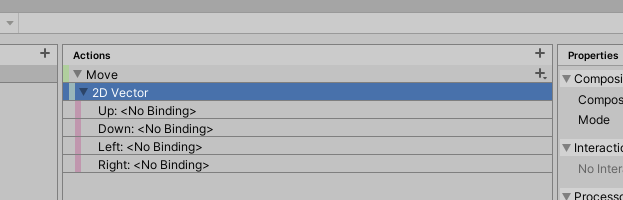
A Two Dimensional Composite Axis will provide a Vector 2 value from two axes.
This is ideal for movement controls and similar types of input.
However… the value you get from a 2D Composite can vary depending on the Composite Mode.
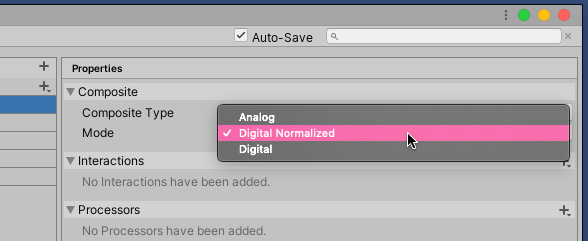
The Composite mode determines how the two dimensional axes combine
The Composite Mode changes how the two axes affect each other.
Which one you select depends on the type of response you want from the control.
For example, Digital provides a square response. So if you push Up and Right, you’ll get a Vector 2 value of 1,1.
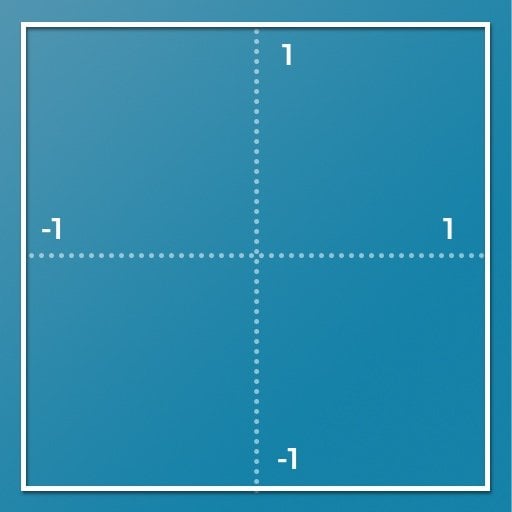
Unity’s Digital Composite Mode produces a Square response
Using this method is fine if the vertical and horizontal axes aren’t linked.
For example, tank movement, where left and right turns while up and down moves, wouldn’t necessarily require the two axes to affect each other although you might bind them together to a single control, such as a thumbstick, for convenience.
One example of when not to use the Digital Mode, however, would be when setting up eight-way directional movement.
This is because the magnitude, the length, of a Digital Mode Vector with a value of 1,1 (or up and right pressed at the same time) would be around 1.4, which means that your player will move faster diagonally than in a single direction where the magnitude would be 1.
How can you fix this?
The solution is to normalise the vector.
Digital Normalized, which is the default mode, works in the same way as Digital except that the Vector is normalised, producing a magnitude of one in all directions.
Unity’s Normalized Composite Mode produces a Diamond shaped response and is ideal for eight-way movement
Unlike the Digital Mode, where pressing two adjacent directional buttons (i.e diagonal movement) produces a Vector 2 value of 1,1 and magnitude of around 1.4, using Digital Normalized produces a Vector 2 value of around 0.7,0.7 to maintain a magnitude of 1 in all directions.
If you’re not sure what I mean by a vector’s magnitude, try Unity’s video on vector maths for more information.
This means that, when creating eight-way directional controls, your player will move at the same speed diagonally as in straight directions when using the Digital Normalized Mode.
You can also use Digital Normalized to snap an Analogue Control, such as a thumbstick to eight directions.
So, for example, you could create retro 8-way controls with an analogue thumbstick by using this mode.
The Analogue Mode, provides an even circle response in all directions, as you’d get from a thumbstick or joystick.
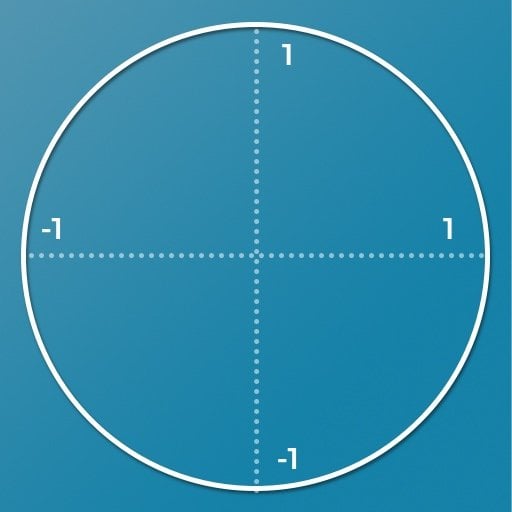
The Analogue Composite Mode creates a circle response but only works correctly with analogue controls.
Just like with Digital Normalized the magnitude is 1 in all directions, just in a complete circle instead of a diamond.
But, this only works when using analogue controls, such as an analogue stick.
While testing for this article, I found that using this setting with a composite of digital buttons, such as the WASD keys or the directions of a d-pad, resulted in a vector value that wasn’t normalised, just like when using the Digital Mode.
So, for best results, it makes sense to only use the Analogue Mode with analogue controls, such as the left or right sticks of a controller.
How to recognise two buttons being pressed at once (Button with a Modifier Composite)
Sometimes, you may only want to only register an input while the player is pressing two (or more) keys or buttons at once.
You’ve used commands like this before, such as CTRL+Z to undo, or CMD-S to save in an application or, in games, multi-button moves in a fighting game.
Unity’s input system also allows you to create bindings that require one or two modifier keys using the Button with One Modifier Composite or Button with Two Modifiers Composite bindings.
These allow you to add a Button binding, with up to two Modifiers that will gate the Action from firing until you press them in combination.
There is, however, a downside…
There’s currently a known limitation of the Unity Input System that one Action cannot pre-empt the input of another.
This means that if you assign a Jump action to the B Button, and a Dive action to a combination of Left Trigger + B, both the Dive and Jump Actions will be triggered when the Left Trigger and B Button are pressed.
Obviously, this isn’t helpful if you planned to use modifier buttons to extend the controls of a gamepad.
So how can you fix it?
How to avoid triggering both actions when using a Modifier Composite
Until this issue is officially fixed by Unity (it’s understood to be high priority problem), if you want to use buttons with modifiers, you’ll need to use a workaround.
One simple solution is to separate the modifier and button elements into two different Actions
The Button, which is just a normal button, and the Modifier, which will be used to report if the modifier is true or false.
Then in your script, when the Button is triggered, you can simply check to see if the Modifier was also held down, triggering one Action if it was and a different Action if it wasn’t.
Like this:
using System.Collections;
using System.Collections.Generic;
using UnityEngine;
using UnityEngine.InputSystem;

public class InputTester : MonoBehaviour
{
    bool modifierPressed;

    void OnModifier(InputValue value)
    {
        modifierPressed = value.isPressed;
    }

    void OnTrigger()
    {
        if(modifierPressed)
        {
            // Do one thing...
        }
        else
        {
            // Do a different thing...
        }
    }
}
The new Input System in Scripting
When using Input System classes, don’t forget to add the using UnityEngine.InputSystem; namespace declaration at the top of the script.
This is required because I’m using the Input Value parameter type in my function to get the Is Pressed value from the button.
If you’re new to the Input System and you don’t recognise some of the code in the example above, such as the Input Value parameter type, then don’t worry.
I’ll be covering how to connect Input Actions with scripts in your Scene a little later in this article.
For now, though, know that the Input Value parameter allows me to collect some information about the Action that was triggered.
This basic workaround works in a similar way to the original, intended, functionality, in that it gates the trigger button’s secondary function until the Modifier is pressed.
In this case, I’m using it to monitor when the Modifier is pressed or released, storing the result in a Bool.
For this to work, however, you’ll need to trigger the Action when the Modifier is Pressed and when it’s Released.
By default, the Button Action only triggers when the button is pressed (The equivalent of Get Key Down in the old system).
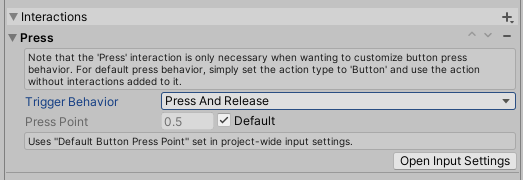
To register both the Press and Release, you can change the behaviour of the button with an Interaction, in this case, the Press Interaction.
Like this:
Interactions, along with Processors, are properties that can be added to an Action or a Binding to change how it is recognised or to modify the resulting value.
Here’s how they work…
Interactions and Processors
When setting up your game’s controls, Interactions and Processors can be used to change how input is interpreted.
For example, tapping is not the same as holding a button down.
You may wish to make a gun trigger more, or less sensitive.
Or, if you’re anything like me, you will absolutely have to enable invert look.
I honestly can’t play a first-person game any other way.
Helpfully, all of that functionality, and more, can be created by adding Properties to an Action or directly to the Binding itself.
Properties include Interactions, Processors and for Actions, the Action Type, which you will have already set when creating the Action.
Interactions change what is required for an input to trigger an Action, while Processors modify the value that’s received.
Let’s look at Interactions first.
Interactions
Interactions change what the player needs to do in order for an input to trigger.
For example, there are different ways that you can press a button.
You can press a command quickly for a light attack, or longer for a heavy one.
You can press and release, triggering an action when you let go of a button.
Or you can double-tap it quickly.
To add an Interaction, select an Action or Binding and click the + symbol beside Interactions in the Properties Panel.
The Hold interaction modifier won’t trigger until the button has been held down for a minimum amount of time.
While Press allows you to specify if you want the Action to be triggered on the press or release of a button or both.
You’ll also find Interactions designed for touch devices, such as Tap, which will only fire after a quick press and release, Slow Tap, which works in a similar way, except over a longer duration.
At first glance, Slow Tap appears to work in the same way as Hold.
Except, while Hold triggers after a set duration, Slow Tap triggers on release after a set duration.
Until you release it, it won’t do anything.
Using Hold with the new Input System
At first glance, you’d be forgiven for thinking that the Hold Interaction in Unity’s Input System refers to holding a button down, similar to how Get Key used to work. In fact, what it does is trigger an Action, only once, after a button has been held for a set amount of time.
Instead, to continuously get a value from a button, choose the Value Action Type. See the section earlier in this article for more information on Action Types.
How to create double-click actions
Lastly, there’s Multi-Tap which is for measuring repeated taps, or clicks, within an amount of time.
Such as a double click for example, Or for pressing a button twice, quickly, to perform a dodge.
What to do if Multi-Tap isn’t working
There’s currently a known issue with Multi-Tap which, if you don’t know about it, could make you think that it just doesn’t work at all.
Multi-Tap won’t work unless it is on the only Binding assigned to an Action.
So if you, as I did, assign both a regular button press and a double-tap press to an Action the Multi-Tap won’t work.
If you need to trigger the Action from two bindings in the same Control Scheme, and one of them is a Multi-Tap, then one workaround is to duplicate the Action and simply have one trigger the other to achieve the same result.
Like this:
void OnTrigger1()
    {
        // Do something
    }

    void OnTrigger2()
    {
        OnTrigger1();
    }
Just like with Modifier Composites, however, there’s currently no way to have one input prevent the firing of another so, even with this workaround, a double press may still trigger any single press Actions from the same button.
At least until Unity modifies the Input System to allow one input to override another.
Processors
Processors modify the input value after it is received, for example, to change how sensitive a control is, define its limits, or to completely reverse it.
Just like Interactions, they can be applied to Bindings or to entire Actions.
Invert, as you might expect, flips the value from a control or, technically, multiplies it by -1.
One example of how you might use the Invert Processor is to invert the direction of vertical or horizontal controls so that they work backwards.
This is ideal for settings like invert look, or for reversing camera controls.
You can also apply the Invert Processor to 2D Vectors, which allows you to Invert the X and Y axes independently or together.
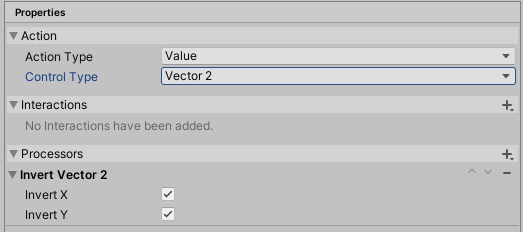
A Processor can be used to invert look or camera controls.
Clamp limits the value to a fixed range while Scale multiplies the value by a set factor, which can be useful for adjusting the sensitivity of a control.
You’ll only see some Processors, such as Invert Vector 2, on Action Types and Bindings that support them.
And not all Processors will work with all Actions and Bindings, so you’ll more than likely need to experiment a little to get the results you want.
How to modify Processors at runtime
If you add an Invert Processor, for example, to reverse look or camera controls in a game, or a Scale Processor to adjust a control’s sensitivity, it’s likely that you will also want to offer the option to change those settings from the game’s menu.
So, how can you edit a Processor from a script?
Right now, there isn’t a convenient way to modify Processor settings at runtime.
Luckily, however, Unity are already planning a way to dynamically set Processor parameters from scripts so expect this to be added as a feature in the future.
In the meantime it’s still possible to change a Processor at runtime, you’ll just need to apply an override to do it.
Here’s how…
First, get a reference to the Action that you want to apply the Processor to,
Like this:
public InputActionReference moveAction;Note that I’m using an Input Action Reference variable type here to get a reference to an existing Action from the Action Editor, as opposed to an Input Action variable which allows you to embed an Action into the script.
Then I can simply apply an Override to add a new Processor to the Action.
To change the Scale:
using UnityEngine;
using UnityEngine.InputSystem;

public class ControlSettings : MonoBehaviour
{
    public InputActionReference moveAction;

    private void Start()
    {
        moveAction.action.ApplyBindingOverride(new InputBinding { overrideProcessors = "scale(factor=10)"});
    }
}
Or to Invert the look of the camera:
using UnityEngine;
using UnityEngine.InputSystem;

public class ControlSettings : MonoBehaviour
{
    public InputActionReference moveAction;

    private void Start()
    {
        moveAction.action.ApplyBindingOverride(new InputBinding {overrideProcessors = "invertVector2(invertX=true,invertY=true)" });
    }
}
See the Unity documentation for a full list of Processors and the values they can accept.
The Processor doesn’t need to already exist for this method to work so you won’t need to add a Processor before you use an Override.
Also, Binding Overrides don’t stack up, which means that to add a new configuration you don’t need to worry about removing the old Override, it’s simply replaced.
Which is great, as it means you won’t accidentally add multiple Overrides evertime you change the setting.
However… this does mean that if you add multiple Processors separately, such as one Processor to invert the look and another to adjust the look sensitivity, only one of them will actually be applied.
Multiple Processors can still be added to the same Action, they just need to be added in one Override via a comma separated list.
Like this:
moveAction.action.ApplyBindingOverride(new InputBinding {overrideProcessors = "scale(factor=10), invertVector2(invertX=true,invertY=true)" });By default, Binding Overrides don’t persist between sessions.
This means that if you apply an override to set additional control options, you’ll need to manually load and apply any Processors you set the next time you start the game.
Processors are ideal for manipulating input values before they get used in your game.
So… now that you have Input Actions, that are bound to devices, which are modified by Processors…
How do you actually use those in your game?
For example, how do you connect a jump action to the function that actually makes your player jump?
How do you pass values from the controller to scripts in your Scene?
And, in multiplayer, how do you assign different devices to different players?
Let’s do that next.
How to connect Input Actions to game objects with the Player Input component
Once you’ve created Input Actions and the controls that will trigger them, it’s time to connect them to the objects in your game.
Unity’s aim for the Input System was to provide flexibility and extensibility, so it won’t surprise you that there are lots of different ways to do this.
However, one of the most straightforward options and, in my opinion, the easiest way to get started with the Input System, is by using the Player Input Component.
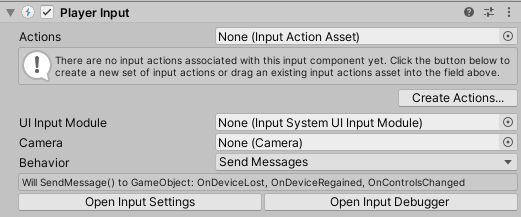
The Player Input Component makes it easy to connect Input Actions with game objects.
It works by attaching the Player Input Component to a player object and setting the Actions field to match your Input Actions asset.
Then, input action functions will be called in scripts on the object and, optionally, its children as well, using one of four different communication methods, including Unity Events, C Sharp Events and, in my opinion, the easiest method, Send Messages.
How to use the Player Input Component
For more information on how to set up and use the Player Input Component, try the below article:
The Player Input Component is an easy way to connect all of your Input Actions to all of your player object scripts using a single component.
It provides a ready-made solution for handling the connection between controls and the game functions they trigger, without needing to write any extra code.
You simply add it to your player object, configure it to work with your scripts and you’re done.
Should you use Unity’s new Input System?
Hopefully, by now, you’ve got a good idea of how Unity’s new Input System works and how to use it.
But should you?
It’s definitely an improvement over the old Input Manager but, then again, Unity’s old system has had issues for some time.
The question is, is the new Input System good enough now, to replace the old Input Manager, or is there an alternative that works better?
Such as Rewired, an extremely popular input manager asset available on the Unity Asset Store.
And, importantly, an asset that has been extensively used, updated and tested since 2014.
So, while Unity’s new Input System is definitely good, and definitely an improvement, is it the best option? and just how does it compare to the most popular alternative system, Rewired.
Input System alternatives
Rewired is an advanced input management system for Unity that’s built on top of the old Input Manager.
Unlike the Input Manager, however, it’s highly customisable and flexible.
Rewired is centred around defined players and, in a similar way to the Input System, uses Actions to connect scripts to inputs from one of its supported devices.
Which is a lot…
Rewired is a popular input management system in Unity and is built off the Input Manager.
How to use Rewired and how it compares to the Input System
For more information on how Rewired works and how to use it, try my in-depth article here:
Having spent some time with the Input Manager and the new Input System, I was surprised at how easy Rewired was to use.
While the Editor can be a a little confusing, it didn’t take long to get to grips with and, to me, it felt like a mix between the old Input Manager and the new Input System, which might be exactly what you’re looking for.
Now it’s your turn
Now I want to hear from you…
Have you tried Unity’s new Input System?
Are you still using the old Input Manager?
Or maybe you prefer Asset Store plugins or have even made your own custom system.
Whatever it is, let me know about your experience with input in Unity by leaving a comment below.

John French writes all of the Unity tutorials for Game Dev Beginner, and specialises in deep-dive guides teaching game development basics.

Comments
Wow, what a fantastic walkthrough! Exactly what I was looking for to get started with the new system. Amazing job, thanks!
Thank you Rob! Glad you liked it.
Seconded. Thanks very much John for this extremely detailed guide and all of the work you’ve clearly put into it! Much appreciated. I’m implementing the new Input System (thanks to you) in my current project!
This is the best resource I could find online for understanding this system. Incredibly thankful.
Same here, great walkthrough! Thank you so much for writing it John.
Hi John,
Fantastic article. Extended explanations and very detailed reading. First key working at first attempt. Suscribed and reviewing all entries in your blog.
Thanks.
Thank you, glad to hear it helped
John, You are my hero. I’ve been installing the new input system and rewriting code to do so all week. This helps me know I am on the right path.
Now that I’ve almost ironed out the bugs on the new input system, I’d rather eat my socks than change.
Eventually, I want to learn how to set up an options screen where the user can ‘set’ the input buttons. It appears the new Input system is set up for this, but that is a battle for another day.
Thanks so much Will, really glad it helped!
It was the best article I’ve ever seen about the new input system.
Despite the long content, it is easy to read and gives excellent overall information.
I’m glad to have new information about the things I didn’t know well about and moved on.
Yet I do not fully understand and utilize this system.
(specifically related to player input components)
– Which object exactly should player input component be connected to?
Actually, i can use the new input system with out player input component, right? From its name and use, it seems appropriate that I actually attach myself to the object to which I will deliver the motion.
However, there are many requirements in real games, such as having to control multiple objects, dynamically creating them, and wanting control of cameras and not players. Should a player input component be present and managed for every object that should receive this movement? Or can it be managed with a separate manager?
– Player input components provide four distinctive methods. Each of the four motion settings will have distinct pros and cons and cautions. Many tutorials using each method were available. However, ordinary courses and documents simply show that the method works normally.
The four methods will definitely make a big difference.” (e.g., design convenience, performance, etc.)
However, it is difficult to get clear answers about when and how they should be used and chosen.
Thankfully, unlike other tutorials, this article compares the four methods to each other.
It was helpful to me.
Personally, I hope there will be a more detailed explanation of this part.
I want to know more about the `performance`, `critical issues`, `design benefits in real project` between these four methods.
It was also good to read and helpful to write about the experiences and thoughts of Rewired.
I hope you have a good day and I’ll go look for more of your other writings. 🙂
Thanks so much. So to answer your question about the Player Input Component, my understanding is that, while you definitely don’t have to use it, it offers a convenient way to leverage a lot of the new systems advanced features without manually implementing them. This is especially true for local multiplayer where it makes assigning controls per player much easier but, the way I see it, it can be used just as well in a single-player game.
Generally, you would put it on whatever player object has input related scripts on it, or on the root (using the Broadcast option to send messages down to child objects). If you were going to use it to control other objects, you might find it better to use the Unity Events or C Sharp behaviour option but it heavily depends on your game’s structure and I’d always suggest go with whatever is easiest to manage.
One thing I wouldn’t recommend, however, is using multiple Player Input Components in a single-player game. As, by default, Unity will see them as different players and try to assign different control schemes to each of them. One input component = one player. Hope that helps!
Fantastic post, thank you very much. Very detailed and very helpful.
You’re welcome!
Version 1.0.2
But there are some problems on mobile devices (Android).
InputSystemUIInputModule.cs
comments
The UI is currently not reacting to pointers until they are moved after the UI module has been enabled. What needs to happen is that point, trackedDevicePosition, and trackedDeviceOrientation have initial state checks. …….
The UI is just triggered once at the same position.
Sad.
After reading about the official Unity’s New Input System release I was excited to learn it and implement it in my project. While I’m a beginner and have only done prototype projects for fun, I was looking for something like this which gives overview as well as little detailed information about how to use it.
Your blog is worth subscribing.
As you mentioned above that Rewired is good for multiplayer game as it player-centric and it automatically assign controller to player. How do I use New Input System to make local co-op and multiplayer games. Some resource and guide will really be helpful.
Thank you.
Thanks, the Player Input Component is a good place to start with local multiplayer, as it automatically assigns control schemes to instances of the component (where each one is a player), I might try an expanded article on just multiplayer if that’s something you, and others, would want to see.
Yes, please. It would be really helpful.
I’ve never seen an explanation so detailed and near perfect
Thank you!
thank you sooooo much! Unity’s new input system feels so lacking on documentation and you explained everything!! 😀 great work
You’re welcome Dan, glad I could help!
I’d love for someone to implement an extension allowing to create a full rebind screen (with save and load) by just feeding an input action asset. A lot of devs seem to have an issue with proposing that critical feature.
I tried looking into it but I’m too much of a noob to get anything done apparently. 😛
Great article! I was confused a bit on how to execute code on button release, and landed on your site. Reading the entire post just felt like my brain exploded with all these new possibilities and also solved my problems. Thank you.
One of the best things about using the new Input system is that the Input class gets decoupled with the actual logic. I can now make a shooting script without even caring about what Input it takes in. It is handled somewhere else. It means the code becomes more flexible and I can now export the same shooting script as a package and re-use them in other projects as well! (Assuming that the new project uses the Input system as well and minor tweaks are made with the code) That’s so useful!
Thank you once again.
Thank you, great to hear it was helpful!
Best description of the new Input system I’ve come across and trust me I’ve looked!
Most excellent job sir.
if at some point you could show examples of touch, swipe and tap and mouse movement that would be fantastic, I’ve been trying to use Touch for my Android game but to no avail.
Thank-you sooooooo much
Unbelievably good description of the system. After digging through countless resources, this one finally had all in one place.
Thank you so much!
Excellent guide!!! I was having the worst time trying to figure out how to get everything setup and working, and this guide just boosted me forward a bunch. Very in depth and detailed with great examples and explanations. Keep up the great work!!
Thanks so much, glad to hear it helped.
Thanks John for this great guide. I went from having no idea how to use the new input system, to have controller support going within a short time. You have a lot of very practical and useful articles here so thank you!
Thank you! So glad to hear it helped.
Excellent article, John. Very much appreciated.
Thanks, Perry!
This was a detailed and good rundown of the new input system.
It’s also just so convoluted and unnecessary. I don’t want to fiddle around with menus and obtuse references, I just want the input code language to be stable and logical. I don’t find the new input method or Rewired to be acceptable. Unity’s older input makes more linguistic sense, but there is near constant unexpected behavior when trying to do certain types of things, and some things just don’t work the way they should.
So I think it says a lot when this new system seems like one step forward and two steps back.
Thanks for this excellent article with everything under one roof! I still have a problem getting the UI Input to work in a scene in which the player character is present. I’ll explain the problem.
I have a Third Person shooter game where I use the New Input system. The game works fine until I press the Esc key which takes me to the UI Menu. That too works. Now the problem starts. Whatever I do, the MOUSE OVER THE UI DOES NOT WORK when I come from the game into the UI within the same scene. If I open a new scene with ONLY the UI, there is no problem. It seems that as the Player has taken over the Input system it is not passing the UI Button presses or is not detecting them. I will try to make a separate small version of the project to show the problem but as it is I am pressed for time. How I solved it was to start the scene with both the old and new Input systems, the player disabled, and then enable the player from the Game manager, and then initialize all the player components using Event Actions. Then everything works perfectly, no code errors and I get a very good frame rate, (in the 500fps range). Do you know this problem and a solution? See the thread below which talks about the same problem.
https://forum.unity.com/threads/button-ui-not-working-with-the-new-input-system.797976/
I hope someone comes up with a good solution. I asked this question in many forums to no avail. Seems like no one knows the answer/no one has had this problem/no one is bothered/some otherreason. 🙂
My guess would be that it’s to do with the UI Input Module, and it might help to connect the UI module in the scene to the Player Input component if you’re using that and haven’t already done it. But that’s just a guess, and it’s assuming that this isn’t a bug, which it could be. I’ll try to look into this and update the article if I find something.
Thanks for this very in-depth guide. I’ll definitely be referencing it later.
I’ve used the new input system a bit, and I think it’s worth the extra work you have to put into it over the older system. At very least it allows of players to choose their own gamepads.
There are a few things I have issues figuring out though, like having one controller control multiple objects, and one object be controllable by multiple controllers.
For example: I have a two-player game. Players can use keyboard of gamepad to control. There’s a GameObject for each player. There’s also a GUI GameObject for my pause menu.
Maybe player 1 has a gamepad and player two is on keyboard. Maybe it’s vice-versa. Maybe they both have gamepads. Maybe (with a bit of work) they’re both on the keyboard, or multiple keyboards?
At any rate, I want the ESC key on any keyboard and the START button on any player’s gamepad to be able to reference that GUI GameObject to pause/unpause the game.
I guess I could have each individual player GameObject reference the pause menu via an Event. But then what about my other GUI GameObjects that might exist before/after the player GameObjects exist (ie the “press play to start” GUI element).
I’m experimenting with different solutions.
Thanks! I believe the UI Input Module setting on the Player Input Component should allow multiple players to control the same menu, although i haven’t tested that specifically.
Thanks – what a great write-up!
You’re welcome!
This was a really well put-together article that goes over all the different aspects of the new input system and all the different ways that Unity has provided to accomplish the same things.
Thank you!
You’re welcome!
Thanks great gruide
You’re welcome!
Thank you for writing this VERY useful and informative article
You’re welcome!
As always the best resource for us aspiring Unity-developers. Thank you John.
You’re welcome, glad it helped!
I don’t think there’s even a question if you should use the new Input System.
DON’T
run, don’t walk, away from that trainwreck. It’s confusing, badly engineered, full of traps the docs don’t mention (like the whole RebindUI stuff not working with the generated C# class approach) and most importantly: It fails for some players for no reason and without error. I’m going through that hell right now. A certain percent of my players suddenly have no input whatsoever despite all testing being successful and no errors being generated.
Take Rewired.
Stay away from the Input System
Love You thanks, i wanted to know how to switch between both Input Systems, old and new ones
Glad it helped!
Great and extensive article, thanks for your work!
You’re welcome! Glad it helped.
A delight of article, thank you so much.
You’re welcome!
Finally I understand the new InputSystem of Unity, thanks for your work
You’re welcome! Glad it helped.
Bro… you are a life saver! This has everything we need to start using the new system in our game, thank you so much!
Thank you, I’m so glad it helped!
Thanks.All your articles are of very good quality.
Thank you!
Great job with this overview of the Input system. Thank you!
You’re welcome George, glad you liked it!
Amazing job at with this document, and thank you! Usually don’t leave comments but this inspired me and wanted to give you the same positive 3nergy to continue following your passion. Thank you Bro 🙂
You’re welcome!
Hello,
I tried Unity actions and don’t work. I am using 2021.3.8 LTS. Created action WASD with Vector2 digital and hold type, then an object with PlayerInput component, selected the scheme, the action set, the unity actions option, and added an object with a script with this code
public void MovementAxis(InputAction.CallbackContext context)
{
}
Then when i press W holding it i start receiving a lot of these messages
InvalidOperationException: The InputEventPtr is not valid.
InvalidOperationException during event processing of Dynamic update; resetting event buffer
The problem here is the Hold interaction, if you remove that it should work. For continuous input from a Vector2 composite, such as WASD, set the Action Type to value. The Hold interaction is for creating an input after holding a button down for a period of time, such as a long press on a phone, and isn’t compatible with the Vector 2D data type that you’re trying to pass with the action.
In the section on Processors, you use a variable of type InputActionReference to “get a reference to an existing Action from the Action Editor.”
https://gamedevbeginner.com/input-in-unity-made-easy-complete-guide-to-the-new-system/#:~:text=get%20a%20reference%20to%20an%20existing%20Action%20from%20the%20Action%20Editor
Some Questions:
– Is the processor you’re modifying on the action itself in the editor, or on a binding that is attached to (subset in the editor) that action?
– How do you actually establish the reference? I see where you declare the variable, make it public, and set it to type InputActionReference. But how do you actually make it say “this variable refers to THAT action?”
I would really like to know that. Thanks!
So if you create a new Input Actions asset and set up actions within that, using the circle select button next to a public Input Action Reference should give you the option to select one of the actions inside the Input Actions asset. So it refers to a specific action inside the Input Actions asset. If you’re not seeing anything, double-check that the Input Action assets is saved.
Nice topic what exactly I was looking for
Is there a way the Rewired plugin can be used alongside the new Unity input system and OpenXR? We are using rewired to recognize and use a specific peripheral but are currently using the old Unity input manager. We need to move to the new Unity input system along with OpenXR. Can Rewired be used in the OpenXR environment?
For specific integration advice you’d be best to contact Rewired’s developers here: https://guavaman.com/projects/rewired/#support, however, I know that it is possible to enable the new Input System and the old Input Manager at the same time.
This is the best thing I have read about unity superb the best
Well done my guy
You are now my fav
Developer look forward to seeing
New posts
Hi John
What a wonderful written article for a said begginer!
Old, new and other product comparison…
Thank you
Thanks! Happy to help.
Brilliant!
I’ve seen so many tutorials and explanations, and this one is wonderfully clear – I just read the bit about “What are Action Maps used for” – and that was exactly what my mind was doing when I first experimented – I created one then had no idea what to call it ’cause I didn’t know what it really was!
I am still thoroughly confused with the new input system, however!
This isn’t a reflection on your article but more a reflection on the complexity and lack of (legible) documentation and examples!
What I am trying to do would, I think, be relatively simple – but I want to try to do it the ‘right’ way rather than hacking it – partly to help me learn!
I want to detect a touch on the screen, and also detect swipes across the screen.
If it’s a touch and not a swipe, I think I would define it by the touch point being in the same spot for x amount of time – while if in the same time the touch has moved, it’s the start of a swipe.
It sounds easy – but although I’m closer to achieving it now than I was before reading your article, I don’t feel I’m actually close at all!!!
Thank you! I think that the ideal way to do what you’re trying to do is using a custom interaction to detect a swipe. This isn’t something I’ve tried but, since interactions are how you can separate different types of similar input, that’s where I’d start.
I just wanted to say Thank You for that guide. I didn’t search much regarding New Input System since it was introduced to the public, but it has now returned to the scene and seems like it’s the best dive-in material on a table.
You’re welcome!
Thank you SO MUCH for this amazing piece of content you made.
Understanding the new Input System was a challenge for me, but within 20 minutes of reading this post I became confident in working my way around the basics of it, just enough to kickstart my learning and send me on my way making more robust Input Systems for my projects!
Keep up the amazing work!
You’re welcome Alex, Happy to help!
Thank you! This guide was amazing!
I wish unity would have linked me here to learn the basics… I was just about to give up on learning the input system after watching hours of videos and documentation overcomplicating things. After reading this I have a much better understanding of how it works and how to use it in my project.
I’ll defenitly check out your other content.
Thanks
Thank you! Great to hear that it helped you.
Overcomplicated article.
Thanks for your feedback.
Hey, can you tell me more about that example about 2D composite mode
you mentioned that we should use Digital Normalized because the magnitude of for example keyboard input W and D would be 1 and not the 1.4
because the input would have been read as (0.7,0.7) and not (1,1) if you use the Digital which would make the movement speed goes faster diagonally
what i don’t get is where would i use the magnitude ?
a movement implementation that i know would only need the direction of the input which would get multiplied by player speed such as
void Move(Vector2 dir)
{
rigidBody.velocity = dir * moveSpeed;
}
I mean i think using the Digital and not Digital Normalized would be better since the value input from the diagonal keyboard input would always be (1,1) and not (0.7,0.7) which would make it slower right ?
or is my understanding about diagonal vector is flawed somehow ?
please enlighten me!
You wouldn’t necessarily need to use the magnitude, it just highlights that if you use Digital, not Normalized, you’d be moving faster diagonally. As I understand it, some inputs, such as analogue sticks, already provide a normalised value (i.e. they will output 0.7, 0.7 before it gets to unity) so you don’t always have to worry about this, but if, for example, you’re combining two digital axes, like WASD, to make up a four directional input yourself, using normalized means that you move the same speed in every direction.
Hope that helps.
John.
Excellent and clear write up, thank you very much for lowering the entry hurdle to this new system!
You’re very welcome!
I’ve been learning Unity part time for the past half year or so, and I consistently come back to so many of your articles (this one several times, on a few of my projects). There’s nothing better out there!
Wonderful job at explaining topics, giving usable samples, and anticipating questions that your readers are likely to have.
Thank you for all your work on these!
You’re welcome! Happy to help.
Hi, thank you very much, But can you help me make compatible (the code), please?
Using old Input, I have:
KeyboardShortcut keyboardShortcut = new KeyboardShortcut(KeyCode.LeftAlt, KeyCode.Keypad4));
And the command to check keys pressed:
if (keyboardShortcut.Value.IsDown())
{
// keys pressed!
}
But how I use this same code with the New Input, please?
I can not make it compatible.
Thanks!!!!
There isn’t a direct equivalent in the new Input System, but if you use a value type input you can use that to check for a continuous input. See this section in the article for more.
i almost thought i am reading a book!
Hey John, Thank you for your time, you spared for this.!
the article has answered a lot of my questions.
You’re welcome!
What an amazing article!Very helpful for me.Thank you very much!!!
You’re welcome!
Your article is absolutely fantastic.
I tried to get into the new input system with tutorials on Youtube but most of them show specific use cases without explanation of code or option if the system.
Although I needed some time to read the full article due to its length it is competently written and explains every part of the system in depth enough to give a solid base understanding.
So, thank you for this
You’re welcome! Great to hear it helped.
Thank you so much for this article. It helped me understand the new Input System so much better.
I’m still quite stuck on how to get this to work in a local multiplayer setting where both players are using the keyboard though…
While I’m sure it’s possible to have two players use the same device, I’m not sure how to do it off the top of my head. Part of the benefit of the input system is the recognition of devices as a player, so you’d probably have to go against that in order to get two players using one control device, where one “player” is made up of two sets of controls, player one and player two. However, this isn’t something I’ve done and there may be a better way than that to do it.
Very complete and well explained. Although I will need a bottle of aspinira and reread several times to understand everything since I am new to this. Any major changes for the year 2023?
To be honest I have to re-read my own article sometimes to remember how parts of it work. I’m not aware of any major changes, since even though this article is a little old now, it was written after the input system left preview. I think there have been a few tweaks here and there but the general concept is the same. If you run into something that doesn’t make sense, let me know and I’ll update the article.
Thank you so much for this!
You’re welcome!
Thanks John for this article!
Do you know if they’ve remedied the issue yet with modifier actions and normal actions both still firing
e.g. Shift+W and W action both fire
I don’t know if they’ve fixed that yet to be honest, but it’s been a little while since I’ve checked.
I got a question. I try to make a my camera rotate using the new Input System. I added an action mapping and set the binding to Delta [Mouse]. Every time I start the game I get a big value at the beginning. Is there a build in way to skip the first input?
Not that I’m aware of, but I haven’t seen this problem before. Is it the same in the build as it is in the editor?
Wow! You have done a wonderful work here! Thank you for the far complete tutorial. You could turn it into an e-book. Very good, really. Thanks man!
You’re welcome!
Thanks very much, but i have a big question. How to save input actions like in a lot of games, who can change input?