
The Player Input Component is a built-in method for connecting Input System Actions to scripts on a player object.
It provides a ready-made solution for handling the connection between controls that are set up using Unity’s Input System and the game functions they trigger, without needing to write any extra code.
As a result, the Player Input Component only works with the Input System, not the Input Manager, which is the default, legacy input method.
But, if you are using the new Input System, it’s one of the easiest ways to actually connect the controls you set up in your Action Asset to the scripts on your object.
So how does it work?
How to set up the Player Input Component
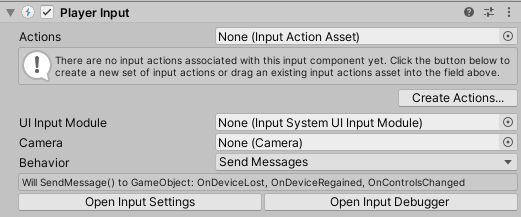
When you first add the Player Input Component, you’ll need to assign an Input Actions Asset to it.
Typically, you may only have one of these, or none, in which case you can generate a new set of actions with the Create Actions button.
The Player Input Component makes it easy to connect Input Actions with game object behaviour.
By default, the Control Scheme, which is a defined group of one or more devices that can be used to control the player (such as a mouse and keyboard for example) will automatically switch to whichever one is receiving input.
However, you should take care to set the default Action Map (if you have more than one), as it’s easy to forget to do this.
Action Maps change what your input will do and are useful for creating different input configurations based on the player’s activity.
For example, you might use one Action Map for general movement but, when the player jumps in a vehicle, you’ll want the same controls to perform different functions.
Using multiple Action Maps allows you to do just that, and also allows you to modify one set of controls without disturbing the other (such as having different control options for vehicles, for example).
When using the Player Input component, it’s possible to change the current Action Map, using a script.
How to change Action Maps from a script
If you’re using multiple Action Maps, you will probably want to be able to change between them during the game.
With a reference to a Player Input Component, you can switch Action Maps by calling the Switch Current Action Map function, passing in the name of the Action Map you want to switch to.
Like this:
playerInput.SwitchCurrentActionMap("Menu");When testing this, keep in mind that the Player Input Component shows the default Action Map, not the current one.
This means that when you switch the Action Map, it won’t show in the Inspector.
If you need to check that it worked, you can display the Current Action Map property in a log message.
Like this:
Debug.Log(playerInput.currentActionMap);Other options on the Player Input Component include the UI Input Module field, which connects a specific Player Input Component with a UI Input Module component, and the Camera setting, which is used for split-screen multiplayer.
Both of these settings relate to local multiplayer so, if you’re making a single-player game, you can leave them as they are.
Local multiplayer with the new Input System
The Player Input Component is ideal for local multiplayer, as it can assign different users, and their control devices, to different player objects automatically.
It also means that, by using a Player Input reference to access Actions and Bindings (instead of accessing them directly), controls and processors can be set on a per-player basis (e.g. to rebind the controls for one player, but not another).
Based on your Control Schemes, and the number of Player Input Components in the Scene, Unity will know how many people are playing the game and what devices they’re using.
However, for this to work, you should only use one Player Input Component per player.
The Player Input Manager component can be used to handle players joining and leaving games, instantiating player prefabs and can even split the screen for split-screen multiplayer.
You can find out more about the Player Input Manager Component here, or try the multiplayer sample project, available in the Package Manager.
While you may not need to connect your Player Input Component with an individual UI Input Module, you might still be wondering what one is.
So what is it?
What is the UI Input Module?
The UI Input Module provides default user interface interactions for menus and UI elements.
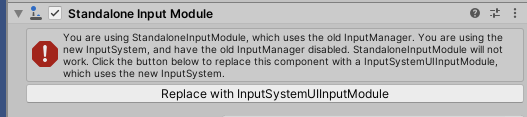
It directly replaces the old Standalone Input Module, which is normally added to the Event System game object by default when making a Canvas UI.
Just like the old module, the UI Input Module handles basic tasks like mouse clicks and button navigation with the keyboard.
It’s what makes buttons and UI elements work out of the box in Unity.
This means that if you add a button, you can already click it, and if you add four, you can already navigate between them using the keyboard.
Without any extra work.
What to do if the UI Stops working after upgrading to the new Input System
After you upgrade to the new Input System, the Standalone Input Module won’t work anymore. So, after upgrading, if your UI suddenly stops working, and you’re not sure why, chances are you need to replace your old Standalone Input Module with the new Input System UI Module.
To do that, find the old Standalone Input Module in your Scene, you’ll likely find this on the Event System game object that was added with your Canvas.
You’ll see an error on the component, with a prompt to replace it with the new UI Module.
Click the button to replace the component and your UI should work as it did before.
If your UI suddenly stops working after switching to the new Input System, This is why.
You may also find that some game-related Input functions, such as locating the mouse position in the world or Raycasts from the Camera, may no longer work after upgrading to the new Input System.
This is because they use the old Input Class and also need to be updated.
How to get the mouse position with the new Input System
To update scripts that use the Input Class to get the mouse position to work with the new Input System, you’ll need to replace Input.mousePosition with Mouse.current.position.ReadValue() (remembering to also add the using UnityEngine.InputSystem namespace).
Like this:
using UnityEngine;
using UnityEngine.InputSystem;

public class ReportMousePosition : MonoBehaviour
{
  public Vector2 mousePosition;

  void Update()
  {
    mousePosition = Mouse.current.position.ReadValue();
  }
}
The UI Input Module is ideal for setting up menu navigation quickly and easily.
In fact, it’s easy to forget that being able to click buttons and navigate menus isn’t a built-in feature, and is, instead, a removable component in the Scene.
But, while triggering UI elements is a near-automatic process, triggering player functions is not.
Although, it can be surprisingly easy.
Exactly how it works, however, depends on the Behaviour setting of the Player Input Component.
The Behaviour Setting (how to connect the input system with script functions)
The Behaviour setting decides how the Player Input Component will communicate with other game objects and their scripts.
This is the part of the Player Input Component that actually communicates with the scripts on your object.
There are four options to choose from:
Send Messages
Send Messages is, in my opinion, the most straightforward method of connecting Input Actions to scripts.
Why?
Because it uses a method of connection that you’ve already used before.
You’ve probably already used Update to run code every frame.
Or functions like Start to run code at the start of the game.
You’ll know that you don’t need to explicitly call Start when you use it, as Unity does this for you.
Just as it does with other common event methods, like Awake, OnEnable or OnDisable etc.
The Send Messages behaviour option triggers functions in a similar way.
Every time an Input Action fires, the Player Input Component will trigger functions on the same game object that match the name of that Action, prefixed with “On”.
For example, if you have an Input Action called Jump, the Player Input Component will search for and call any method on the same object called “OnJump”.
Like this:
void OnJump()
{
    // Jump !!
}
In fact, when selecting Send Messages, you’ll be able to see exactly what will be called, so that you can configure your scripts to match:

Send Messages will call functions that match your Action’s names, so Fire becomes “OnFire”.
Fire becomes OnFire,
Duck becomes OnDuck,
Movement becomes OnMovement.
It doesn’t need to be public and you don’t need to create a connection between the Player Input Component and the script you want to use.
Just add it to the same object and it will work.
Easy, right?
But what about the input data?
For example, how can you capture Vector 2 movement from a thumbstick or a float from a trigger press?
It’s possible to collect information from the input by adding an Input Value parameter to the function.
Here’s how…
If you haven’t already, you’ll need to add the Input System namespace to the script.
Like this:
using UnityEngine.InputSystem;Then add an Input Value parameter to the function that matches the name of the Action that will trigger it.
Like this:
using UnityEngine;
using UnityEngine.InputSystem;

public class MovePlayer : MonoBehaviour
{
    public Vector2 moveVal;
    public float moveSpeed;

    void OnMove(InputValue value)
    {
        moveVal = value.Get<Vector2>();
    }

    void Update()
    {
        transform.Translate(new Vector3(moveVal.x, moveVal.y, 0) * moveSpeed * Time.deltaTime);
    }
}
The value is retrieved from the Input Value reference using Get, at which point you’ll be able to specify what type of date you want to try to get from the Action. In this case, I’m applying movement, so I want a Vector 2 from the Action.
Otherwise, for a trigger, I might get a float value:
void OnFire(InputValue value)
{
    float triggerVal = value.Get<float>();
}
I can also get the status of a button as a boolean using InputValue.isPressed,
Like this:
bool modifierPressed;

void OnModifier(InputValue value)
{
    modifierPressed = value.isPressed;
}
Getting the state of the button like this will only work if the Action triggers on both the Press and Release, which can be done with an Interaction or by using a Value Action Type.
What’s the equivalent of Get Axis in Unity’s new Input System
While there’s no one way to use the new Input System, you may have noticed that, generally, the process of getting an axis value from a control and using it to create movement is a little different to how the old system worked.
In the old system, you could use Get Axis in Update to get the value from a control and then use that value to move something.
In Unity’s new Input System, however, instead of getting a value directly from an axis, you receive it from an Action, but only when it’s triggered. How often an Action is triggered depends on the Action Type, where a Button type will, by default, trigger it once and a Value type will provide continuous data as the control is used.
This means that to create basic movement, instead of looking up the axis, you’ll generally need to record the data you get from the action and then, in a separate function, use it to create movement in Update.
Using the Player Input Component with the Send Messages behaviour works great for easily adding input functionality to a single game object.
But what if your player functionality is split between a number of different scripts on different game objects?
Which, chances are, it probably is.
Luckily, there’s an option for that too.
Broadcast Messages
Broadcast Messages works in the same way as Send Messages except that it broadcasts messages down through the object hierarchy, which is useful if you’ve split your control scripts over a number of different objects.
By adding the component to the root object, you can control multiple control systems from one place, without needing to squeeze it all onto a single object.
This is especially useful if you organise different control systems on the player using nested game objects, or by turning them on or off, or by adding and removing objects as you need them.
Send Messages and Broadcast Messages are, in my opinion, the easiest way to set up input connections in Unity.
Which may be all you need.
However, if you need more information about what, how and when an Input Action is triggered, you might prefer to use Unity Events instead.
Invoke Unity Events
This behaviour option triggers functions by invoking Unity Events.
You may have already used Unity Events before without even realising.
For example, if you’ve ever connected a UI button or slider control to a script, then you probably used Unity Events to do it.
Using the Invoke Unity Events behaviour with a Player Input Component works in a similar way.
You’ll see a list of Actions for each Action Map and, for each, you’ll be able to connect one, or more, functions to be triggered by it.
However…
To trigger methods or get data from controls when using this method, you’ll need to configure the functions in your script to accept a different data type, the Callback Context.
Put simply, a Callback Context is a data type that provides information about what triggered an Action.
While Send Messages and Broadcast Messages are able to receive information from an input using the Input Value parameter, you’ll need to create methods that accept a Callback Context parameter when using the Unity Events behaviour option.
Like this:
public void Move(InputAction.CallbackContext value)
{
    moveVal = value.ReadValue<Vector2>();
    transform.Translate(new Vector3(moveVal.x, moveVal.y, 0));
}
Note that the Callback Context data type reads input data with the Read Value method, while Input Value uses Get.
This means that if you set up your game to work with Send Messages, for example, and then switch across to Unity Events, you’re probably going to have to make some changes to any input-controlled scripts to get things working how you want.
Because of this, it’s probably a good idea to decide which behaviour option you’re going to use early on in your project.
Invoke C Sharp Events
Invoke C Sharp Events works in a similar way to Unity Events, except that the events are delegate-based events, meaning that you’ll need to set them up and register them manually for this to work.
Something like this:
using UnityEngine;
using UnityEngine.InputSystem;

public class CSharpEvent : MonoBehaviour
{
    public PlayerInput playerInput;

    void OnEnable()
    {
        playerInput.onActionTriggered += MyEventFunction;
    }

    void OnDisable()
    {
        playerInput.onActionTriggered -= MyEventFunction;
    }

    void MyEventFunction(InputAction.CallbackContext value)
    {
        Debug.Log(value.action.name + (" was triggered"));
    }
}
One potential drawback of using this method is differentiating between Actions that have been fired, as the On Action Triggered event gets called any time any Action is triggered.
Because of this, and for the purpose of this guide, I’d recommend getting started instead with either Send Messages, Broadcast Messages or Unity Events and only use C Sharp Events if it makes sense for you and your project.
Now it’s your turn
Now I want to hear from you.
Are you using the Player Input Component?
Have you found it easy to use, or tricky to work with?
And what have you learned about player input in Unity that you know someone else would find useful?
Whatever it is, let me know by leaving a comment.

John French writes all of the Unity tutorials for Game Dev Beginner, and specialises in deep-dive guides teaching game development basics.

Comments
Thank you for your articles! They are easy to read and very interesting, as usual.
I’ve started using Unity a year ago and I directly started using the new Input System. Let me tell you that it was hell. Most (if not all) tutorials were about Input.GetAxis() and consorts and it was very difficult for a complete beginner to understand and use the much more complex Input System.
Nevertheless I’m happy I persevered because it helped me a lot understanding concepts like events and proper evaluation of input values. I also think it’s good to learn about events early if you don’t want to just plug everything into your Update(). My Updates() are very light on code because I rely a lot on events and I’m pretty happy about that.
Conceptually it makes much more sense to me to run code only when a pertaining event happens instead of checking every frame if it should happen or not.
tldr: it was hell but worth it
Happy to help! Thanks for sharing
John, I just discovered your articles on Unity development and programming. These are EXCELLENT, and have provided me a lot if new insight, even after developing and teaching in Unity for several years.
Your series on the “new” Input System and Player Input component are how I discovered your site, and they’re top-notch!
Thanks Derek, happy to help!