There are two built-in methods for handling input in Unity.
There’s the Input System, which is Unity’s newest method for handling input, and the Input Manager, which is the original system for setting up player controls.
Generally speaking, the newer Input System is much more capable than the older Input Manager.
It features better support for different control schemes, multiple players, and supports modern controllers.
However, despite the new system being out of preview for several years now, the older Input Manager is still the default method for dealing with input in Unity.
Meaning that, when you create a new project, even in one of the newest versions of Unity, that’s what you’ll be using.
But, is that really a problem?
While the Input Manager does have fewer features than the new Input System, it’s also very simple and easy to use.
What’s more, even though it’s technically out of date, for some projects it’s absolutely fine to keep using it, and may even be the preferred option in some cases.
So how does the Input Manager in Unity work, and is it ok to keep using it in your project?
How the Input Manager works
The Input Manager is made up of two parts: The Input Class and the Input Manager itself.
The Input Manager refers to the settings window (available in the menu under Edit > Project Settings) where you can assign buttons, key presses and axis inputs from real devices to named Virtual Inputs (such as “Horizontal”, “Fire” etc.).
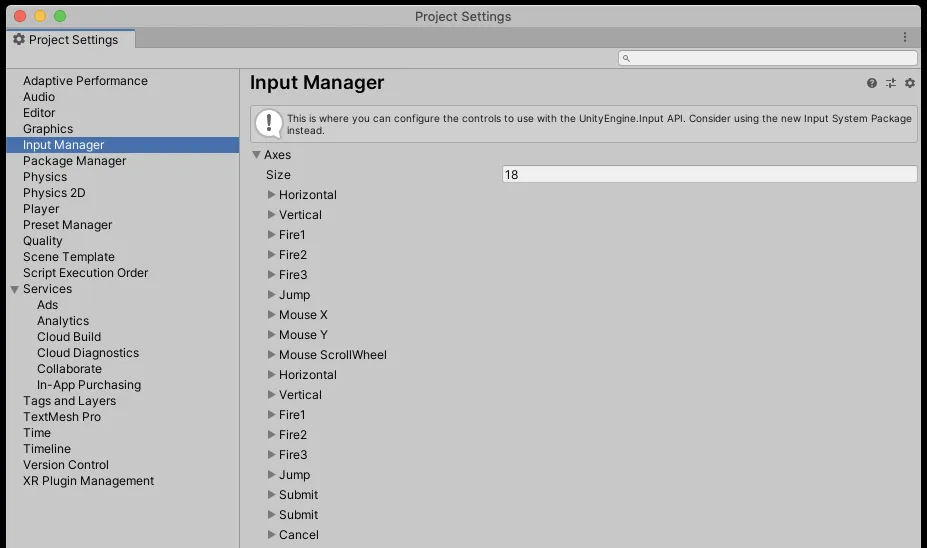
The Input Manager in Unity
The virtual inputs can then be listened for in scripts, using the methods from the Input Class.
So how do you actually use it?
How to set up an input using the Input Manager in Unity
Just like in the newer Input System, the point of the Input Manager is to create a layer of abstraction between specific key and button presses and the logic that they trigger.
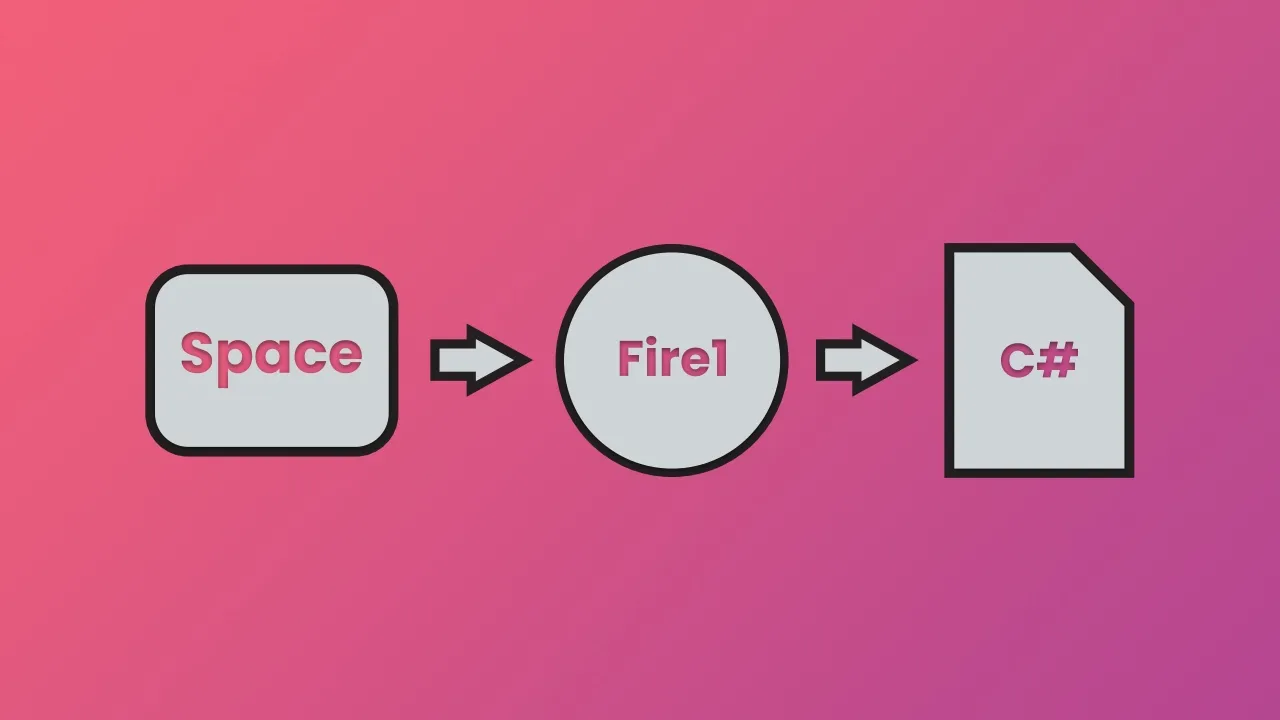
For example, let’s say that I want to create an input that will allow the player to fire a gun by pressing the Spacebar.
I could listen for the space bar press directly, using the Get Key Down method in the Input Class.
Like this:
void Update()
{
    if (Input.GetKeyDown(KeyCode.Space))
    {
        // Fire !!
    }
}
This works but, if I want to change it later, or if I want to support other control devices, I’m going to have to come back to the script later to change it.
Which, for one script, is fine but, as your project gets bigger, changing every script that responds to input could be extremely difficult.
Instead, I can use the Input Manager to create a Virtual Input, called Fire1, and then listen for that virtual input, not the Spacebar key press specifically, in any script that needs to use it.
The idea is that, now, because there’s a virtual input that sits in between the keypress and the code that will use it, you’ll be able to change what the trigger is without changing the script that responds to it.
The Virtual Input acts as a middle step between the actual key that’s pressed and the script that will use it.
Here’s how to do it…
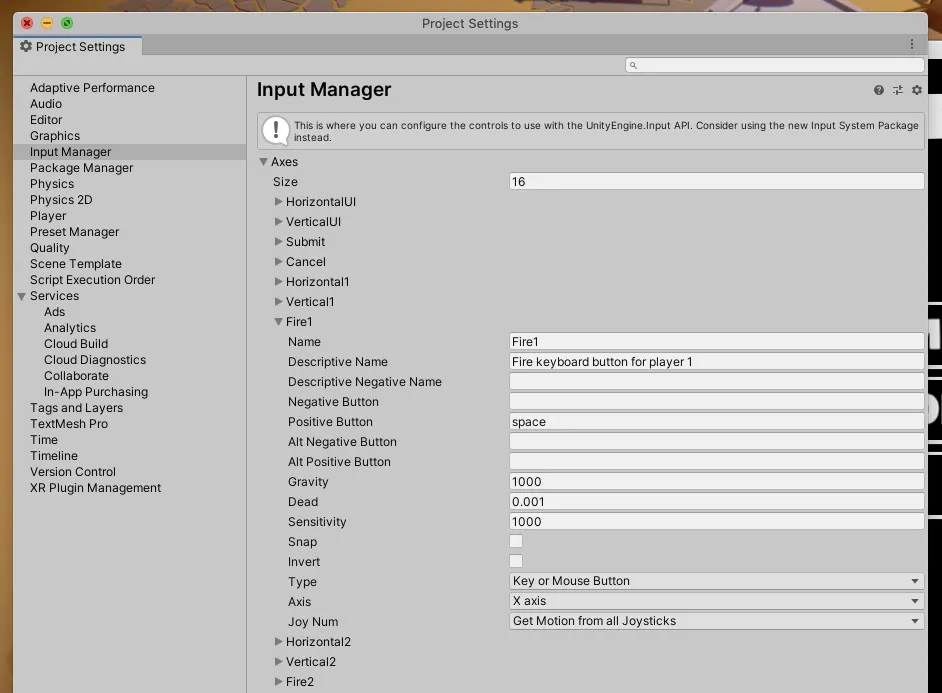
- First, open the Project Settings and select the Input Manager.
You’ll see a list of default inputs already set up, you can add to the list by increasing the Size value (like you would with an Array) - Create or reuse an existing input.
There’s already an input named Fire1 so, for this example, I’m just going to reuse that. - Set the Input Type and Positive Button.
In my case, I’m setting the Input Type to Key or Mouse Button (as opposed to a Joystick or Thumbstick axis) and the Positive Button to the Spacebar.
Don’t know what to put here? Use the Input Manager documentation to find the naming convention for other special keys.
Like this:
The Input Manager allows you to assign real device inputs to virtual ones which can then be listened for in scripting.
Should you enable Use Physical Keys?
The Physical Keys setting is a checkbox in the Input Manager that can be used to maintain a consistent keyboard layout, even if the mapping of specific keys is different.

Enabled by default, it basically means that when you specify a key, you’re really referring to where on the keyboard that key is, not what letter it represents.
This can be useful if you’re creating WASD movement, for example, as even if the layout of the keyboard meant that those specific characters were in a different place, you’d typically still want them to be in the same pattern and the same position so that you could actually use them effectively.
Whereas, if you’re creating a game with many key-specific commands, such as a complex simulator with key commands that correspond more closely to their letter than their position, you might want to disable physical keys instead.
Now, with the Virtual Input set up, I can write a script to listen for the Fire1 event by using the GetButtonDown method of the Input Class (which returns true on the frame that the button was first pressed).
Like this:
void Update()
{
    if(Input.GetButtonDown("Fire1"))
    {
        // Fire !!
    }
}
Note: that I used Get Button Down, and not Get Button, which would have returned true for every frame that the button was pressed.
Using a Virtual Input like this means that I can easily change the control for firing without changing the script that actually does the firing.
It also means that I can add different controls that perform the same action, supporting multiple control types.
For example… let’s say I want to support a controller and a keyboard at the same time, allowing the player to fire with the Spacebar or with a controller button.
How to support multiple devices using the Input Manager
It’s possible to assign multiple device inputs to a single Virtual Input in the Input Manager by using the same input name.
For example, I already have a Fire1 Virtual Input that responds to the Spacebar.
By creating a duplicate Virtual Input with the same name, but that responds to a different control, I can allow two devices, using two different buttons to trigger the same Virtual Input.
Such as a controller button:
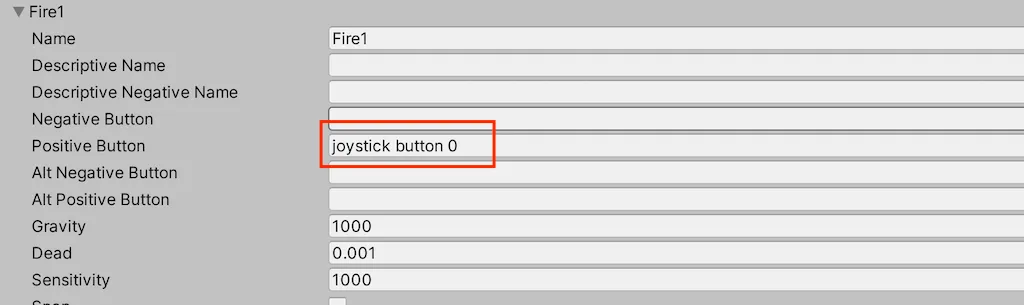
Creating duplicate Virtual Inputs that respond to different devices allows you to support multiple control schemes using the Input Manager.
Alternatively, I could also use the Alt Positive Button, which acts as a second button to trigger the same input.
However, although it works in the same way, it makes a little more sense to reserve the Alt Button fields for secondary buttons on the same device (e.g. two buttons on the same controller) and make a new input for different devices.
In this example, I’ve created a virtual fire input that responds to the Spacebar or to the First Button of a controller (usually A or X depending on the platform).
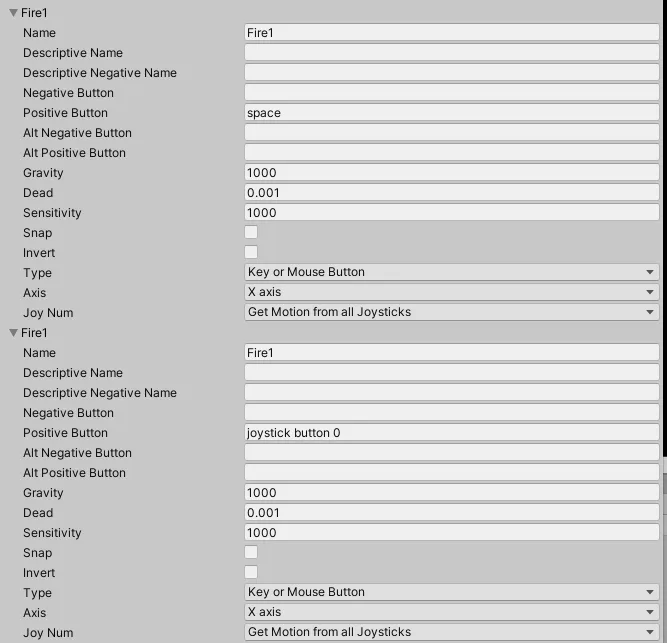
You can support multiple inputs in Unity’s old Input Manager by creating duplicate Virtual Inputs with the same name.
However, not every control can be expressed using a simple button press.
Movement, for example, is typically controlled using an axis that works in two or more directions.
How to get an axis using the Input Manager
An axis in Unity generally refers to a value between -1 and 1, where 0 is typically the default, off value.
Technically, all of the inputs in the Input Manager list are axes, even on / off button presses, which are simply an axis between 0 and 1, where 0 means off and 1 means on.
However, it’s possible to define an axis that extends from -1 to 1, allowing a scale of movement in two directions, with off in the middle, by adding a Negative Button assignment.
For example, you could create a vertical axis using the up and down arrow keys.
Like this:
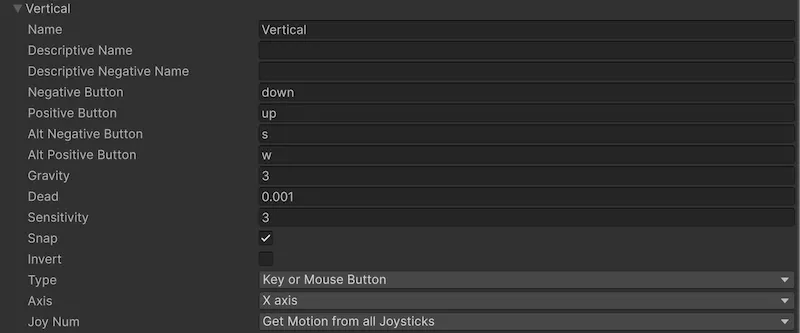
An axis can be created by simply assigning a negative button to the virtual input.
Then, to read the read the value, simply use the Get Axis function of the Input Class.
Like this:
void Update ()
{
    moveAmount = Input.GetAxis ("Vertical");
    turnAmount = Input.GetAxis ("Horizontal");
}
To use a controller thumbstick, you’ll need to set the Virtual Input’s Type to Joystick Axis (instead of Key or Mouse Button).
You’ll also need to know which axis to use.
For example, the left stick, on Xbox and Playstation Controllers, is usually mapped to axes 1 and 2, while the right stick uses 4 and 5.
The d-pad uses axes 6 and 7, but not on the Switch Pro Controller, which uses 11 and 12.
However, your experience may vary, as some users have reported.
While you might be more familiar with using Get Axis to apply analogue movement controls, all of the Input Manager’s inputs are, technically, axes. As even a digital button provides a value between 0 and 1 when used.
This means that even an on/off button when used with Get Axis, can provide an analogue value.
How that value responds to the button being pressed depends on the Sensitivity and Gravity settings for the Axis, where Sensitivity controls how quickly the value moves towards the target and Gravity controls how fast it falls away from it once released.

Sensitivity and gravity affect how quickly a digital input moves a Virtual Axis towards its target.
This is why, when using the Input Manager’s default axes, horizontal and vertical movements that are controlled by the WASD keys are smoothed, not rigid, despite being controlled with digital buttons.
Should you still use the Input Manager now that the new Input System is available?
The Input Manager has its benefits. It’s simple to use and quick to set up, making it easy to add basic controls quickly.
However… there are some drawbacks to using the old system.
For example, it’s not possible to rebind controls at runtime and the splash screen that used to let you change controls before starting the game has since been removed.
There also appears to be limited support for some newer devices. For example, I was only able to get my Switch Pro Controller partially working and, even then, the axis mapping was different to Xbox and PlayStation controllers, which both share similar mappings.
So when is it ok to use the Input Manager?
Is the Input Manager still a good option?
While the old Input Manager can be a good way to quickly add input to your game, it’s difficult to recommend it over the new Input System.
But that doesn’t mean you shouldn’t use it.
If you know how big your project is going to be, and if you know what kind of input you want to be able to support, then it’s not necessarily a problem to use the older Input Manager, even now.
This is especially true if all you’re doing is prototyping a project or even in the early stages of a larger game.
But, if you think that you might want to switch from the Input Manager, it’s extremely important to avoid hardcoding it into your scripts as much as possible as you’ll need to go back and change every script that uses it later on.
And, if you want to support newer control devices, re-mappable controls or manage input for different types of gameplay, you will probably be better off using a more advanced plugin, such as Rewired, or Unity’s new Input System instead anyway, so it makes more sense to start as you mean to go on.
Now it’s your turn
Now I want to hear from you.
Are you thinking of using the Input Manager in your project?
Do you prefer it over the more complex, but newer, Input System?
And what have you learned about Input in Unity that you know someone else would find useful?
Whatever it is, let me know by leaving a comment.

John French writes all of the Unity tutorials for Game Dev Beginner, and specialises in deep-dive guides teaching game development basics.
