
Delta Time is a built-in value in Unity that returns the amount of time, in seconds, that has passed since the last frame.
And that’s all it does.
Very straightforward, and very specific.
But, even if you’re new to Unity, you’ve probably already used delta time before and, chances are, you’ll be using it a lot in the future as well, since it affects just about any part of your game that takes place over an amount of time.
This means that every time you measure an amount of time that’s elapsed, change a value over a number of frames, or move something at a consistent speed, you’re probably going to need to use delta time to do it.
But not always…
So how does delta time in Unity actually work, and when should you be using it?
How to use Delta Time in Unity
Delta Time is a static float value that returns the duration in seconds between the last frame and the current one, and can be accessed using the Time Class.
Like this:
float deltaTime = Time.deltaTime;A typical use of delta time is for measuring time intervals, where adding the duration of the last frame to a running total can be used to create a basic timer.
Like this:
float timer;

void Update()
{
    timer += Time.deltaTime;
}
This can be extremely useful for making a countdown timer, or a stopwatch that can be used to measure intervals and delay functions.
However, delta time is also used as a scaling value.
This is because framerates in games aren’t usually consistent.
A game might run at 60 frames per second, or it might run at 30 or, as is often the case, the framerate might change constantly, meaning that every frame takes a different amount of time to process.
For tasks that need to be completed in the frame that they were started in, this isn’t a problem.
And, in fact, this is how most code works, it’s started and finished all at once, during the same frame, as quickly as possible.
Meaning that the duration of that frame doesn’t really matter.
But… if you’re trying to do something over multiple frames, over a period of time, such as move an object, or change a value, then you’re going to need to control how fast it happens.
Which means scaling it, either by the rate at which it’s supposed to change, or by the amount of time it’s supposed to take.
For example, if you want to constantly move an object in a particular direction, one way to do that is by adding to the object’s position every frame.
Like this:
void Update()
{
    transform.position += new Vector3(0, 0, 1);
}
Which works, kind of…
The problem with moving an object in this way is that, like this, it will move one unit every frame.
But, since each frame takes a different amount of time to process, the object will move inconsistently.
Double the framerate, and the object moves twice as fast, halve it and it will move at half speed.
Or, more likely, it will move at a variable speed depending on the current framerate.
This happens because the unit of scale is the frame when, really, it needs to be time.
Multiplying the movement value by Delta Time converts the rate of change from units per frame to units per second.
Like this:
void Update()
{
    transform.position += new Vector3(0, 0, 1 * Time.deltaTime);
}
Meaning that, in one second of actual time, the object will have moved forward by one unit.
No matter how many frames it took to get there.
And, if you want to change how fast the object moves, then you can, by changing the value of the unit that’s scaled by delta time.
For example, if you want the object to move at 2 units per second, just change the 1 to a 2.
Or create a speed variable so that you can easily change the rate of movement from the Inspector, without modifying the script.
Like this:
[SerializeField] float moveSpeed = 1; // In units per second

void Update()
{
    transform.position += new Vector3(0, 0, moveSpeed * Time.deltaTime);
}
Alternatively, it’s possible to scale a rate of change by how long you want the change to take.
Typically, when you want to control how long something takes to complete, you’d use a function like Lerp.
Like this:
float valueToLerp;

IEnumerator Lerp(float start, float end, float duration)
{
    float timeElapsed = 0;

    while (timeElapsed < duration)
    {
        valueToLerp = Mathf.Lerp(start, end, timeElapsed / duration);
        timeElapsed += Time.deltaTime;
        yield return null;
    }

    valueToLerp = end;
}
Lerp works by measuring an amount of elapsed time relative to an intended duration.
It then returns a value between a minimum and maximum range, based on a weighting value, which is the amount of time that has passed divided by the target duration.
This means that the actual rate of change, how fast the value changes, might be faster or slower, depending on how long it’s supposed to take.
In either case, whether you’re changing a value by speed or by duration, scaling the rate of change by delta time is extremely important, for two reasons.
Firstly, it means that the rate of change is consistent, even if the framerate isn’t.
But it also means that how fast an object can move, or how quickly a value will change, will vary if the Timescale changes.
What is Timescale in Unity
Timescale is a static float value in the Time Class that represents how fast time passes.
Normally, it’s set at the default value of 1, meaning that one second in your game is equivalent to one second in real life.
However, it’s possible to change the timescale, moving it up or down, meaning that time will pass faster, or more slowly.
For example, if you change the timescale, to 0.5.
Like this:
Time.timeScale = 0.5f;Then time will pass at half its normal speed.
In your game, that means that an object that normally takes one second to move one unit will now take two seconds to cover the same distance.
But only if its movement is scaled by Delta Time.
This is because delta time is, itself, scaled by timescale.
So, when the timescale is lower than one, delta time is scaled down as well, meaning that less time is perceived to have passed than actually did each frame.
Timescale affects Delta Time, meaning that a game can be slowed down using timescale, but only if your movements and value changes are scaled by delta time in the first place.
As a result, changes in values that are scaled by delta time, such as position or the time on a stopwatch, happen at a slower rate.
Allowing you to slow the game down, or speed it up, using timescale.
And if you drop the timescale down to zero, the rate of change will also be zero, meaning that nothing changes and the game is, effectively paused.
This is why it’s generally good practice to always scale time-based value changes by delta time, particularly if you’re using the timescale method to pause your game.
But what if you want to change something while the game is paused?
Unscaled Time in Unity
Unscaled Time is time that isn’t affected by changes to Timescale in Unity.
Meaning that, if you slow down or stop the game using timescale, unscaled time values won’t be affected.
Like this:
Time.deltaTime; // This value is affected by timescale,
Time.unscaledDeltaTime; // but this one isn't.
This is useful when you need to use delta time, but you don’t want whatever it is you’re changing to be affected by changes in the game’s speed.
For example, you might want to create a slow-motion effect in your game, or create a feature that advances time at a faster speed, such as in a simulation game, which you can do by changing the timescale.
But, you wouldn’t necessarily want unrelated movements and animations, such as the UI, to be affected by how fast the game is moving.
In which case, using the Unscaled Delta Time value in place of delta time will allow you to scale value changes by the actual amount of time that the frame took to process.
So does that mean you should be using unscaled delta time for everything if you don’t plan to change the timescale?
Generally speaking, no.
Typically, it’s better to only use Unscaled Time when you need to measure the actual amount of time that has passed in a frame, regardless of timescale, and use Delta Time for everything else, especially gameplay.
This is mainly because delta time, unlike unscaled delta time, includes a built-in limit, the Maximum Delta Time, in case a frame goes on too long.
Maximum Delta Time (Maximum Allowed Timestep)
The delta time value is limited to a maximum amount of time for each frame, meaning that if a frame is very long, its duration is capped to a default value of 0.3333333 seconds.
This is the Maximum Delta Time value, or the Maximum Allowed Timestep as it’s referred to in the Project Settings menu.
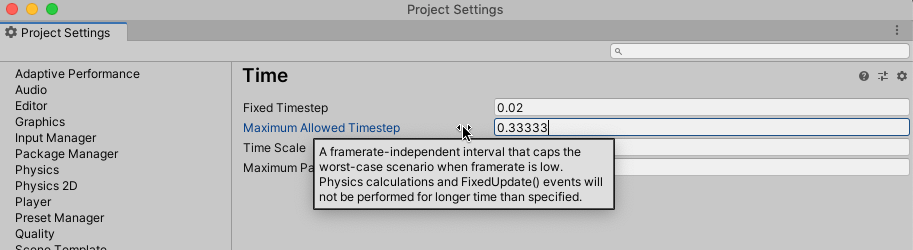
If a frame takes longer to process than the Maximum Allowed Timestep, Unity will consider it a hitch and Delta Time will return the maximum allowed timestep value instead of the actual time that the frame took.
This value can be changed, however, it’s important to not set it too high.
The point of the maximum delta time is to prevent an extreme jump forward when a very long frame occurs, such as if the game freezes for a moment.
At this point the frame isn’t just long, it’s a hitch and, when this happens, it’s typically better to pick up where you left off when the game resumes again, instead of moving the game forward based on how much time has passed.
For example, if the player is moving forward into a new area and triggers a loading operation that takes several seconds, you wouldn’t expect them to have moved forward by an equivalent amount when the game finally does resume.
However, that’s not the only reason that delta time is capped.
Another reason for avoiding excessively long delta times is to prevent an increase in Fixed Update calls as the physics system tries to ‘catch up’ with a long frame.
This is because the physics system may call Fixed Update multiple times in the next frame based on how long the last frame took to process.
Meaning that, if it wasn’t capped, one long frame could result in the following frames being longer and longer as the physics system makes more and more calls to make up for the time that’s lost which, in extreme circumstances, will eventually just freeze the game.
As a result, unscaled delta time is ideal for measuring how long a frame actually took but, in most other cases, it’s better to use delta time instead, especially if you’re scaling game-related functions.
However, there are times when, even if you’re doing something over multiple frames, when you don’t actually need to use Delta Time at all.
Such as when working with Physics, for example.
Fixed Delta Time in Unity
Unlike the frame time, which is variable, Unity’s physics system advances on a fixed timestep, equivalent to around 50 frames per second by default.
Unlike delta time, which is how long the last frame took, Fixed Delta Time determines how many times the physics system needs to be updated each frame in order to keep up.
This could be multiple times during a frame, or not at all, depending on how long the previous frame took.
Meaning that, if you want to consistently modify a value inside of Fixed Update, you’ll need to scale it by Fixed Delta Time or, optionally, Delta Time, which returns the fixed delta time value when it’s called from inside Fixed Update.
Like this:
[SerializeField] float fixedCounter;

private void FixedUpdate()
{
    fixedCounter += 2 * Time.fixedDeltaTime; // counts at 2 units per second
}However, if you’re moving an object in Fixed Update then, typically, you’ll be moving it using one of Unity’s built-in physics functions, which may mean that you don’t need to scale the movement amount by delta time at all.
This is because most of Unity’s physics-based movement functions, such as Add Force, will typically accept a Vector 3 value, which is the amount of force that needs to be applied and in which direction.
However, unlike transform-based movement functions, such as Translate, for example, which typically do need to be scaled by delta time, most physics movement functions that take a force value will scale the movement of the object automatically when the physics system is updated.
As a result, you should usually always call physics functions, such as Add Force or Add Torque, from Fixed Update and without scaling them by delta time.
However, there are some exceptions.
Move Position, for example, is a Rigidbody function that moves a physics object to a new position, meaning that the value it takes is a position, not a force.
In which case, if you use it to move an object, you’ll typically want to scale the movement amount by fixed delta time, so that it can be controlled in units per second and so that the movement speed always stays the same, even if the fixed timestep is changed.
Like this:
[SerializeField] Rigidbody rb;
[SerializeField] float speed = 1;

void FixedUpdate()
{
    rb.MovePosition(rb.position + Vector3.forward * speed * Time.fixedDeltaTime);
}
However, some physics functions not only don’t need to be scaled, they don’t need to be placed in Fixed Update at all.
Such as one-shot physics functions, like Add Force in Impulse mode, or Raycast, for example.
Because these functions will typically only be triggered once, in the next physics call, it doesn’t really matter if they’re placed in Fixed Update or not, and they can be called in a regular Update function instead.
This can be useful, especially if you want to connect a physics function with an Input event, for example, which normally won’t work in Fixed Update.
Now it’s your turn
Now I want to hear from you.
How are you using delta time in your project?
Are you using it on everything? Or nothing at all?
And what have you learned about managing time in Unity that you know someone else would find useful?
Whatever it is, let me know by leaving a comment.

John French writes all of the Unity tutorials for Game Dev Beginner, and specialises in deep-dive guides teaching game development basics.

Image Attribution
- Timer icon created by Flaticon