There are a lot of different reasons why you might want to capture the screen in Unity.
You might want to take high-quality screenshots of your game for a sales page.
Maybe you want to record gameplay footage as part of a trailer or cutscene.
Or you might want to capture screenshot images in-game, allowing the player to take and save their own photos.
But what’s the best way to do that?
In the same way that there are many different reasons why you might want to record images or video in a Unity project, there are, also, several different methods for making it work.
Which one you use will depend on what it is you’re trying to do.
In this article, you’ll learn about the different methods for capturing the screen in Unity, so that you can decide which one is right for your project.
Here’s what you’ll learn on this page:
So, how do you capture the screen in Unity?
How to capture the screen in Unity
Generally speaking, there are three different methods for capturing the screen in Unity.
- Take a game view screenshot using the Screen Capture class.
- Render the view of a camera into a Render Texture and save it to a file.
- Or use the Unity Recorder to take a high-quality screenshot or video.
Which method you use depends on what it is that you’re trying to do, as each option has its own strengths and weaknesses.
The Screen Capture class, for example, is the simplest method of taking a screenshot from a script and can be used to allow the player to capture whatever it is they can see.
Or, if you’d like to hide the UI, filter certain layers, or take a screenshot with a transparent background, your best option may be to render the view of a camera into a texture and save the result to a file.
However, if you’re trying to capture high-quality screenshots or gameplay footage in the editor, for a sales page or for a trailer, or if you’re using Unity for 3D animation or rendering, for example, the Unity Recorder is, by far, the best way to do that.
But let’s start with the simplest method of taking a screenshot, with the Screen Capture class.
How to take a screenshot in Unity (using the Screen Capture class)
One of the easiest ways to take a screenshot in Unity is using the Capture Screenshot function in the Screen Capture class.
Like this:
//Saves a screenshot when a button is pressed

public KeyCode screenShotButton;

void Update()
{
    if (Input.GetKeyDown(screenShotButton))
    {
        ScreenCapture.CaptureScreenshot("screenshot.png");
        Debug.Log("A screenshot was taken!");
    }
}
This will save the current game view as a PNG file in the root directory of the project folder when working in the editor or in the application’s data folder when running the game in the standalone player.
The Capture Screen function will save whatever the player can see.
This will include any UI elements, such as crosshairs or HUD panels, while the dimensions of the image will be the same as that of the game view.
Meaning that, if you use the Capture Screenshot function in the editor, changing the shape of the game view viewport will result in a different aspect ratio when capturing the screen.
Taking supersized screenshots
When taking a screenshot using the Screen Capture class, you have the option of increasing the resolution by passing in a supersize value, which is a whole number integer that will multiply the game view’s resolution, resulting in a higher quality image.
Like this:
// Supersizes the resolution by a factor of 4
ScreenCapture.CaptureScreenshot("screenshot.png", 4);
This can be extremely useful for taking high-quality screenshots for sales pages or other promotional uses, as the increased resolution often results in a better overall image with smoother edges.
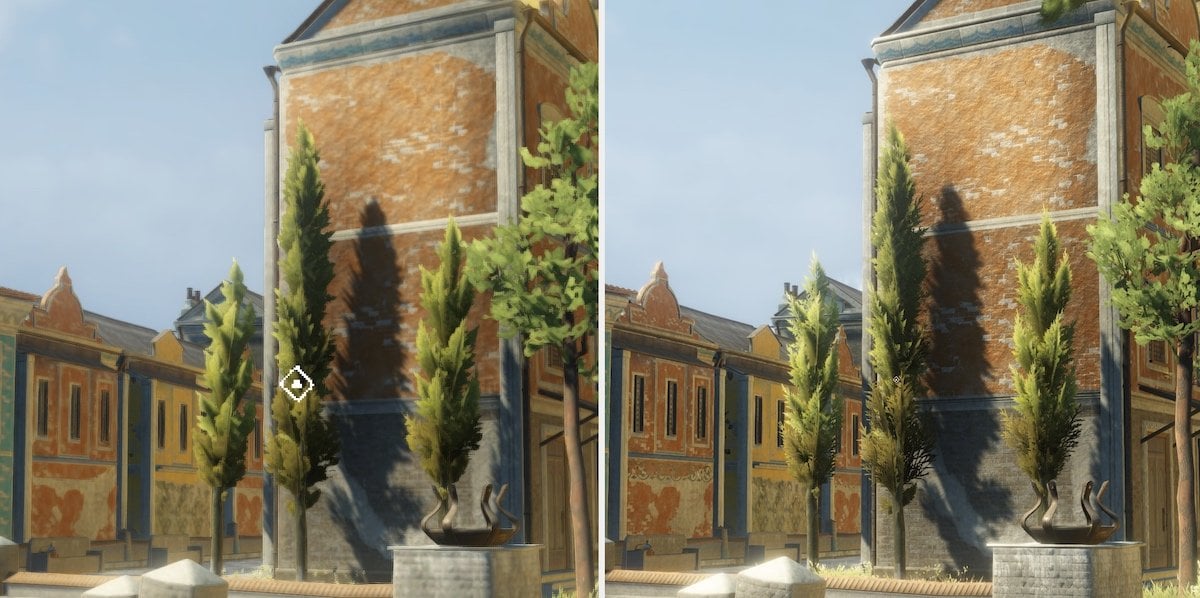
However, capturing a larger image takes longer and, as a result, not only will the game freeze while the image is saved, some post-processing effects, such as the camera motion blur in this example, will become extremely exaggerated, causing a blurry image.

Using the Supersize parameter can significantly improve image quality (top), as the increased resolution smoothes the appearance of jagged lines. However, the increased rendering time can also cause blurring of some post-processing effects (bottom).
So, while the Supersize value can be used to take higher quality screenshots, it’s not a perfect method, and you may experience some unusual visual artefacts depending on the post-processing in your game.
Where are captured screenshots saved?
By default, when working in the editor and taking a screenshot in play mode, the image will be saved to the root directory of the project folder.
You won’t be able to see the file in your project window in Unity, but you’ll be able to access it from the project directory using Finder or Windows Explorer:
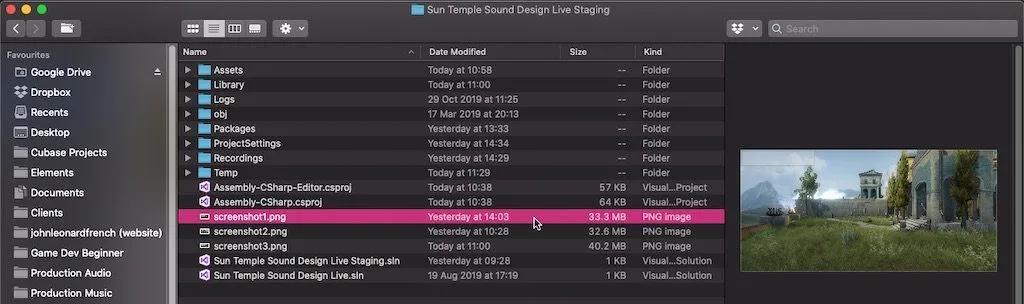
When taking a screenshot in play mode, the file will be saved to the root directory of your project folder.
When capturing a screenshot in the standalone player, after the game is built, the image will be saved in the application’s data folder (the Application Data Path) or, on iOs and Android, the Persistent Data Path.
The Application Data Path typically exists in the same location as your installed game’s files while the Persistent Data Path is usually kept separate and won’t be overwritten if the game is updated.
It’s possible to change the directory to a custom path, such as your own desktop, for example:
ScreenCapture.CaptureScreenshot("/Users/johnfrench/Desktop/screenshot.png");However, while this may be a convenient way of getting to your own screenshots, it’s generally not a good idea to save files in a player’s personal folders.
For the most part, unless you want to offer a way for the player to access screenshots outside of the game, using the default path will probably be all you need to do.
However, even if you want to keep the file path the same, you might want to add a dynamic element to the filename, such as a counter, or the date and time, so that previous screenshots aren’t overwritten when new ones are saved.
Like this:
ScreenCapture.CaptureScreenshot("screenshot " + System.DateTime.Now.ToString("MM-dd-yy (HH-mm-ss)") + ".png");In this example, I’m adding the system date and time to the file path, so that each filename is unique, and formatted in a particular pattern to prevent errors when saving.

Adding the date and time to a screenshot will prevent previous screenshots from being overwritten by new ones.
How to fix the ‘failed to store screenshot’ error
If you’re trying to save a screenshot with a date and time value in the file name, but you’re getting a ‘Failed to store screen shot’ error in Unity, then it’s most likely because you haven’t formatted the system’s date and time value.
By default, the value that System Time returns includes colons, which can’t be included in a filename.
To fix it, simply format the time value without colons, using the To String function.
Like this:
string currentTime = System.DateTime.Now.ToString("MM-dd-yy (HH-mm-ss)");For more information on how to format strings, see the .NET documentation.
Waiting for the end of the frame
When saving a screenshot, or when using the visible game image in any way, it’s generally a good idea to make sure that the current frame has finished rendering before trying to do anything with it.
Typically this involves moving the Capture Screenshot function into a Coroutine as, unlike in Update, which is called before rendering, this will allow you to wait until the end of the frame before executing the function.
Like this:
// Captures a screenshot at the end of the frame.

public KeyCode screenShotButton;

void Update()
{
    if (Input.GetKeyDown(screenShotButton))
    {
        StartCoroutine(TakeScreenShot());
    }
}

IEnumerator TakeScreenShot()
{
    yield return new WaitForEndOfFrame();
    ScreenCapture.CaptureScreenshot("screenshot.png");
}
Otherwise, you could experience image defects as a result of trying to save a partially rendered frame.
However, chances are, that, if you do trigger the Capture Screenshot function in Update, you may not actually run into any issues.
For example, when researching for this article, after taking many screenshots in many different ways, only one rendered incorrectly when taken from Update, in this case with some missing shadows.
Which, if you’re just taking screenshots for yourself, may not be too much of an issue.
However, so that you can be sure that every image comes out as it should do, and since it requires very little extra work anyway, triggering the Capture Screenshot function in a coroutine, at the end of the frame, is usually the best way to do it, as it guarantees that everything that’s supposed to be in the frame will actually be there.
But what if you don’t want to capture everything that’s in the frame?
What if you want to exclude certain elements, such as the UI, for example?
How to take a screenshot in Unity without the UI
The Capture Screenshot function records an image of the game view, exactly as it is, including the UI.
Which is great if you want to take a picture of everything, or you’re working in the editor, where you can easily remove anything you don’t want to see.
However, there may also be times when you’d like to capture what a camera can see, but with certain elements excluded, such as without the UI, with a transparent background or even if you simply want to take a shot from a camera that’s in a different position, out of sight.
This can be done by rendering a camera’s view into a texture and then by saving that texture as a file.
So how does it work?
First, create an additional camera and, in its settings, filter out any layers that you don’t want to be visible using the Culling Mask dropdown.
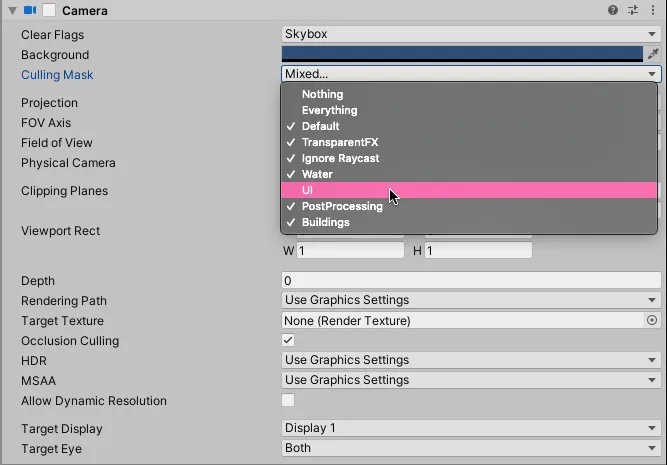
In the Camera’s Culling Mask dropdown, disable anything you don’t want the camera to see.
Next, render the view from that camera into a texture and save it.
Like this:
void SaveCameraView(Camera cam)
{
    RenderTexture screenTexture = new RenderTexture(Screen.width, Screen.height, 16);
    cam.targetTexture = screenTexture;
    RenderTexture.active = screenTexture;
    cam.Render();

    Texture2D renderedTexture = new Texture2D(Screen.width, Screen.height);
    renderedTexture.ReadPixels(new Rect(0, 0, Screen.width, Screen.height), 0, 0);
    RenderTexture.active = null;

    byte[] byteArray = renderedTexture.EncodeToPNG();
    System.IO.File.WriteAllBytes(Application.dataPath + "/cameracapture.png", byteArray);
}
When using this method, it’s possible to keep the target camera turned off, which can be useful as, depending on what it’s rendering, keeping it on can significantly decrease performance.
This method of capturing the screen works well because, once you’ve set it up, it allows you to simply record whatever it is a camera can see.
Which makes changing what is and is not included in the screenshot easy to do, by simply changing the camera’s view settings.
This can be useful for filtering out the UI, hiding certain objects or making the background of the scene completely transparent.
How to capture a screenshot with a transparent background
To take a screenshot with a transparent background, you’ll need to use the same render texture method as in the previous example.
Then, to filter everything out, click the Culling Mask dropdown and select ‘Nothing’, followed by the layer or layers that you do want to be visible.
Next, you’ll need to remove the skybox from the camera render.
This can be done by setting the Clear Flags dropdown to Depth Only.
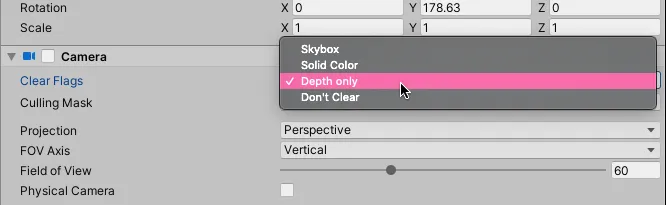
The Depth Only option will prevent the camera from rendering the skybox.
Alternatively, you could use the Don’t Clear or Solid Colour options here too (with a transparent colour) and the effect will be the same.
This will cause any visible layers to be rendered while culled layers, and the skybox background, are removed:
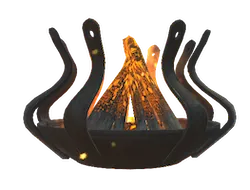
Placing an object on its own layer and culling everything else allows you to take screenshots with transparent backgrounds.
You might typically use this method to capture the image of a single object in your game, either for your own use or for an in-game feature that’s triggered by the player.
However, while using the Screen Capture class and render texture methods can be a great way to create in-game screenshot functionality, and while they are both good for taking screenshots in the editor as well, the highest-quality method of capturing gameplay footage and screenshots of your project is to use the Unity Recorder.
How to use the Unity Recorder in Unity
The Unity Recorder is a built-in tool that allows you to capture high-quality screenshots and video of your game project for sales pages, trailers or for 3D animation and filmmaking.
It can only be used in the editor but allows you to capture significantly higher quality images and video than when recording the game view directly.
Which looks like this:
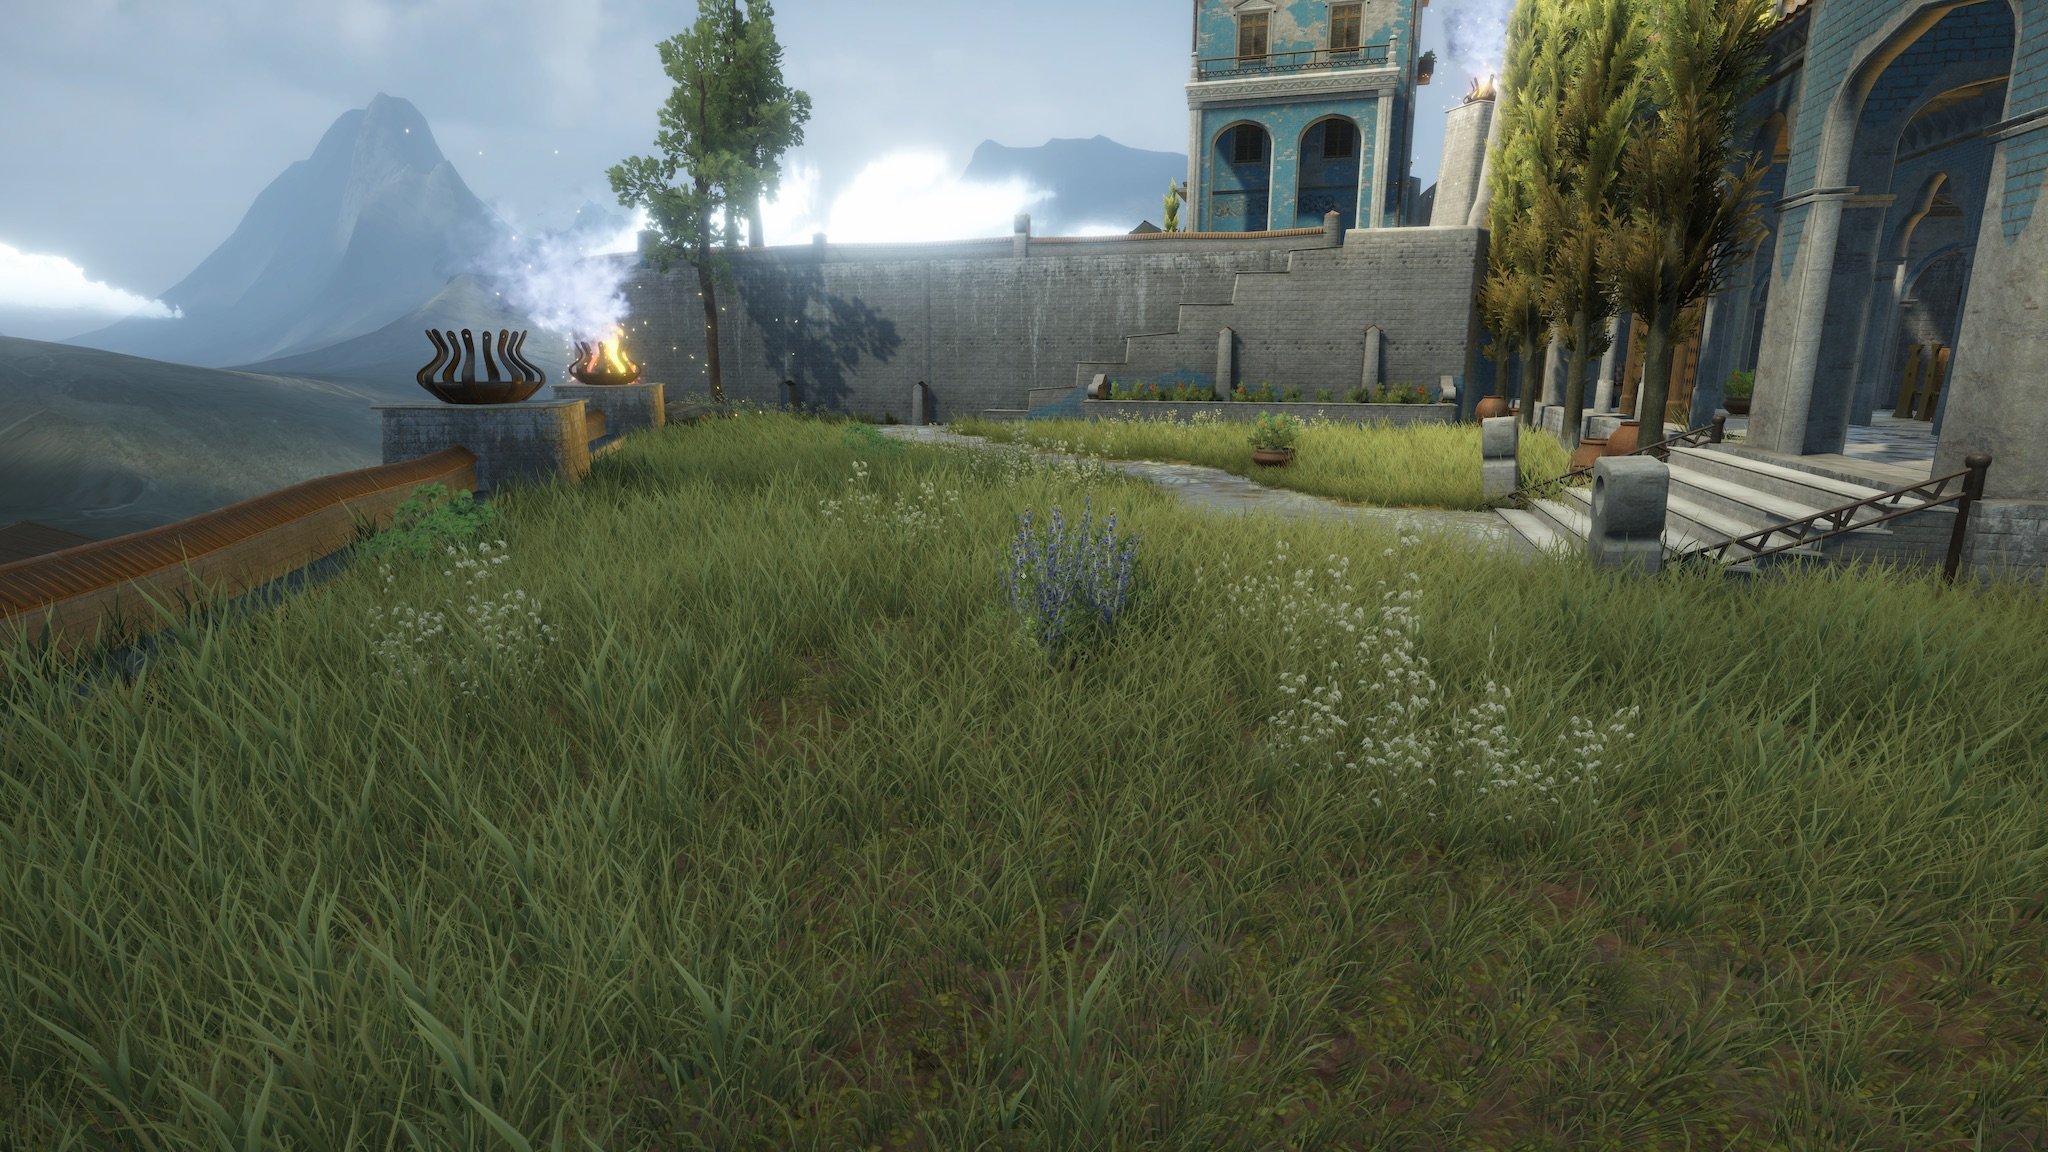
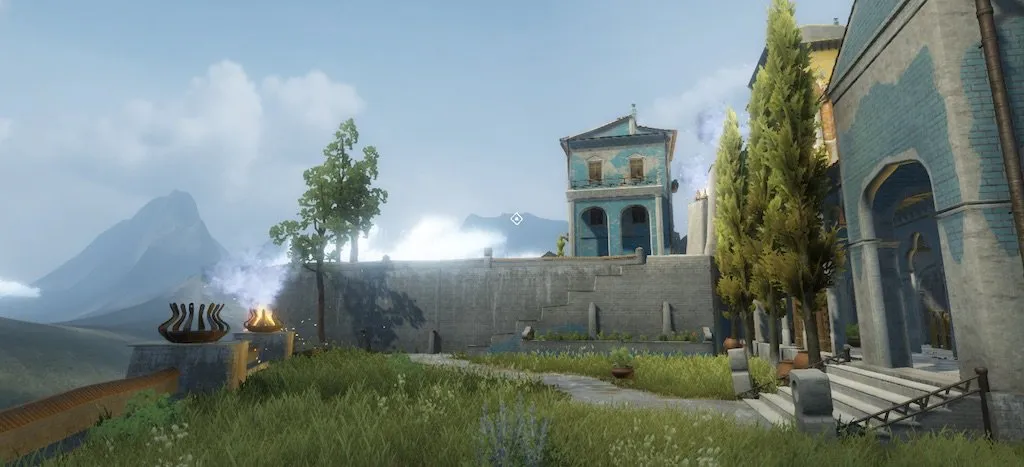
The Unity Recorder, which was used to capture this image, is the best way to capture high-quality screenshots from the editor (click for full-size).
This is because, while the game view’s quality is limited by a variable level of detail, designed to improve the actual performance of the game, the Unity Recorder appears to bump all of the game’s settings up to the maximum possible level before taking a screenshot.
As a result, texture and model details are often better, post-processing effects are cleaner, and don’t suffer the same blurring issues as when using the Screen Capture method, and the overall quality of the screenshot is higher.
The Unity Recorder generally produces a much higher quality screenshot than a screen capture alone as it appears to bump all of the game’s quality settings to maximum in the process (click for full-size).
The Unity Recorder can also be used to record high-quality video, which can be useful for recording content for trailers or for generating a video file from a 3D animation.
However, instead of simply recording what you see, in the same way that a captured image is rendered at a higher quality, a video recorded using the Unity Recorder will typically be much smoother and more stable than capturing the output of your screen.
This works because, when using the Unity Recorder, Unity will prioritise capturing footage correctly and at a stable framerate, meaning that the game itself is likely to run slower as a result.
In extreme circumstances, this can make playing the game quite difficult to do. However, the Unity Recorder is typically designed to render pre-animated footage, such as for 3D animation, where your ability to control the game doesn’t really matter.
What this means is, that, if you intend to use the Unity Recorder to capture yourself playing the game, it can help to find a balanced quality setting that still allows you to comfortably play it at the same time.
So that’s what the Unity Recorder can do for you, but how does it work?
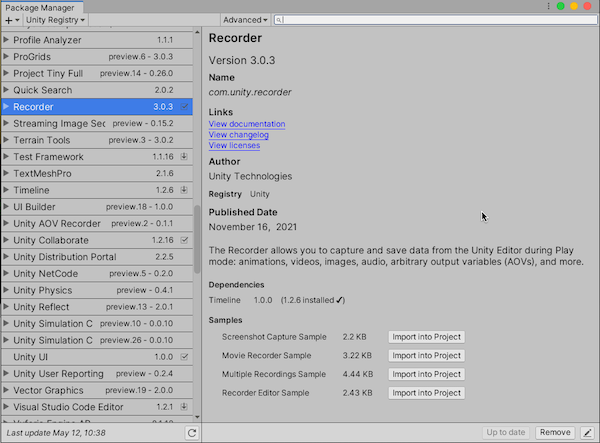
How to install the Unity Recorder
The Unity Recorder isn’t built-in to the editor meaning that, if you want to use it, you’ll need to download and import it from the package manager first.
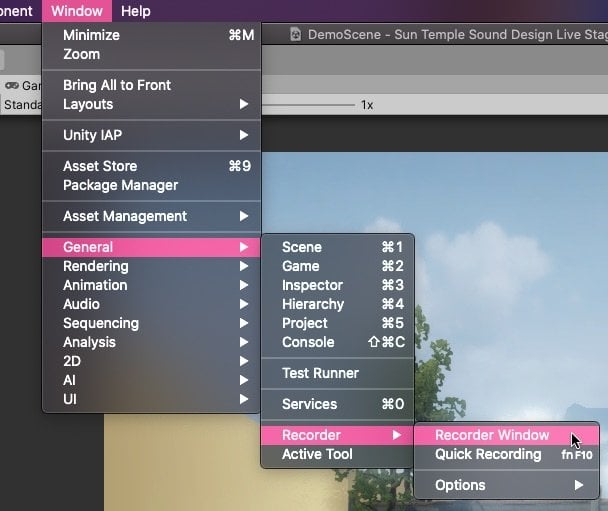
Once it’s installed you’ll find the Unity Recorder window by selecting Window > General > Recorder.
How to use the Unity Recorder
Once the Unity Recorder is installed you can take a screenshot or record a video by adding a new Recorder to the list on the left of the Recorder window.
Like this:
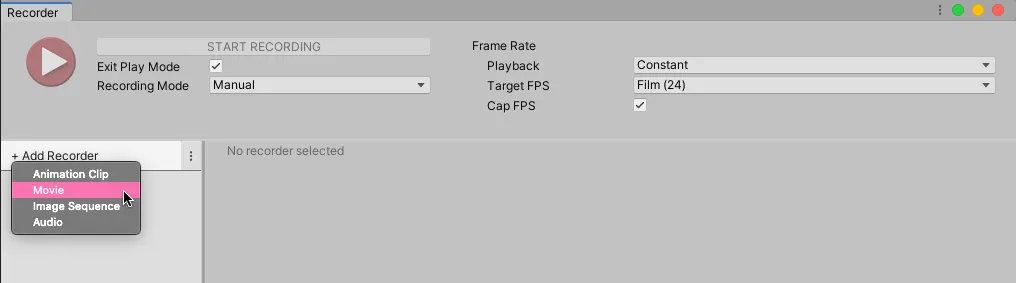
Use the Add Recorder dialogue to add a new Movie Recorder, to record video, or Image Sequence, to record one, or more, screenshots.
The type of recorder you add depends on what it is you want to capture.
A Movie recorder will render a video file, while an Image Sequence recorder can be used to capture one, or more, frames.
The recorder’s settings will allow you to specify the image source, resolution, file type and quality settings, as well as where the file will be saved.
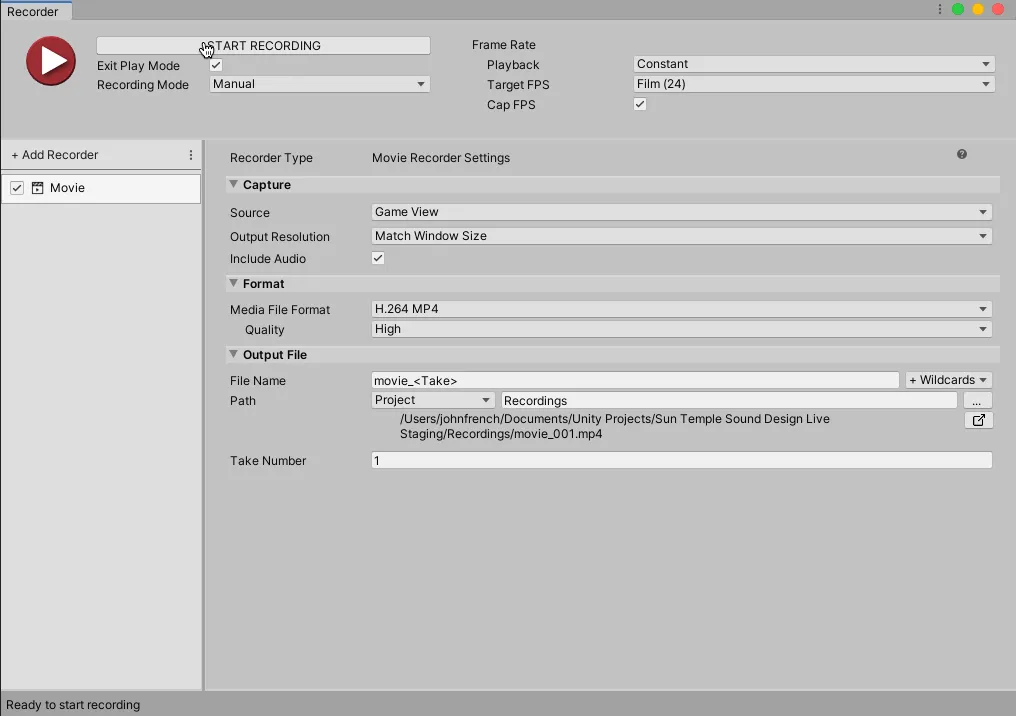
The Unity Recorder settings allow you to change the source, resolution and file format of the captured file.
To capture a single screenshot, add an Image Sequence recorder and change the Recording Mode to Single Frame.
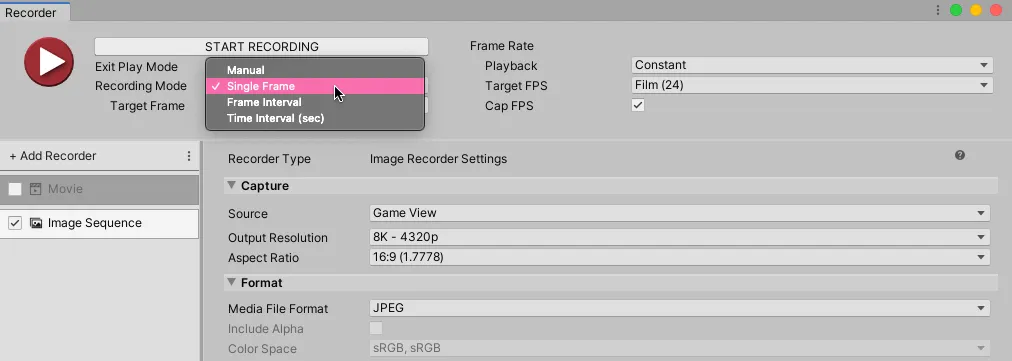
The Single Frame recording mode allows you to capture a high-quality screenshot whenever you click the Start Recording button or the keyboard shortcut, F10.
Then, when the project is in play mode, click the Start Recording button, or F10, to take a screenshot.
By default, you’ll find the screenshot in the Recordings folder in your project directory.
How to improve the Unity Recorder video quality
While the video that the Unity Recorder captures is good, in that it is captured at a stable framerate; depending on the settings you use, the video image may still suffer from compression artefacts.
For this reason, if you’re using the Unity Recorder to render a 3D animation, or any kind of cutscene that might later be edited into a video, it can be better to generate a sequence of images instead of using the Movie recorder.
This works by using an Image Sequence recorder in either the Frame Interval recording mode or the Time Interval mode.
Instead of generating a video file, this will render each frame as a high-quality PNG, which can then be combined to create a higher-quality video.
To use this method, just like when recording a video, you’ll need to specify a number of frames or a duration of time over which the recording will take place.
Alternatively, it’s possible to cover a timeline of events using a Recorder track in the Unity Timeline.
Like this:
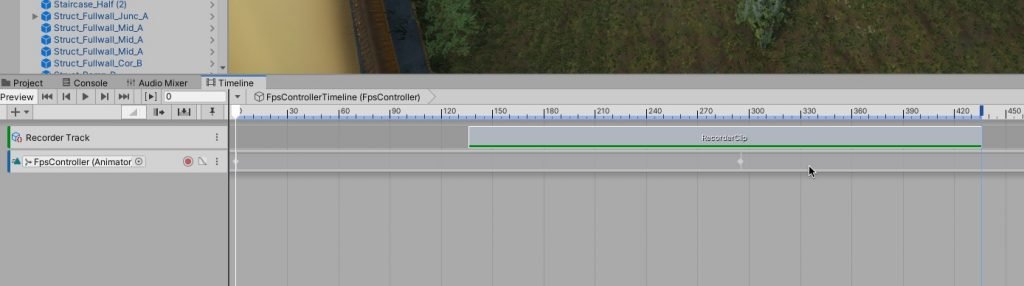
You can use a Unity Recorder track in the Timeline to specify a range of events to capture.
This will automatically record footage for the duration of the Unity Recorder clip.
Remember, however, that when using a Unity Recorder track with the Timeline, the Recorder settings for that clip will be in the Inspector, not the Recorder window:

When using the Unity Recorder as a Timeline track, you’ll find the settings for that Recorder clip in the Inspector, not the recorder window.
Unity Recorder alternatives
The Unity Recorder is one of the highest quality options for saving images and video of your project.
But, it’s not possible to use the Unity Recorder in a finished game, so what other options are available if you want to create in-game functionality to capture screenshots and video in Unity?
- Ultimate Screenshot Creator – Complete and customisable tool for creating screenshots.
- NatCorder – Lightweight and easy to use video recording API.
- Cross Platform Replay Kit – Easy screen recording on iOS and Android.
Now it’s your turn
Now I want to hear from you.
How are you capturing images and video in your game?
Are you using the Screen Capture class, the Unity Recorder, or something else?
And what have you learned about capturing gameplay shots and images that you know other people will find useful.
Whatever it is, let me know by leaving a comment.

John French writes all of the Unity tutorials for Game Dev Beginner, and specialises in deep-dive guides teaching game development basics.

Comments
Thanks again for your useful articles. Perfect timing. I was just getting ready to record the gameplay of my game and got a notification of this blog post. I’m used to taking snapshots in other apps with external tools and didn’t even think it was better to try the built-in solutions.
Wow, that was lucky timing! Glad it helped!
Great Post. I use the recorder for animated gifs and set the FPS super low to get the needed animations. I will also make a video and then export it to another software program (filmora) and take screen “grabs” — That way I can get awesome action pics.
And…another trick is to set a custom window size in the game view and record a higher-res version than your screen (like 3840 x 2160) or maybe you want to make a vertical video for a phone… then you set the window to the backward res or 1080w x 1920H. Change your fps to 30 or 60 and it will look great!
Or maybe you need a strange resolution for whatever… Just make a custom game screen and a camera to go with it … You can play your game like normal, but the recording will be done in the custom res. This way is so much better than cropping a video or image. I love this tool!
And I use it for making top-down low poly maps to make a beautiful 2048×2048 texture of my scene. And then put that on a 2 triangle plane…
Great tips! thanks for sharing.
Very useful tips! It works good in windows standalone running with batchMode. But I got a blank video (all frame black) when run in windows server. Any one knows why?
Thanks!!!!!
Thanks John French, for another great article from you.
I wanted to add something based on my experience. In my experience, the Culling Mask option doesn’t seem to work with Canvas -> Render Mode -> Screen Space – Overlay. It works with Screen Space – Camera or World Space instead. You might want to consider adding this information to your excellent article.
Thanks for the tip!
to many words, as usual.
You need to set cam.targetTexture back to null if you’re using a camera that normally renders to the screen (eg. the main camera).
Thanks for the tip