In this article, I’m going to share with you 10 of the most useful tips, tricks and techniques that I’ve learned while working with audio in Unity. Techniques that have helped me the most and that will help you to create better audio for your game.
You’ll find some easy fixes to some extremely common audio issues, some best practice methods that will help you to audio performance and techniques that will give you more control over the sound of your game.
If you’re an experienced developer, or a complete beginner, this article will introduce you to some of the lesser known audio features, methods and bugs that are super useful to know but that aren’t covered in the standard tutorials.
Let’s get started…
On this page you’ll learn how to:
- #1 Use PlayOneShot effectively
- #2 Structure Audio Mixers for better performance
- #3 Pause all of the game’s audio except for the menu sounds
- #4 Soften 3D sounds with Audio Source Spread
- #5 Create audio zones using only primitive colliders
- #6 Stitch together Audio Clips seamlessly
- #7 Prevent audio popping when using Audio Mixer Snapshots
- #8 Fade multiple audio effects by blending Snapshots
- #9 Make user volume controls that actually work
- #10 Crossfade audio in Unity (without a volume dip in the middle)
#1 Use Play One Shot effectively
While it seems like extremely basic advice it’s a question that gets asked over and over again in the Unity forums:
“How do I play a second sound, without stopping the first?”
Simple, just use Play One Shot instead of Play.
Using PlayOneShot in Unity
PlayOneShot works just like the standard Play function, but with a few key differences:
- PlayOneShot doesn’t interrupt a clip that’s already playing on the Audio Source
This makes it great for repeating sounds, like machine gun fire, footsteps, swings, hits, etc. - PlayOneShot requires you to specify the Audio Clip to play when you call the function
This makes it easy to use different clips for variation, instead of swapping out the Audio Source’s clip field. - You can set the volume scale of the clip when calling PlayOneShot.
This will modify the volume of the clip (on a float scale of 0-1), great for randomising the sound without affecting the overall volume of the Audio Source.
In scripting PlayOneShot looks like this:
audioSource.PlayOneShot(audioSource.clip,0.75f);When to use PlayOneShot and when to use Play
PlayOneShot is best for short, non-looping clips such as sound effects. It’s also useful for triggering multiple sounds from the same Audio Source, without them interrupting each other.
The standard Play function, however, is better for music, ambience and other effects that require looping (which you can’t do with PlayOneShot).
Both methods will still use the volume, pitch and 3D settings of the Audio Source and, apart from using fewer Audio Sources, the performance of both methods is generally the same,
However…
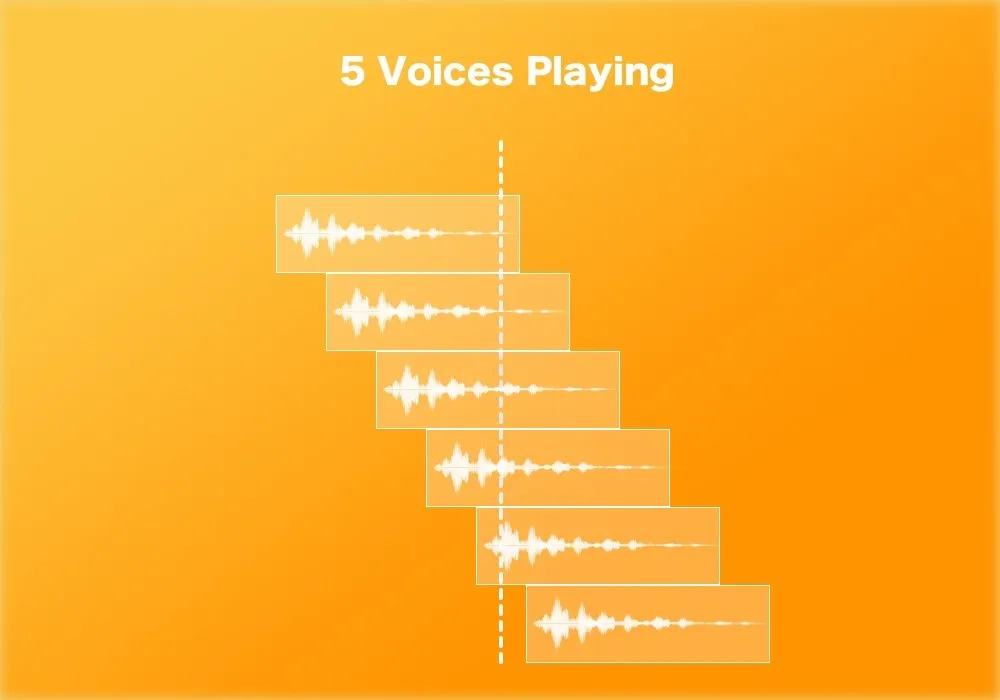
It’s important to note that multiple overlapping sounds triggered with PlayOneShot will all count towards your total voice count (32 by default), so be careful to keep the tails of repeating sounds short to avoid clips getting culled.
Voice counts can easily rise if your audio files are too long.
More information about PlayOneShot is available in the Unity Scripting Reference.
#2 Structure Audio Mixers for better performance
What Audio Mixer set up gives you the best performance?
Is it better to use multiple groups, and run all of your game’s audio through one big master mixer?
Or is it better to use multiple Audio Mixers, organising audio into smaller, more manageable mixers?
Well, it turns out, it depends…
Generally speaking, it’s more efficient to use multiple Audio Groups on one Audio Mixer as adding more groups requires less processing power than adding more mixers.
However, this isn’t always the case…
Unity is able to suspend audio processing for a mixer when it’s not in use. This happens when the signal drops below the Audio Mixer Threshold Volume, which is -80db by default.
This saves processing power but only works at Audio Mixer level.
Audio Groups that aren’t being used will continue to take up processing power if their mixer is still active, and that includes any effects that are added to them, whether they’re being used or not.
There are other reasons to use separate mixers too.
Audio Mixer Snapshots, for example, affect every setting on a mixer, which makes it very difficult to use Snapshots on a large single mixer with many groups.
So which option should you use?
If…
- The audio in your game rarely changes from scene to scene,
- You simply want to control audio levels more easily and…
- If you’re not using Snapshots
Then a single Audio Mixer will give you slightly better performance.
However…
For more complex audio setups, particularly when using effects, snapshots or groups that are only used in some scenes, and not others, using multiple Audio Mixers will be easier to manage and will perform much better.
So don’t be afraid to use multiple Audio Mixers if the situation calls for it as the functional and organisational benefits will likely outweigh the processing overhead.
#3 Pause all of the game's audio easily, except for the menu sounds
When you pause the game using timescale=0; it won’t pause the game’s audio as well.
While this can be useful, there are times when you will want to pause the audio as well. For example, to prevent music and longer sound effects spilling over into the pause menu.
You could pause every Audio Source individually, but this would be extremely difficult to manage and, luckily, there’s a much better way.
In fact, it’s possible to pause all of the game’s audio with a single command. Simply set the Audio Listener Pause property to true whenever you pause the game, like this…
AudioListener.pause=true;This will suspend all audio until you unpause it again (just reset it to false using the same method). Any playing audio will continue exactly where it left off.
This method is great for easily pausing in-game audio, but you’re still going to need some audio for your pause menu, such as UI sound effects and menu music.
So how do you pause some Audio Sources, while keeping others active?
It’s possible to force an individual Audio Source to ignore Audio Listener Pause, allowing it to play even while other audio sources are paused.
In scripting it looks like this…
AudioSource.ignoreListenerPause=true;This allows you to set aside selected Audio Sources for menu music and sounds, that will continue to work even when the Audio Listener is paused.
#4 Soften 3D sounds with the Audio Source Spread setting
The Spread setting on an Audio Source can be surprisingly handy. But, its usefulness can be a bit of a mystery.
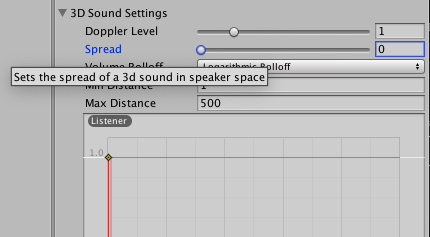
The Spread value changes the distribution of a 3D sound between the speakers and takes a value between 0 and 360 degrees.
But what does that even mean?
More importantly, when would you actually want to use it?
How does the Audio Source Spread setting work?
Spread is a 3D sound setting, meaning you’ll need to increase the spatial blend value before you’ll start to hear it take effect.
The Spread setting takes a value between 0 and 360:
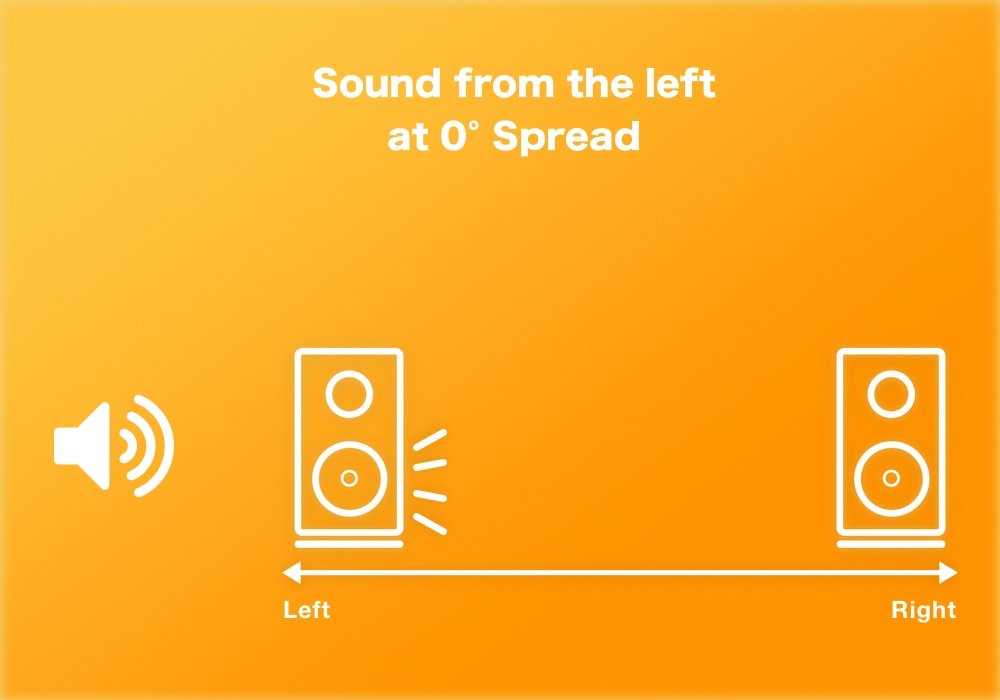
- At 0 degrees (the default), 3D sounds are hard panned to their direction of origin.
e.g. A sound that is immediately to your left plays only through the left speaker (pictured below). - At the maximum Spread value, 360 degrees, the 3D sound is hard panned to the opposite speaker.
e.g. a sound on your left, plays through the right speaker. (I can’t think of any practical use for this feature. Can you? Leave a comment and let me know if you’ve got a use for this.) - Finally, at 180 degrees of spread (half way), the 3D sound is evenly spread between the speakers.
At the default of zero Spread, Unity hard pans audio to the 3D source.
When would you use an increased Spread value?
Increasing the Spread value a little, for example 45 degrees, softens the panning of a 3D sound. This creates a more ambient sound but that is still affected by 3D position.
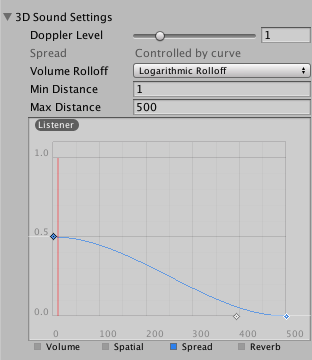
Alternatively, to keep full 3D positioning but avoiding a hard point of origin (e.g. the audio jumps from the left speaker to the right when passing the Audio Listener) use Spread in combination with a roll off curve. Smoothly adjusting spread from 0 to a maximum of 0.5 in the roll-off curve settings will create a 3D sound that passes more smoothly between the speakers.
How is Spread different to Spatial Blend?
On the surface, Spread would appear to behave in a similar way to Spatial Blend, but there are a few key differences:
- Spatial Blend controls how much of the sound is processed by the 3D engine
- Spread, however, changes how that 3D sound is distributed over the speakers.
- When using Spatial Blend, a sound that is even partially 2D is always audible no matter where the physical point of origin is in the scene.
- Using Spread, however, will not stop a sound from becoming quieter as you move away from it, as it does not affect the other 3D roll off curves (such as volume).
- 2D sounds can be stereo. If you want to use stereo sound in a 3D space, you must use a Spatial Blend roll off curve to (see the image below).
- 3D sounds are forced to mono, meaning that both channels will play at the same position, even when using an even Spread setting.
#5 Create audio zones using only primitive colliders

A couple of years ago, while I was working on a Western Saloon themed sound design demo, I wanted to trigger a change in the audio depending on whether or not the player was inside the saloon.
My plan was to use Colliders with the On Trigger Enter and On Trigger Exit events to fade in different Audio Mixer Snapshots.
However, I had a few issues…
First off, the building isn’t a simple shape, such as a rectangle or square, and it’s accessible from all sides.
This meant that I couldn’t cover the building with one large Collider, as the player would be able to trigger it in places outside the building. I had to match the shape of the building in order to get it to work.
I wanted to avoid using an inefficient Mesh Collider but using multiple primitive shape Colliders meant that the On Trigger Exit event would frequently fire wherever the primitive shapes overlapped.
After struggling for a solution, in the end I found a simple fix.
How to combine multiple Colliders to create a single audio zone in Unity
Here’s my method for creating a single zone using multiple primitive shape Colliders:
- Whenever the player enters or exits a Collider, keep count using a simple script (I’ve given an example below).
- Every time an enter trigger is fired, add one to the total and for an exit, subtract one.
- If the total is 1 or higher, the player is inside the saloon, if it’s 0, they’re outside.
It’s definitely not rocket science. But it works well and solved my problem without using a Mesh Collider.
Here’s the script I used:
using UnityEngine;
using System.Collections;

public class MusicControl : MonoBehaviour {

public bool indoors;
public int colliderCount;

void OnTriggerEnter(Collider other)
  {
    if (other.tag == "Saloon")
    {
      colliderCount += 1;
      UpdateState();
    }
  }

void OnTriggerExit(Collider other)
  {
    if (other.tag == "Saloon")
    {
      colliderCount -= 1;
      UpdateState();
    }
  }

void UpdateState()
  {
    if (colliderCount == 0)
      indoors = false;
    else if (colliderCount > 0)
      indoors = true;
  }
}
#6 Stitch Audio Clips together seamlessly
Play Scheduled is an ultra-precise method of playing back audio at specific times and, for dynamic music, or any kind of beat matching, it’s an absolute must.
The Play Scheduled function takes a time parameter, a double value (which is more accurate than a float), which is the Audio DSP time that the Audio Source should play.
The DSP time value that you need to pass in is a point in time, not a delay, so you’ll need to either record or reference the current DSP time (using the reference AudioSettings.dspTime) in order to use Play Scheduled.
For example, to play a clip in 3 seconds time would look like this in scripting:
audioSource.PlayScheduled(AudioSettings.dspTime + 3);The real value of Play Scheduled’s accuracy, however, is the ability to stitch two audio clips together seamlessly.
This method will start an Audio Clip exactly when the first one ends.
Here’s how to do it:
Step 1: Work out the length of the first clip as a double value
The AudioClip.Length value is a float, which isn’t accurate enough for you to use), You need a double. Instead, cast the Audio Clip’s total samples as a double and then divide it by the sample rate. to get a super accurate duration value that you can use with PlayScheduled.
Like this:
// This gets the exact duration of the first clip, note that you have to cast the samples value as a double
double clipDuration = (double)firstAudioSource.clip.samples / firstAudioSource.clip.frequency;
Step 2: Set up two Audio Sources
For this to work, you must use two Audio Sources, as it’s impossible to schedule an Audio Source to play that’s already playing, or that’s already scheduled to play.
However, If you intend to trigger more than two clips in a row, simply toggle between the two Audio Sources as you schedule clips.
Step 3: Schedule the Audio Clips
Even if you intend to start the Audio immediately, you’ll need to start the first clip using Play Scheduled and not Play. This is so that you can use the exact start time in your calculation.
Schedule the first clip to play at the current Audio DSP time, plus a small delay (to ensure it plays at the correct time). Next schedule the second Audio Source to play at the current DSP time plus the small delay plus the first clip’s duration.
Use this script to play an Audio Clip exactly after the other one finishes:
//this plays the first clip and schedules the second to play immediately after it
firstAudioSource.PlayScheduled(AudioSettings.dspTime + 0.1);
secondAudioSource.PlayScheduled(AudioSettings.dspTime + 0.1 + clipDuration);
If you’d like to know more about Play Scheduled, I wrote a huge guide on how it works and how to use it effectively:
#7 Prevent audio popping in unity when using Audio Mixer Snapshots
Sometimes, when transitioning between two Audio Mixer Snapshots in Unity, you’ll hear the audio popping; a split second of distorted noise that occurs as soon as the Snapshot starts to change.
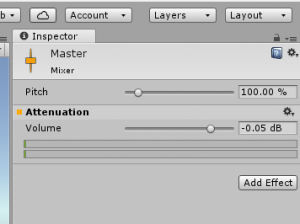
This happens when changing Group volume levels using Snapshots, specifically when the default Snapshot includes a Group that’s set to exactly 0db (the default volume).
Setting the volume of that Group to a slightly lower value, such as -0.05db, instantly fixes the problem.
No more popping in your Snapshots.
Unlike some audio bugs in Unity, this problem isn’t fixed when you build the project.
Knowing about this common problem (and its very easy solution) will save you time troubleshooting later on in your project.
#8 Fade multiple audio effects by blending Snapshots in real time
Did you know you can transition to multiple Snapshots and blend between them in real time?
This is made possible using Transition to Snapshots, which is not to be confused with the, more standard, Transition To function that simply switches from one Snapshot to another.
It’s an Audio Mixer function that allows you to blend two (or more) snapshots continuously by using different float weightings and an array of Snapshots to blend.
This is great for connecting multiple Audio Mixer effects to in-game values, without having to individually expose their parameters to scripting.
For example: creating a low pass filter that gradually blends in as the player starts to lose health
Using Transition to Snapshots to create a ‘muffled’ effect when health is low.
How to use Transition to Snapshots
Here’s how it works:
- Create an Array of Audio Mixer Snapshots and an equal array of floats
These will act as weightings for the snapshots. - Call Transition to Snapshots on the Audio Mixer
Pass in the Snapshot and weights arrays along with a time to reach value. Use a fixed value, e.g. 3 seconds, for a single change or use Time.deltaTime if applying the effect continuously.
In scripting, Transition to Snapshots looks like this…
audioMixer.TransitionToSnapshots(snapshotArray, weightsArray, time.DeltaTime);#9 Make user volume controls (that actually work)
Even if you’re new to Unity, you may have already learned how to make a volume control slider.
Make a slider, give it a value of -80 to 0, and connect it to an Audio Mixer Group by exposing the volume parameter to scripting.
Simple, right?
There’s a problem though. The slider value range is linear but the Audio Mixer Group’s volume is measured using a logarithmic scale.
This means that, although the slider will work, it will be far too sensitive. For example, moving the slider to half volume results in a value of -40db, much lower than where we would actually perceive half volume to be (around -6db).
So how do you fix it?
How to make a volume slider that actually works
There’s a very simple method for converting the linear slider value to a logarithmic scale:
- Make the slider as usual, but use a slider value of 0.0001 – 1 (exactly)
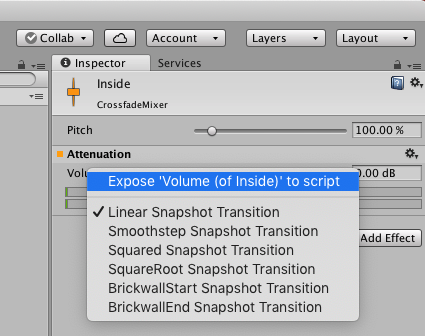
- Expose the Audio Mixer Group fader to scripting (select the group and right click on the value label in the inspector)
- Name the exposed parameter in the Audio Mixer window
- Create a script to set the exposed parameter, using the calculation below to convert the value:
AudioMixer.SetFloat("exposedVolumeParam", Mathf.Log10(sliderValueGoesHere) *20);Finally, connect the slider to the script, using the On Value Changed event.
For a more detailed guide on how to do this, and a video that shows you all the steps, read my full guide using the link below:
When you don’t need to do this: Setting the Audio Source volume directly
If you’re using a slider to directly change the volume of an Audio Source Component (i.e. not through a mixer) then you don’t have to worry about this problem.
The Audio Source volume control in Unity already works correctly. Setting an Audio Source Component’s volume to half outputs a level of -6.02db (as shown in the Audio Profiler) which is exactly correct.
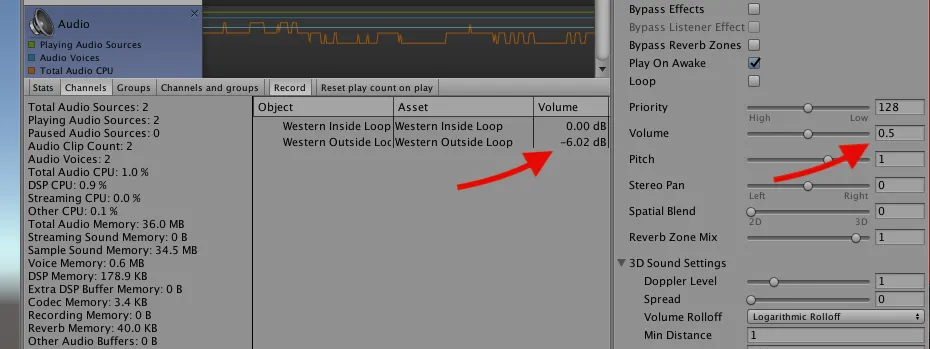
The direct volume controls on Audio Sources work just fine.
#10 Crossfade audio in Unity (without a dip in the middle)
Audio Mixer Snapshots in Unity are great. At a basic level they provide an easy method to fade audio from multiple audio sources. For more complex audio setups, Snapshots make it possible to store and recall a whole range of volume, panning and effects settings.
There is however something that Snapshots do very, very badly…
Crossfading.
Believe me when I say… this has bugged me for years.
Let’s say, for example, you have two game scenes, each with multiple audio sources and different sounds, and you’d like to smoothly transition the audio between the two levels.
Snapshots in Unity are made for just this!
And the Transition To function allows you to smoothly fade between two Audio Mixer Snapshots.
But…
Use this method and you’ll notice that the outgoing audio drops down far too much, fading out too fast, before the new audio has had a chance to fade in properly.
This is the problem with Audio Mixer Snapshots in Unity. If you want to fade one audio group out, while fading another in, you’ll notice a significant dip in volume in the middle of the Crossfade.
But why?
If you’ve done any searching online about this, then you’ll have seen people mention the difference between “equal gain” and “equal power” crossfades, and that it can be fixed by simply changing the transition curve.
Although changing the transition curves can help a bit (you can find out exactly how each one performs in this article) that’s not what’s happening here…
These settings won’t help your crossfades much.
The problem, just like the volume slider issue I mentioned earlier in this article, is to do with Logarithmic Conversion (or a lack of it in this case).
When moving between two snapshots, Unity represents the halfway point of the transition as a whopping -40db on the audio group fader.
That’s not half.
In fact, it’s just 1% of the full signal strength. No wonder it sounds like it’s gone silent.
So how can you fix it?
How to crossfade Audio Mixer Snapshots in Unity
There are two methods for setting up working Audio Mixer crossfades in Unity:
- Crossfade Audio Mixer Groups using Exposed Parameters
This is the simplest method and works best if all you want to do is crossfade the volume of two Audio Mixer Groups. We’ll start with this one first. - Crossfade Audio Mixers using Snapshots
This requires a bit more work but allows you to create crossfades without exposing any parameters to scripting. This is ideal if you need to retain all of the functionality of Audio Mixer Snapshots.
If you want an easy method for fading just a single Audio Source, try my article on Fading Audio in Unity.
Below I’ll show you how to do both methods, step by step.
How to crossfade Audio Mixer Groups using Exposed Parameters
This is the simplest method for creating working crossfades in Unity. It works by Lerping the exposed volume parameter over a logarithmic curve, using the same conversion calculation as the Volume Slider fix in Tip #9.
This is also the absolute best way to fading audio in Unity, as it produces the highest quality audio fade of any method I tested. To see the results of those tests in detail, try my article on fading audio in Unity.
Here’s how to do it:
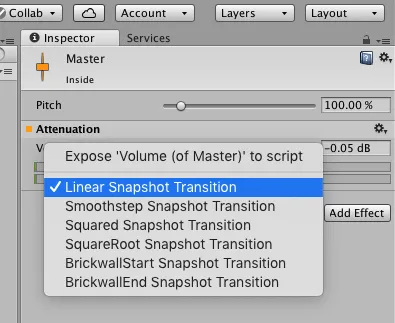
- Select the each Audio Mixer Groups you want to crossfade.
- In the inspector, right click on the volume label and select “Expose volume to scripting” (pictured).
Repeat this for for both Groups.

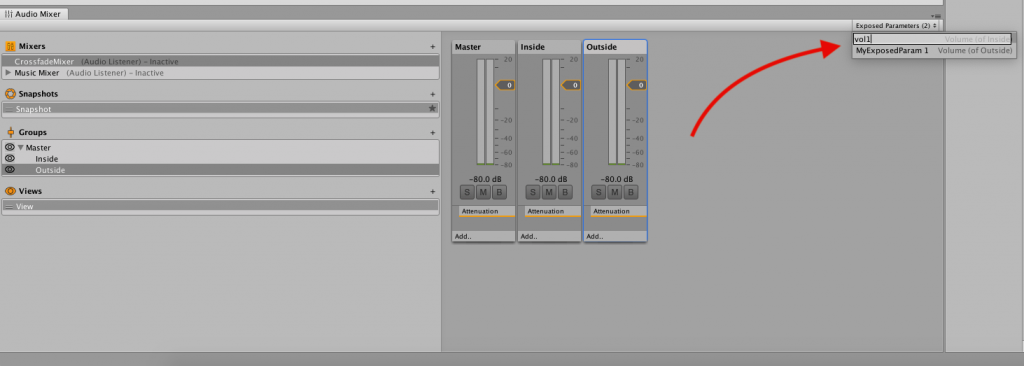
- In the Audio Mixer, select the exposed parameters dropdown and rename the parameters.
In this example I’m using “vol1” and “vol2”.
- Use the script below to Lerp the exposed parameters on a logarithmic scale.
Call the CrossfadeGroups function to start the crossfade, pass in a float value for the duration.
using System.Collections;
using UnityEngine;
using UnityEngine.Audio;

public class Crossfade : MonoBehaviour
{

    public AudioMixer mixer;
    bool fading;

    public void CrossfadeGroups(float duration)
    {
        if (!fading)
        {
            StartCoroutine(Crossfade(duration));
        }
    }

    IEnumerator Crossfade(float fadeTime)
    {
        fading = true;
        float currentTime = 0;

        while (currentTime <= fadeTime)
        {
            currentTime += Time.deltaTime;

            mixer.SetFloat("vol1", Mathf.Log10(Mathf.Lerp(1, 0.0001f, currentTime / fadeTime)) * 20);
            mixer.SetFloat("vol2", Mathf.Log10(Mathf.Lerp(0.0001f, 1, currentTime / fadeTime)) * 20);

            yield return null;
        }

        fading = false;

    }
}
To call functions on Audio Mixers, remember to add the using UnityEngine.Audio; namespace at the top of the script.
How to crossfade Audio Mixer Snapshots (without using exposed parameters)
Disclaimer: This method is a little janky and, for most scenarios you’ll usually be better off using the first method or, if you prefer to use Snapshots, using the transition curve settings to lessen the impact of the overly sensitive fades. If, however, it must be Snapshots, you don’t want to expose parameters and if you want a perfectly even crossfade, then this is the way to do it.
This method is a little more in depth, but it allows you to retain all of the convenience of using Audio Mixer Snapshots without exposing any parameters to scripting.
When using this method, instead of using Audio Mixer Groups, you must use two Audio Mixers instead, each with their own On / Off Snapshot*.
- Set up two Audio Mixers.
Instead of using two groups and transitioning between them, you’ll need to set up two Audio Mixers. - Set up two snapshots for each Mixer, called “On” and “Off”.
If copying the below example, ensure that you copy these Snapshot names exactly. - Set the mixer volumes for each Snapshot.
You guessed it. Turn down the fader for the “Off” Snapshot to -80 and for the “On” fader set the volume to -0.05db (remember that tip about Snapshot pops, already come in handy hasn’t it). Set the inactive Mixer’s default Snapshot to “Off”. - Use the script below to crossfade between the two Audio Mixers.
Pass in the Audio Mixer to fade out, the Audio Mixer to fade in and a float value for the duration. To fade the mixers back, simply use the same function with the roles reversed.
* Why set up two Audio Mixers?
This is to do with how the weighting of each snapshot is calculated.
This method uses the Transition to Snapshots function, which continuously blends snapshots using a relative weighting value with no fixed scale. This is great for controlling the percentage of each group to blend and, importantly, the curve of the blend over time, which is what makes the crossfade work.
To do this, however, we must create a fixed scale for the weightings (e.g. blend 40% on with 60% off). This is impossible to do on one mixer, as each Group’s weighting would interfere with the other.
using System.Collections;
using UnityEngine;
using UnityEngine.Audio;

public class CrossfadeMixers : MonoBehaviour
{

    bool fading;

    public void CrossfadeSnapshots(AudioMixer mixerToFadeOut, AudioMixer mixerToFadeIn, float duration)
    {
        if (!fading)
        {
            StartCoroutine(Crossfade(mixerToFadeOut, mixerToFadeIn, duration));
        }
    }

    IEnumerator Crossfade(AudioMixer mixer1, AudioMixer mixer2, float fadeTime)
    {
        fading = true;
        float currentTime = 0;

        float[] mixer1Weights = { 1, 0.0001f };
        float[] mixer2Weights = { 0.0001f, 1 };

        AudioMixerSnapshot[] mixer1Snapshots = { mixer1.FindSnapshot("On"), mixer1.FindSnapshot("Off") };
        AudioMixerSnapshot[] mixer2Snapshots = { mixer2.FindSnapshot("On"), mixer2.FindSnapshot("Off") };

        while (currentTime <= fadeTime)
        {
            currentTime += Time.deltaTime;

            mixer1Weights[0] = Mathf.Log10(Mathf.Lerp(1, 0.0001f, currentTime / fadeTime)) * 20;
            mixer1Weights[1] = mixer1Weights[0] / -80;
            mixer1Weights[0] = 1 - (mixer1Weights[0] / -80);

            mixer2Weights[0] = Mathf.Log10(Mathf.Lerp(0.0001f, 1, currentTime / fadeTime)) * 20;
            mixer2Weights[1] = mixer2Weights[0] / -80;
            mixer2Weights[0] = 1 - (mixer2Weights[0] / -80);

            mixer1.TransitionToSnapshots(mixer1Snapshots, mixer1Weights, Time.deltaTime);
            mixer2.TransitionToSnapshots(mixer2Snapshots, mixer2Weights, Time.deltaTime);

            yield return null;
        }

        fading = false;

    }
}
Now it’s your turn
Which of these tips did you find the most useful for your game? Do you have your own audio advice that you think should’ve been on the list?
Or maybe you still have questions about some of the techniques above?
Either way, you can let me know by sending me a message.
Icon (speaker) made by Dave Gandy from www.flaticon.com licensed by CC 3.0 BY and icon (laptop) made by Freepik from www.flaticon.com licensed by CC 3.0 BY

John French writes all of the Unity tutorials for Game Dev Beginner, and specialises in deep-dive guides teaching game development basics.

Comments
This is Great!
I used to have a very extensive SoundManager that makes an array of audio sources for audio requests.
Now I have a much lower number of audio sources due to playoneshot, didn’t know it can mix clips, I always assumed it was a shortcut for Source.clip=c; and Source.Play(); with a volume.
Also the mixer is awesome I knew it was there but I never took the plunge for using it.
20 mins and all my games are Using it.
As a dev/gamer who really loves good sound and music in games I find these Guides Amazing!
Glad it helped!
thanks! this one’s a bookmark 🙂
second that! awesome article! +1
Thank you both.
love the article, but I have an issue with audio that nowhere else seems to answer… when I call PlayOneShot in my game, sometimes the audio doesn’t play, and sometimes it does. I traced it using visual studios to get to the line, and its like a flip of the coin whether or not the PlayOneShot will actually play the sound effect. its a very small clip (button click sound). have you encountered this before and have any tips as to where I can begin looking? It is super frustrating
Because it sometimes plays and it sometimes doesn’t my guess (and it’s only a guess, since I don’t know your project) would be that it’s getting culled. If this is the case then you can change the Audio Source priority or increase the voice count in settings (32 by default). If not though, email [email protected] with more details and I’ll try to help.
Great article and thanks for code examples. I think I’ll steal the primitive collider counter code to improve my occlusion culling triggers :).
Question: How do you handle environment ambient sounds when going from outside to inside? I currently have 2 triggers (inside and outside) at the doorway, which Crossfades the audios between 2 audios sources. It works ok, except one issue, if the player stops in the middle, the Crossfade still happens, which is not realistic…it should stop at 50% volume for each audio source.
I’m thinking of writing code to handle this, just not sure if it’s overkill and no player would ever notice (my game is a VR game).
Thanks Steve, glad you liked the article. To answer your question about triggers: personally, for something like a building I’d probably just use one trigger and crossfade depending on if they were in or out (without the variable amount in between). There will be times that a more complex approach is needed however, without knowing your game, unless it’s a feature that you think players will really feel the benefit of, I’d be tempted to keep it simple.
Great article!
Question: I’m always informed that playoneshot() is bad for performance and should be avoided (although i haven’t encountered any performance issue, this is somewhat validated from what I have read on forums, although from older versions of unity). It has been suggested it is better instead to use a set of pooled audio sources and play() . Do you agree with this? I’m thinking in terms of rapid and frequent audio requirements; such as footsteps of gunfire.
Any advice appreciated
Thanks!
I think it’s worth being mindful of PlayOneShot, if only because it’s easy to layer up many sounds really quickly if the sounds are long. I don’t know specifically that it’s less efficient, although I am interested in testing this now that you’ve mentioned it. All I would say is use what works best for you. Using Play() will stop any previously playing clip on that Audio Source, which will limit the Audio Source to one voice, but may lead to pops in the audio if you’re cutting into the previous clip’s waveform. In any case, you can always check the Audio Profiler which will tell you how many voices are being played and the Audio CPU usage.
Hi, very interesting tips!
As for the use of spread ={180 – 360}, I know how I would use this.
There’s an effect in most Digital Audio Workstations called ping pong, which keeps mixing the L-R channels around your head, giving you a dizzy and trippy feeling.
This could be achieved in Unity with spread, using some kind of parameter animation or Lerp by code, to create a special trippy moment for the player.
Awesome tips! The crossfading script and explanation are amazing
Thanks Kenny!
I have actually a use case for spread above 180 degrees and your bit mentioning using a distance spread curve is exactly what I was looking for. What I am using the high spread level for is in a scene I needed cheap nature ambiance. So I took a stereo recorder and walked around on a spring day with some nice birds and a gentle breeze in the background. Implementing that into Unity, since it’s not a fancy 7.1 surround recording, I just put a single source, at the center of the small play area (it’s an enclosed tree house) and with the spread function I inverted the stereo so when you got closer to one of the wall the sound would be louder from the opposite side of the tree house to give a sense that you were by the wall. My issue was that the stereo phase was way too jarring, but the distance curve spread should solve my issue. Thank you
That’s fantastic. Thanks for sharing Austin.
Great, thank you!
thanks for ur tutorial about sounds in unity
you’re welcome
Hey John sharing your work and knowledge of how Unity works is really valuable. Unity docs lack any practical examples. Thanks so much for sharing your insight.
If you have time I’d love to see you breakdown some practical examples for :
1) Timeline audio features – I can see there are a few different places to connect audio for example in the playable director component, audio clips and audio snapshot tracks. The unity Docs also don’t tell us what the timeline dropdown menus do for audio clip or snapshot. its completely un documented.
2) Snapshot Blending – A practical use case for snapshot blending with multiple mixer effect parameters blending would be amazing. I’d also like to know how blending interacts with SetMixerProperty.
Thanks so much, This is really helpful feedback. I’ll try to do an article on those topics in the future.
#4 is really really useful to help me understand how the 3D sound setting curve editor works ! Thank you so much!!!
You’re welcome. Glad it helped.
Hello !
First, thank you for all the great articles. I’m working on my first game audio and they’re really helping.
Doing this, I found a nice way to randomize repeating sounds a bit without having multiple clips.
footStepSource.volume = animVelocity.magnitude * Random.Range(0.8f, 1f);
footStepSource.pitch = Random.Range(0.7f, 1.3f);
footStepSource.Play();
In this code :
footstepSource is the AudioSource for a single footstep clip
animVelocity is the character velocity but it can be skipped.
It’s quite simple so I think it can be useful and easy to understand for audio beginners. It can also help to reduce the use for audio assets.
Great job!
Thank you!
Thank you for the superbly written info. Came here for insight on OneShot vs Play, now I’m so glad to learn about PlayScheduled.
Thanks Joe, glad you liked it.
Excellent stuff. My favorite is #6.
You say #5 is not “rocket science,” but I’d call that a feature and not a bug. It’s the method I use and, just as you say, it works.
Thanks! Apparently there’s also a way to this with compound colliders but I never got it working right, and I’m a sucker for a simple solution.
Simple is better. Compound colliders do work, but I bet your approach actually has lower overhead.
Hi,
Do you know if it’s possible to play multiple audio tracks in sync in Unity?
I’ve tried to play 6 stereo tracks, but there are some pops (tipical from latency) and they get out of sync over time.
Is there a solution for this?
Thanks for this amazing post!!
If you’re trying to play audio clips in perfect time, you should try Play Scheduled if you haven’t already. I wrote a massive guide on Play Scheduled if it helps.
Extremely helpful article. Thank you for sharing this. We’re using quite a lot of mixer groups on our mixer currently (50+) which seems to be putting a strain on the CPU, even though sound is passing through no more than 2 at a time. I’m curious if you’ve experienced this, and if you have a maximum number of mixer groups that you try to keep below?
I haven’t worked with that many on a single mixer before but the short answer is that you will probably need to split it up. Even though only a couple are being used, all of them will be active. Mixers, on the other hand, can suspend if they’re not being used, saving cpu. So, instead of thinking about max number of groups per mixer, I’d try to approach it with groupings of sound sources that are used at different times, so that whole sub-mixers can be auto-disabled when they’re silent. Hope that helps.
Massive Thanks. This article is really informative and I hope it gets more views 🙂
Thank you!
Hi John,
Great set of tutorials you have created here. Thanks for sharing, they really are invaluable. I wonder if you can help me figure something out regards to audio crossfading and that is creating a DJ mixer crossfader. I have 2 audio sources set up and using UI slider to control the volume. The problem is how do i use one slider on 2 channels. ( I’m creating DJ turntables FWIW ). Would love to know if it’s possible at all.
Thanks, so to answer your question, assuming you already have one audio source connected to the on value changed event on the slider, add a script that takes a float value to set the volume of the 2nd audio source but inverts the value first (i.e volume = 1 – slidervalue). Then add an extra function call to the slider event with the plus button and connect it to that function using the Dynamic float option. That should work.
Thanks so much John for the advice. I got it working now. I was trying to add another slider instead of the audiosource game object to the value changed event. Doh! You really have helped me out here. Your site is awesome too. So much knowledge and useful information in a digestable way that even idiots like me can understand. Thanks again i really appreciate the effort you have made.
Hello, I’m curious if there is a way to have different areas of a map have stereo sound that fades as you enter another area. For example I have a pirate island, and it has a tropical forest that starts at the beach. I wish to have the sounds of the ocean and seagulls playing where the ocean and beach is, but as you go further into the tropical forest I wish for the ocean sounds to fade out into wind and rain sounds. Right not I can’t use scripting for anything in my 3D world. So I was using a mono for the ocean and stereo for the rain and wind, but you can see the issue. The ocean sound pans from left to right as you turn and the ocean sound is directional from the point of origin of the audio. I build worlds in Altspace, and we aren’t allowed to use any scripts for security reasons. Why they can’t sandbox it and allow us to use scripts or have a scripting system is beyond me. Thanks for the article very useful.
Hi! So you could probably use roll-off curves to create something that works for you. If I remember correctly it’s possible to apply a roll-off curve to spatial blend so you could have a sound that is 3D and mono at a distance but becomes 2D and stereo as you get closer to it. So when you’re standing near the ocean, the sound appears to be all around. Spread works in a similar way, and can also be rolled off, although it may be mono only. Hope that helps.
Hi!
Thanks. Very worthwhile notes!
According to my experience, spread can be used for sounds that are too far away from the audio listener. For example a gunshot tail; you can use it a little.