So… you’ve decided that you want to make your game.
Maybe it’s something you’ve been thinking about for a while and you feel like now’s the time to really go for it.
Or maybe you’ve only just started to get into game development, but you want to start by making something that’s yours.
Either way, now is a great time to get started, as there are a huge amount of resources available to help you to build your first project.
Learning how to use Unity, for example, and how to create certain kinds of functionality, while it’s not always simple, can sometimes be relatively straightforward.
If you have an idea of what it is you want to do, an example, or a tutorial can probably show you how to do it.
However…
A lot of the time, the hardest part of making a game isn’t making one part of it, it’s knowing what the parts will be and how to put them together.
And actually starting your project, deciding what you will make and planning how you will make it, can sometimes be a bigger challenge than technical obstacles, such as learning to code.
But don’t worry.
In this article, I’ll show you some useful strategies and techniques that you can use to turn an idea for a game into a real project that you can work on.
Here’s what you’ll find on this page:
- How to choose the right game idea
- How to develop your game idea
- How to plan your game project
- How to manage your game project
Let’s get started.
How to start making your first game
If you’re interested in making a game, chances are you will have already tried one of the many Unity tutorials, or an example project in another game engine, so that you can learn some of the basics.
And that’s a great place to start.
Working on smaller projects, such as tutorials, personal experiments or game jams, can be a great way to pick up skills, experience and familiarise yourself with the software you’re using.
However, moving on from tutorials to a real project of your own can sometimes be a challenge.
So how can you do it?
How do you actually start making your game?
Generally speaking, there are three steps to starting your first game:
- Choose an idea that plays to your strengths and minimises your weaknesses.
- Keep your project small and simple.
- Break it down into bite-sized tasks that you can work on bit by bit when you have the time.
However, there’s no one right way to do this.
While I’ve worked hard to make this article as helpful as possible, I don’t claim to be an expert and how useful a particular technique is will depend on you and how you like to organise your work.
So I’d encourage you to take what’s useful from this article and ignore anything that’s not a good fit for you.
However, if you’re a beginner, and you’re not sure where to start, then these techniques can help you to make the jump from a game idea to a game project.
So what’s first?
Before you start working on your project, you’ll need to decide what it’s going to be.
How to choose the right game idea

If you want to make a game, chances are that you already have an idea of the kind of game you might like to make.
Maybe you have several ideas.
Maybe you don’t have any.
Or maybe you’re just not sure if an idea is worth pursuing or not.
While it’s not my place to tell you what you should make, I can show you, as a beginner, how playing to your own strengths can make building your first game a lot easier to do.
Making a game can be hard, so the trick is to shift the balance of difficulty in your favour, by making use of the skills you already have and avoiding areas of work that you’ll find difficult.
So how does it work?
How to play to your strengths and limit your weaknesses
Everyone has a unique mix of experiences, skills and resources, from their work, from their hobbies and from their relationships and life experiences, that make up who they are and what they’re capable of doing.
As a result, your strengths, your experiences and your skills, will be different to anyone else’s.
Some of these strengths could be very obviously valuable to game development while others, although equally useful, you might not even realise you have.
But, whether you feel like you have skills to use or not, your particular mix of experiences can be an advantage over other people in certain situations.
What this means is that, understanding what skills you do have, regardless of if they seem relevant or important, can help you to choose a game idea that is more achievable for you, even as a beginner, than it would be for someone else.
For example, you might already have technical experience from your work or from hobbies.
Or maybe you’re creative, you like to draw or write stories.
Or maybe you already work in a game development discipline, working in testing, community, project management, all hugely valuable skill sets in their own right.
Picking a project that leans more heavily on the skills that you have, and less on the ones that you don’t, can make your first project easier to work on and easier to finish.
For example, if you’re not familiar with scripting, don’t choose a game idea that will require complex scripting to work.
If you can’t draw or model characters, don’t.
Use cubes, or other basic shapes.
However, if you do have skills that others don’t, then don’t be afraid to use them.
If you can write a good story, and so many people, myself included, can’t, use that skill to make a more engaging game.
Or, if there’s something that you know a lot about, from your work or from your hobbies, even if it doesn’t seem like it could be a game, make a game out of it!
You’re much more likely to make something that’s enjoyable if you already understand what’s enjoyable about it.
Which is why knowing what you know, and accepting what you don’t, can help make the large task of building a game much, much smaller.
But what if you don’t know what your strengths are?
How can you work out what your advantages are and how they could be useful?
How to work out your strengths
One method of working out what your strengths and experiences are, and how they relate to your idea for a project, is to simply write them out.
First, make 3 lists:
- What am I good at?
- What do I like doing?
- What advantages do I have?
Then, under each list, write out what you know about yourself:
First, list what you’re already good at.
It doesn’t matter if it’s related to game development, if you’ve got a skill, or some experience, or some weird party trick, write it down here.
Next, write down what you like doing.
Add your hobbies, your interests, generally any way you like to spend your free time.
This can include new things that you think you’d enjoy learning, even if it’s not something you can do today.
Lastly, write out the advantages of your specific situation.
For this, try to think of any part of your life that is beneficial, such as free time, disposable income, supportive friends and family, youth!
Anything that you can think of that gives you some kind of headstart goes in this list.
Then, analyse your idea
Once you’ve listed your strengths, write out what you think will be involved in making your game idea.
These are the things that you will need to be able to do to actually build your project, such as making 3D models, writing a story, artwork, game design, etc.
Write them all down, in order of importance if you can.
Once you’ve listed the areas of work required to make your game, compare that list with your three lists of strengths.
Score each requirement using a colour:
- Green: If you have experience in that area.
- Orange: If you have less experience, or none but are willing to learn.
- Red: If you have no experience or ability to meet that requirement.

Compare what you’ll need to do to make your game (on the right) with your strengths (on the left) and score them with a colour to reveal trends.
This will help you to understand where your experience and your interests overlap with the task ahead.
Different game ideas will require different skill sets.
Some might be easy for you, while others could be tricky.
Such as multiplayer, or artificial intelligence, which could be difficult, or impossible, for you to get working as a beginner.
However, sometimes the easiest way to overcome a large obstacle is to simply avoid it in the first place.
And, while the point of this exercise isn’t to try to think of an idea with all green boxes.
It can help you to understand what tasks are ahead and how difficult they might be for you.
Not to put you off, but to help you predict what the biggest challenges will be.
And, if you have multiple ideas to choose from, a project that has more green and orange requirements than red is likely to be easier for you to work on and finish.
Once you’ve settled on an idea that you feel you can achieve, it’s time to work out just how big, or small, your game is going to be.
How to develop your game idea
At this point, you’ve thought about your idea for a game and what making it might involve.
What’s next is to take that idea and turn it into something real by planning a minimum viable product.
So, what is a minimum viable product, and how can it help you?
What is a minimum viable product in game development?
Typically, “minimum viable product” is a product development term used to describe the first version of a product or service, that’s usable enough to provide early feedback from users, but basic enough that it can be made quickly and modified easily.
When developing your game, the minimum viable product approach can help you to decide what the scope of your project will be.
Which is useful, as it makes the task of building your game clearer and more specific.
So what makes a minimum viable product?
There are two key characteristics to a minimum viable product:
- It’s the most basic version of your game that can exist that still fulfils the description of the idea.
- It’s shippable, meaning that what you make has enough value that it could be released as a playable game.
Working towards a minimum viable product forces you to think in terms of only what is essential to the concept of your game.
Which is helpful, because it will encourage you to focus on what’s actually important, allowing you to ignore anything that isn’t a core part of your idea, making the project smaller and easier to finish.
In fact, when using this approach, your project might be a lot smaller than you think.
For example, sound effects… probably not important.
Music… probably not important (and I say that as someone who works as a game composer).
Artwork… still probably not important to the definition of your game idea.
Now, you might be thinking “of course these things are important!”
And yes, absolutely, art, music, sound and many other features that I might describe as optional in this article do make games better and more enjoyable.
Of course they do!
But, they are not the game if the game can exist without them.
Remember that a minimum viable product is the most basic version of an idea.
And, when thinking about the absolute most basic definition of what your game is, they may be optional extras.
For example, consider a platform game.
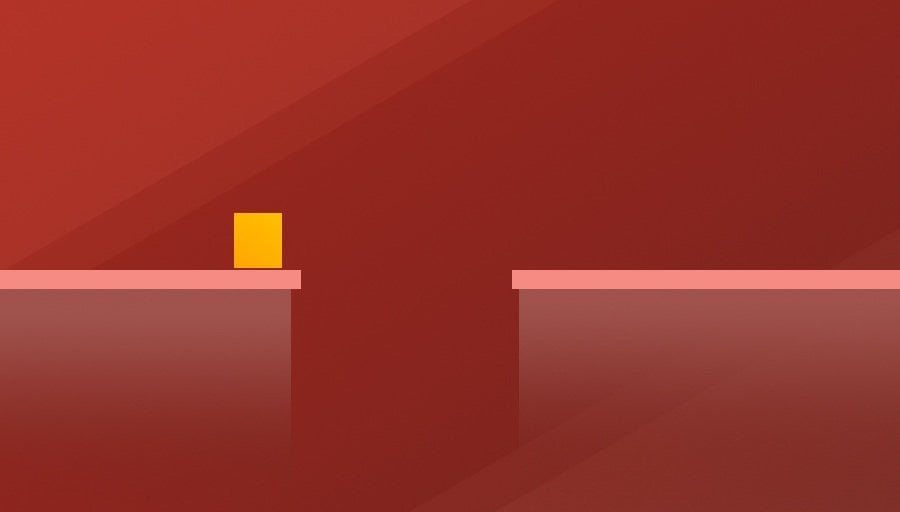
A platform game doesn’t need to be complicated to be enjoyable or engaging.
Fundamentally, a platformer is the player moving an object and making it jump, as well as some kind of hazard or obstacle that makes the moving and the jumping necessary.
Probably platforms.
And that’s it, that’s what the game is.
Anything else is an extra feature, meaning that it might make the game better, but it doesn’t make the game what it is.
Music, sound effects, artwork. You could take all of them away and the game would still be there.
But, take away the moving and the jumping, and there is no game.
And no amount of art, or music, no matter how good it is, can change that.
Minimum Viable Product vs Vertical Slice
A minimum viable product involves limiting your project’s scope, so that the amount of time between starting to build it and actually getting it into the hands of players is as short as possible.
The vertical slice, however, is generally a more advanced stage of development that typically involves adding many, if not all, of the features that are planned for your project, but limited to a small section of the game such as a single level.
While a minimum viable product can be useful for getting your core gameplay right by avoiding everything else, a vertical slice can help you to refine what your game will be when it’s finished by adding everything else back in again.
Which is useful, as it allows you to bring all of the moving parts together before building out the game’s other levels and content.
Is all of this really necessary?
This process can be quite difficult, so is it really necessary to think about your game like this?
There are many games that could be considered to be defined by the very features that, in this process, would appear to be unimportant. And, when imagining your game idea as a finished product, you probably already have strong ideas about what the game should be like.
What it might look like, or sound like, or how it might play.
Which can make disregarding so much of that idea as unimportant, a hard thing to do.
So, for this reason, it can help to imagine that the minimum viable product definition of a “shippable” game, means that the project is playable in its own right. For example, you could export it as a build, send it to a friend, and they could play it without any special instructions from you.
The game might only be one level, it might be horribly ugly, and completely silent.
But you could play it.
So it’s not necessarily the case that you must only build the minimum version of your game.
Instead, try to think of your minimum viable product as the thing you should build first, before you do anything else.
Then, you’ll be able to add extra features that enhance the experience of the game, later on.
However, if you can’t make your game, now, without those extras, then that may be a sign that your game idea doesn’t focus enough on what the player will actually do when they play your game.
In which case you’ll likely need to go back a step and rethink your idea.
But…
If you can identify only what is important to your game idea, and ruthlessly cut out everything else, if only for now, you stand a much better chance of building something that is engaging and fun.
And if it’s not fun, you’ll find out much, much sooner.
So how can you work out what your minimum viable product should be?
Here’s how to do it…
How to work out the minimum viable product for your game
To work out what your game idea’s minimum viable product should be, ask yourself the following two questions.
1. What will the player do to play your game?
This should be a single, specific statement that explains what playing the game is.
The focus is on doing, not experiencing so, while there are some games that are experienced more than they are played, try to think only in terms of what the player can directly control.
Write it down, this is your game’s core concept.
For example, for a simple spaceship game, the concept might be to collect points without crashing:

The core concept of your game is what the player will actually do to play it.
2. What features or mechanics must exist to enable this to happen?
Write down any feature that absolutely must exist to enable someone to play the game in the way you’ve described in the core concept.
In this example, the player will need to be able to move the ship and collect points, there will need to be damage if they hit an obstacle and, to enable any of that to happen, there will need to be a way to start and end the game:
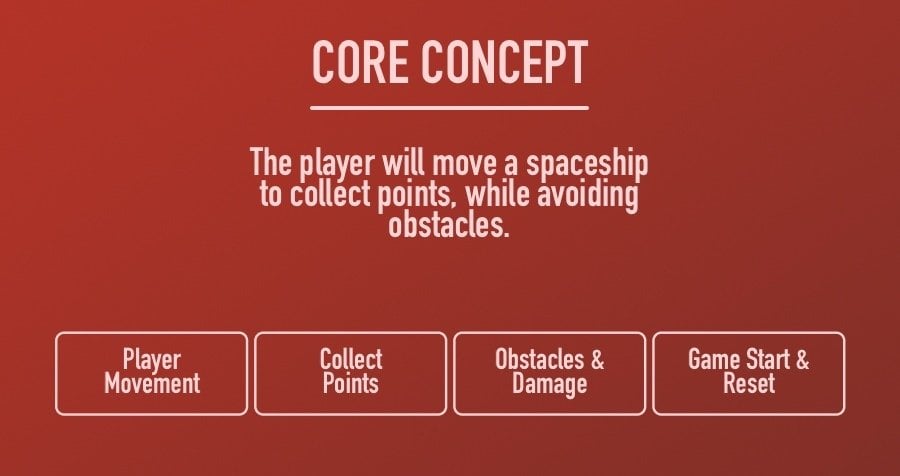
Next, think of the basic features that must exist to deliver the core concept.
The trick here is to mercilessly and brutally reject anything that doesn’t directly enable the game’s concept to happen.
This won’t be easy…
Chances are, you will have already imagined certain art styles, story elements, extra features, mini-games and all kinds of charming features that you were looking forward to making for your game.
However…
If you’re serious about starting a project that you can finish, you may need to leave out anything that doesn’t directly contribute to the core idea of your game, at least for now.
But how can you know what that is?
Following this process, it can sometimes be unclear if a feature of your idea should be included in the minimum viable product or not.
There will no doubt be edge cases, where something feels like it’s vital, but it may not be.
In these scenarios, simply ask yourself:
“If I shipped the game without this feature, would the core concept description of the game still be possible?”
If the answer is yes, then the feature is not mission-critical and you can save yourself time, money and effort by simply not doing it.
It won’t be easy and, if you’re anything like me, you will probably try to sneak some of your favourite features back into the concept.
But…
If you can be ruthless, and if you can cut out everything that’s not vitally important to your game, you’ll be able to focus all of your energy on what is important instead.
Which can make the game better to play, and easier for you to make.
But how will you make it?
Once you have an idea, and once you’ve decided where that idea starts and ends, how can you go about building it?
How to plan your game project
Once you’ve worked out what features need to exist to make your minimum viable product, you can start to plan how you’ll make each part.
However, each area of work, as a task, is much too large and too vague for you to simply start working away at it.
Which, if you only have limited time available to work on your project, can be a problem…
If a task isn’t specific enough for you to know where to start, or what it should look like when it’s finished, it can be difficult to make any kind of meaningful progress when you do get the chance to work on it.
This is because you’ll probably spend most of whatever time you have trying to figure out where you left off and what you need to do next.
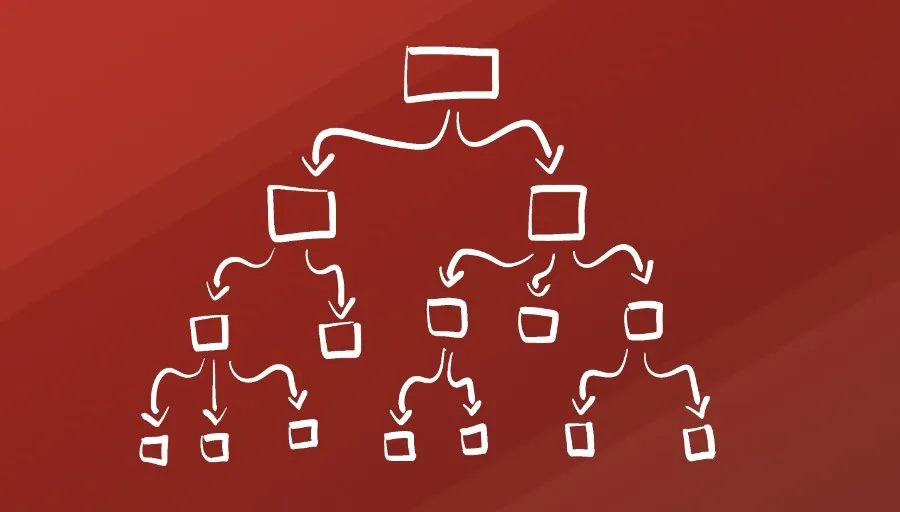
So, in order to get the most out of the time you have set aside for making your game, and so that you can make consistent progress on your project more easily, you’ll need to break the large tasks of your project down into smaller pieces.
Obviously, this isn’t a new concept.
Breaking down a big piece of work into smaller chunks is an effective way of simplifying what you’re trying to do and allows you to make steady progress in a large project more easily.
However, while that’s easy to say, it can actually be quite difficult to do in practice.
How, exactly, do you break down a big project into smaller tasks?
One method is to divide each large task into two or three smaller parts first, after which you’ll be able to break each subdivision down further and further until it’s specific enough to work on easily.
Keep in mind that this is just one way that you could approach this, so I’d encourage you to explore whatever method makes the most sense to you and what you’re trying to build.
However, if you’re stuck, this technique is simple, it’s easy to try, and can be a good way to get started.
Here’s how it works…
How to split up your game project into small tasks
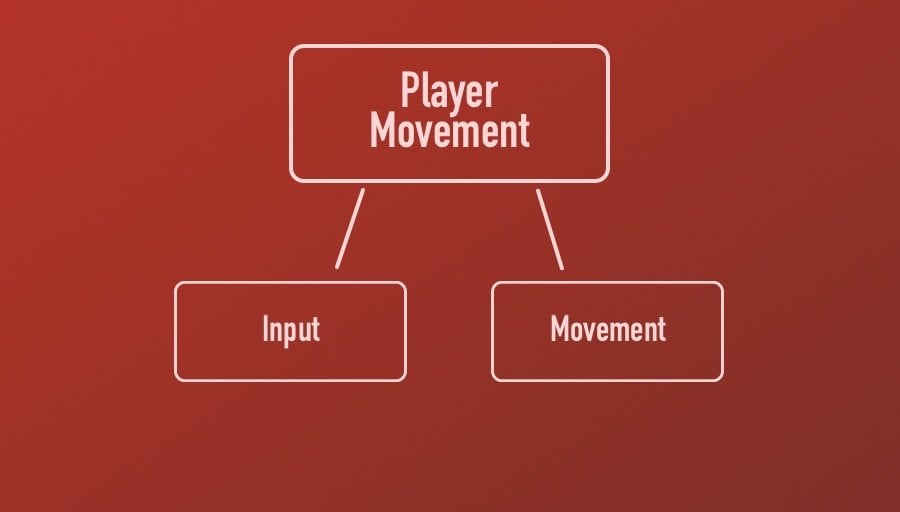
Start with each of the broad features that were identified in the minimum viable product stage, such as Player Movement, for example.
Then, to break it down, ask yourself one question about that feature…
Is this one task?
If it’s not, and it shouldn’t be yet, you’ll need to divide it into smaller parts.
Now, this is where it gets tricky.
It can sometimes be difficult to know how to split up a large task, either because you’re not sure exactly how the feature is going to work, or you’re not sure how small to go when you’re dividing.
So, to split the task into appropriately sized chunks, follow this process:
First, take the core concept and divide it into the largest chunks that you can.
This will mean that each divided part is probably still quite vague and non-specific.
What’s important, however, is that each division is unique, meaning that it is different from the other divided parts.
As much as possible, the divided parts shouldn’t overlap with each and, if you added them together again, they should form the whole feature they come from, without missing anything out.
When dividing tasks it can be easy to go too small too soon. The trick is to divide each large task into only slightly smaller parts that still make up the whole when added together.
Next, for each of the divided parts, ask yourself the same question again…
Is this one task?
Again… it probably still isn’t, and probably still shouldn’t be, but repeating the process will reveal more and more specific areas of work until you can reduce a large, vague, objective into a number of actionable tasks.
Try to reduce each feature down far enough that you have a list of tasks that are specific enough to work on:
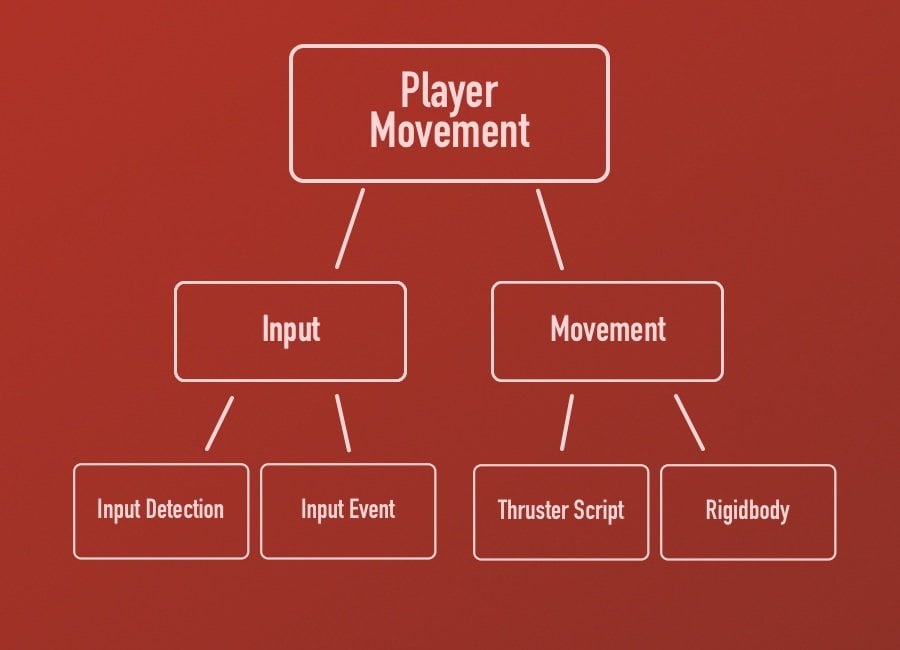
Keep dividing each task until it’s specific enough for you to work on easily.
By repeating the process for every feature and sub-feature in your project you’ll eventually end up with a list of individual tasks that are each simple enough to work on but, when combined, roughly add up to a full game.
And while this process isn’t perfect, and while you’ll often have to reconsider sections of work you may have missed or systems that may be dependent on each other, reducing down the challenges of your game in this way can be a useful way to start identifying the actual work involved in making your project, so that you know what to do when you sit down to work on it.
But which tasks will you work on first?
And how will you keep track of them?
How to manage your game project
Once you know what you want your game to be like and how you will make it, you’ll need to actually do it, and keep doing it, until it’s finished.
Which can be challenging, especially if you’re making your game in your free time.
So how can you manage your project, and yourself, to make working on your game as easy and efficient as possible?
There are many, many different ways to manage your time and you may already know what works best for you.
However, one method is to manage each task as if you’re giving it to someone else.
Even as a team of one, you’ll be taking on multiple roles in your project.
You’re the project owner, the manager and the developer.
And while being all of those things at once can be helpful, as it allows you to work in an extremely flexible way, sometimes, the easiest way to work is by following a clear brief, that’s been given to you by someone else.
Which is why it can be useful to separate the task of managing your project from actually working on it.
Here’s how…
To manage the tasks of your project, you’ll need a place to write them down.
You can use whatever system you want for this, however, for this method to work, you should be able to make notes for each task and easily organise them so that you know what’s done, what’s not, and what you plan to work on next.
One option is to use a tool like Trello, which is a Kanban project management tool that works using Lists and Cards.

In this example, I’ve used Trello to organise the four areas of work required to create the game’s minimum viable product.
It’s the tool I use to manage every music project I work on and every post I write on Game Dev Beginner.
Here’s how to use it to manage your project.
How to keep track of your game’s development (using Trello)
Make a list for each category of work that you identified in the minim viable product stage earlier in this article.
Then, at the top of each list, add a card to make any notes about the functionality of that feature as a whole, such as how it should work.
Then, for each specific task, add a short description to explain what the feature you’re building should do, how it will be used and what type of information will be passed in or out of it.
Like this:
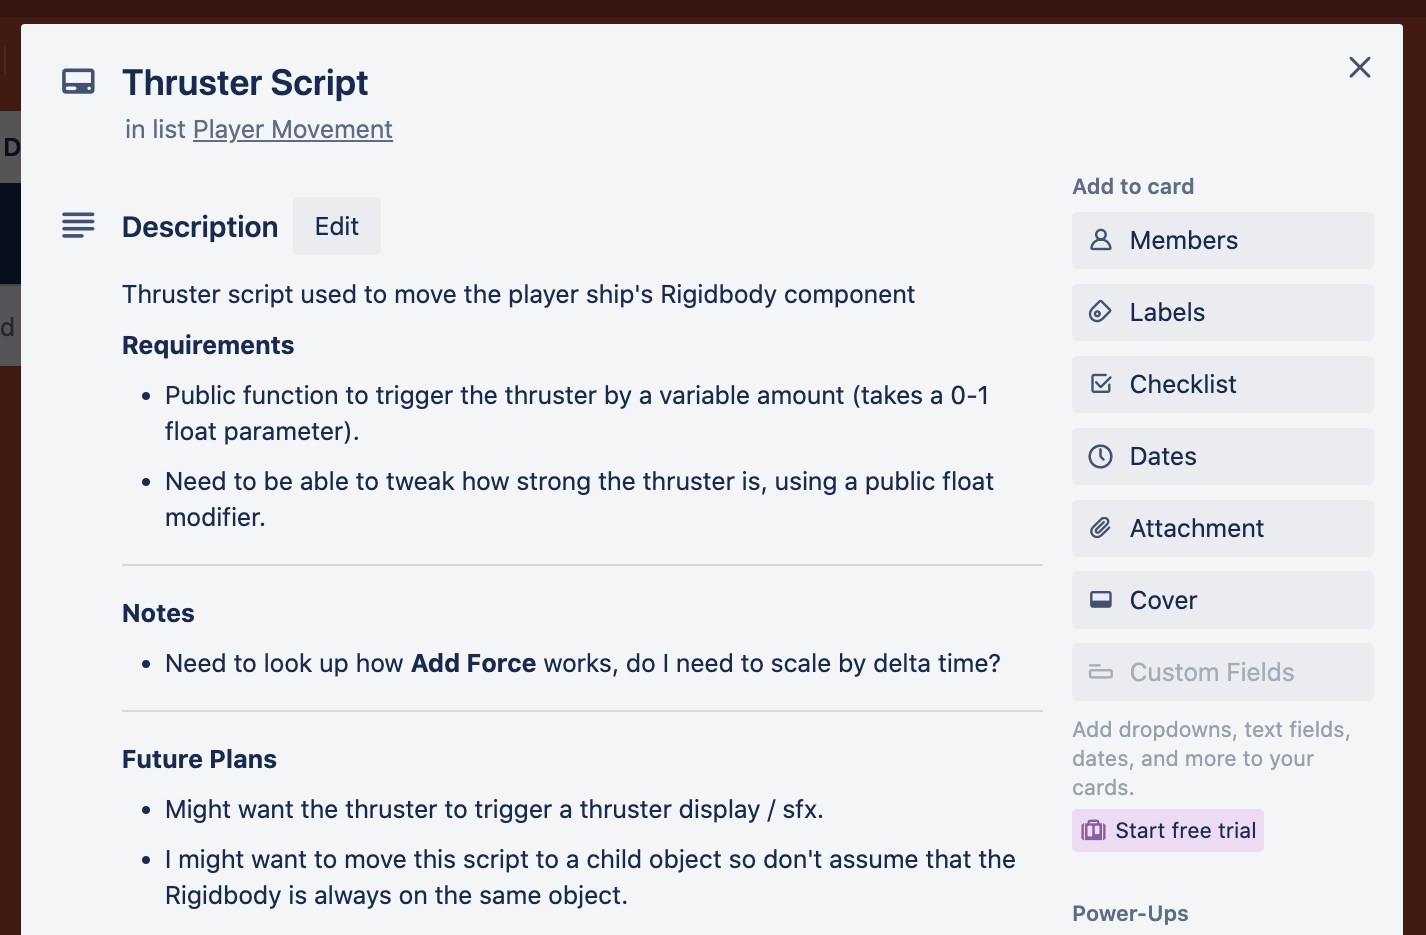
Giving yourself clearly defined tasks can make it much easier to work on your project.
At this point, you’re basically delegating work to yourself.
Which means that, if you want to be a good manager, taking the effort to write a clear brief for each task will make your employee’s job much, much easier.
After all, you want them to keep turning up, right?
So how can you make sure the task briefs you leave yourself are specific enough?
One method of writing good tasks is to use SMART goals as a guide.
What’s SMART?
SMART is a project management mnemonic that describes the different elements of a well-managed task.
It stands for:
- Specific
- Measurable
- Achievable
- Relevant
- Time-bound
Specific means that what you’re supposed to create or do is clearly described.
When you’re giving yourself a task, and you want it to be specific, write it as if someone else will read it. This can help you to include details that are comfortably in your head today but that you might forget by the time you come to work on the task.
Future-you will thank you for it.
Measurable means that a task can actually be finished. It’s how you will know when to stop working on something and how you will measure if it was successful or not.
To make a task measurable, ask yourself “How will I know when this task is done?”
Achievable means that you have the ability and the resources to carry out the task you’ve been given.
As a beginner, there may well be tasks that you don’t know how to do yet, in which case making a task achievable can be as simple as recognising the research you will have to do first, either as another, separate, task or as part of the task itself.
Relevant is how the task fits into the bigger picture of your project.
For you and your game, keeping a task relevant can be as simple as making a note of your future plans for a given feature. Such as if something that will affect how this task works is likely to be changed later on.
Lastly, Time-Bound refers to when the task needs to be done.
Traditionally, this might be the deadline for the task.
However, while you may find having a deadline for your project helps you to stay focused, it can also cause unnecessary stress so it’s up to you if you think placing a timescale on each task is helpful or not.
However, Time-Bound doesn’t only mean when a task needs to be finished.
It can also mean the order that tasks need to be worked on, as there will likely be some systems and pieces of functionality that need to exist before others can be built.
In which case, making a note of a task’s dependencies, if it has any, can be useful.
Motion vs Action
While planning what you will do before you do it can be extremely useful, it is also possible to spend too much time preparing and not enough time doing.
James Clear, author of Atomic Habits, describes this as motion vs action, where motion is typically planning and preparation while action is the behaviour that leads to results.
In this case, building your game.
While planning is important, it’s also possible to spend all of your time in motion, which can make you feel like you’re moving forward, when you’re actually not doing anything.
To avoid getting stuck in motion, it can help to schedule time that is just for action, so that you can get on with the task of actually developing your game.
Working on your project piece by piece
Together, the list of tasks that you’ve created should, for the most part at least, represent the backlog of work you’ll need to do to create your minimum viable product.
Meaning that, if you can do all the tasks on your list, you should have a working project that you can start to refine and expand into a finished game.
But, in order to get to that point, you’ll need to be able to work through the backlog of tasks, which means that you’ll need a way to keep track of which tasks have been finished, and which are in progress.
If you’re using Trello, or a similar system, you can do this by adding a Doing list and a Done list to the Trello board.
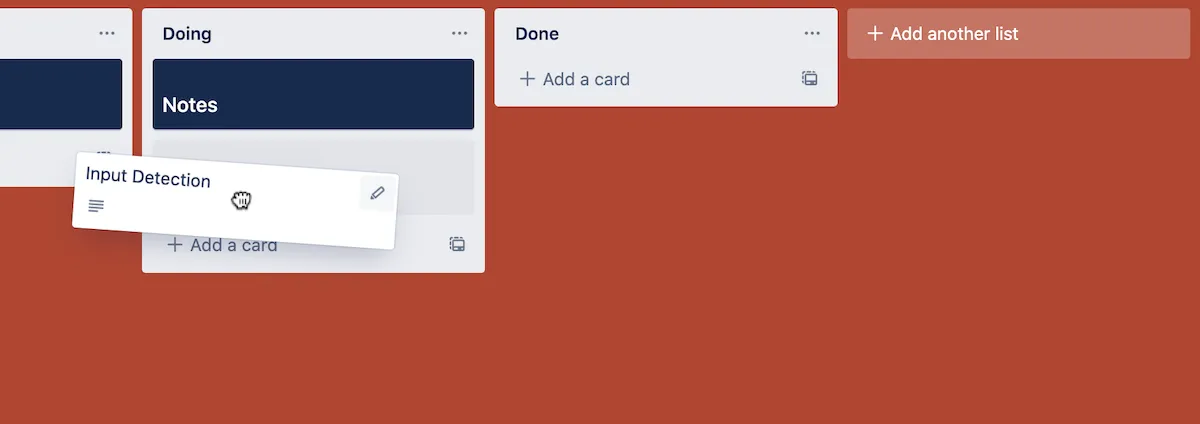
You may also want to add a Notes section to the Doing list, so that you can leave yourself reminders about what you were working on.
This can be extremely important.
If your time is limited, it’s unlikely that you’ll have the luxury of neat and tidy stopping points between each session working on your project.
Which means that you may need to leave something half-finished or broken.
Keeping track of what you were working on, and having a place to leave yourself some simple instructions, can save a lot of time and confusion.
While being able to clear tasks off of your Doing list into the Done column can help you to focus on what’s still left to do.
Agile project management in game development
If you have regular time to work on your game, you may find it helpful to consider your doing list as a specific unit of time, such as an hour, an evening or a day, whatever amount of time you have available to work on your game.
Then, when planning what you’ll do in that time, only move the tasks from your backlog into your Doing list that you expect to get done in that amount of time.
In Agile project management frameworks, this is a sprint, and it typically involves choosing a number of tasks from your backlog that will be completed during the sprint window, after which you’ll be able to assess what was finished, what wasn’t and why.
While this is an over-simplified description of what Agile project management is, it can be extremely useful to manage your doing list in a way that reflects the amount of time you actually have available to work.
Only adding what you expect to get done can prevent your doing list from becoming a 2nd backlog, filled with tasks that you haven’t gotten round to yet and are, therefore, not actually doing at all.
While being able to see what you could or couldn’t get finished in each window of time can help to highlight tasks that keep hanging around, in which case you’ll probably need to go back to that task and break it down further.
Turning vague objectives into specific, actionable tasks can be a tricky process, so don’t be surprised if you find you need to start this process over a couple of times before getting it right.
However, the reason it can be difficult is also why it’s important.
Breaking down the different moving parts of your game into specific tasks encourages you to think about how they will need to work, which means that you may need to make decisions about your game that you hadn’t even thought about yet.
And while this isn’t meant to be a design process, and while you certainly shouldn’t try to plan every detail of your game in advance, it will at least reveal the parts of your game that aren’t specific enough to build yet, forcing you to think about how they might function before you try to work on them.
Which, for the purpose of helping you to turn your game idea into a project you can actually work on, can be extremely useful.
Now it’s your turn
Now I want to hear from you.
There’s no one right way to manage a project, so I want to hear your best advice.
How do you turn vague ideas into specific tasks?
How do you keep track of what you’re working on?
And what have you learned about organising a game project that you know others will find useful?
Whatever it is, let me know by leaving a comment below.

John French writes all of the Unity tutorials for Game Dev Beginner, and specialises in deep-dive guides teaching game development basics.

Comments
My all time fav website
Thanks for informative articles
Thanks so much!
Very helpful John!
Appreciate how informative this is – You’ve put things I’ve heard elsewhere and put it all together and added more to it – fantastic!
Good timing for me as I’ve finished and shipped my game 2 days ago and will be planning for my next. Your writing is very helpful for ‘Intermediates’ and not just beginners!
(ps. If you’re willing, I can put a link to my new game, but don’t want you to feel I’m spamming 🙂 )
Thank you, I’m so glad it helped. What’s the name of your game?
Thanks John,
Scapegoat
(Available on Steam for PC & Mac, Google Play and the App Store)
https://store.steampowered.com/app/1914240/Scapegoat/
Thanks for sharing this information.
You’re welcome!
I’m a 14-year-old student who dreams of becoming a game planner Your writing helped me a lot Thank you.
Happy to help!
thanks for this, I’ve got a few ideas, but I’m moving to unity. I can and have made hobby stuff from c64 machine language to stuff in game maker, it’s always been others ideas or copies of existing stuff. This idea (one of the 3) seems the least daunting, but don’t know were to start. Guides like this give you some direction when your drawing a blank on were to start. Appreciate your time typing this up and it’s definitely bookmarked. If you have any other tips, tricks or useful urls I’d be glad to check them out. Keep up the good work.
Thanks Paul! I’d recommend Extra Credit’s ‘How to start your game development’ video, if you haven’t already tried it: https://www.youtube.com/watch?v=z06QR-tz1_o
Great Article! Keep up the good work.
Thanks!
Hi John!
I’m starting on a project developing a game with some friends, and have already worked in other industries as a Software Engineer. I really appreciated the section about breaking down and defining the MVP. I do struggle a lot with it, and I have to say you gave me a lot of insight on my own process, and it inspired me to do better. Thanks!
The biggest advice I’d care do share and add to your great article is this:
When creating tasks, add a “Definition of Done” section. This tells you how the game should look like once the task is finished. It gives you a goal-oriented look at what you are doing, and I find it helps me a lot keep track of progress and motivate myself. It makes it so much easier to shave off extra stuff that can be a separate task too.
Thanks for sharing! That’s a great tip.
I really want to learn from you thanks.
so were do I start
i love this
hi John,
After reading this clear and useful guide, i am very happy and appreciate it. It is not only tell me how to start my game project, but also give so many advise to manage it, thank you 🙂
Besides, there are several points hit me and open my mind:
1. Choose the project that can make good use of my skills and avoid difficult. I always ignore the distance between the target and my ability, thus i haven’t finish one project for my own yet. That’s a good point to realize and after reading, I think i can improve next time by using the ‘green-orange-red’ model;
2. MVP in game project is to think what player directly control, it will make me focus;
3. Motion vs Action. This tell me to realize i always spend too much time in plan rather than action.
I love this guide, and thank you for working on it.
Thank you! It’s so great to hear that you found it useful!
Hello, I am a blogger as well! I found this post very informative and would like to link to this page as a resource for game devs in a post I am making?
I think it adds a lot of value toward an indie ddev trying to learn how to makee and plan their projects.
This is awesome – thanks so much, this article was really useful – as an aside, here is the goal ‘path’ I use instead of SMART goals:
To achieve long-term goals, we have to set short-term goals. I start by asking myself the following questions:
How am I going to do this?
How long is it going to take?
How am I going to remember that I have this goal?
Who can help me stay on track with this?
How will I celebrate when I achieve it?
How will I keep on going even when it seems hopeless?
I find this more useful than SMART or maybe alongside SMART – anyway, keep up the awesome work .
Thanks for sharing!
thank you for making this website
its a nice intro.. I like your talent WOW … IM unspeakable LOL
I will like to make game
I want to make a rocket league
i want to make a building game
fighter robot just a normal game
no ai