When working on a project in Unity, you may want to move it to another computer or a different folder location.
Maybe you’re looking for a simple way to back up your work, or maybe you just want to work on it from different computer than you started on.
Perhaps you want to duplicate the entire project in the same location so that you can work on two versions at once…
Whatever the reason, while it is a very simple task there are a couple of tips to keep in mind that will make moving or copying a Unity project much easier.
So… what’s the best way to move a Unity project to a new location?
The right way to move or duplicate a Unity project is by copying the entire folder to the new location, making sure to enable ‘Visible Meta Files’ in the Project Settings first. It also helps to remove the Library and Temp folders when moving the project, as these can be very large and are not required, as Unity will rebuild them automatically.
This is different to exporting a Unity Package, which does not include project-wide settings and package manager dependencies. Moving a project by copying the folder is the best method for moving an entire project to a new location without breaking it.
In this article I’ll be exploring each step in detail, as well as a few tips to make moving your project a little easier.
Here’s what you’ll find on this page:
How to move a Unity Project step by step
- Enable Visible Meta Files
- Delete the Library and Temp folders (optional)
- Compress the folder to a Zip file (optional)
- Copy the project folder to the new location
- Add the project to Unity Hub
1. Enable Visible Meta Files
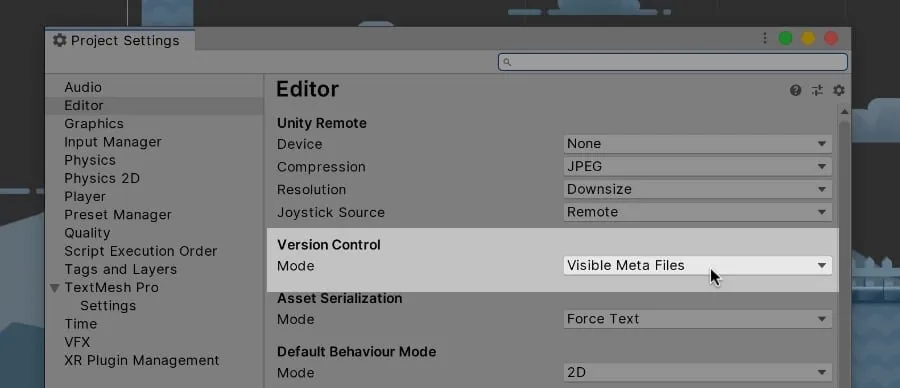
The Version Control option in Project Settings allows you to make hidden meta files visible. A must when using version control software.
Got to Edit > Project Settings and select the Editor Tab.
Find the Version Control Mode and, if it’s not already, set it to Visible Meta Files.
How to change the Version Control in Unity 2020 and up
In Unity 2020, you’ll find this option in the Version Control tab of the project settings, not the Editor tab.
Why should you enable Visible Meta Files in Unity?
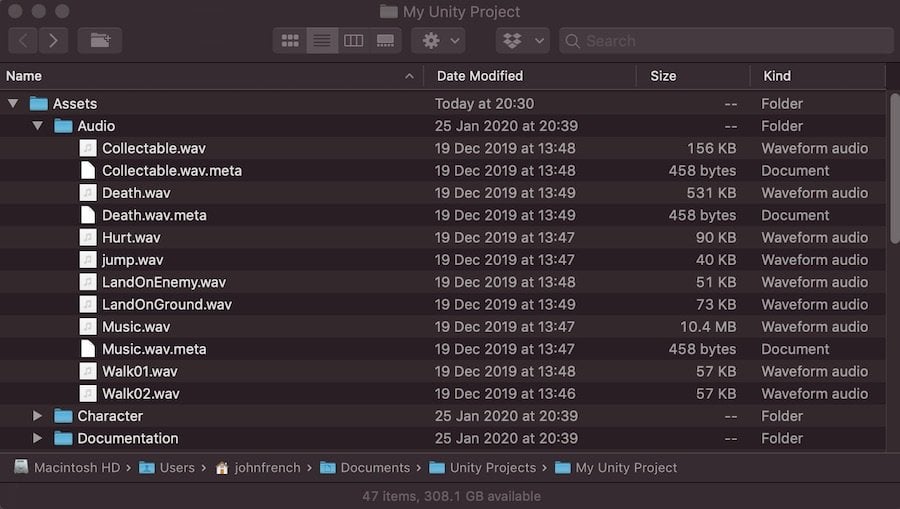
In Unity every asset has hidden meta data that is used to make and maintain references between script variables, game objects and assets. This meta data is stored in .meta files which are created by Unity when you import assets.
These meta files are hidden by default and, while Unity does not need to be visible to use them, other software may do. Enabling Visible Meta Files simply makes sure that they are included when the project is moved or copied.
Normally hidden, Unity’s meta files are used to maintain references between objects and assets.
This prevents the hidden references from being recreated, overwritten, or duplicated which can cause broken connections and errors. This is especially important if using version control software or when accessing the same project from multiple locations.
The good news is that, while researching for this article, I wasn’t able to deliberately break a project by keeping the meta files hidden, so it’s unlikely that missing out this step will cause you many problems in most scenarios.
However,
As it’s such an easy step, and because it can potentially protect your entire project from breaking when you move it, it’s good practice to set them to visible anyway.
2. Delete the Library and Temp folders from the project directory (optional)
Deleting the Library and Temp folders can help to bring the size of the project down before moving it.
This step is optional and only applies if you wish to move a Unity project to a different computer.
Open File Explorer (Windows) or Finder (Mac) to find your Unity Project.
Unless you’ve changed the default location for new projects, you’ll find your project in your Documents folder under Unity Projects.
If you can’t find your project folder then open up the Unity Hub, find your project in the list and select ‘Show in Explorer’.
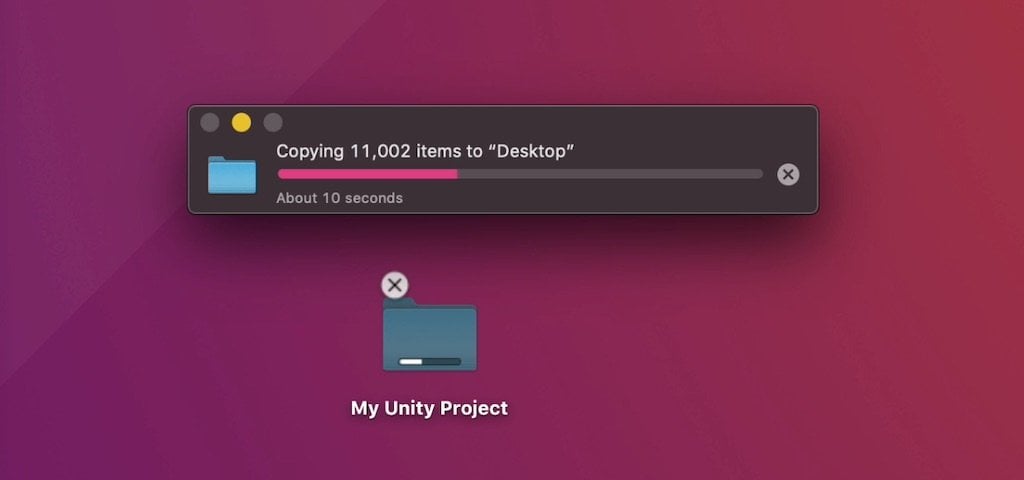
Once you’ve found your project folder, copy the entire directory to a new location (your desktop for example).
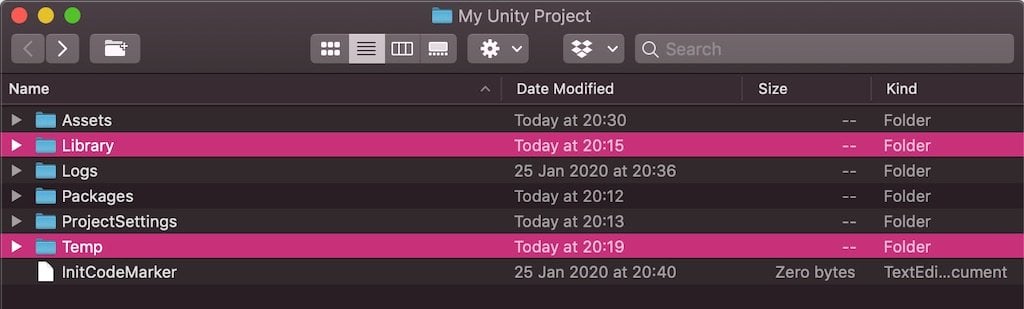
Open the copy and delete the Library folder and the Temp folder (if there is one) from the directory.
Why should you delete the Library and Temp folders?
You don’t have to delete these folders.
The reason that you may want to, however, is to reduce the size of the directory before you move it.
For example, to test this method I moved a small project which, when zipped, was 180 MB in size with the Library folder included.
By removing the Library folder first, it was only 25MB.
Removing the Library and Temp folders can massively reduce the size of the folder temporarily. This is ideal if you want to fit it on a small USB stick or share it online.
Then, when you open the project copy, Unity will rebuild the Library folder in the new location, restoring it to its original size.
Why make a copy of project directory first?
Copying the project to a different folder first lets you remove the unnecessary Library and Temp folders without damaging your project.
It is safe to remove the Library and Temp folders from the original project directory as Unity will simply rebuild them when you next open the project.
However,
For the time it takes to make a copy of the project first, it’s much safer to do it this way. As deleting the wrong folder by mistake could break your project.
3. Compress the folder to a Zip file (optional)

Unity projects, even small ones, have thousands of files. Zipping the directory makes the project easier and quicker to move.
This step is optional. It’s most relevant if you wish to upload a Unity Project using cloud storage, such as Dropbox.
When you’re ready to move your project, it’s time to Zip the project folder.
Right Click on the root folder, which is named after your project, and select Send To > Compressed (Zipped) Folder (Windows) or Compress (Mac).
Why should you Zip the project folder first?
You don’t have to Zip the project folder to move it.
However…
A Unity project, even a small one, may include many thousands of files.
And while this may not cause you any issues when moving a project locally, it can affect performance when uploading and downloading so many individual files. Something you may have noticed if you’ve ever created a new project (even a completely empty one) inside of a Dropbox folder.
For example,
It took 1m 33s to upload my test project which, although small, included almost 10,000 individual files.
To upload the same project when zipped, only took 40 seconds.
And while the time savings in my example are small, it’s likely that your project is much larger and much more complex.
Zipping the folder makes it easier to manage and quicker to move.
4. Copy the project folder to the new location
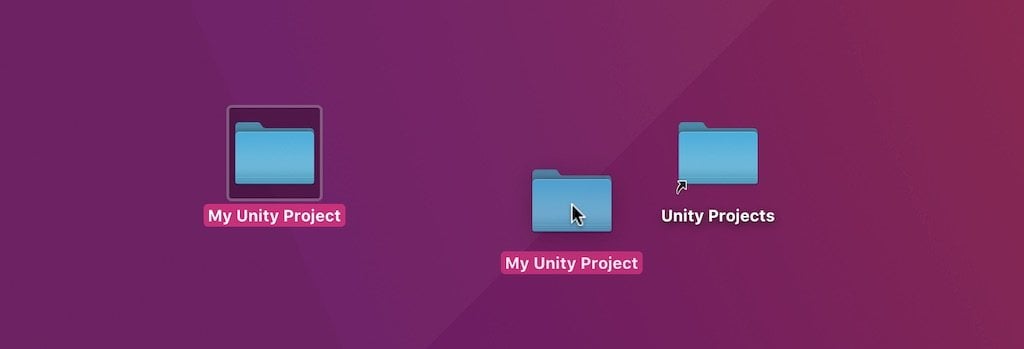
Move the copied project folder to the Unity Projects folder on the target computer.
Lastly, paste the directory, or extract the zipped project folder, to the new location.
How to create a duplicate Unity Project in the same location
If you’re not moving the project to a new location, and all you want to do is create a working duplicate in the same folder as the original project, here’s how to do it.
- Enable Visible Meta Files but ignore steps 2 and 3.
- Duplicate the project folder inside the Unity Projects directory.
- Rename the new folder as you like.
- Add the new project copy to Unity Hub (see below).
5. Add the project to Unity Hub

Click Add to add the new location to your Unity Hub after you’ve moved it.
If you’re using Unity Hub you’ll need to add your, now moved, project to the list of Projects in your dashboard.
Simply open Unity Hub, click Add and select the new project directory.
At this point you may also want to make sure that you have the same version of Unity installed as the source project (if moving the project to a new system).
If you don’t, you can download a specific version of Unity, (including older versions) from Unity’s download archive.
You can now open the project as normal.
How to remove a project from Unity Hub
If you’re no longer using the original project you may want to remove it from the Unity Hub projects list.
To do so simply find the project from the list and select Remove from List from the dropdown menu on the right hand side.
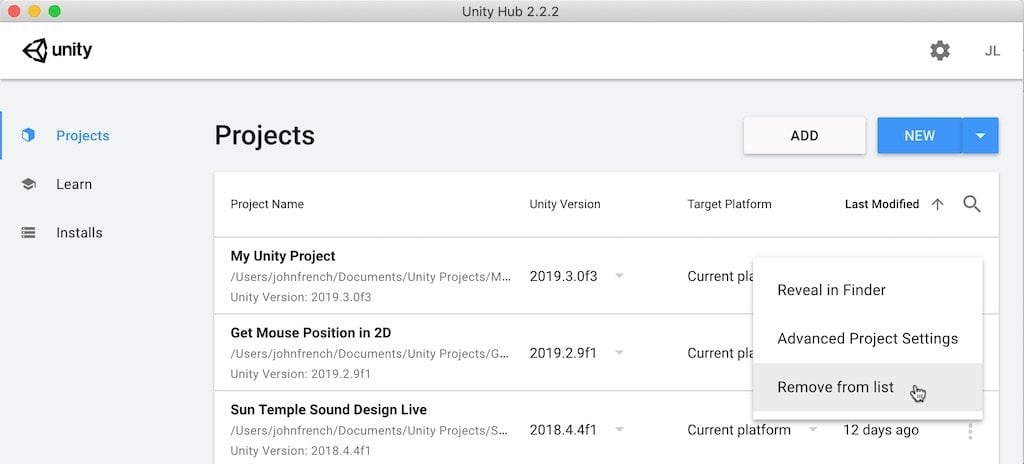
Removing a project from the Unity Hub does not delete it, but it does tidy up your list.
This will remove the project from the Unity Hub list but it will not delete the project folder.
If you want to do that, you can simply delete the project folder manually from the Unity Projects folder.
Now I want to hear from you
If you’ve been working in Unity, chances are you’ve had to move your Unity project at some point.
What happened?
Were you able to move the project without breaking it?
And if something did go wrong, what do you wish you had known beforehand that would help someone else right now?
Whatever it is, let me know by leaving a comment below.
Image Attribution
- Icons made by Freepik from www.flaticon.com
- Unity Logo © Unity Technologies

John French writes all of the Unity tutorials for Game Dev Beginner, and specialises in deep-dive guides teaching game development basics.

Comments
Thanks a lot ive been working hard on a project and got a new laptop. ive been stuck trying to figure out how to move my project from my old pc to my new laptop. I followed your instructions and I was able to open it without any crashes or bugs, Thanks A LOT
You’re welcome!
But about keystore for unity android project. I need backup it
Thanks, very helpful.
I just transferred my project this way and the only issues that came up was the Editor layout doesn’t transfer (tied to Unity install, not project), and the Snap & Grid settings fall under that.
Obviously it only takes a few seconds to reset your layout, but in case you have a very precise setup you can use Window > Layouts > Save to file… to transfer that too.
Snap & Grid settings are very important for my project, as it is 2D Pixel-based. Very glad I noticed that had changed before moving/importing any sprites.
Great tip, thank you!
Thank you — very clear and helpful!
You’re welcome!
Didn’t work for me. When I moved the whole folder (without deleting anything) the project won’t load. I get a weird half transparent view of the Steam holding room with my project also half visible but I’m in the wrong place and not able to interact with anything… Have tried it a few times now. I wanted to make a copy to experiment with so I can preserve the work I have done so far so this is a bit frustrating. Can’t think why it doesn’t work. I have to add it to Unity hub and open it that way – dont know how else to do it so maybe that’s causing the problem.
I’d double-check the basics, i.e. make sure you’re using the same version of Unity, that you have any package manager dependencies installed in the new project (this should happen automatically) and that no files have been left out during the transfer. Beyond that, I’d need to know your project better to be able to help. If you don’t mind sharing details about it you can email me at [email protected]
It all worked for a regular project, although how about when copying a cloud collaborated project? I have found that when I copy the project folder, it still retains relationships to the cloud in the original. How can I detach it cleanly from the original cloud?
Thanks mate!
Hi Jesse, I might be able to update this article to include managing Cloud projects in the future but, for now, I’d recommend getting in touch with Unity on that one.
Very useful thank you!
One thing that happened to me as I was working on a scene and then I wanted to open a new scene, thinking it was a “new project”. So Unity doesn’t work that way…and it cleaner my previous project (luckily only testing map and playing around).
That’s why I was looking for an article like this to create a physical backup somewhere as well. Thanks for the tips!
Glad it helped!
Hi.
Thanks for this well put article.
My project is in my OneDrive folder. I regularly make a copy of the entire project on my F drive for backups. When I open one backup from UnityHub, I find many occurrences of the OneDrive path in files like *.csproj. So I guess it is why when I open a script by clicking inside Unity log console, I get the OneDrive version and not the copied version. Why the paths are not updated? – ‘Visible Meta Files’ is enabled but I do not delete Library and Temp folders.
That’s interesting. Does this happen only when clicking from the log console? i.e. not an actual script file in the project panel.
Hi John.
Yes.It does not happen when 2x clicking a script from the project panel. I did not notice this before your question – thanks. I tried with a deleted library folder but the project becomes corrupted with 100s of errors. So I guess something is wrong with my project or something is missing in the copy procedure. Have you tried on your side to open, from a copied project, a script from the stack trace in the console?
I haven’t tried that but I’ll look into it. If I can recreate it and find a cause I’ll update the article with the extra info.
Thank you for your help. I was having issues as my project was initially saved on the usb to save storage space. The problem is, the usb was getting so hot that it ended up dropping-off in the middle of running Unity. Transfered it to a new location and it was running with no issues 🙂
Probably a good idea! I’ve found this to be the case when syncing a project with Dropbox too, where syncing the project can cause high CPU usage.
Thank you so much! Now making game backups is more convenient and less space. ^_^ This saves me a lot of back up on my works…
You’re welcome, great to hear it helped you!
I have a problem that when I open the project on the new computer it stuck on “resolve packages” loading screen and never open it, I tried over and over but it doesn’t work, and It’s very important project for me and I can’t find a way to resolve it, please help!
I don’t have any experience with that error, but after some searching, it seems to be a package manager issue (I assume it’s trying to check and download any packages that you need). This forum post might be helpful: https://forum.unity.com/threads/stuck-on-resolving-packages.544269/ alternatively, official support may be the way to go on this one.
Very, Simple, Very Concise, and, Easy to follow. Thank You!
You’re welcome!
The most comprehensive move instructions on tinternet, thanks!
You’re welcome!
Very clear and reassuring – instills the confidence to try and it is a revelation to see how compact a project is without the Library.
I did not see the option to show/hide the Meta files – perhaps this has gone in the latest version of Unity? – but they were in the directories, perhaps by default.
Would Echo the previous poster who enquired about doing this that is already under Collaborate. Would be good to know what safe options exist for severing (or keeping) those links.
I’ve used the collaborate feature before and found it to be, surprisingly, very easy (particularly for cloud storage and working on the same project on multiple computers). I haven’t thoroughly tested it with a large project yet, hopefully I can write a future article on it.
I would love to see an article on the built-in Collaborate feature. Thanks for all the great content!
You’re welcome. I’ve used it briefly and found it surprisingly easy, I’d like to do an in-depth article on it some time in the future. It’s on my list!
You sincerely saved my soul with this one. Thanks.
You’re welcome!
Hi, I’ve just been wondering if you can import your Unity project to mac? I’ve been thinking about switching to a mac and I don’t want to lose all my Unity projects.
I’m not aware of any major issues switching between platforms, although you’ll see an advisory message in the console about script line endings. You may want to also make sure your target platform matches too. So it’s probably a good idea to make a backup but I’ve recently used both PC and Mac on the same project (via Unity Cloud) and it’s been working fine.
I was recently needing to do this so as to be able to switch between making small tweaks on the stable version while developing completely new behaviours on the other. I would recommend to anyone doing this to delete the .sln and .csproj files along with the Library and temp folders because intellisense stopped working on vs code for me and this is because the files will point to the previous project. I just pushed my stable project to github with .gitignore ignoring the usual files and folders and then I cloned it to a new project and Unity rebuilds everything when the project opens.
Thanks for the tip!
Github, or BitBucket, is a MUCH better way to do this, worthy of a whole article by itself. In addition to being able to move a project, you get built-in archiving and easy undo.
For example, 2020.2 is finally out. Push your project to github, then create a branch to work on the upgrade (or a bug, whatever). Once everything works, then merge it back into the main branch. If it doesn´t, simply revert.
I develop on a desktop most of the time, but a laptop when I travel, so this is critical for me.
Thanks Tac, for your feedback. Personally, I really like the built-in Collaborate feature for saving a project to the cloud, but I’m not a professional developer, and I accept that Github and options like it can offer much more, certainly at scale, if you’re comfortable with using them. It really depends on what you need from it. Thanks again.
I would love to see an article on the built-in Collaborate feature. Thanks for all the great content!
Hey John. I recently purchased some apps to reskin but I am a complete noob on this front. I have watched videos and tutorials on how to work inside of unity but have found no solid info on how to import the source code that I purchased. I ended up changing my file name to .unitypackage and got it into Unity but all I can see is the game and the info in the Projects folder. Everything appears to be there but when I click on Scene to look at the programming, it’s just a 3D view of the background like there’s nothing there. Not sure what I did wrong but can’t figure out how to get the project loaded to make my reskin changes. I am very new and very confused but anxious to get started on this process. Been studying for 2 months before even attempting and now……I am stuck. Thanks for any advise you have for me.
Hi Patsy, if it’s fair to say that you’re fairly new to using Unity? it’s going to be hard to tell if there’s an issue with what you have, or if you’re just unfamiliar with how to work with it. Best advice I can give is to get someone with a bit more experience with Unity to take a look at it, if only to double-check that you’re not missing something basic. Hope that helps.
Thank you sooooo much Sir!
You’re welcome!
Thanks for the instructions; I’m new to Unity (just finished Brackeys ‘How to make a Video Game in Unity’ tutorial) and always good to know, how to duplicate a project safely in this environment.
Just two small remarks:
1) in Unity 2020.3.0 (possibly earlier), the single ‘Mode’ option for version control has been moved from ‘Editor’ to ‘Version Control’ menu, so now it’s better to write: ‘Got to Edit > Project Settings and select the Version Control Tab.’. The attached screenshot need to be updated as well.
2) in my case, the Mode is already on ‘Visible Meta Files’ and I can see the .meta files under Assets, as expected.
I’m not sure though, wether this is now the default setting, or Brackeys made me change that during his course…
Thanks for the tip, I’ll take a look at how this works in 2020 and see about updating the article.
Good explanation! Very didatic! Thanks!
Glad you liked it!
This worked for the most part. But two things seem to happen no matter what I do. First, my main character script is not linked, and all the audio sources are missing their audio files (but the audio files are still in the assets). This happens no matter what I do, no matter which project I copy over.
Thanks for your feedback Robert. I don’t know what’s causing this for you. There seems to have been some issues with missing references in rare circumstances (see this forum thread for more) however this may not apply to your project. Could you let me know your Unity version so I can look into it when updating this article in the future?
Thanks, John! Just moved my project from Mac to Windows. The project was already using Git so I thought I was safe, but when I opened the project on Windows, all of the script links were broken. Turns out the meta files weren’t there because, while I had meta files visible, they were ignored in my .gitignore. I think I had combined a standard Unity .gitignore with a .NET .gitignore, so beware of .gitignore leaving your files behind!
Just posting this here in case someone else moves a git project. 🙂
Thanks for the heads up, hopefully, you’ve saved someone else from having the same issue.
Great article, thank you.
You don’t cover the case where you want to duplicate a project and rename it.
How to proceed ? Is the .sln file the only one to rename ? This is the only one where I see a link to the main project parent folder name.
Thanks
If you duplicate the project folder, then add it to Unity Hub as a different project and open it, any scripts you open from that project should be part of the new project and a new Visual Studio Solution, without you having to manually rename the .sln (in the test I ran a new .sln was created). However, others have reported different results and others have recommended removing the sln, so your mileage may vary. I’ll update this article in the future with an expanded section on duplicating projects and how it affects Visual Studio.
I’m partly working in an offline environment and have problems opening projects that depend on packages like [email protected] or [email protected]
How can i move these files with my projects and where do i have to copy them into?
I copied the folders from my internet connected machine that have all the packages from AppData\Local\Unity\Cache\packages.unity.com\ and tried to put them into the same folder on my offline-device but unity didnt recognized them and said missing dependencies.
Then i tried putting them directly into the PackagesCache folder inside “Library”, but whenever i opened the project in unity, unity automatically deleted the additional folder i put into.
I haven’t done any offline testing with Package Manager dependencies. My only understanding of this is that, depending on your Unity version, it may not be properly supported at all and that the easiest way to move Packages is to let Unity manage the dependencies online. See this Unity forum thread for more information.
Thanks a lot for the thorough well-made explanation!
You’re welcome!
Hi John, thanks for the article. Anyone struggling with Collaborate after duplicating the project where new project still pointing at old project can do following to resolve the issue.
1. Go to Edit >> Project Settings >> Services (General Settings panel on the right)
2. We need to Unlink existing Project ID & create new one. For this, in general settings, look for Unity Project ID & click on “Unlink Project” button.
3. Then, select your organization and create a new Project ID.
This should decouple the new project & you should have clean collaborate repository.
Hope this helps someone 🙂
Thanks for the tip Rupesh!
recently i moved my project (so unity could run it more efficiently) from a solid state external hard drive by only moving the assets and project settings folders but it didn’t seem to help much speed wise…
after opening the project through the unity hub it was able to rebuild it pretty well but had i known, i would have brought the package folder with it because i had to reinstall all the packages that were previously installed.
what benefits would i achieve by including the logs folder, if any?
That helps me alot because i didnt know that Library and tamp folder can be deleted without problem but i know faster solution for zipping. Just go to your folder, select everything, diselect Library and Temp folder then click RMB – 7zip – add to archive. Change name and voala you dont need to copy entire project first
Great tip! Thank you.
Hey John, you have helped me a lot, it worked out perfectly. You have my deepest gatitude man. Keep up the good work!
Happy to help!
I’ve been working on a very large project that (along with everything else on my computer) outgrew my 110 Gig hard-drive and I didn’t catch on until I was in the middle of a build. Then it was 2 days of nauseating stress wondering what to do, chasing down error messages. I learned that disk space was likely the cause, and I rediscovered the 900 Gig D: drive that’s been on my computer the whole time that I never really noticed. I think it’s an SSD built in add-on.
Anyway, it was my last hope, and I found your tutorial, and it brought order back into my life in the time it took to follow these very, very thoughtful, flawless directions. Thank you, thank you, thank you!!!
Well done for getting that sorted! I’m so glad my article helped you.
Just reading this post while moving my whole unity projects files and folders, should take your 2nd steps, those tiny files hurts a lot during moving process. Wish I finished reading this post first before moving those massive project files. Btw, good post, I’ll stop by on others interesting topics. cheers.
Thanks for posting your article! I needed to archive a Unity project to transfer to someone. Your detailed walkthrough and tips were quite useful.
Happy to help!
Thanks I want to create two different versions from the same project and that’s the best solution to save a creation version 2.
Unfortunately, this does not work for me. I am on version 2022.3.22f1, completely new to Unity.
I just followed this tutorial here: https://www.youtube.com/watch?v=AmGSEH7QcDg
I have installed the cinemachine addon, which was preserved in the unzipped version on another computer.
The other computer also detected the version of the unity editor, and upgraded.
The layout was preserved in the unzipped version.
However:
All Gameobjects are gone. A camera is in the scene, but it is the default camera, and not the one set-up in the original project.
Thanks for sharing your experience.
Stefan your project is probably not broken. Here’s what I think happened:
In the library folder, there is a file that keeps track of the last opened scene (LastSceneManagerSetup.txt).
If that file is deleted (along with the library), an empty “Untitled” scene will be displayed the next time the project is opened. But the project is still functional even when the last opened scene file has been deleted, you can put everything back in order by simply opening your scene (from your Assets).
By the way, there is a free tool on the Asset store to export a project to zip without this problem.
I was working on a school project, and I needed to get the project which I had started at home onto the school computer. I didn’t know about the library and I uploaded my project to Google Drive without even zipping it. I found out after trying and failing to download it for an hour, that it hadn’t finished uploading. I had started it two hours prior and it still wasn’t done! I was so confused, so I checked the logs and immediately realized why it took so long. It was downloading every single file in the library one at a time. I downloaded everything except the library, and that seemed to work. I checked my files when I got home and discovered that the whole entire project was 1.12 GB. The library itself was 1.12 GB. The rest of the project was only 10 MB. When I finished the project, it totaled to 1.17 GB, with the library being 1.16 GB by then.