
When you start learning how to write your own scripts in Unity, one of the first things you’re likely to do is create a variable.
This might be a number, a string, or a reference to an instance of a script or a game object in your scene.
However, while creating a single variable can be very straightforward, at some point you’re probably going to need to work with multiple variables of the same type.
For example, instead of using one footstep sound, you may want to pick a sound from a set of different effects, randomly.
Or, you might want to move an object between a number of different waypoints, stored as vector 3 positions.
Or maybe you need to sort through an entire set of references, such as multiple colliders that are touching an object, to see if any of them match a particular condition.
And when you do that, you’re probably going to want to do it one place, as trying to treat a number of individually declared variables as if they’re a single set of data can be extremely difficult to do.
Luckily, in Unity, it’s possible to work with multiple variables of the same type, in one place, using an Array.
In this article, you’ll learn how arrays in Unity work, how to make them and what they’re good for, so that you can manage data in your game more easily.
Here’s what you’ll find on this page:
Let’s get started…
Arrays in Unity
An array in Unity is a type of collection, which is a set of data that’s stored and accessed using a single variable instead of multiple variables.
They allow you to store multiple numbers, strings, vector 3 values or references to game objects, classes and assets, from a single point of access, allowing you to iterate through a list of objects, or check one value of many, without needing to identify and manage individual variables.
So how do they work?
How to make an array in Unity
To make an array of a particular type of variable in Unity, simply declare the variable as you normally would, then add a set of square brackets after the variable type.
Like this:
public int[] integers;Then, in the Inspector, instead of seeing only a single variable, you’ll see an empty list:
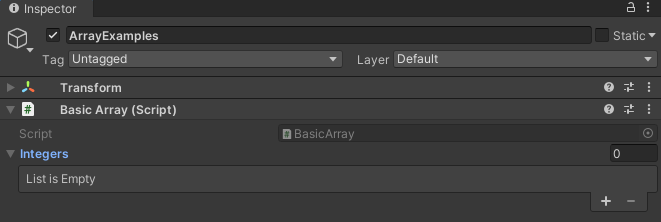
At the moment, the array is empty, and doesn’t have any elements in it.
To increase the size of the array, you can use the Plus or Minus buttons at the bottom of the list to add or remove entries.
Or, you can change the total length of the array by setting the element count directly.
Like this:
Setting the Element Count value can often be quicker than manually adding entries. It also allows you to quickly clear an existing array by setting the element count to Zero.
It’s possible to turn just about any kind of variable into an array of that type.
For example, you can create arrays of value types, such as integers, strings, floats, booleans and vectors.
Like this:
public int[] integers;
public float[] floats;
public Vector3[] vectors;
public string[] strings;
public bool[] booleans;
Or you can create arrays of reference types, such as game objects or components, where each entry in the list is a field that points to an instance of that type in the scene or in the project.
Like this:
public Transform[] transforms;
public GameObject[] gameObjects;
public AudioSource[] audioSources;
public Sprite[] sprites;
public MyClass[] scripts;
You can then access an element of the array you’ve created by using its name.
How to get an element from an array
To access an element in an array, simply reference the array variable by its name, and pass in the number of the element you want to access inside square brackets.
Like this:
// Gets the fourth element
int number = integers[3];
Arrays are numbered starting from zero, meaning that the first element is referenced using zero, not one, while the index of the last element in an array will be one less than the total number of elements.
For example, the last element in an array with four entries can be accessed using the number 3.
But, if you try to use an element that doesn’t exist in the array, you’ll get an out-of-range error.
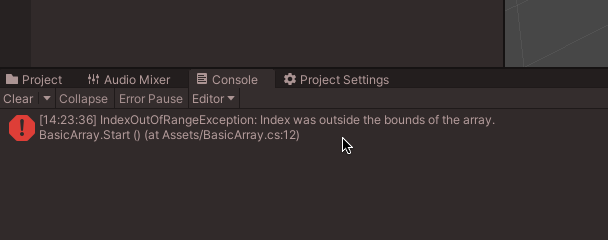
The Index Out of Range Exception error happens when you try to reference an element that doesn’t exist in the array.
To avoid this, if you’re not sure how many elements are in the array before you use it, it’s usually a good idea to check if an element exists before trying to do anything with it, by getting the Length of the array first.
How to get the length of an array
It’s possible to check how many elements are in an array by using its Length property.
Like this:
public int[] numbers;

void Start()
{
    int lengthOfArray = numbers.Length;
}
This will return the total number of elements in the array, which will be a number that’s one higher than the index of the last entry.
This means that, if you want to check the entire contents of an array, by iterating through every element, you would typically increment an index number, i, inside of a For Loop, adding to it each time, for as long as the number is less, but not equal, to the length of the array.
Like this:
for (int i = 0; i < numbers.Length; i++)
{
    Debug.Log("Entry: " + numbers[i]);
}
The length of the array is the total number of elements that you added to it in the Inspector, including any empty references.
But, what if you didn’t set it up in the Inspector?
What if your array is private and you only want to work with it in the script?
How to initialise an array in code
In order to actually use an array for anything, you will need to initialise it first.
An uninitialised array has no values and has a length of zero.
Meaning that you won’t be able to use the array to store values or to read them.
Normally, you might initialise the array in the Inspector, by adding your own elements and values to it manually.
However, if your array is private, or if you’re using an array temporarily, such as entirely inside of a function for example, then you won’t be able to set the values yourself.
So how can you initialise an array in your script, so that it can be used?
Generally speaking, there are 3 ways to initialise an array.
- You can initialise it manually, in the Inspector,
- You can initialise an array when you declare it in your Script,
- Or, you can set the contents of an array using the result of a Function that returns an array of that type.
Most of the time, if you’re just using an array to hold information that the script will use, such as sound effects, or waypoint data, particularly data that might be different between instances of the script, you’ll probably want to add it in the Inspector manually.
However, if your array is private, or otherwise isn’t visible in the Inspector, or won’t be created until the game is running, you won’t be able to set it up ahead of time.
In which case, you’ll need to initialise your array when you declare it.
How to initialise an array when declaring it
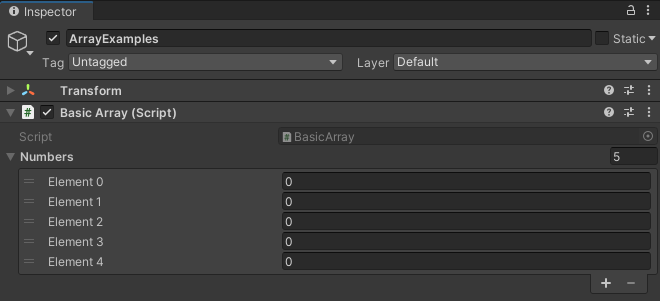
When declaring a new array, it’s possible to initialise it with a number of empty entries, just as you might do when manually setting the length in the Inspector.
This works by setting the variable to a new array of that type when you declare it, passing in the number of entries you want into the square brackets.
Like this:
// Creates an array with 5 empty elements
public int[] numbers = new int[5];
Which, in this example, will create an array with five empty elements.
However, if you’re creating your array in code, you probably won’t be able to set its contents manually, in which case it’s also possible to initialise and set the array’s values when you declare them, by setting the variable to a series of comma-separated values in brackets.
Like this:
// Creates an Array with 4 numbers already set to 1,2,3 and 4
public int[] numbers2 = { 1, 2, 3, 4 };
In this case, the length of the array is implicit, so you don’t need to also declare the array’s length when initialising it using this method.
Setting the initial value of each element works when using Value Type variables, such as integers and floats, however, it’s generally not possible to initialise the starting values of Reference Type variables, such as game objects and classes.
For example, while you can initialise an empty array of game objects when you declare one…
Like this:
public GameObject[] objects = new GameObject[2];…it’s not possible to enter references for those game object fields like you can when declaring a collection of values.
Meaning that, if you want to set the references of an array of game objects using a script, you’ll need to do it in a later function, such as in Start.
Like this:
public GameObject[] objects;

private void Start()
{
    // Initialises an array with 2 elements, this object and null
    objects = new GameObject[] { gameObject, null };
}
However, there may be times when you don’t need to set an array’s initial values, or even its length, when using one in a script.
For example, certain functions return an array of a particular type, meaning that it’s possible to fully set the contents of an array by calling a function.
How to set the contents of an array using a function
Some functions in Unity use an array of values as their return type meaning that, if you set an array to the result of a function that returns an array of the same type, the function will set the length and contents of the array when it’s called, whether it was initialised or not.
For example, physics functions, such as Raycast All, will typically fill an array of Raycast Hit variables with instances of hit data, so that you can sort through them and check what was hit.
Like this:
RaycastHit[] hits;

void Update()
{
    Ray ray = new Ray(transform.position, transform.forward);
    hits = Physics.RaycastAll(ray);
}
However, creating new arrays like this generates garbage which, when used sparingly, isn’t necessarily a problem but, if you’re doing it every frame, can impact your game’s performance.
As a result, when using functions that return array types, you will usually find an alternative Non-Allocating version that can be used with a fixed array.
Like this:
RaycastHit[] hits = new RaycastHit[5];

void Update()
{
    Ray ray = new Ray(transform.position, transform.forward);
    int numberOfResults = Physics.RaycastNonAlloc(ray, hits);
}
This allows you to initialise an array and use it like a buffer where, the integer that the function returns, which is how many results were found when the function was called (up to a maximum that equals the length of the array), can be used in place of the length value when checking results.
The benefit of this method is that the array isn’t continuously reinitialised, avoiding garbage and saving performance.
But what if you don’t want to constantly overwrite the array anyway?
What if all you want to do is change it once, such as to add or remove a single entry?
How to add an entry to an array in Unity
Generally speaking, there isn’t a built-in function to add or remove an element from an array in Unity, but it is still possible.
Despite the fact that you may find mentions online of both Add and Remove methods that exist as part of the Array class, these generally refer to older methods of managing arrays in Unity using Javascript, not C Sharp.
Instead, to change the length of an array in Unity, without overwriting its contents, you’ll need to use the Resize function of the Array class.
It works by passing in a reference to the array you want to change, and an integer value to set the new length.
Which, by starting with the current length, makes it possible to add or remove an array value by changing it to one more or one less than it is now.
Like this:
// Adds one element to the end of the Array
System.Array.Resize(ref numbers1, numbers1.Length + 1);

// Removes the last element of the Array
System.Array.Resize(ref numbers1, numbers1.Length - 1);
The advantage of this method is that, unlike when simply reinitialising an array, the contents of the remaining elements will stay the same.
Which makes it possible to add a new empty element to the end of the array, or remove the last element from the array, without changing the other values.
It would also technically be possible to add or remove an element from other positions in the array as well, such as the start or middle of the array, by shuffling the remaining values around manually to accommodate for the new or now, missing, element.
However, generally, if you’re going to use an array in that way, you’ll probably be better off using a List anyway which, unlike arrays, can be dynamically sorted and changed.
Arrays vs lists in Unity
Lists work in a very similar way to Arrays, except that, unlike arrays, lists are typically more suitable for dynamic collections where the length of the list is likely to change.
public List<int> numbers;
For example, it’s possible to add or remove single entries to or from a list, lists can be easily sorted, and entries can be checked, compared or even removed based on their contents, not just their index number.
Meaning that, if you want to work with a collection of data dynamically, instead of simply storing it in order, you’ll probably be better off using a list instead of trying to make an array perform tasks it’s not designed for.
How to make an array that’s visible in the Inspector
Making an array Public, or adding the Serialize Field attribute to a private array, will allow you to view and edit its contents in the Inspector.
Generally, most fields that can be serialised as a single value, will also be serialised when used inside of an array.
Meaning that value types, such as integers, floats and vectors will appear as editable fields.
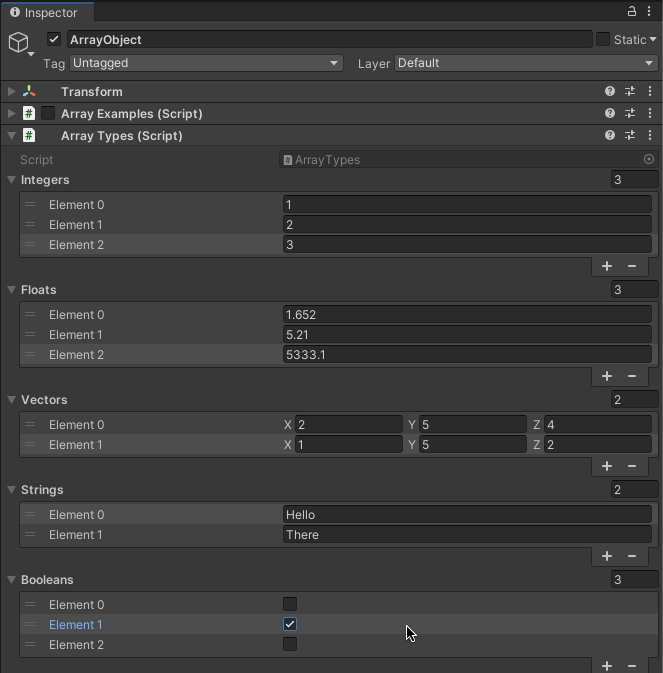
Value Types display editable fields in the Inspector when they’re serialised
However, arrays of Game Objects and Monobehaviours, such as scripts and components, will appear as a list of references, just as they would when declaring a single variable of that type.
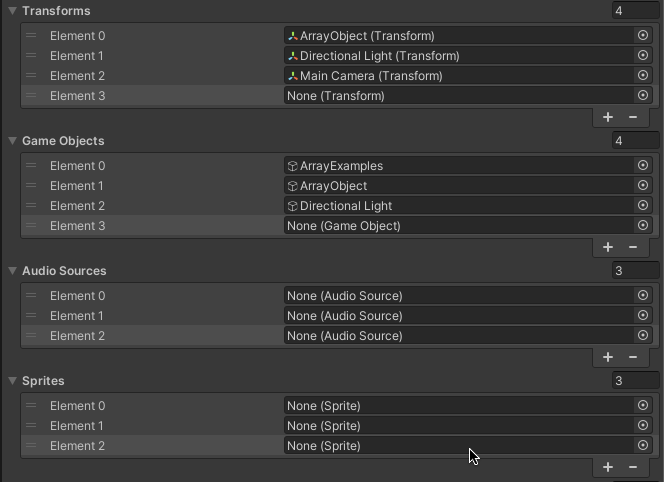
Reference Types, on the other hand, will display a reference to an instance of that type, such as an asset, script or object elsewhere in the scene
However, it’s also possible to create custom data structures directly inside of an array by creating a serialisable class or struct.
Creating arrays with visible class data (using classes and structs)
Normally, when you create an array of reference type variables, such as an array of game objects or script components, you’ll see them in the Inspector as reference fields.
Meaning that the array itself doesn’t contain the class or the object that each element is referencing, it simply points to where it does exist.
But what if you want to use an array to create a collection of self-contained data? Where the values and variables of each class element appear in the array as an item.
Being able to do this can be useful when the data type that the array stores is more complex than a simple value, but shouldn’t necessarily exist somewhere else as a component, such as the contents of a container, a player’s inventory items or associated data, such as a high score value and a name to go with it.
So how does it work?
Generally, there are two ways to create instances of data directly inside of an array, so that it can be seen and edited as if it was a value type variable.
You can either use a Plain Class, or you can use a Struct.
Plain Classes are C# scripts that don’t inherit from Monobehaviour, meaning that they can exist as instances but they can’t be attached to game objects as components.
Structs on the other hand are, essentially, data structures that can be used to hold information in a custom format in a similar way to a class but as a value type, such as Vector 3 values, or Raycast Hit data types, which are both, themselves, structs.
Making your own custom class or struct allows you to create a type of data that will be visible when used in an array.
Meaning that, so long as the class or the struct is serialisable, using the System Serializable attribute, you’ll be able to create custom data arrays that can hold information directly.
Like this:
public class ArrayTypes : MonoBehaviour
{
    public ItemClass[] classItems;
    public ItemStruct[] structItems;
}

[System.Serializable]
public class ItemClass
{
    public int value;
    public string itemName;
}

[System.Serializable]
public struct ItemStruct
{
    public int value;
    public string itemName;
}
Which, when viewed in the Inspector, looks like this:
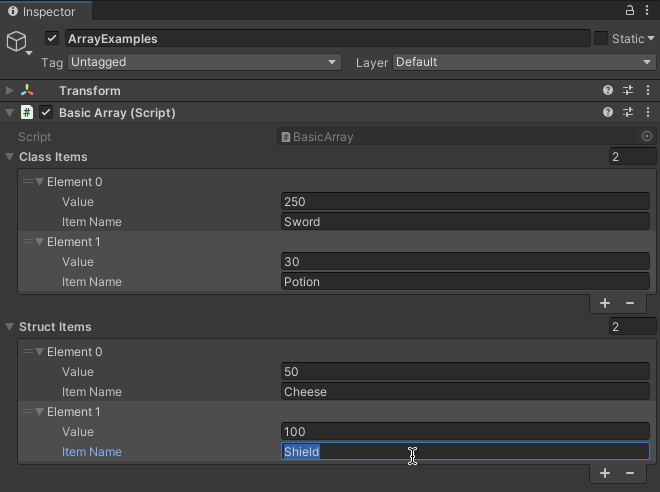
Creating your own serialisable variable types allows you to create data that can be stored and edited directly in an array as if it was a value.
But which should you use?
Class or struct?
Classes vs structs in Unity
Generally speaking, the main difference between a class and a struct is that a class is still a reference type, meaning that it can be null, whereas a struct is a value type, meaning that it can’t.
An example of why this might be important is when using an instance of a class as a piece of information that’s passed to a function.
If the class hasn’t been created yet, the reference is null, meaning that it doesn’t exist which, if you want to be able to tell if something exists or not, may be exactly the kind of behaviour that you want.
A struct, however, exists as soon as it’s declared and, just like any other value, it will provide default information for its variable types, instead of being null, in the same way that a new Vector 3 is all zeros, or how a new boolean is always false.
In practice, however, a class that’s initialised as an entry in a public array does already exist, meaning that, when using classes as a type of array data, they typically behave in the same way as structs do anyway.
If the array was private, or otherwise hadn’t been serialised, it would be possible for one of its entries to return null, like an empty reference would.
As a result, and because structs typically don’t cause garbage in the same way that new classes can, it’s usually better to use structs for custom array data that’s visible in the Inspector, unless you have a reason not to.
So far, each of the examples in this article has only dealt with single-dimension arrays, arrays that each store one collection of a single type of data.
However, it’s possible to create more complex, multi-dimensional arrays, that store two or more sets of data in a single variable.
Multi-dimensional arrays in Unity
Generally, there are two different types of multi-dimensional array in Unity.
There are true multi-dimensional arrays, such as 2D Arrays, which are arrays that contain multiple collections of the same variable, and then there are Arrays of Arrays, which are single-dimension arrays, but where the type of variable that they hold is, itself, an array.
How to make a 2D array in Unity
A 2D Array is created in the same way as a regular array, by adding square brackets after declaring the type of variable it will contain.
However, to make the array multi-dimensional, you’ll need to add a comma inside of the square brackets.
Like this:
public int[,] numbers;This indicates that the array has two dimensions, instead of one.
Which sounds simple but, since you won’t be able to see the array in the Inspector, can sometimes be tricky to picture in your head.
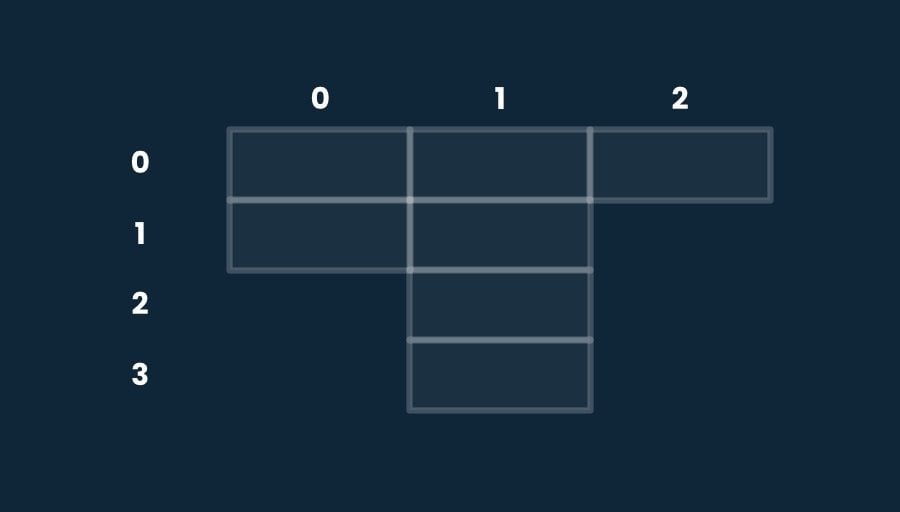
The easiest way to visualise the array’s two dimensions is to imagine that it’s a spreadsheet, where the first dimension is the column number, and the second dimension is the row.
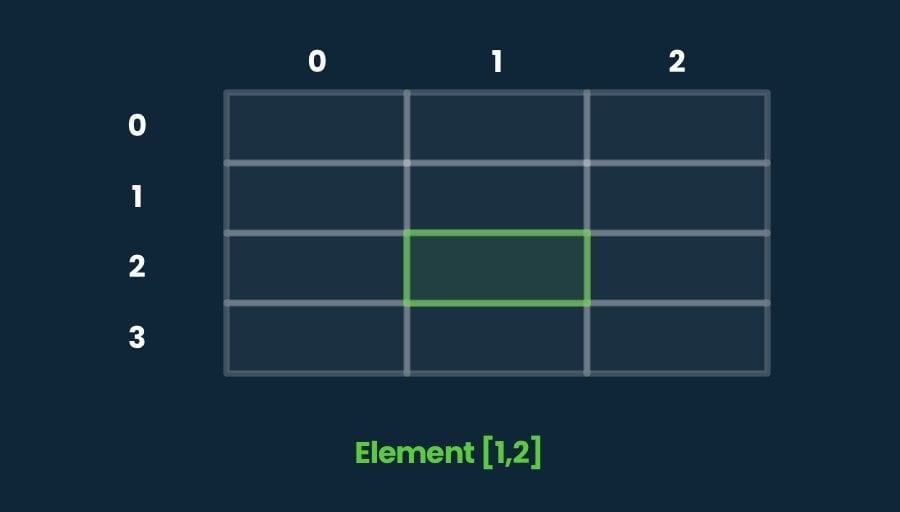
Two-dimensional arrays basically work like spreadsheets, where the column and row values will return a specific result.
Then, to access an element in the array, just like when identifying a cell in a spreadsheet, all you need is the column and row coordinates.
Like this:
int newNumber = numbers[1,2];Treating the values of a multi-dimensional array as rows and columns can make it much easier to understand what’s going to be in your array when you initialise it, since all you’ll need to do is first decide how many columns you want (the first value) and then decide how long you want those columns to be (the second value).
You can also initialise the array’s elements by using comma-separated values in a set of brackets, one set of rows for each of the columns.
Like this:
// Initialise without values (5 columns, 10 rows long)
public int[,] numbers = new int[5,10];

// Initialise with values (2 columns, 5 rows long)
public int[,] numbers2 = new int[2,5] { { 1, 2, 3, 4, 5 }, { 6, 7, 8, 9, 10} };
One of the most common tasks when working with any kind of data collection, including multi-dimensional ones, is to iterate through all of its elements.
But how can you iterate through two different dimensions?
The basic method is the same as when iterating through a regular, single-dimension array, by using a For Loop.
However, because it has two dimensions, not one, you’ll need to nest one for loop inside of another.
Like this:
for (int x = 0; x < numbers2.GetLength(0); x++)
{
    for (int y = 0; y < numbers2.GetLength(1); y++)
    {
        Debug.Log("Element " + x + ":" + y + " is " + numbers2[x, y]);
    }
}
In this example, I’ve used the Get Length function to read the length of a specific dimension in the array, identified by passing an integer into the get length method.
This is different to the Length property, which counts all of the elements in an array, in all of its dimensions.
Which is fine when working with single-dimension arrays but, now that there are two dimensions, the length property will be incorrect when trying to iterate through just one of the two columns, causing an out-of-range error.
How to make a 3D array in Unity
3D arrays work in the same way as 2D arrays, except that they contain three dimensions, not two.
To make one, simply pass two commas into the square brackets when declaring an array.
Like this:
public float[,,] numbers;Like 2D arrays, three-dimensional collections still, basically, create a grid-like data structure, where the first and second values represent columns and rows.
The only difference is the addition of a third value, which, if you continue to imagine the array as a spreadsheet, allows multiple, duplicate tabs of the same set of columns and rows.
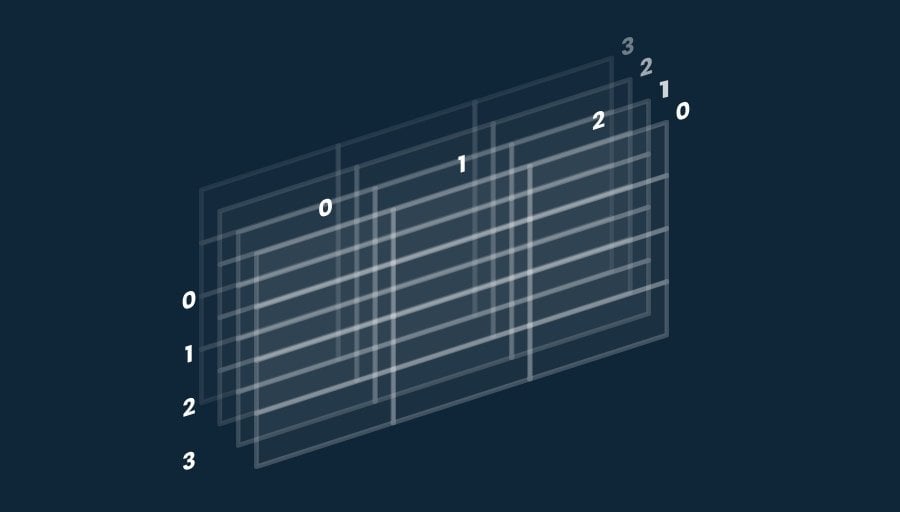
3D Arrays introduce a third dimension, allowing you to store huge amounts of data in a single variable.
This allows you to store a huge amount of information in a single variable, such as the alpha map data of a terrain object, where the three values are used to represent the X Position, Z Position, and a Texture Index of the alpha map, at which point a float value is returned, which is the 0-1 mix of that texture at that, precise, position.
How to make an array of arrays
A multi-dimensional array, such as a 2D array, is not the same as an Array of Arrays, which is, put simply, a single array, where the variable type of each element is, itself, also an array.
While a 2D array is, essentially, a set of columns and rows, an array of arrays is more like multiple lists kept together.
How is that different?
The main difference between multi-dimensional collections and nested ones is that the individual arrays in a nested collection can be different lengths, while the dimensions of 2D and 3D arrays are always the same length as each other.
The advantage of nesting arrays is that their dimensions can be different lengths.
This might mean that a nested array is more or less suitable for what you’re building, depending on the type of data you want to store.
For example, a multi-dimensional approach is good for creating fixed-length data structures, where all of the possible elements of the collection are known in advance, such as checking tile positions on a fixed grid.
Whereas nested collections are useful when each array may need to be a different length, meaning that one part of the array may be longer or shorter than another.
But how do you actually make one?
To make an array of arrays, simply declare the variable type followed by Two sets of square brackets.
Like this:
// Creates an array of integer arrays
public int[][] numbers;
Then, if you want to initialise the array in the script, you’ll need to declare each new array as if it was an individual collection, separated by commas and inside a set of brackets.
Like this:
public int[][] numbers = { new int[] { 1, 2, 3, 4 }, new int[] { 1, 2, 3, 4, 5 } };

private void Start()
{
    for (int x = 0; x < numbers.Length; x++)
    {
        for (int y = 0; y < numbers[x].Length; y++)
        {
            Debug.Log("Element " + x + ":" + y + " is " + numbers[x][y]);
        }
    }
}
How to see a multi-dimensional array in the Inspector
Generally speaking, it’s not possible to display a 2D array or a nested array in the Inspector.
However, there is a workaround that will allow you to view and edit the contents of nested collections manually.
It works by creating a serialisable struct that contains an array as one of its variables.
Then, by creating an array of that struct type, you’ll essentially be creating an array of arrays, but where the individual elements of the collection are visible in the Inspector.
Like this:
public class MultiArrays : MonoBehaviour
{
    public NumberStruct[] numbers;
}

[System.Serializable]
public struct NumberStruct
{
    public int[] moreNumbers;
}
Which, in the Inspector, looks like this:
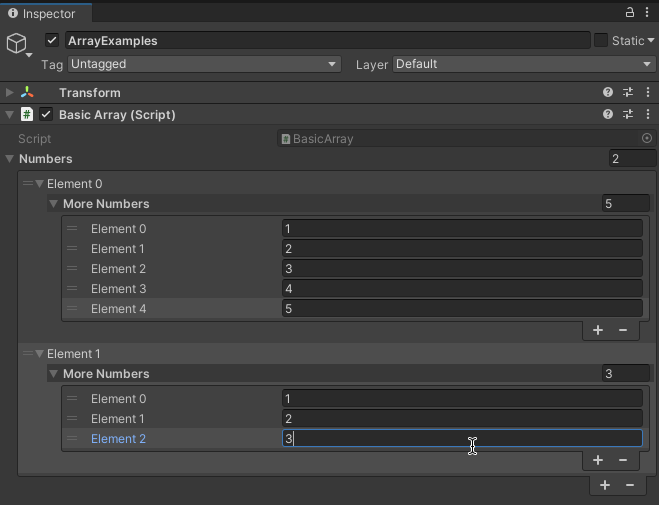
Now it’s your turn
Now I want to hear from you.
How are you using arrays, lists and other collection types in your game?
Do you find them easy to work with? Or have they caused you more problems than they’ve solved?
And what have you learned about working with arrays in Unity that you know someone else would find helpful?
Whatever it is, let me know by leaving a comment.

John French writes all of the Unity tutorials for Game Dev Beginner, and specialises in deep-dive guides teaching game development basics.

Comments
Thank you!
Thank you for the instructions. If you set up a 2d array in one script can it be accessed in another script? Would you use : Public void Start() to initialize the array in one or both scripts. I assume you declare the array in both .
Just trying to figure this out.
Andrew
So yes it can, because arrays are technically reference types, even if they hold value types, you only need to initialise them in one place and then another script will be able to access the same array.
For example, if you point an array reference to another, already initialised array (e.g. array1 = array2;) then they will both contain the same values, and changes in one will be reflected in another.
As far as I know, you can’t do this in the Inspector so yes you would do it in Start or, typically, the initialisation step in Awake, with the setting in Start.
Hope that helps.
is it possible to attach the same set of multiple different booleans to each of the elements under “more numbers”?
Off the top of my head, yes. It’s possible to keep nesting data types. However, there is a limit, at which point Unity will warn you that you’ve created too many levels.