
Making a game can be a challenge.
Knowing how to design and build your game and how to market and release it when it’s finished can be an extremely difficult thing to get right.
So, it’s no surprise that there are many projects that are simply never finished.
However…
While there are often large obstacles to overcome when making a game, more often than not, it’s the, seemingly, smaller frustrations and issues that can cause a project to be abandoned.
Sure, there are some projects are shelved because of specific technical challenges. But sometimes, however, a project that’s simply disorganised can, bit by bit, become too difficult to work with.
Until it’s not worth working on anymore.
Which is why taking the time to organise your project in a way that makes sense to you can sometimes be the difference between finishing a game or not.
But what’s the best method of organising your Unity project?
While there’s no one right method for organising a project in Unity, it can help to know what your options are, so that you can pick and choose the methods that make the most sense to you and how you like to work.
So, in this article, you’ll find some best practice tips that can help to make organising your project a little bit easier to do.
Here’s what you’ll find on this page…
- How to organise your scene hierarchy
- How to build game objects
- How to organise your project files in Unity
Let’s get started.
How to organise your scene hierarchy
When working with a scene in Unity, you usually only have to manage a couple of objects at first.
However, as you start to build the scene, the number of objects you’ll have to work with will increase, surprisingly quickly.
Which can make finding a single object extremely difficult.
A complex scene might be made up of hundreds of different objects.
So how can you organise your scene to make it easier to work with?
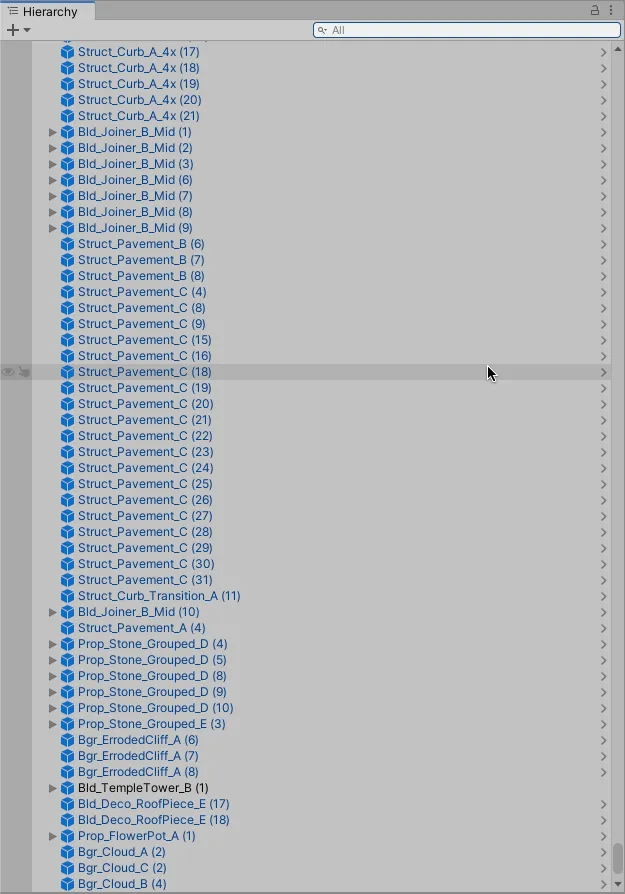
Use empty game objects as folders
One simple method of keeping your hierarchy organised is to use empty game objects as folders.
Simply create a new empty game object and place any objects that you’d like to group together inside it, so that they are child objects of the folder parent.
This will allow you to collapse and hide all of the objects in a particular category, hiding them from view.
Which is useful when your scene contains tens or even hundreds of objects that you won’t always need to access.
For example, you could use this method to place all of your game’s background objects together, hiding them to make your hierarchy easier to work with at a glance.

Using Game Object ‘folders’ allows you to easily hide objects you don’t want to see.
What’s more, grouping certain types of objects can make it easier to edit them together.
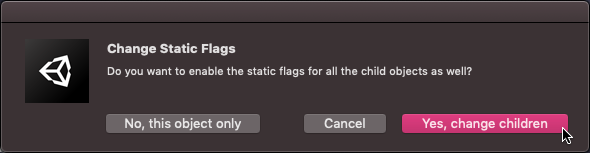
For example, if all of your environment objects are children of a single Environment folder, marking the parent object as static will allow you to set all of the child objects to static as well.
Or, if you want specific objects to persist between Scenes, simply create a folder object for persistent systems and add a single Don’t Destroy on Load script to that parent object…
Like this:
using UnityEngine;

public class DontDestroy : MonoBehaviour
{
    void Awake()
    {
        DontDestroyOnLoad(gameObject);
    }
}
Then, to allow objects to be carried over to new scenes, simply drag them to the persistent systems folder object.
Like this:
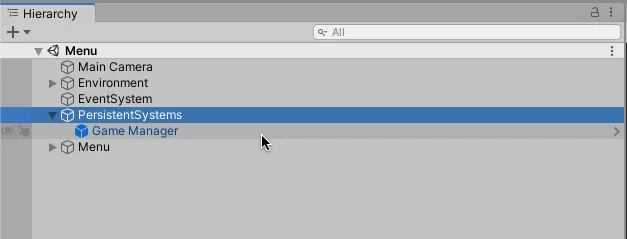
Creating a Don’t Destroy on Load object allows you to move objects between scenes by simply dragging them to the persistent systems folder object.
Instantiate new objects as children
While organising the objects in your hierarchy into folders can be a useful way to hide and show the objects that already exist in your scene, it can also be helpful for keeping your game tidy when it runs.
When instantiating objects, particularly projectiles and enemies, your scene can very quickly become cluttered with new game objects.
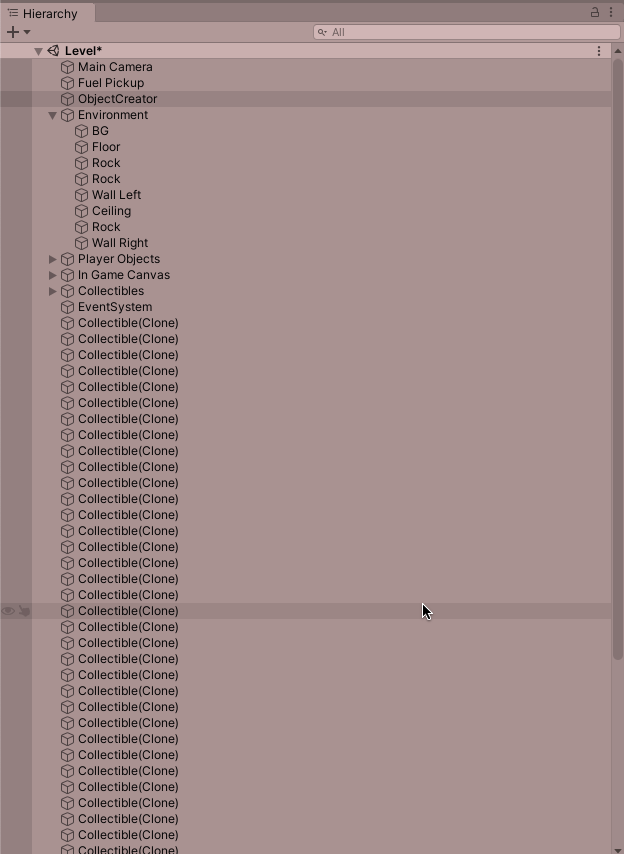
Instantiated objects appear as clones, and can quickly clutter up the hierarchy.
Which, if all you can see is clones, can make it difficult to understand what’s happening in your scene.
However, it’s possible to assign a newly instantiated object as a child of another object when you create it.
Like this:
public GameObject objectToCreate;
public Transform parentObject;

void Start()
{
    Instantiate(objectToCreate, parentObject);
}
This will nest each newly created object as a child of a specific object, identified by its Transform component.
Which can be useful for keeping your hierarchy neat and tidy when running your game in the editor.
However…
When using the game object folder method, you’ll need to remember to set the position of any folder objects you create to the Origin Position in the scene (0,0,0).
Otherwise, the local position of each child object will be affected by the relative position and orientation of its parent, which could cause you some confusion later on.
Should you use the game object folder method?
The game object folder method is an organisational tool.
It’s designed to help make working on your project easier but it doesn’t have any real impact on the performance of your game.
So, how useful it is depends entirely on how helpful it is to you to be able to hide groups of objects.
For example, if your scenes are made up of a large number of objects, so much so that it’s become difficult to find anything in your scene’s hierarchy, then the object folder method could help you.
However, it’s not the only method for organising your hierarchy in Unity.
Use empty game objects as separators to split up your hierarchy
Another method for organising the objects in your scene is to split them up visually in the hierarchy window using empty game objects as separators.
This avoids any local space positioning problems that might be caused by nesting objects while still allowing you to visually organise what’s in your scene.
This method typically involves adding empty game objects, renamed to appear as horizontal lines, to visually separate object groups in the hierarchy.
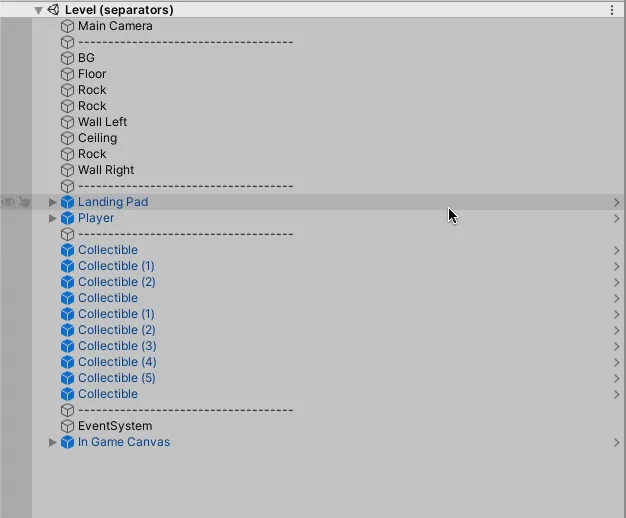
The benefit of this method is that it’s very easy to see all of the separate objects in your hierarchy at a glance.
What’s more, the separator objects themselves, while their memory impact is minimal, can be removed from the finished game automatically.
To do so, simply add the Editor Only tag to the separator objects, and they won’t be included in the finished build.
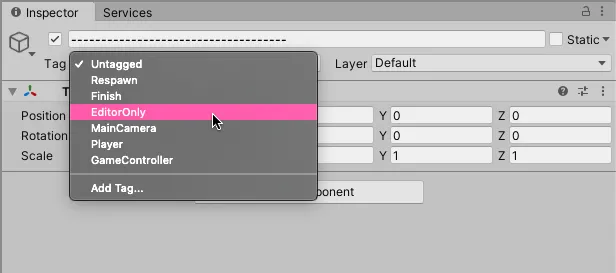
The Editor Only tag will remove the separator object in the finished build, saving memory.
The object separator method is generally a cleaner way to manage your hierarchy.
This is because, while the object folder method works well to reduce the number of objects you’re looking at, it needs to hide them inside another object to do so.
Which, considering that most of the objects in your game are likely to also have children of their own, can make it difficult to tell the difference between a game object and an object folder at a glance.
However, both the object folder and separator methods can make the scene hierarchy in Unity easier to work with.
So it will be up to you to decide if either of them can help you to organise your scene.
How to build game objects
When you start building a Game Object in Unity, such as the player, for example, it can be easy to just start adding components to add new functionality to it.
A script to handle input, an audio source to play sounds, and so on.
However, even a relatively simple object can quickly become complicated to work with when adding functionality in this way.
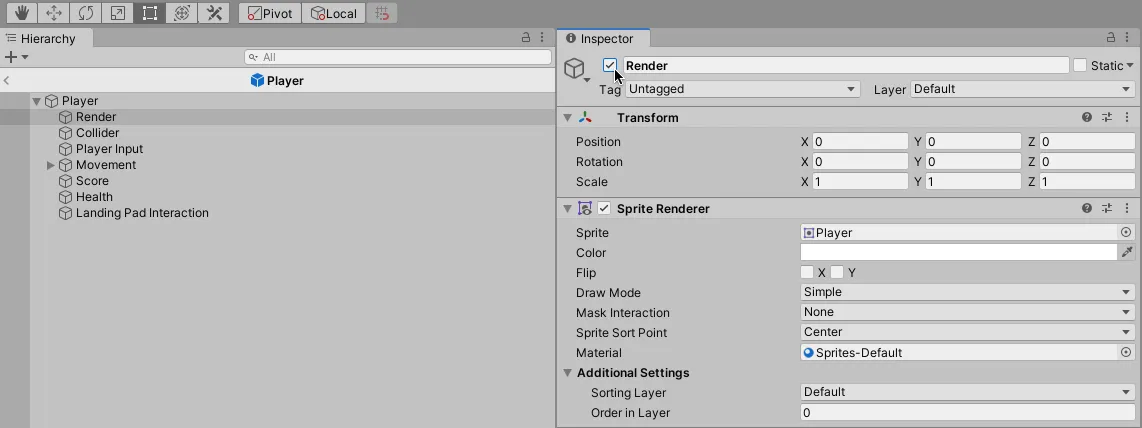
It can sometimes be easier, instead, to separate the different elements of an object’s behaviour into subsystems that are added to child objects of the base object.
Organise game object behaviour into subsystems
Adding behaviour components to an object as grouped behaviour systems, instead of adding all of your components to a single object, can make them easier to manage.
When using this method, the root of your object might only have a few special components on it, ones that will interact with multiple other systems or that may need to be on your object’s root to work correctly, such as a Rigidbody for example.
While everything else, from the renderers that define how the object looks to the colliders that give it a physical presence in the world, are handled by sub-systems, child objects that each handle particular tasks.
Organising feature sets into child objects can make them much easier to work with.
But why do it this way?
One reason is simply that it’s easier to work with different components when they’re kept separate.
Adding multiple components to an object can quickly clutter it up and, even though components can be expanded or collapsed to save space, it’s often much easier to only work with the components you need at any given time.
However, there’s another benefit…
When a certain kind of behaviour is encapsulated to one individual object, it can be much easier to add, remove or change how that behaviour works, without affecting anything else.
For example, placing all of an object’s renderers under a single Render System, gives you control of all of that object’s visuals from one point of reference.
Grouping functionality to system objects makes it easier to turn features on or off, such as hiding a player by turning off its Renderer
Want to hide the player? Simply turn that object off.
Want to disable player input? Put your input scripts on a separate object, then turn that off.
In fact, simply turning objects on and off, or removing them completely, can be an extremely effective way of managing object functionality in a simple way.
Hide objects instead of deleting them
Sometimes it’s easier to hide or turn off an object instead of destroying it.
What’s more, if you want to use the object again later, you can, by turning it back on.
This is the basic idea of object pooling, which involves reusing objects by resetting their data instead of destroying old objects and creating new ones.
Which can be good for performance, particularly when you’re creating and removing objects frequently.
How to organise your project files in Unity
Organising your objects and your scene can be extremely useful for keeping things simple and easy to work with.
However…
A lot of the time, the biggest challenge for keeping a project organised will be how to manage and structure your project’s files, the assets, scripts and other content that make up your game.
There are a couple of ways you could do this and what’s best for you will depend on the type of game you’re making and how you like to work.
But, generally speaking, there are two main methods for organising the files in your project, by Content type or by Feature.
How to organise your project by content type
A typical way to structure a Unity project is to simply organise the files by type.
For example, audio goes in one folder, scripts go in another.
Each type of content gets its own folder, so you always know where to put a particular type of file and where to find it.
Which is useful, particularly if you like to work with one type of content at a time.
For example, if, for the moment, you’re working on all of the models for your game, keeping them all in one place can make importing them into your project much easier.
Likewise, if you’re working as part of a team, keeping files in an obvious type-based structure can help everyone to know where something is supposed to go or where something can be found.
For this reason, a content-based structure can be a simple and effective way to organise the files in your project.
However, there is another method that can make working on the different features of your game much easier.
How to organise your project by feature
Organising your project by feature can be extremely useful for keeping all of the files associated with a particular part of your game, such as the player, or a specific system, together.
For example, all of the files that relate to the player go in one folder, while all of the files that relate to the UI, or another part of your game, go in a different folder specific to that feature set.
Organising files by the feature they relate to can make it easier to focus on what you’re working on.
Typically this means that each feature folder will contain a mixture of scripts, models, sounds and other assets that are specific to that area of work.
Which can feel a little counter-intuitive at first.
However, it can also make it much, much easier to find related files and assets when you’re working on a particular part of your game.
For example, even if you’ve completely forgotten which files relate to a particular feature or object of your game, such as the player, for example, keeping them together in one place can make it easier to find a particular model, sound or script.
And, when you’re working on a new part of your game, when the connections between files and scripts may be messy, broken or unfinished, keeping all of your other files out of the way can make it easier to keep track of what you’re doing.
Put simply, using the feature organisation method can make it much easier to focus on one area of work at a time.
But…
If each folder contains a mix of files, what do you do if you need to view all of the scripts in your game, or all of the audio files, or all of the models.
How can you find files of a certain type if they’re split between multiple folders?
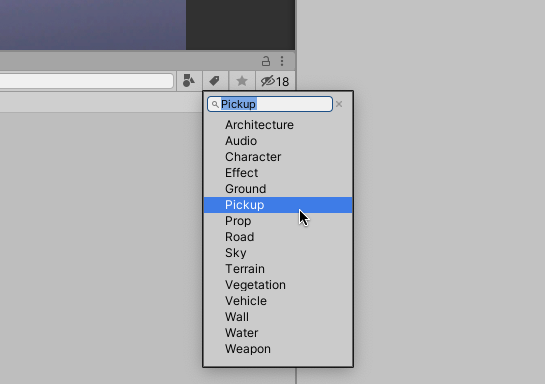
Helpfully, Unity’s built-in search tool allows you to filter files and assets by their type.
Unity’s built-in filtering tools allow you to sort project files by type.
Which can be extremely useful, as it provides the organisation of content-based organisation with the convenience of the feature method.
How to use Labels to categorise files
If you like the idea of being able to search by functionality, but don’t want to split up your folders by feature, Asset Labels could give you the best of both worlds.
With a file or multiple files of the same type selected, click the Asset Label icon at the bottom of the Inspector.
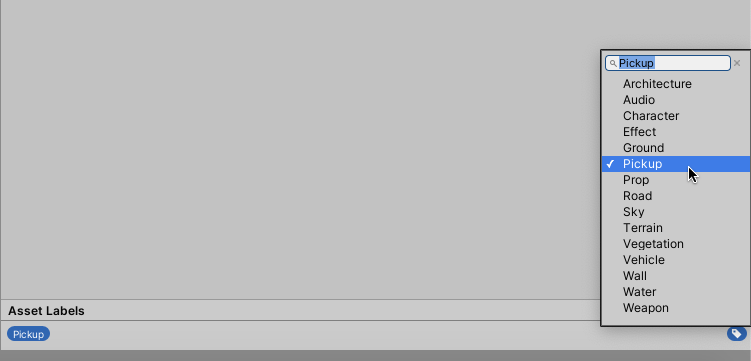
Add one of the existing labels, or start typing your own to add a new label, to mark that particular asset as belonging to a specific feature set.
Then, in the project window simply search for that Label to filter your project’s files.
Labels can be extremely useful for creating functionality groupings that work across folders.
Allowing you to filter by functionality, while organising your files by content type.
Which method you choose for organising your project really is up to you.
Some projects may be better suited to a certain method of organisation, or you might personally prefer one technique over another.
And, in practice, you might choose to use a combination of techniques when making your game.
However…
While many of the tips in this article are simply suggestions that you might find useful, there’s one simple technique that is almost always helpful.
Keep asset data separate from your project files
By default, assets, packages and other third-party files, such as those downloaded from the Asset Store will be added to your project in the Assets folder.
And, while this isn’t necessarily a problem, it can become tricky to manage your own project files around the files of third party plugins and assets.
What’s more, some assets can’t be moved from their default locations, as this can cause hardcoded connections in the asset’s scripts to break.
However, one solution to make working with other assets easier is to simply add a root folder for your project files, so that any automatically created directories don’t get in the way of the files and folders that are specific to your game.
Just add a folder, named after your game, to store all of your own scripts, models and content.
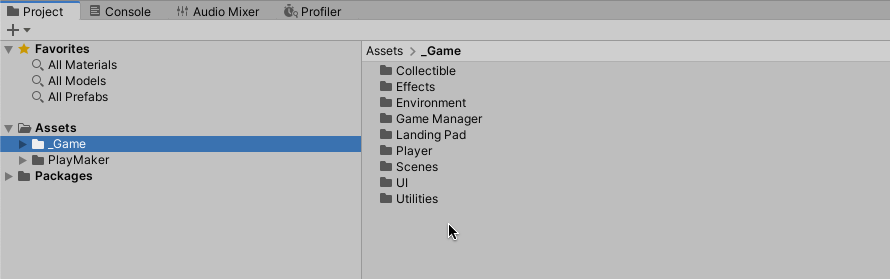
Adding an underscore to the start of your game’s root folder places it at the top and helps to keep files separate from third-party asset files.
Then, when asset and plugin directories are created, they won’t get in the way of your project’s neat and tidy file structure, however you’ve chosen to organise it.
Now it’s your turn
Now I want to hear from you.
How are you keeping your project organised?
Do you organise by content, by feature, or some other method?
And what are your best organisation tips that you know others will find useful?
Whatever it is, let me know by leaving a comment.

John French writes all of the Unity tutorials for Game Dev Beginner, and specialises in deep-dive guides teaching game development basics.

Comments
Great Article! I also think it is crucial to stay organized ALL THE TIME. Or the project will eventually become a mess!
Thank you!
Thank you and hi from Ukraine!
You’re welcome, stay safe!
As allways great content. Thanks!
I’m about to reorganize a project to feature-orientated. 🙂
Glad it helped! The feature-orientated approach is definitely my favourite.
Woah asset labels is something I never knew I needed so much!
And type filtering too!
As always, great content delivery in your articles man. I love it!
Thank you! Glad it helped.
This is an amazing useful article. Thanks John!
You’re welcome Larry!
Another great article John, thanks! I am fairly experienced (5+ yrs of Unity) but I like your style and always learn something from your posts. Today’s tidbit: I know DontDestroyOnLoad() only works when the object is in the root so I’ve always ended up with at least half a dozen DontDestroy objects in the root of my Heirarchy – GameManager, AudioManager, etc…. It never occurred to me to use your trick of making them children of a single PersistentGameObject parent and calling DontDestroy on that. Nice one. Thanks!
Thank you Ian, really glad to hear it’s been useful, even with your experience.
On the “Organising feature sets into child objects” I wonder how would you handle things like a script with “OnCollisionEnter”.
As i understand it should be in the same GameObject as a Rigidbody, or else it doesnt trigger.
But then the Rigidbody has to be in the parent GameObject or else only the child GameObject would move.
How could I organise Scripts that check for collision, if they can only be in the parent?
It’s possible to have a collider and an OnCollisionEnter script on the same child object that’s separate to the Rigidbody, which does need to be on the root. So you could have the Rigidbody on the root object and a Collider subsystem which you could turn on or off, for example. With one Collider, this works, although I haven’t tested it with multiple or compound colliders. Hope that helps!
I use a blend of all of these except one in my projects; I haven’t dealt with asset bundles yet, but this definitely will help manage the project space once I do. Great tips, thanks for taking the time to share with us.
You’re welcome, glad it helped!
thx,谢谢,good job
You’re welcome!
Do you put the player UI related in the Player folder?
Or put it in the UI folder? If you add a monster and item box folder that can be attacked, I wonder how to configure Health script and damageable script.
Ultimately, it’s up to you but I would consider the player folder to be where you put things related to the player object specifically, whereas the player’s UI is part of the UI and should go in the UI folder.
As for the monster and the box both using the same scripts there are a number of ways you do that. For example, you could keep a folder of common attribute scripts (damageable, moveable etc.) if you know you’re going to use them on different kinds of objects. Or, if it’s something that’s common to ll enemies, you could start with a root enemies folder, keep common scripts at the top and then use sub folders to manage individual enemy types.
It’s a personal decision though, so it’s up to you to think about how you like to work and what your project will include. Hope that helps!
Hi John. Another great and informative article.
One thing I’m struggling a bit with… how do the concepts in this article play along with the “Organise game object behaviour into subsystems” section of your article on unity project best practice tips?
For example, in the current article, it sounds like the assumption is that all these small, self-contained components will be on the one game object, correct?
But if you had a player’s collider as a separate child of the player object parent, then things like the below no longer work (even if you substitute TryGetComponent with GetComponentInChildren):
if (objectToDamage.TryGetComponent(out Damageable damageableObject))
{
damageableObject.DealDamage(-damageAmount);
}
Was wondering what you think about these sorts of situations and how you would approach them? I ended up having to put a collider on the same child object that contained the Health, Damageable, and Destructible components to resolve the above issue, but felt that wasn’t necessarily ideal?
Thanks Adam, to answer your question, the reality is that there are always going to be some methods that aren’t suitable for some games or that don’t work well together, and the answer to whether or not you should use them will depend on you and what you’re making. To solve that specific problem, you could put attribute-style scripts, i.e. the kind of script that another script may need to discover and use, such as a damgeable script, on the root and use Get Component in Parent to find it, since Get Component in Parent will always find a component on the root object. You could still put other systems in child objects but knowing that damageableObject is a script that exists for other scripts to use, it makes sense to put that on the root. Hope that helps.
How do you organize the system folder with your _Game approach? For example, Resources folder (I believe so) must be in the Asset\Resources to work with Resources.Load and so on
I think with the Resources folder, the reality is you’re going to have to just put whatever you need to put in there to make it work. I believe it may be possible to create sub-folder structures in resources, so you could do that I guess. However Unity generally advises against using the Resources folder anyway, in favour of Addressables.
Você é muito inteligente John, o artigo foi brilhante e de grande utilidade, mas também na resposta dos comentários em problemas que contém exceções você deu incríveis soluções que por incrível que pareça eu já conhecia.
Entretanto nunca pensei em fazer nessas situações, como ”pasta de scripts de atributos comuns” no caso da organização como recurso e também separar tudo o que poder em subsistemas, não somente o input do jogador.
Obrigado! Glad you enjoyed the article!