
Snapping objects inside the editor in Unity, while you’re working on your game, is generally quite straightforward.
But what if you want to snap objects in-game in Unity?
For example, how can you snap an object’s movement to a custom grid?
How can you snap an object to an exact position whenever it gets close to it?
And what if you want to snap objects together by their edges, making it easier for the player to align objects inside of the game?
While Unity provides convenient methods of snapping objects in the editor, you’ll need to build your own snapping functions to create similar, in-game, mechanics.
But don’t worry,
Because in this article you learn everything you need to know to get started with in-game object snapping in Unity.
Let’s get started…
How to Snap objects to a grid in-game in Unity
There are two basic methods for snapping an object’s position to a grid in Unity.
Which method you use depends on the size of the grid you want.
The first method uses Unity’s existing standard scale of 1 unit, which typically represents 1 metre in-game.
Here’s how it works…
How to snap to a grid in-game (using a 1 unit scale)
Snapping an object to a grid in-game in Unity can be fairly straightforward.
Typically, it involves rounding the position of an object, which is normally made up of 3 float values, to whole numbers instead.
Like this:
public Vector3 targetPos;

transform.position = new Vector3(
    Mathf.Round(targetPos.x),
    Mathf.Round(targetPos.y),
    Mathf.Round(targetPos.z)
    );
This works by setting the object’s position to a new Vector 3 that takes the X, Y and Z float values of the Target Position (which is where the object is meant to be) and rounds each one to the nearest whole integer using the Round function.
As a result, the object moves in whole number increments, snapping it to a grid.

Snapping can be useful for moving objects on a consistent grid.
The same method can be used to snap some values to a grid, but not all.
For example, you could round the X and Z values, which would lock an object’s movement to units on the forward and horizontal axes, while leaving the Y value, the object’s height, alone.
Like this:
public Vector3 targetPos;

void Update()
{
    transform.position = new Vector3(
        Mathf.Round(targetPos.x),
        transform.position.y,
        Mathf.Round(targetPos.z));
}
Snapping from a Target Position
In many cases, to snap an object to a grid, you’ll need two different position values, the position of the object that you’d like to snap, and a Target Position, which isn’t affected by the snapping function.
The Target Position is where the object is meant to be and is usually going to be the position that the player is able to control. Examples might include a mouse position in the world, a holding position of an object in a first-person view, or a target cursor that the player is able to move around.
The Target Position’s value is then rounded to create a new, snapped position, that can be used to set the object’s actual location in the world, placing it on a grid.
This method is an easy and convenient way of snapping an object’s position using Unity’s existing unit grid.
But what if you don’t want to use a 1 unit scale?
What if you want to snap an object to a custom scale?
Such as 2, or 3, or 1.2895?
How to snap to a grid in-game (using a custom scale)
Rounding position values to whole numbers is a straightforward way of snapping to a grid in Unity.
It’s convenient, it’s simple and it works well.
There’s just one problem…
When snapping an object using the rounding method, you’re forced to use Unity’s existing 1 unit scale.
Which, if that’s the grid size you want, isn’t a problem.
But, if you want to use a custom scale for your grid, you’re going to need to use a different method to do it.
So how can you create a custom snap grid, in-game in Unity?
Here’s how…
Snapping to a custom scale at runtime works in a similar way to the rounding method except that, instead of rounding to the nearest whole number, you’ll need to round to a custom unit instead.
For example:
public float gridSize = 1.5f;Once you’ve decided what the unit size should be, you can use it to round a position value down to the nearest grid multiple.
This works by using the Modulo Operation (%), which is a mathematical function that returns a remainder, after division, of one number by another.
For example:
// This will return 2,
// because there are two 4's in 10, leaving 2 behind
float number = 10 % 4;
Modulo returns the remainder of a value that doesn’t make up an exact unit.
Which, in this case, allows you to find the difference between a position value and what it would be if you rounded it down.
Like this:
float RoundToNearestGrid(float pos)
    {
        float difference = pos % gridSize;
        pos -= difference;
        return pos;
    }
Subtracting the difference from the real position value basically rounds it down, allowing you to round any value down to a custom unit size.
However, if you’re snapping an object to a grid, it’s likely that you’ll want to round the object’s position value to the nearest grid unit instead, which might be the next unit up, if that’s closer.
To round to the closest grid value, simply add one extra unit to the position if the difference is more than half of a unit.
Like this:
float RoundToNearestGrid(float pos)
    {
        float xDiff = pos % gridSize;
        pos -= xDiff;
        if (xDiff > (gridSize / 2))
        {
            pos += gridSize;
        }
        return pos;
    }
This technically still rounds the value down but does so from a higher value, which is the same as rounding up from the original position.
However, at the moment, this will only work with positive values.
To also allow negative values below zero, you’ll need to check if the value is positive or negative and either add or subtract the grid size amount accordingly.
Like this:
float RoundToNearestGrid(float pos)
{
    float xDiff = pos % gridSize;
    bool isPositive = pos > 0 ? true : false;
    pos -= xDiff;
    if (Mathf.Abs(xDiff) > (gridSize / 2))
    {
        if(isPositive)
        {
            pos += gridSize;
        }
        else
        {
            pos -= gridSize;
        }
    }
    return pos;
}
This method can then be used to round each of the float values that make up a Vector 3 position, snapping it to a grid.
Here’s how it looks all together:
public Vector3 targetPos;
public float gridSize =1.5f;

void Update()
{
    transform.position = new Vector3(
        RoundToNearestGrid(targetPos.x),
        RoundToNearestGrid(targetPos.y),
        RoundToNearestGrid(targetPos.z));
}

float RoundToNearestGrid(float pos)
{
    float xDiff = pos % gridSize;
    bool isPositive = pos > 0 ? true : false;
    pos -= xDiff;
    if (Mathf.Abs(xDiff) > (gridSize / 2))
    {
        if(isPositive)
        {
            pos += gridSize;
        }
        else
        {
            pos -= gridSize;
        }
    }
    return pos;
}
Grid snapping in the editor
While you’ll need to set up your own custom grid to snap objects in-game, snapping in the editor is, in comparison, very straightforward and makes it easier to place objects evenly in your scene.
To use grid snapping in the editor, simply hold the Control or Command key while moving an object with the Move Tool.
More about snapping in the editor can be found in Unity’s official documentation here.
While these methods work well for snapping an object to a standard, or even non-standard, grid, you might want to use snapping in Unity for different reasons.
For, example, you might want to use snapping to guide an object to a target position when it gets close enough.
Such as snapping a key into a lock, snapping an object to another using one, or many, points of contact, or connecting the edges of two objects if they’re close enough.
So how can you use snapping to join objects together in Unity?
How to Snap objects together in-game in Unity
There are several ways to snap objects together in-game in Unity.
Which method you use depends on what it is you’re trying to do.
For example, the method of guiding an object to a single position is different to snapping multiple objects along their edges.
However,
While the methods of snapping are different depending on the mechanic you’re trying to create, the general approach is similar between all of the methods.
Typically, this involves setting a Snap Distance float variable.
Like this:
public float snapDistance = 1;Which can be used to check if the Target Position, which is usually controlled by the player’s movement or mouse input, is close enough to a snap point to snap the object to it.
Like this:
public Vector3 targetPosition;
public Vector3 snapPosition;
public float snapDistance = 1;

void Update()
{
    transform.position = targetPosition;

    if (Vector3.Distance(snapPosition, targetPosition) < snapDistance)
    {
        transform.position = snapPosition;
    }
}
Then, if the object’s Target Position moves away from the snap point, the object is released.
If the Target Position, in this case the mouse, moves far enough away from the snap point, the object stops snapping.
This works well for snapping an object to a single, known, point of contact.
However, how can you snap an object to one of a number of possible snap points, such as connection points on an object, or different snap positions in a scene?
How to snap objects together in-game (using multiple snap points)
It’s possible to snap objects together, using multiple possible snap points, by storing the points of contact in a List.
For example, you could store a reference to the Transform components of several game objects in the scene, where each object is a possible snap point.
![]()
The list of possible positions can then be checked against, to see if an object is close enough to snap.
Like this:
public Vector3 targetPosition;
public float snapDistance = 1;
public List<Transform> nodes = new List<Transform>();

void Update()
{
    transform.position = targetPosition;

    float smallestDistance = snapDistance;
    foreach (Transform node in nodes)
    {
        if (Vector3.Distance(node.position, targetPosition) < smallestDistance)
        {
            transform.position = node.position;
            smallestDistance = Vector3.Distance(node.position, targetPosition);
        }
    }
}
This works by checking all of the positions in the list of Transforms to see which, if any, are within range of the object’s Target Position.
If a position is close enough to snap, the Smallest Distance variable is set, which then becomes the new distance value to beat.
If any other positions are closer, they will be picked instead meaning that, if more than one position is within range, the closest one will always be returned.
Here’s what it looks like:
Checking against a List of Transform components can be a useful way of snapping to a handful of possible positions.
This method is relatively straightforward and can be useful for checking multiple snap positions easily.
However, checking the distance of many objects in this way can be inefficient.
This is because the Distance function uses the Magnitude property to calculate the length of a vector between two points.
The Magnitude property can be slow, as it uses an expensive Square Root calculation.
Which is useful for measuring distance, but isn’t necessary for comparing it.
The Square Magnitude property, in comparison, can be much faster and is essentially the same as Magnitude, but without the Square Root calculation.
Which is useful for comparing distances more efficiently.
Like this:
public Vector3 targetPosition;
public float snapDistance = 1;
public List<Transform> nodes = new List<Transform>();

void Update()
{
    transform.position  = targetPosition;
    float smallestDistanceSquared = snapDistance * snapDistance;
    foreach (Transform node in nodes)
    {
        if ((node.position - targetPosition).sqrMagnitude < smallestDistanceSquared)
        {
            transform.position = node.position;
            smallestDistanceSquared = (node.position  - targetPosition).sqrMagnitude;
        }
    }
}
Using Square Magnitude can make distance calculations more efficient, which is useful for checking against multiple snap points when using a simple grid isn’t an option.
But what if you don’t want to snap an object to a fixed position?
What if you want to snap objects together along their edges?
How can you create a kind of vertex snapping in-game in Unity?
How to snap objects together in-game (using edge snapping)
It’s possible to create basic edge snapping in-game in Unity by comparing the position of two objects’ Collider components, using the Closest Point function.
The Closest Point function returns a position on the surface of a Collider that’s closest to another position in the world.
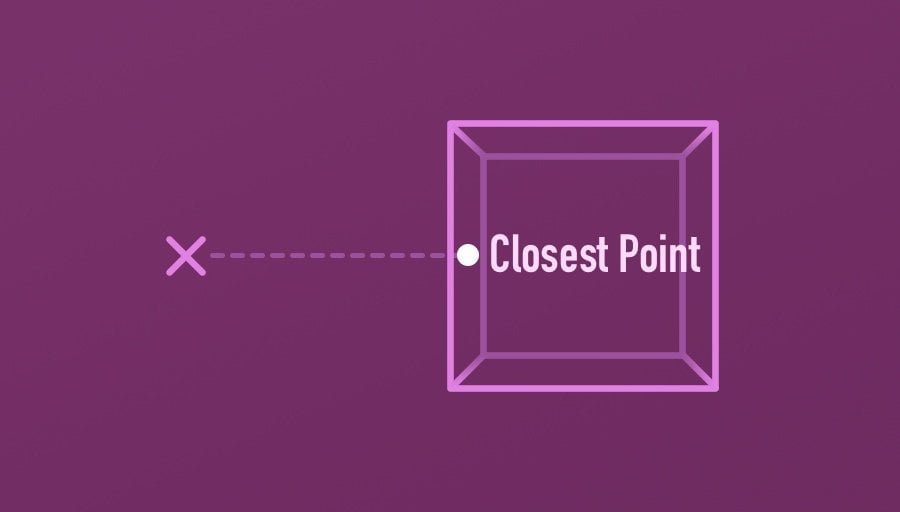
Closest Point gets the position on a Collider that is closest to another position in the world.
Which can be useful for detecting how close together two objects are.
For example, I could find the closest point between a snappable object’s Collider and another object that it might snap to.
Like this:
public Vector3 targetPosition;

public Collider targetCollider;
public Collider myCollider;
public float snapDistance = 1;

void Update()
{
    transform.position = targetPosition;
    Vector3 myClosestPoint = myCollider.ClosestPoint(targetCollider.transform.position);
    Vector3 targetClosestPoint = targetCollider.ClosestPoint(myClosestPoint);
}
Then, once I have both positions, I can calculate the offset between them, allowing me to check if the object is close enough to snap.
Like this:
public Vector3 targetPosition;

public Collider targetCollider;
public Collider myCollider;
public float snapDistance = 1;

void Update()
{
    transform.position = targetPosition;

    Vector3 myClosestPoint = myCollider.ClosestPoint(targetCollider.transform.position);
    Vector3 targetClosestPoint = targetCollider.ClosestPoint(myClosestPoint);

    Vector3 offset = targetClosestPoint - myClosestPoint;

    if (offset.magnitude < snapDistance)
    {
        transform.position += offset;
    }
}
The result is basic snapping along an object’s edge, where the object will snap to the target object if it gets close enough to it.
Which looks like this:

The Closest Point function can be used to create basic edge snapping
Now it’s your turn
Now I want to hear from you.
How are you using snapping in your game?
What techniques have you used to snap objects together in Unity?
And what tips have you learned about snapping that you know others will find useful?
Whatever it is, let me know by leaving a comment.

John French writes all of the Unity tutorials for Game Dev Beginner, and specialises in deep-dive guides teaching game development basics.

Comments
Your post was helpful so I thought I’d add a coule of things.
Snap to any increment:
This simply divides the current position by your increment (snap_distance), rounds off the decimal, then multiplies it back in for the nearest multiple. This one operates only on the X and Z axis, but you can also change the Y axis if you want full 3-dimensional snapping.
transform.position = new Vector3(Mathf.Round(transform.position.x / snap_distance) * snap_distance,transform.position.y, Mathf.Round(transform.position.z / snap_distance) * snap_distance);
Snap down to ground:
I also couldn’t quite get your code for snapping to objects to work, but all I wanted was for an object to raycast downward and move on top of the first object it saw. The distance is only 3 because, in my case, I knew it’d already be close to the ground.
Variables:
private Vector3 targetlocation;
[SerializeField] private float drop_distance = 3.0f;
Function:
RaycastHit hit;
if (Physics.Raycast(transform.position, Vector3.down, out hit, drop_distance))
{
targetLocation = hit.point;
targetLocation += new Vector3(0, transform.localScale.y / 2, 0);
transform.position = targetLocation;
}
Thanks for the tips~
Great tips, thank you!
I need this updated script if you have please let me know!
I am very new to unity coding and your post helped me a lot, but i really wanted to know what would be the best option to block a second object to snap to the same place as the first one, could your help me?
Do you mean to prevent it from moving through an object that’s already there? There are two ways that I can think of, either use colliders to check if an object is already there or have a collection, such as a Vector2Int Dictionary, with references to grid positions and use that to see if something has been placed there or not. Then you’d need to make sure the current object doesn’t snap to the position that’s occupied, so you’d need to make your checks first and then move the object. Hope that helps, let me know if I’ve misunderstood.
It helped a lot! Thank you very much! Thanks to your post my game is not just a idea anymore.
That’s so great to hear. Best of luck with it!
Helps very much 😀
I am currently creating a rhythm game, and need to create a level editor. The level editor will be half UI, half 3D. The snap will be used for the UI, so I will have to edit the script a little bit. Thank you very much 🙂
There seems to be a problem with the last code block, you should not set transform.position = targetPosition in Update; this will make the object unable to move.
Also, how do you make it so that an object can snap any other object?
So in that example, treat Target Position as the intended position of the object, and the transform position as the snapped position. So basically, where you would have moved the object using transform position, move the target position instead. This is required to stop the object permanently snapping to an edge, as you need to be ablet to keep track of where the object is supposed to be and then use transform to snap it if needed. To answer your other question, to make it snap any other object use an Overlap Sphere to get all of the colliders within snapping range and then sort their closest points by distance.
Awesome example! I am working on a game that lets you snap modular buildings together to make a base. I would like to use the method of snapping but the buildings can only snap on points where there are connectors on the model. I am unsure how to determine the snap locations on the model. Is there a way to store those vector3 values as physical points in the model I can reference in code? The models are scaled down from their original size in Blender as well. Even if I could determine their coordinates as distance from origin point, and vector in Blender, it might not translate properly in Unity. Any ideas?
One of the easiest ways to store and reuse a location as a relative point in the scene is to use an empty game object and then, in a script, create a Transform variable and reference that. Is that an option for you?
Hi John, great articles. This one really helped me get to where I needed for my puzzle game. I ended up with a variation on the use of “snap points”. Since my puzzle pieces are different shapes (triangles, squares, parallelograms), I used Collider Path points as the snap points :). This allowed me to snap shapes at their center positions (when appropriate) as well as at the corners of the shapes. I did end up having to transform the snap points to “screen coordinates” for calculating the deltas, but all worked great once I did that. Working in the Unity coordinate system is a bit tricky at times (compared to working in iOS Xcode :P) but I am learning the ropes thanks to articles like this.
Thanks again for all your great articles that I have used many times now.
Thanks Steve! Happy to help!
In the snapping to many different points script, would it be possible to use tags instead? I ask this because i’m attempting to make an editor similar to sfs where you can put in many objects and connect them. The problem with the current code is that it doesn’t work on spawned in prefabs, so I was thinking tags would work better.