
Making an inventory system in Unity can be surprisingly difficult.
One of the reasons why is that it can sometimes be tricky to decide how you will actually define the items your inventory will hold.
For example, objects in your game normally exist in the scene’s hierarchy, while items are likely to work in a different way.
They may take one of many different forms, such as a 2D icon in a menu, or a real 3D object in the world.
They may exist inside your inventory or inside containers in your scene, or they might be generated as loot which is then passed around, between different objects and systems.
As a result, working out exactly how you will create each item, and how your player will use it, can sometimes be tricky.
But don’t worry,
In this article, you’ll learn the different ways to create items in Unity and the inventory systems that will hold them, so that you can choose the method that will work best for your game.
Here’s what you’ll find on this page:
So how do inventory and item systems in Unity work?
Inventory and item systems in Unity
Inventory systems and the items they hold are typically made up of three different elements:
- The Container
- The Item Data
- And the Item Instance
The Container is an element that allows an item, or a number of items, to be held or stored inside of it.
Containers are how you will pass items between different objects in your game.
For example, a player might hold a collection of items, such as a List, or an Array, which will act as their inventory, while a treasure chest in the game world might also hold a collection of items, its loot.
The Item Data is a definition of what an item is, such as what it looks like, what stats it has, and what it will do.
This is the core information for each item and, typically, you’ll create it manually, in advance.
While the Item Instance is a class that represents item data in the game.
Instances are specific, allowing generic item types to have unique characteristics, such as condition, quantity or randomised statistics that only exist in their instance.
Exactly how you use each element depends on how you want to implement items in your game.
So what are your options?
And what kind of items do you want to make?
How to make items
There are many different types of item that you could make in your game.
Such as pick-ups, for example, that power up the player, or collectables that increment your score.
Which might involve using colliders and a form of interaction, such as an interface, to allow different types of collectable object to pass different benefits to the player that picked it up.
But, making an item that can be added to your inventory, or stored in another container in the world, can be a little more tricky.
This is because the item may not, necessarily, be represented by an object in the world.
Instead, it’s stored in a container, typically inside of a script, as an element in a collection, such as a List or an Array.
So how can you make your own items?
First, you’ll need to create a type of item class.
This will be the type of variable that the container will hold and will act as the data structure for your item.
There are two main ways that you could do this, by creating an instanced item type or a non-instanced type.
Instanced items vs non-instanced items
A non-instanced item is, basically, a global definition of an item. It typically refers to the data that makes up what an item is and might hold the item’s sprite, its model, statistics, or a text description.
This is the Item’s Data, and it will typically exist outside of the scene.
While there are different ways you could create item data, one of the easiest methods is to use a Scriptable Object.
A scriptable object is a script asset template, that allows you to create instances of a script inside your project, not your scene.
Which is useful, as it allows you to create a type of item template, and then create multiple instances of it as assets.
This is ideal for making types of item.
For example, you could create an Item Data scriptable object that holds a name, sprite and description,
Like this:
[CreateAssetMenu]
public class ItemData : ScriptableObject
{
    public string itemName;
    public Sprite icon;
    [TextArea]
    public string description;
}
This works by creating a script that inherits from Scriptable Object instead of from MonoBehvaiour.
While adding the Create Asset Menu attribute above the class definition allows you to create an instance of that script in your project by right-clicking inside the project panel.
Like this:
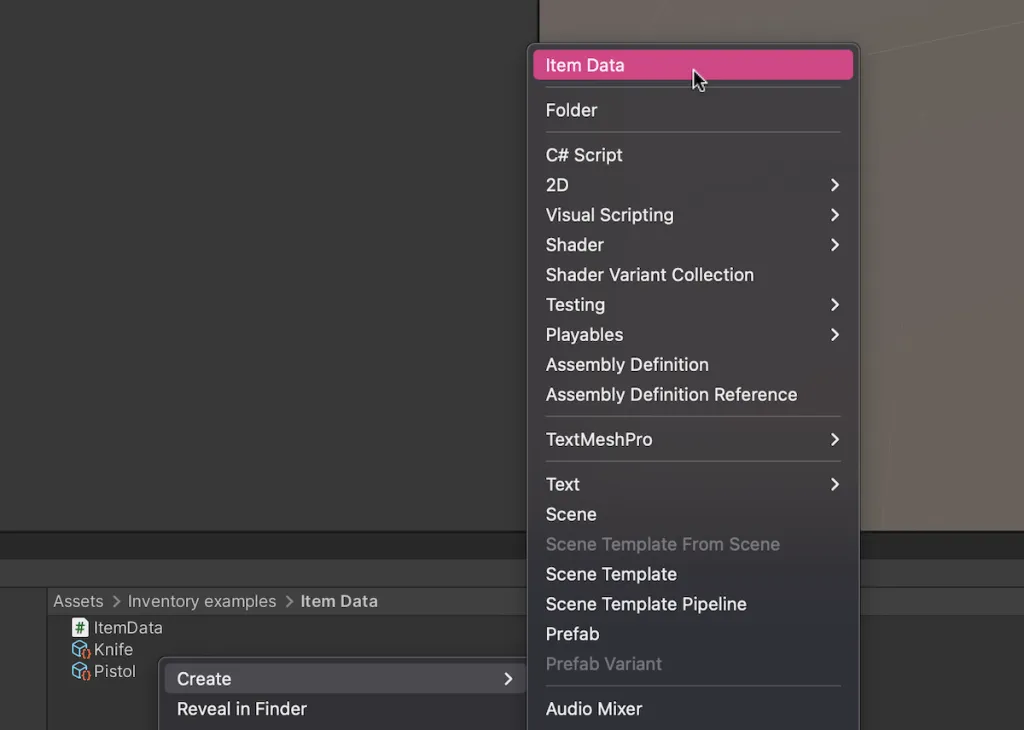
Scriptable Objects are assets, allowing you to create instances of them outside of your scene. Perfect for creating item data.
You can then edit the asset’s information in the Inspector.
Like this:
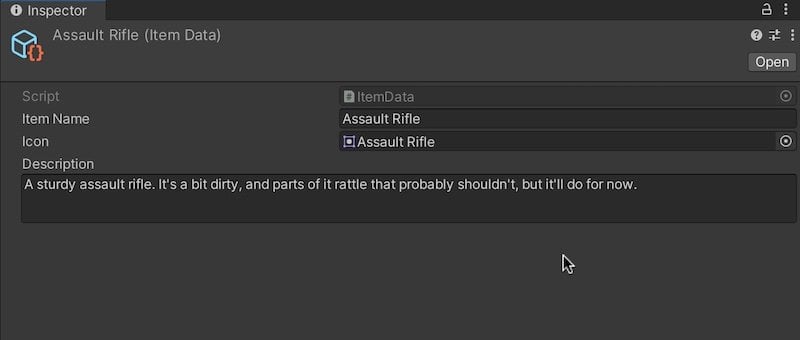
The Text Area attribute makes it easier to add a description to the item’s details.
It’s then possible to use the scriptable object in your inventory, by creating a list or an array of that type.
Like this:
public List<ItemData> items = new();
The list can exist in the scene on an object or it, too, can be a scriptable object, where a script on the player simply refers to a scriptable object inventory asset.
Like this:
[CreateAssetMenu]
public class Inventory : ScriptableObject
{
    public List<ItemData> items = new();
}
Which can be useful if you want the contents of the inventory to stay the same between each scene.
However, it’s important to understand how this method of creating items works.
For example, while it is possible to hold the same item in multiple slots, the actual data that each element points to is the same.
Meaning that, if you want to create items that hold their own, unique information, such as condition, ammo, or randomised statistics, you’re going to need to create instances of them.
Instanced items work in a similar way to non-instanced items in that they are usually created by using an underlying data type that will determine what an item should look like and what it should do.
However, they also allow you to separate the item’s unique information from the data that doesn’t change, allowing you to create two items of the same type, but with different statistics.
This works by wrapping the generic Item Data asset in a unique class, such as an Item Instance class.
Like this:
[System.Serializable]
public class ItemInstance
{
    public ItemData itemType;
    public int condition;
    public int ammo;
}
Typically, this will be a plain class, that does not inherit from MonoBehaviour, allowing it to be contained entirely within another script, such as inside an inventory List, for example.
This works in a similar way to creating an instance of a class that’s attached to a game object.
It has its own data that’s unique to other instances of the same type but, because it’s a plain class, not a MonoBehaviour (which is what allows you to attach a script to an object as a component) it can be contained inside of a variable of that type.
And, by making the class serialisable, it will be visible in the Inspector.
Like this:
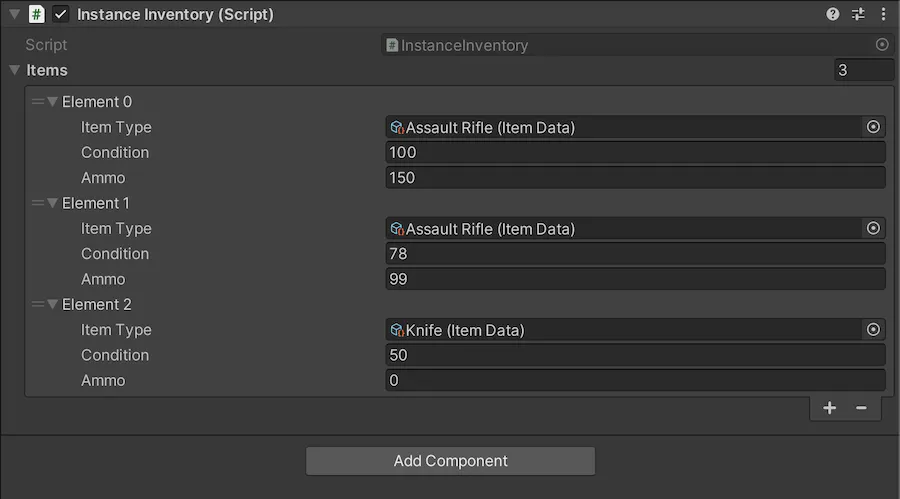
Item Instances allow you to create copies of the same item, but with their own unique information.
Plain class variables vs structs
In this example, I’ve used a plain class to create an object as a variable inside of another script.
This works by creating a script that doesn’t inherit from MonoBehaviour meaning that, when you create a variable of that type, instead of pointing to its location elsewhere, like a reference variable would, it exists in the location you declare it, in the same way as a value.
Generally, there are two ways that you could do this, either with a plain class or with a struct.
Structs work in a similar way to plain classes, except that they are treated as values, meaning that their information is copied from place to place and that they typically can’t be null.
Whereas classes are, essentially objects. Their data stays the same, even when it’s moved around and, unlike structs, they can be null, meaning that it’s possible to create an empty inventory slot, for example, when using a plain class.
However, serialising plain classes will initialise them, meaning that you can’t declare an empty plain class variable if it’s also visible in the Inspector, which might lead you to believe that structs and classes work in the same way and are interchangeable.
But, because of how their data is managed, classes are generally the better choice when creating items, particularly if the value could be null or if you intend to pass it around your scene.
Creating instances like this allows you to create unique copies of the same types of item, with their own, specific data.
But where does that data come from?
Just like when creating item data, you will typically have to create instance data yourself.
However, it’s possible to set default information based on the type of object you’re creating by using the core item data as a base.
For example, you could store default values for an object’s ammunition, or its condition, inside the Item Data scriptable object.
Like this:
[CreateAssetMenu]
public class ItemData : ScriptableObject
{
    public string itemName;
    public Sprite icon;
    [TextArea]
    public string description;

    public int startingAmmo;
    public int startingCondition;
}
The Item Instance’s constructor can then be used to generate the starting information for the item from the base data it’s given.
Like this:
[System.Serializable]
public class ItemInstance
{
    public ItemData itemType;
    public int condition;
    public int ammo;

    public ItemInstance(ItemData itemData)
    {
        itemType = itemData;
        condition = itemData.startingCondition;
        ammo = itemData.startingAmmo;
    }
}
Then, simply pass the item data you want to use whenever you create a new item instance.
Like this:
public ItemData newItemType;
public List<ItemInstance> items = new();

void Start()
{
    items.Add(new ItemInstance(newItemType));
}
But when will you actually create new items?
How you manage the introduction of items into your game depends on how you want your inventory system to work, and how you’d like items to be added to it.
So how do you make an inventory system?
How to create an inventory system
There are many different ways your inventory system could work.
However, generally speaking, an inventory is simply a collection of an item type and, usually, with functions that allow items to be added to it or removed from it.
Like this:
public class Inventory : MonoBehaviour
{
    public List<ItemInstance> items = new();

    public void AddItem(ItemInstance itemToAdd)
    {
        items.Add(itemToAdd);
    }

    public void RemoveItem(ItemInstance itemToRemove)
    {
        items.Remove(itemToRemove);
    }
}
But, not all inventory systems are the same.
For example, you may not actually need to add any items to your inventory while the game is running, in which case you might want to use a fixed inventory instead of a dynamic one.
Fixed inventory vs dynamic inventory systems
A Fixed Inventory system typically involves a known number of items that the player either does or doesn’t have.
Instead of adding items as they are picked up, references to each item object are already known, and whether the player has it or not is defined inside the item data itself.
Like this:
[CreateAssetMenu]
public class FixedInventoryItem : ScriptableObject
{
    public bool hasItem;
    public string itemName;
    public Sprite icon;
    [TextArea]
    public string description;
}
This can be useful if your player will only be able to pick up a limited number of known items throughout the game, as it allows you to set up your player’s inventory ahead of time.
However, if there are a large number of items in your game, and you want to be able to add multiple, unique, copies of the same type of item, you’ll need to create a Dynamic Inventory instead.
A Dynamic Inventory can hold a number of items but without specifying ahead of time what those items will be.
It typically works in the same way, except that adding and removing items is handled by the inventory itself, and whether or not the player has something depends on if it is actually contained within their inventory list.
Typically, dynamic inventories are limited by their size, meaning that, before you try to pick something up, you’ll need to check if there’s enough room.
Like this:
[CreateAssetMenu]
public class DynamicInventory : ScriptableObject
{
    public int maxItems = 10;
    public List<ItemInstance> items = new();

    public bool AddItem(ItemInstance itemToAdd)
    {
        // Finds an empty slot if there is one
        for (int i = 0; i < items.Count; i++)
        {
            if (items[i] == null)
            {
                items[i] = itemToAdd;
                return true;
            }
        }

        // Adds a new item if the inventory has space
        if (items.Count < maxItems)
        {
            items.Add(itemToAdd);
            return true;
        }

        Debug.Log("No space in the inventory");
        return false;
    }
}
This script could work as a MonoBehaviour, allowing it to be attached to an object in the scene or, just like with the fixed inventory, there’s nothing to stop you from using a scriptable object to create an inventory asset.
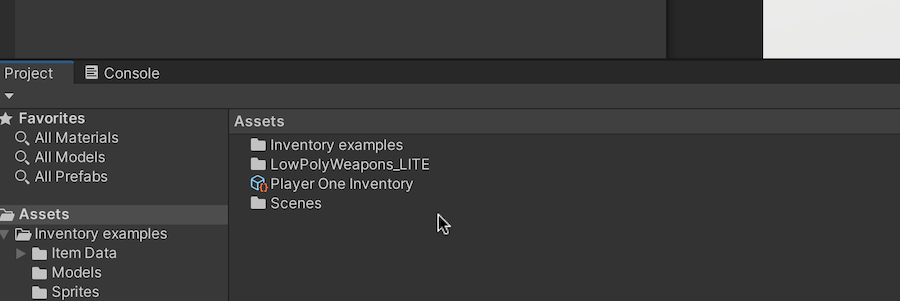
It’s possible to create your inventory as a scriptable object, allowing you to manage it as an asset.
The advantage of doing it this way is that the player’s inventory items will exist in the project, carrying information over between your scenes when loading new levels.
What’s more, even if you’re creating instanced items, because they are class instances that are contained within the scriptable object asset, their unique data is preserved as well.
This works because all of the data for each item exists in the asset, without referencing objects in the scene.
But what if you do want your object to exist in the scene?
For example, how can you move an item out of your inventory into the game world?
How to drop an item from your inventory into the game
Converting an item from an icon in your inventory menu, to a real object in the world typically involves passing its instance data from one container to another and then simply changing how it’s displayed.
For example, it’s possible to store both icon data and model references in the item’s data asset.
Like this:
[CreateAssetMenu]
public class ItemData : ScriptableObject
{
    public string itemName;
    public Sprite icon;
    public GameObject model;
    [TextArea]
    public string description;
}
Meaning that, when the item is displayed in the inventory, its icon can be used to update a sprite in the UI.
Like this:
public class InventoryDisplay : MonoBehaviour
{
    public DynamicInventory inventory;
    public ItemDisplay[] slots;

    private void Start()
    {
        UpdateInventory();
    }

    void UpdateInventory()
    {
        for (int i = 0; i < slots.Length; i++)
        {
            if (i < inventory.items.Count)
            {
                slots[i].gameObject.SetActive(true);
                slots[i].UpdateItemDisplay(inventory.items[i].itemType.icon, i);
            }
            else
            {
                slots[i].gameObject.SetActive(false);
            }
        }
    }
}
While, when the object is dropped, the same instance of item data can be passed to a new container on a new object in the scene, with an instantiated copy of the item’s model.
Like this:
public void DropItem(int itemIndex)
{
    // Creates a new object and gives it the item data
    GameObject droppedItem = new GameObject();
    droppedItem.AddComponent<Rigidbody>();
    droppedItem.AddComponent<InstanceItemContainer>().item = inventory.items[itemIndex];
    GameObject itemModel = Instantiate(inventory.items[itemIndex].itemType.model, droppedItem.transform);

    // Removes the item from the inventory
    inventory.items.RemoveAt(itemIndex);

    // Updates the inventory again
    UpdateInventory();
}
Finally, the object can be picked up again by reversing the process, passing the item instance back into the inventory and destroying the real-world container.
Like this:
public class InstanceItemContainer : MonoBehaviour
{
    public ItemInstance item;

    public ItemInstance TakeItem()
    {
        Destroy(gameObject);
        return item;
    }
}
To do this, you might pick up the object when the player collides with it, such as with a Trigger Collider and the On Trigger Enter event message.
Like this:
public class PlayerInventory : MonoBehaviour
{
    public DynamicInventory inventory;

    private void OnTriggerEnter(Collider other)
    {
        if (other.TryGetComponent(out InstanceItemContainer foundItem))
        {
            inventory.AddItem(foundItem.TakeItem());
        }
    }
}
This triggers the Take Item function on the object, which returns a reference to its instance, and then destroys itself.
Now it’s your turn
Now I want to hear from you.
How are you managing items in your game?
Are you using scriptable objects, plain classes or a different method?
And what have you learned about managing items in Unity that you know someone else would find useful?
Whatever it is, let me know by leaving a comment below.

John French writes all of the Unity tutorials for Game Dev Beginner, and specialises in deep-dive guides teaching game development basics.

Image attribution
- Potion icons created by Freepik – Flaticon
Comments
Very good stuff, thank you very much.
John please would you consider to write an article about shader graph, or animations – it’s very important part of game dev, but still wasn’t properly described here.
Noted, thanks for your feedback!
Hey great stuff- where can I find the part about “UpdateItemDisplay”?
The line was “slots[i].UpdateItemDisplay(inventory.items[i].itemType.icon, i);”. Is that some kind of function within the class ItemDisplay?
Also I don’t see information about “ItemDisplay” either but I assume that’s a new class? Would be really helpful to add that information!
UpdateItemDisplay was a function in the project I used to research this article. It might not make much sense out of context but here it is:
Nice overview of items and inventories, very nice you brought up unique items, something most tutorials almost never mention. However, what I’ve found so far hard to do in Unity, is creating various different items that have quite different set of variables. Like weapons, food items and armors, or something similar for world items. I grativate towards either a monster class suitable for all items or I try to create sub classes for item types and then somehow handle serialization. I guess nowadays one could simply slap SerializeReference to a List or use Json.Net to serialize this “polymorphic” data, but I’ve yet not had time to use those features in my personal projects, neither have I found ever any tutorial or writeup that goes through this whole setup.
Try checking out ErenCode on youtube, he has a playlist of inventory system tutorials that includes how to assign different types of items their own set of variables
Thank you for sharing this!
Would you mind if I ask how to implement ‘FixedInventory’
– how to initialize all ‘FixedInventoryItem’ in the inventory
– how to add items to the inventory using ‘hasItem’ in ‘FixedInventoryItem’
and what kind of item is suited for this type of inventory instanced item or non-instanced item
Thank you for your time.
The idea behind the fixed inventory is that there are a limited number of items in the game and the player either has them or they don’t. For example, imagine some of the older Zelda games where the inventory screen shows spaces for the items you’ll collect throughout the game and then when you get them, they’ll be unlocked. In this example, they’re scriptable object assets so right click in the project menu to create each item. The has item bool can be used to unlock individual items via a reference to the item asset (i.e. FixedInventoryItem.hasItem = true;)
Wow, wonderful stuff. I always head straight here when I want something more elaborate and always get help.
Hey, what does it take to promote a game in here.
Thank you! To answer your question, I’m running a project where developers can submit case studies to promote their game. See the Case Study FAQ Page for more information.
Hey John,
first of all, thank you so much for your tutorials!
But to my question:
I didn’t understood how to link a specific item to the iteminstance.
I created a scriptable object class called SO_Weapon. Afterwards, I created an instance of that in my resources folder called “RustyDagger”.
How do I link the RustyDagger to the weaponInstance class, that is not inheriting from monobehavior? With or without “Serialisable”, I cannot drag and drop the dagger into the weapon instance class.
Or should the weaponInstance class should be called “RustyDaggerInstance”?
Thank you very much in advance.
Inside of the Weapon Instance class, create a variable of the SO_Weapon type. In the Inspector, drag the Rusty Dagger asset to the variable in the instance. Hope that helps!
Was this all done inside of one script? There are no real indicators or info saying if this was all done in 1, 2, 3, etc. scripts. Its a little confusing
Separate scripts. If you’re making monobehaviours, so scripts that attach to objects, or scriptable object classes, then you’d usually want them as separate scripts. With data structures, like plain classes and structs, you can create these in the same script if you want, or separately. In the article, look out for the class definition at the top of each example, that might help you to know which code is in which script. Thanks for your feedback.
This seems to be what I’m trying to learn how to create, but I can’t quite understand how it all goes together because of all the cutting. Thank you!
Piece of solid tutorial, mate. I have been scrolling through YT and every tutorial I stumbled upon was just incomprehensible for me, everything was lacking explanation of modus operandi. Then I have just surrendered and my last ditch effort was to google some forum, but your Blog popped up and now I am soaking in your amazing work for past 30 minutes despite the fact that I am wrecked after my job.
Thanks again!
Happy to help! Thank you
Good lession, but the ItemInstance class arent visible in the inspector. I did it serializable, but nothing. Should ItemInstance be in the same script with public List items = new(); ? or what the problem?
Can you share your code? Email me at [email protected] and I’ll try to help.
When you reached instances you lost me and in the following picture you have a script titled “instanced inventory” which has no mention at all in the entire tutorial.
Thanks for your feedback
I respect You
It really helped me a lot.
Thanks for the tutorials really helpful, I might have missed it but scriptableobject data doesn’t persist between sessions so using one to hold inventory data needs to have some sort of extra save system which isn’t mentioned and might confuse people as mentioned in the CodeMonkey vid – https://www.youtube.com/watch?v=5a-ztc5gcFw
Would be handy for you to go into how you would handle that via code or a unity store asset.