Although it’s a simple thing to do, changing a Sprite at runtime in Unity is a question that’s asked surprisingly often.
This may simply be because each developer’s specific needs are different, so it’s not always clear which method is the best or is the most efficient.
However, if you’ve ever tried to load all of the Sprites from a Sprite Sheet into an array from a script, or if you’ve tried to load a Sprite by its filename, what appears to be a simple task can quickly become confusing.
Especially for a beginner, like me.
But don’t worry…
There are several different uses and multiple methods available for changing sprites at runtime. So I’ve done a little digging and will be exploring each of them, along with their benefits and drawbacks, so that you can more confidently choose which one to use.
Here’s what you’ll learn in this post:
- How to change a single Sprite from script
- How to load Sprite from a Sprite Sheet into a Sprite Array (2 methods)
- How to load Sprites by filename (using the Resources folder)
- How to load Sprites by file path (using Addressable Assets)
- 3 Examples for changing a Sprite from a Sprite Array
Let’s start with the basics…
How to change a Sprite from a script in Unity
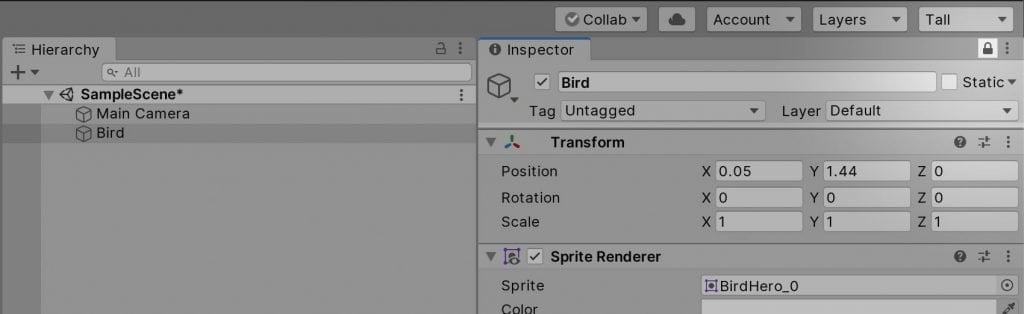
To change a Sprite from a script in Unity, create a reference variable to hold the new Sprite. Then set the Sprite property of the Sprite Renderer Component on the Game Object you wish to change to match the new, replacement Sprite.
In scripting, it looks like this:
public SpriteRenderer spriteRenderer;
public Sprite newSprite;

void ChangeSprite()
    {
        spriteRenderer.sprite = newSprite;
    }
In the inspector select the new Sprite that you want to use by dragging it into the field or by using the circle select button.
Select the new Sprite by dragging it into the field or by using Circle Select.
Make sure to also set the Sprite Renderer reference in the Inspector, otherwise you’ll get an error.
Alternatively, if the script is on the same Game Object, you can easily get it by using Get Component in Start.
void Start()
    {
        spriteRenderer = gameObject.GetComponent<SpriteRenderer>();
    }
Then, when you want to change the Sprite, just call the Change Sprite function.
Like in this example if the Left Mouse Button is clicked:
void Update()
    {
        if(Input.GetMouseButtonDown(0))
        {
            ChangeSprite(newSprite);
        }
    }
The example will easily change a Sprite Renderer’s existing sprite to use a different one instead. But what if you want to change to one of a number of different Sprites?
What if you have multiple Sprites, such as Slices stored in a Sprite Sheet, and you want to switch to one of them, or all of them in order, or a random Sprite, all from a script?
How to change a Sprite from a Sprite Sheet in Unity

Changing a Sprite to another image from a Sprite Sheet can be done using a similar method as changing a single Sprite.
What’s different is that, in this case, the method of loading the Sprites is different, as you’ll be storing multiple Sprites in an array and retrieving the one that you want with an index.
Creating a Sprite array is simple, just add brackets to the Sprite variable to declare it as an array.
Like this:
public Sprite[] spriteArray;Next we need to add the Sprites to the array.
There are two main ways of doing this. We’ll start with the simplest method first, which is the manual method.
Method #1. The Manual Method
This method works in much the same way as changing a single Sprite, by manually dragging the Sprites to your array in the Inspector.
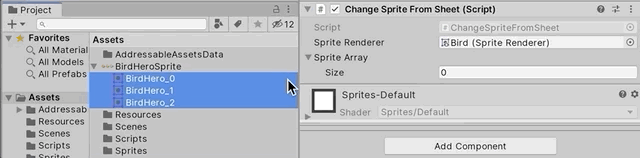
Drag multiple Sprites to the Sprite array to automatically add them.
It helps to lock the inspector window when doing this, as it’s very easy to accidentally switch to the import settings of the file you’re trying to drag across.
Locking the Inspector makes it easier to add Sprites to the array.
Once the Sprites are loaded into the array you’ll be able to retrieve them using their index, like this:
void ChangeSprite()
    {
        spriteRenderer.sprite = spriteArray[0];
    }
Simply pass in the array element number in the square brackets that corresponds with the Sprite you wish to switch to.
To check which Sprite is assigned to which element, click the array dropdown in the Inspector.
When to use the manual method
The Manual Method is the simplest way to switch between multiple Sprites and is ideal if you are able to assign the sprites you’re going to use manually in the Inspector. For example, when using a Prefab.
But, what if you want to access Sprites entirely from scripting, without getting a reference to them first?
Well, as it turns out, there is a way to access Sprites from a script by their filename automatically.
Method #2. The Automatic Method
The Automatic Method allows you to access individual Sprites, or even a set of Sprites from a Sprite Sheet, without needing to get a reference to them in the Inspector.
Instead, by using this method, you will be able to load Sprites into a Scene with their filename from the Resources folder, a special folder that Unity will automatically load assets from (even if they’re not referenced in the Scene).
Normally, this is not how Unity works, as assets are usually identified by assigning references to them (as is the case in the Manual Method). As a result, using this method comes with a few words of caution (more on that later) but, if it works for you and your project, and you understand what you’re doing, here’s how to do it.
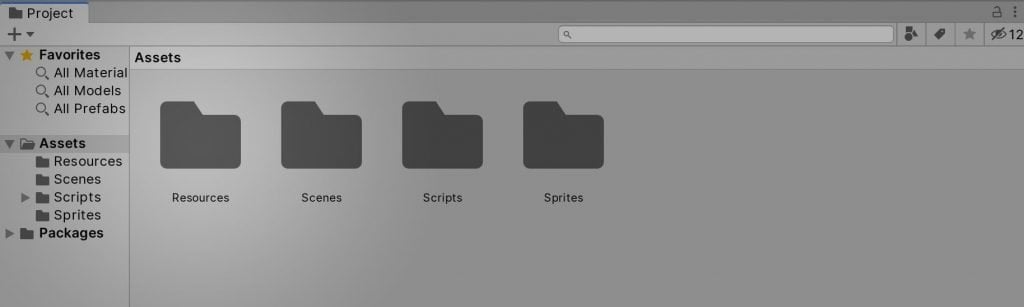
Add a folder named Resources anywhere in your Assets directory.
- First, create a new folder inside of your Assets folder called Resources. This can be placed anywhere in your Assets directory.
- Next place the Sprites into the Resources folder.
- Lastly, from a script, load the Sprite with Resources.Load<Type>(“filename”) passing in a String for the filename (without its extension).
Instead of manually adding the Sprites to the array, we can now, instead, load all of the Sprites associated with a Sprite Sheet by using Load All.
Like this:
void Start()
    {
        spriteArray = Resources.LoadAll<Sprite>("BirdHeroSprite");
    }
In the example above I’ve loaded every file of the type Sprite found in the BirdHeroSprite Texture, which is essentially a directory from which all the Slices are loaded.
While extremely useful, the Resources folder should be used with caution.
Reasons you shouldn’t use the Resources folder
Despite offering a useful option for loading assets, using the Resources folder is, generally, not recommended, as it’s not good practice.
But why?
The main reasons you should avoid using the Resources folder in Unity include:
- Increased memory usage and a bigger application size: as everything inside the Resources folder is packaged and loaded, whether you need it or not.
- Assets are more difficult to manage: as using filename paths can make it more likely that a connection will be broken if a file name or string is changed.
- Longer loading and startup time: as, if you’re using a large number of assets, the operation to load them all takes exponentially longer as more and more is added to the Resources folder. In extreme cases (think thousands of assets) this can add multiple seconds to the startup time of applications to load assets that are not initially required (source).
So, while more experienced developers will no doubt understand the risks of using this special folder, and will be able to work around issues like these easily, it’s worth knowing that the general advice is not to use the Resources folder wherever possible.
So… wait, hang on…
If the Resources folder isn’t recommended, then why does it exist? And what’s the right way to use it?
When it’s OK to use the Resources folder
According to Unity, there are a couple of use cases for which the Resources folder is particularly useful:
- Prototyping – Where performance is less important than being able to rapidly create ideas. In this case, the flexibility of the Resources folder can be extremely helpful and outweighs the performance hit.
- Minor Uses – Using relatively few assets, that are not memory intensive, and are unlikely to change between platforms is much less likely to cause you significant issues.
Generally speaking, if your game is small or performance is not (yet) critical to your project, then using the Resources folder isn’t necessarily a problem. For more information on what Unity considers to be best practice when using the Resources folder, see this tutorial.
So what can you do if you want to load a Sprite by its filename, without using the Resources folder?
Well, what if I told you that there is an option that leverages the flexibility of the Resources folder but without the potential drawbacks.
How to load a Sprite from a script by filename (using Addressable Assets)
This method requires a little extra work to set up, but it allows you to load assets into a Scene with a filename and without the drawbacks of the Resources folder.
What are Addressable Assets in Unity?
“The Addressable Asset system provides an easy way to load assets by “address”. It handles asset management overhead by simplifying content pack creation and deployment. The Addressable Asset system uses asynchronous loading to support loading from any location with any collection of dependencies. Whether you use direct references, traditional asset bundles, or Resource folders for asset management, Addressable Assets provide a simpler way to make your game more dynamic.”
Unity3d.com – Source
How to change a Sprite from a Sprite Sheet in scripting using Addressable Assets in Unity:
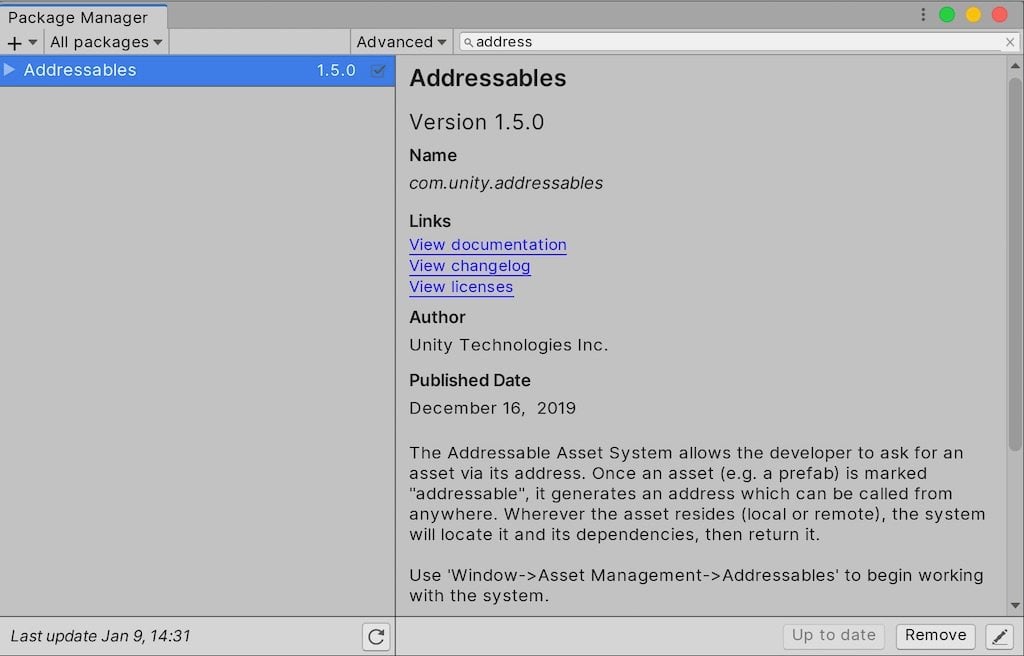
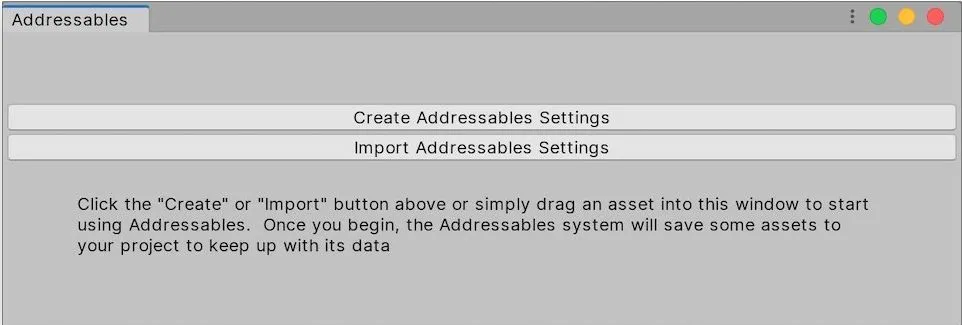
- Select Window > Package Manager and install the Addressable Assets package from the Package Manager (this requires Unity 2018.3 or later).

- Next select Window > Asset Management > Addressables > Groups to open the Addressables Groups Window.
- Click the button labelled Create Addressable Settings, this will create a default Addressable Group.
- In the Project Folder, select the Texture containing the Sprites you want to use and, in the Inspector, check the Addressable checkbox. This will reveal the asset’s Addressable Path, which you’ll need for the script.
- The file should now have been added to the default Addressable Group.
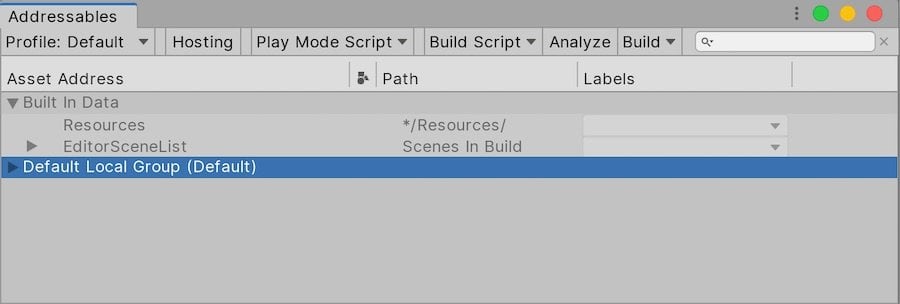

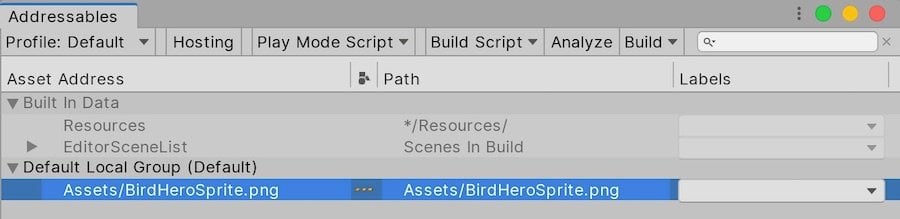
The asset is now Addressable and can be accessed from a script without a reference.
Using Addressable Assets after using the Resources folder
If you were already using the Resources folder, you may have noticed the Resources directory, and its files, in the Groups Window alongside the Addressable Group. If so, dragging those assets to the Addressable Group will automatically mark them Addressable and move them into a new folder for you (as they can’t stay in Resources for this to work).
How to fix the Invalid Key Exception Error when using Addressable Assets
Depending on your version of Unity, the path that is assigned to the asset may continue to match the string that was being used for the Resources folder value (e.g. BirdHeroSprite, without a folder path or a file extension).
However, if you’re getting an Invalid Key Exception error be sure to check that the Addressable Path (displayed next to the asset’s Addressable Checkbox) matches the value you’re using in the script.
How to access Addressable Sprite Assets from a Script
Now that the Sprites are addressable it’s possible to load them from a script, without a reference. Here’s how to do it:
First, add the following two namespaces to the top of the script. These are required for the Addressable features and loading operations to work properly.
using UnityEngine.AddressableAssets;
using UnityEngine.ResourceManagement.AsyncOperations;
You can add them below the existing namespace declarations, using UnityEngine etc.
Next we need to load the Sprites from the Sprite Sheet, just as we did when using the Resources folder.
This happens in two steps:
- First, load the Sprites using an asynchronous operation.
- When that operation is completed, assign the result to the Sprite Array.
In scripting it looks like this:
public SpriteRenderer spriteRenderer;
public Sprite[] spriteArray;

void Start()
{
    AsyncOperationHandle<Sprite[]> spriteHandle = Addressables.LoadAssetAsync<Sprite[]>("Assets/BirdHeroSprite.png");
    spriteHandle.Completed += LoadSpritesWhenReady;
}

void LoadSpritesWhenReady(AsyncOperationHandle<Sprite[]> handleToCheck)
{
    if(handleToCheck.Status == AsyncOperationStatus.Succeeded)
    {
        spriteArray = handleToCheck.Result;
    }
}
Instead of setting the contents of the array directly, what’s happening here is we’re starting a loading operation and creating a reference to it (the AsyncOperationHandle). Then when the loading is finished, we’re assigning the result to the Array, using the Handle reference to look up what was loaded.
Doing it in this way allows time for the assets to load.
Registering the function LoadSpritesWhenReady to the spriteHandle.Completed event means that, as soon as the assets are finished loading, the function will be called and the Sprites will be assigned to the Array.
While this part of the method could be done in several ways (inside a Coroutine for example), using an action like this avoids having to repeatedly check in Update, which would inefficient, especially since we know it’s only going to happen once.
Although using Addressable Assets requires more work than simply dropping the Sprites into the Resources folder, it’s more efficient, and it’s a much more up to date solution when compared to using the Resources folder.
A comprehensive guide of the Addressable Asset system is beyond the scope of this article but you can view the full Unity documentation here.
Now that you’ve loaded the Sprites into the Array, it’s time to put them to good use.
How to change a Sprite from an array (3 examples)
Once the Sprites are assigned to the array, you can change the Sprite Renderer’s Sprite property using the same function as in the first example. Simply pass in the name of the array and the index of the Sprite.
For example, to switch to the first Sprite in the array would look like this in scripting:
public SpriteRenderer spriteRenderer;
public Sprite[] spriteArray;

void ChangeSprite()
{
    spriteRenderer.sprite = spriteArray[0];
}
Or, if you want to switch to a random Sprite simply pass in a random number between zero and the length of the array. Like this:
public SpriteRenderer spriteRenderer;
public Sprite[] spriteArray;

void ChangeSprite()
{
    spriteRenderer.sprite = spriteArray[ Random.Range(0, spriteArray.Length)];
}
Lastly, if you want to cycle through each sprite of the array, create an Integer variable to store the last Sprite index. Then increment it every time you change the Sprite:
public SpriteRenderer spriteRenderer;
public Sprite[] spriteArray;
public int currentSprite;

void ChangeSprite()
{
    spriteRenderer.sprite = spriteArray[currentSprite];
    currentSprite++;

    if(currentSprite >= spriteArray.Length)
    {
        currentSprite = 0;
    }
}
You’ll notice in the example above that I’ve added an If Statement. This is to check if the index number has reached the end of the array. This is important as trying to retrieve a Sprite outside of the array’s range will result in an error.
Now it’s your turn
Now that you know a bit more about changing Sprites, how will you use what you’ve learned?
Or perhaps you’re still looking for a different method for changing Sprites?
Or maybe you know of a much better method for managing Sprites and are already using it in your game.
Whatever it is, let me know by leaving a comment below.
Image Attribution
- Icons made by Kiranshastry from www.flaticon.com
- Icons made by itim2101 from www.flaticon.com

John French writes all of the Unity tutorials for Game Dev Beginner, and specialises in deep-dive guides teaching game development basics.

Comments
Thank you so much!
Hi! Thank you so much, I’ve been trying to do this for hours, I couldn’t find anything online, seriously, thank you so much!!
You’re welcome!
Hello John,
I’m trying to implement this “ChangeSpriteFromSheet” script from the first example, but I dont know where to attach it. I’m attaching to the sprite on the scene but i dont get the fields “spriterenderer” and “newsprite” in the inspecor.
What I’m doing wrong?
Make sure that both of those fields are public and, if they already are, that there’s not an error in the script that’s stopping it from compiling. That would prevent the variables from showing up in the inspector. If that’s not it, send your code to me at [email protected] and I can try to take a look.
Thank you for all your work, this website is very helpful for me <3
You’re welcome, happy to help.
Obrigado Me Ajudou Muito
De nada!
This is awesome! Just what I needed!
Thanks Donna, glad it helped!
Thank You! I have been trying to find this exact answer.
void ChangeSprite() should be : void ChangeSprite(Sprite newSprite)
For the sake of these examples the new sprite is being set in the Inspector, which is why the newSprite variable is publicly declared at class level, and not as an argument of the method as in your comment, which is how you’d do it as a public, reusable function. If there’s a different reason behind your comment that I’m overlooking, please share it.
Good article! But I need to programmatically assign a sprite to an object in unity editor at design time. How can I do this if I know the name of the png or jpeg file and the full path to it? My script is called from the Unity editor menu.
When I run my game, the character game object I selected under the Sprite Renderer field disappeared
Hi John,
Would you be able to update this post to show how you can load an addressable sprite atlas with multiple sprites. Then in a separate c# script use those sprites on multiple images and change them. I can’t see anywhere that shows how to do it.
e.g. addressable atlas has 53 sprites (set of cards plus card back). There as 21 images on the canvas each of which needs a sprite assigning. Then the images would be able to have the assigned sprite changed.
Noted, I’ll see what I can do.
Great article, thanks for sharing!
I have one question, though. And please bare in mind I am beginner in Unity.
On your first animated image, you have following structure for the png image:
BirdHeroSprite
-BirdHero_0
-BirdHero_1
-BirdHero_2
And later on while using addressable, you call the pngs (sprite) with “Assets/BirdHeroSprite.png”, so you have an array of pngs.
My question is: how were you able to load png in the collection of images? For example, I have 3 different pngs:
-BirdHero_0.png
-BirdHero_1.png
-BirdHero_2.png
I import them into the assets and I get following structure:
BirdHero_0
-BirdHero_0
BirdHero_1
-BirdHero_1
BirdHero_2
-BirdHero_2
How I can I join all three pngs into one png array as you did? I tried to import as gif, but that does not work.
ChangeSprite does not exist i got errors
Change Sprite is the function I wrote in the examples for this article, you’ll find it at the top here.